

2 layers217.2 × 113 mm
Junior interface
laurent-fr/junior_computer_replica
A replica of the Junior Computer (a KIM-1 clone) published by Elektor in the 80's
120 parts14

 TeknoTrek/LC-Meter9
This repository is part of the Teknotrek YouTube channel, featuring the DIY LC Meter project. It includes KiCad files, schematics, PCB layouts, and Arduino firmware. Visit the Teknotrek YouTube channel https://www.youtube.com/channel/UCLOmh3PNItDSgDy55UoxpgQ for build videos and tutorials.
LC Meter is an open-source printed circuit board by TeknoTrek, from the TeknoTrek/LC-Meter repository on GitHub. It is a 2-layer board of 134.5 × 83.9 mm with 27 parts on 43 nets, routed with 272 tracks and 0 vias.
It is built around the LM311, JUMPER2 and BC547. Its parts include 7 resistors, 5 switches, 4 capacitors, 2 connectors and 1 IC. It belongs with the AVR (ATmega, ATtiny) boards of this library.
This project demonstrates how to build a DIY LC Meter capable of measuring inductance (L) and capacitance (C) values using an Arduino Nano, an LM311 comparator, and a 16x2 LCD display. The LC Meter is designed to be simple, affordable, and effective for electronics enthusiasts and DIY hobbyists. It is suitable for learning about measurement principles while also being a practical tool.
A detailed circuit diagram explains the working principle and interconnection of components such as the LM311 comparator, relay, calibration buttons, and measurement probes. The schematic provides a foundation for assembling the hardware.
A professionally designed single-layer PCB created with KiCad ensures clean routing and minimizes interference. It includes detailed silkscreen labels for easy assembly and debugging.
A realistic 3D representation of the completed PCB with components mounted, offering a clear view of the final product and component placement.
The Arduino Nano is programmed with custom firmware to calculate inductance and capacitance values. Measurements are displayed on a 16x2 LCD in real time.
The project includes functionality for calibration, zeroing, and easy measurement. Buttons on the PCB allow users to fine-tune settings for accurate results.
Download the provided Gerber files and manufacture the PCB, or use the KiCad design to etch your own board.
Place and solder all components as per the silkscreen labels on the PCB.
Use the Arduino IDE to upload the provided sketch to your Arduino Nano. Ensure all libraries are correctly installed.
Connect the LC Meter to a 5V power source via USB or the provided input terminals. Calibrate the device using the calibration and zero buttons for precise results.
Connect your inductors or capacitors to the respective terminals (Lx or Cx) and observe the measurement results on the LCD.
You can watch the full build process of this DIY LC Meter on my YouTube channel Teknotrek. Click the link below to see how the circuit is assembled, soldered, and tested:
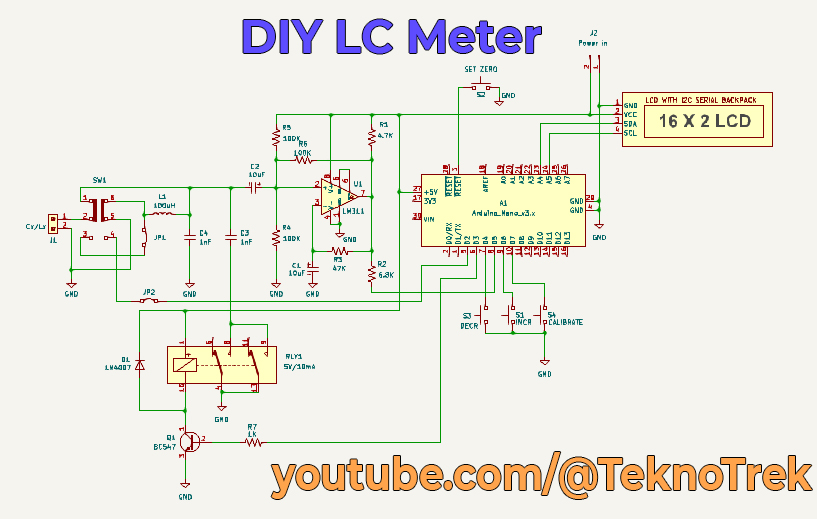
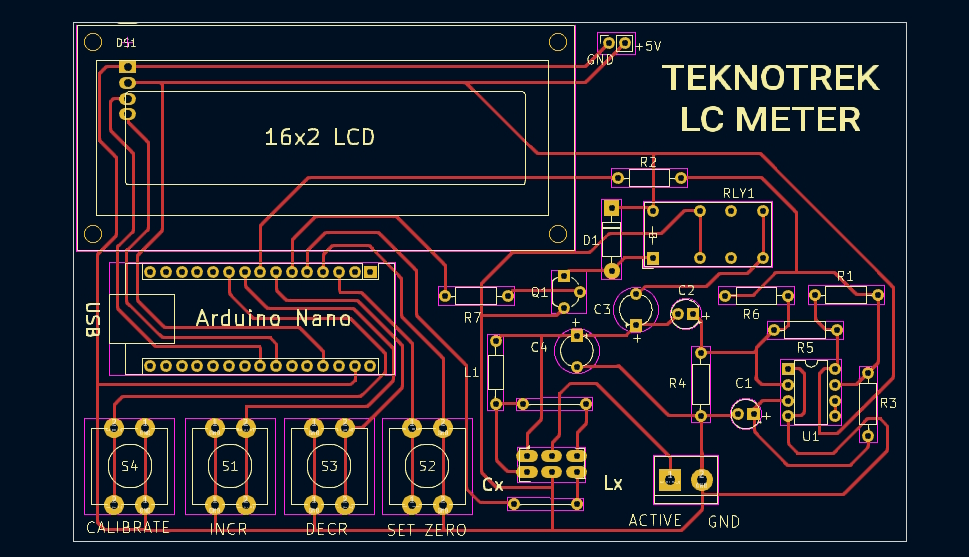
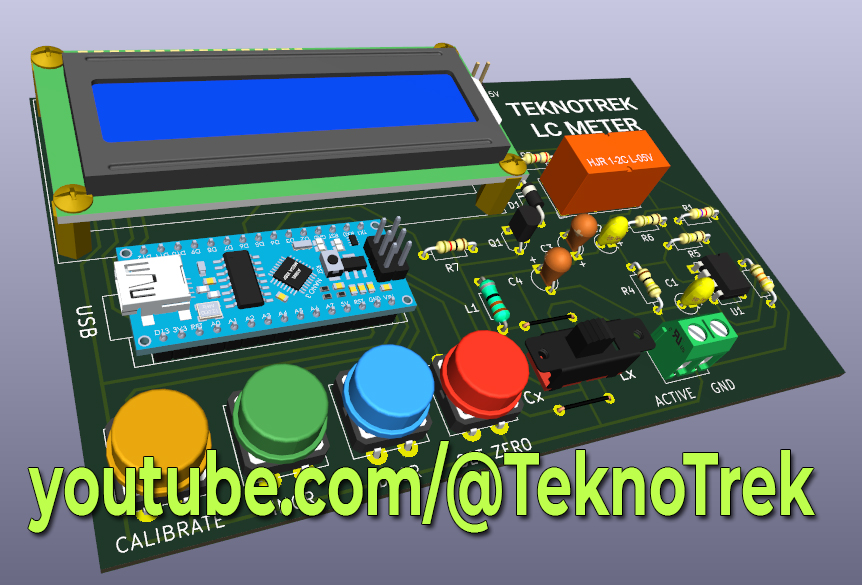
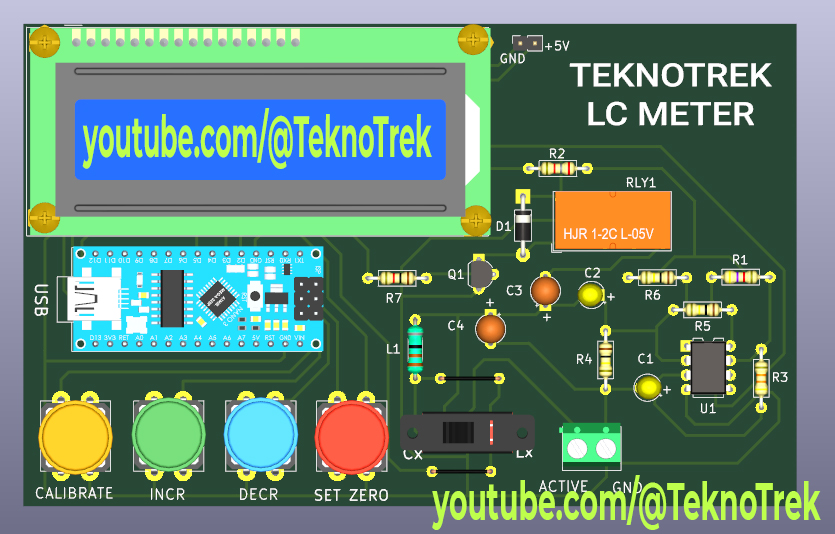
All project files, including schematics, PCB designs, 3D models, and source code, are available on GitHub.
Check out the project here: Teknotrek
This project is perfect for anyone interested in electronics, DIY tools, or Arduino projects. Whether you are a beginner or an experienced maker,this LC Meter provides a hands-on learning experience and a functional tool for your electronics toolkit!
| Qty | Value | Footprint | References |
|---|---|---|---|
| 3 | 100K | Resistor_THT:R_Axial_DIN0207_L6.3mm_D2.5mm_P10.16mm_Horizontal | R4, R5, R6 |
| 2 | 10uF | Capacitor_THT:CP_Radial_Tantal_D4.5mm_P2.50mm | C1, C2 |
| 2 | 1nF | Capacitor_THT:CP_Radial_Tantal_D5.0mm_P5.00mm | C3, C4 |
| 2 | Jumper_2 | Resistor_THT:R_Axial_DIN0207_L6.3mm_D2.5mm_P10.16mm_Horizontal | JP1, JP2 |
| 1 | 100uH | Inductor_THT:L_Axial_L5.3mm_D2.2mm_P10.16mm_Horizontal_Vishay_IM-1 | L1 |
| 1 | 1K | Resistor_THT:R_Axial_DIN0207_L6.3mm_D2.5mm_P10.16mm_Horizontal | R7 |
| 1 | 1N4007 | Diode_THT:D_DO-41_SOD81_P10.16mm_Horizontal | D1 |
| 1 | 4.7K | Resistor_THT:R_Axial_DIN0207_L6.3mm_D2.5mm_P10.16mm_Horizontal | R1 |
| 1 | 47K | Resistor_THT:R_Axial_DIN0207_L6.3mm_D2.5mm_P10.16mm_Horizontal | R3 |
| 1 | 5V/10mA | My-Library:TIANBO-HJR1-2CL-05V-footer | RLY1 |
| 1 | 6.8K | Resistor_THT:R_Axial_DIN0207_L6.3mm_D2.5mm_P10.16mm_Horizontal | R2 |
| 1 | Arduino_Nano_v3.x | Module:Arduino_Nano | A1 |
| 1 | BC547 | Package_TO_SOT_THT:TO-92_Wide | Q1 |
| 1 | CALIBRATE | Button_Switch_THT:SW_PUSH-12mm | S4 |
| 1 | Cx/Lx | TerminalBlock:TerminalBlock_bornier-2_P5.08mm | J1 |
| 1 | DECR | Button_Switch_THT:SW_PUSH-12mm | S3 |
| 1 | INCR | Button_Switch_THT:SW_PUSH-12mm | S1 |
| 1 | LM311 | Package_DIP:DIP-8_W7.62mm | U1 |
| 1 | Power in | Connector_PinSocket_2.54mm:PinSocket_1x02_P2.54mm_Vertical | J2 |
| 1 | SET ZERO | Button_Switch_THT:SW_PUSH-12mm | S2 |
| 1 | SW_Slide_DPDT | My-Library:SW_CK_ | SW1 |
| 1 | WC1602A-I2C | My-Library:WC1602A-I2C | DS1 |
It measures 134.5 × 83.9 mm and has 2 copper layers, 1.6 mm thick.
27 parts, built around the LM311, JUMPER2 and BC547. The full list of its parts is on this page, with links to each part's symbol and footprint where PCBKit's library has them.
From the TeknoTrek/LC-Meter repository on GitHub, at the commit this page was made from: the board is LC-Meter.kicad_pcb and its schematic LC-Meter.kicad_sch. PCBKit opens the board in the browser, with nothing to install.
Its repository states no licence, so its author keeps all rights: ask TeknoTrek before reusing the design.
laurent-fr/junior_computer_replica
A replica of the Junior Computer (a KIM-1 clone) published by Elektor in the 80's


MadsRudolph/vinyl-adc
Discrete 3rd-order delta-sigma stereo audio ADC, built from op-amps and logic gates: a four-layer Raspberry Pi HAT made by PCBWay, with KiCad files, SPICE simulations and measurements

arvjus/Extended_RC6502_Apple1
Flash Disk Storage for RC6502 Apple1 Replica


MobiFlight/mobiflight-panels
A repository with open source panel designs for flight simulation.