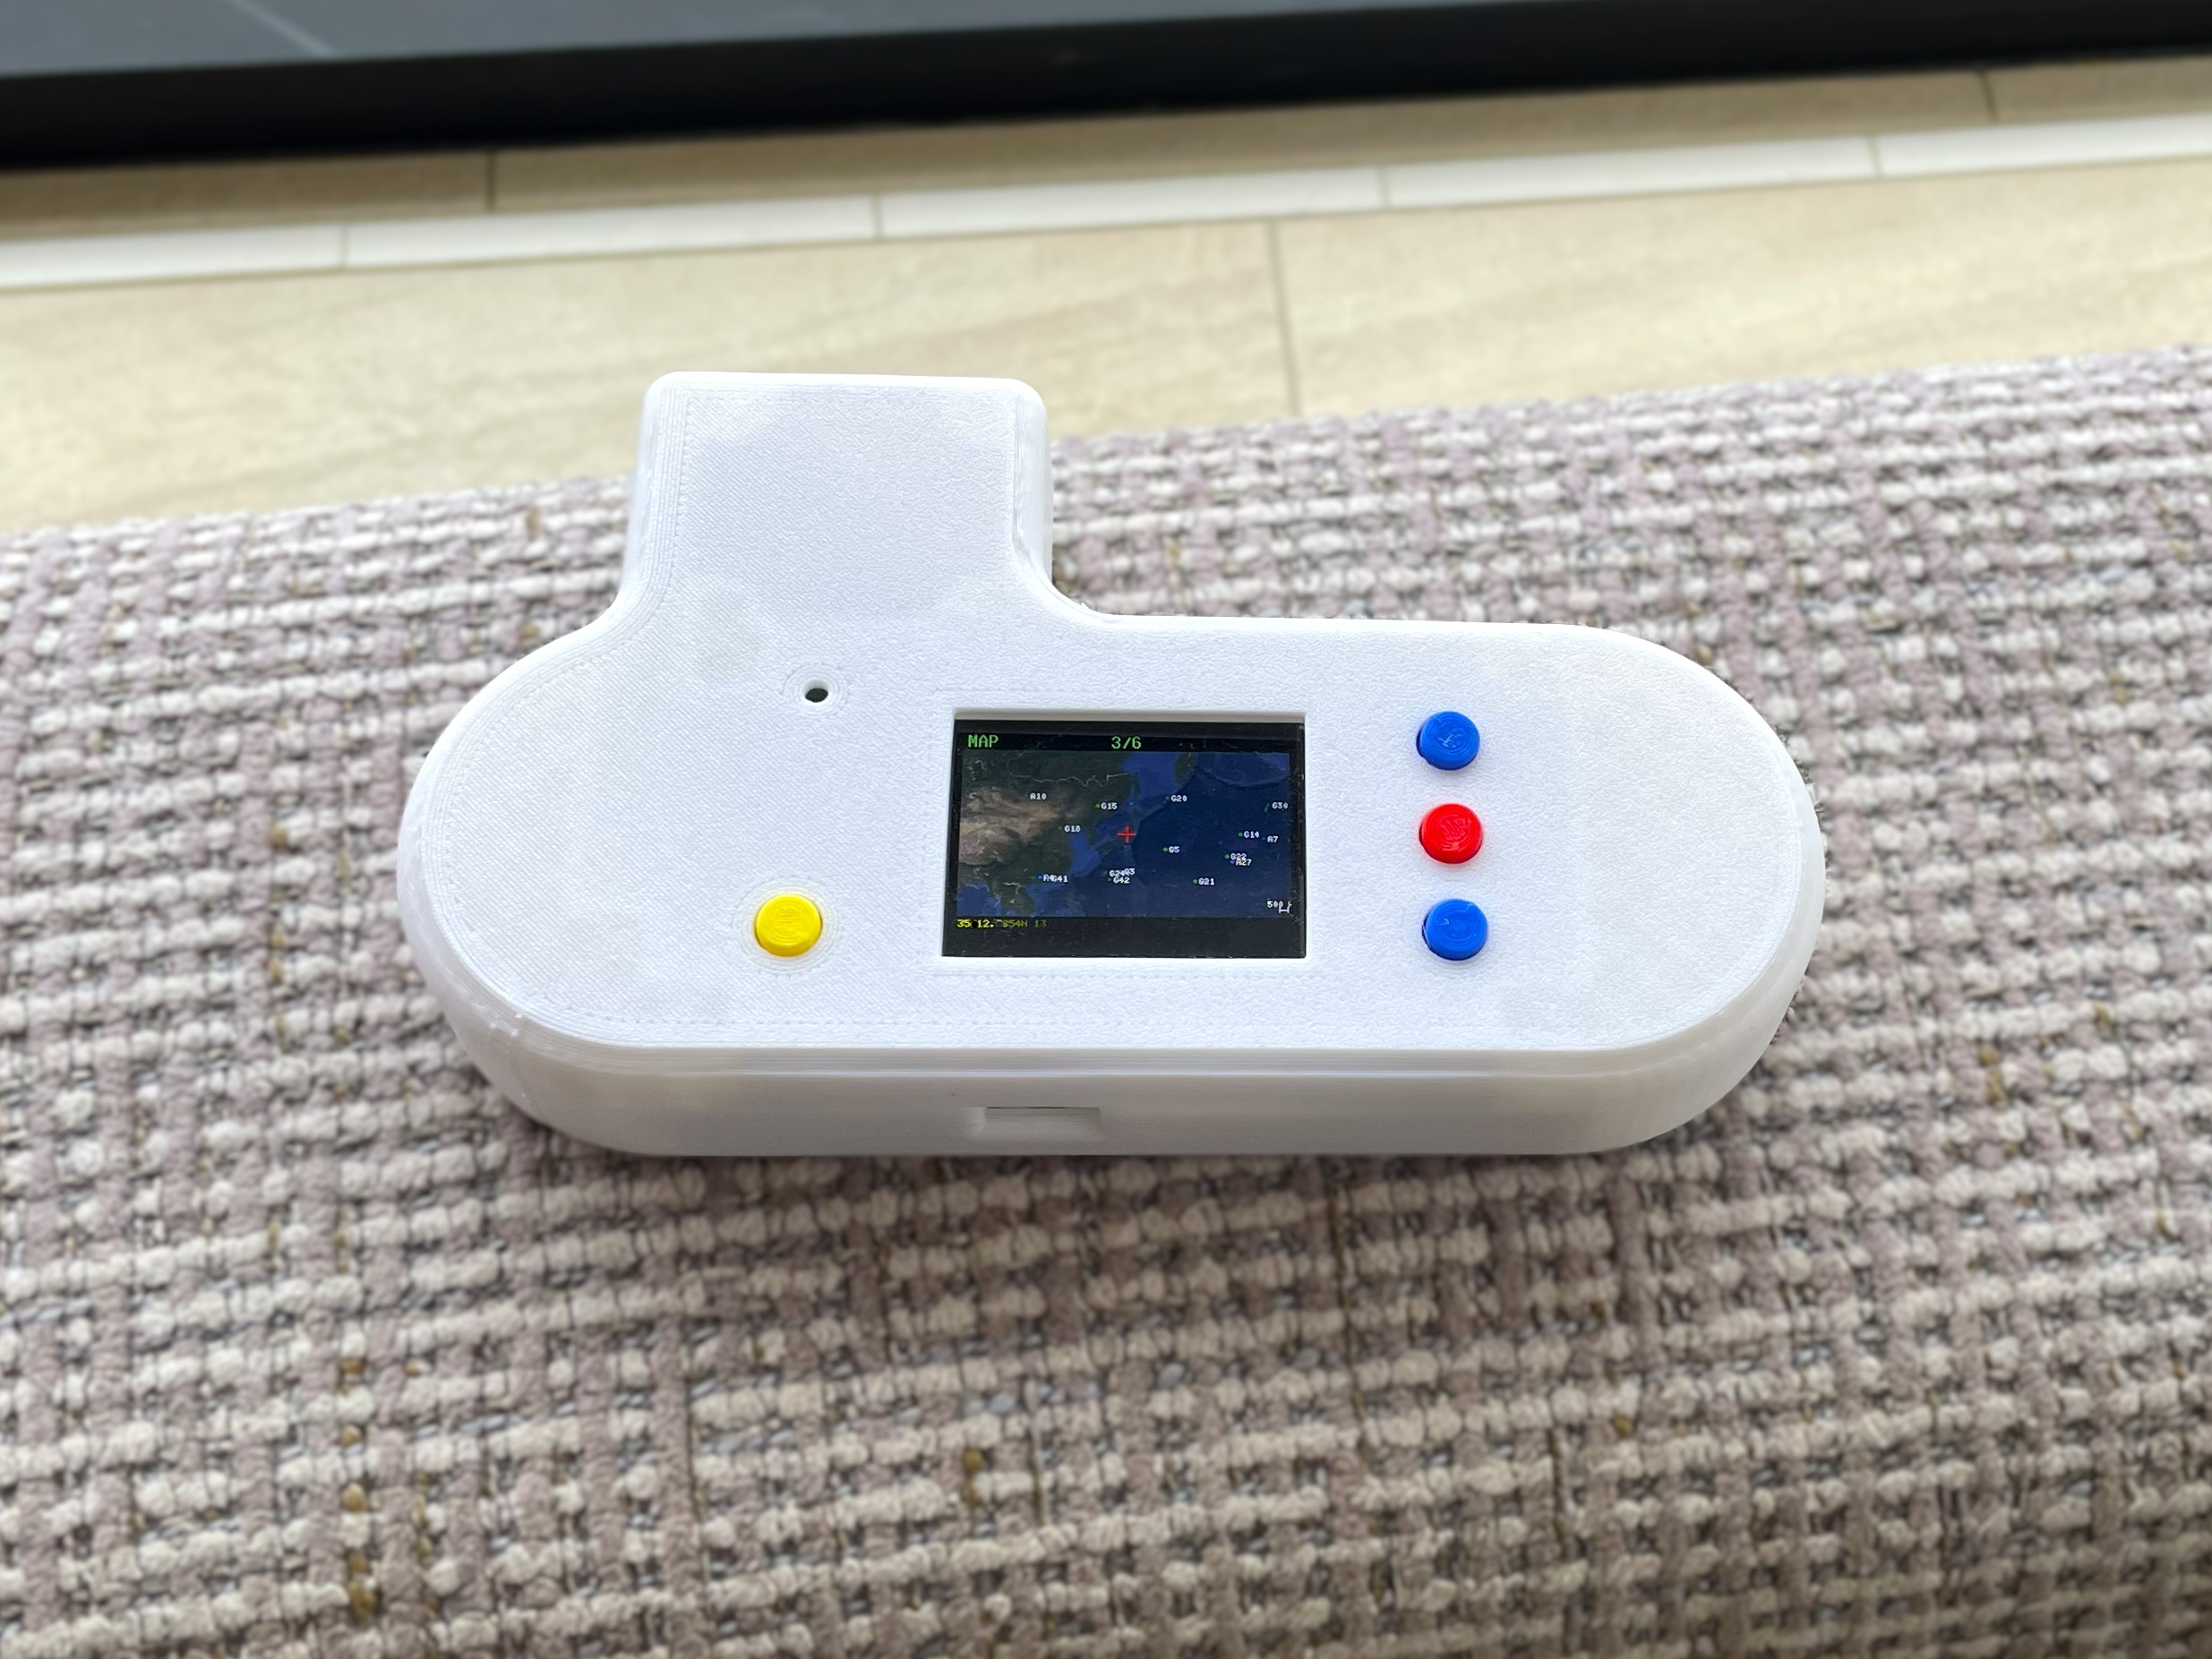
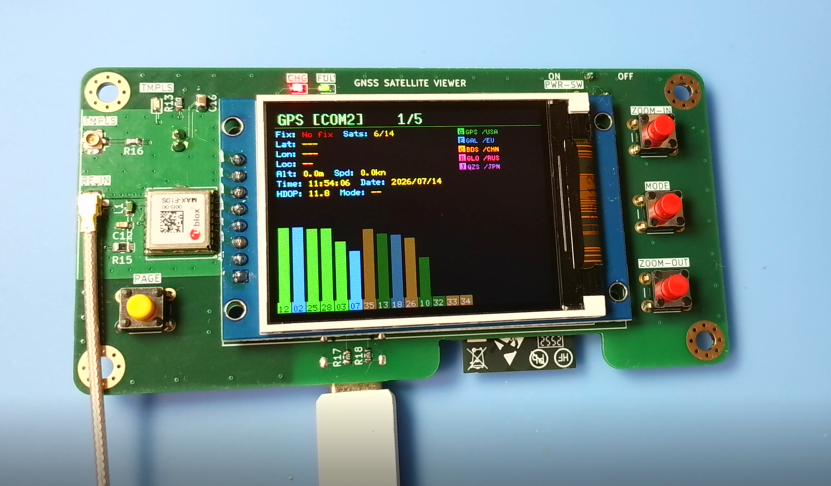
GNSS satellite viewer is an open-source printed circuit board by hnz1102, from the hnz1102/GNSS-viewer repository on GitHub. It is a 4-layer board of 100 × 50 mm with 72 parts on 87 nets, routed with 755 tracks and 210 vias.
It is built around the ESP32-S3-WROOM-1-N16R8, MAX-F10S-00B and EM64VSUKN-BA000-2, with the SPX3819M5-L, MH2029-601Y and 2N7002K among its other parts. Its parts include 24 resistors, 18 capacitors, 6 ICs, 5 switches and 4 diodes. It belongs with the radio and wireless boards and the ESP32 boards of this library.
ESP32-S3 firmware for a handheld GNSS receiver display built around a u-blox
MAX-F10S module. It decodes the receiver's NMEA output and shows the fix,
satellite constellation, a live map and recorded tracks on a 320×240 colour TFT,
and serves the same data over Wi-Fi to a browser. Written in
Rust (esp-idf-hal / esp-idf-svc) with a C component (wolfSSH) for an SSH
console to the receiver.
Features
Feature
Description
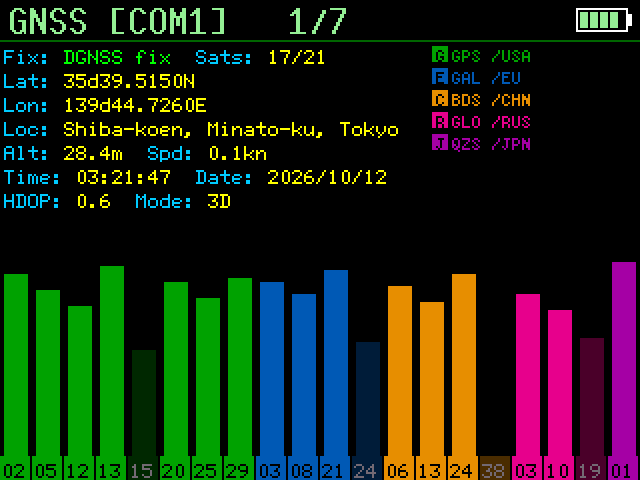
GNSS status
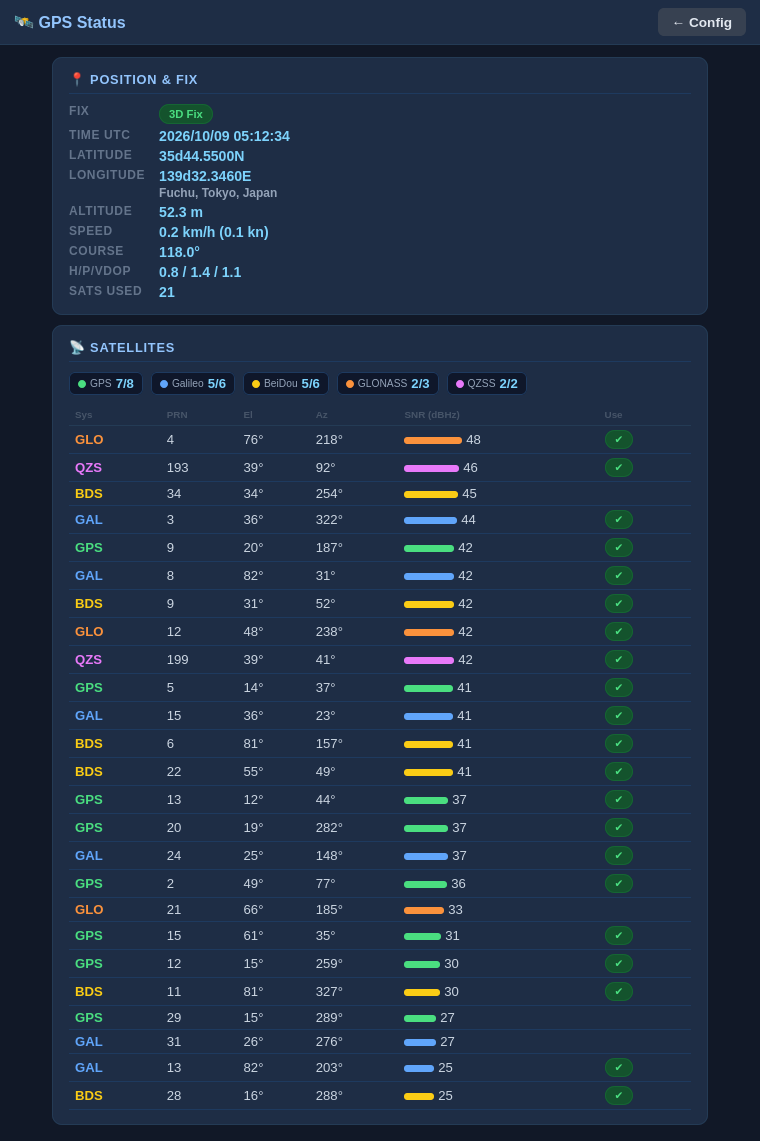
Fix quality, position, altitude, speed, course, HDOP/VDOP, satellites used/in view, UTC time (GPS, Galileo, BeiDou, GLONASS, QZSS, NavIC as supported by the receiver)
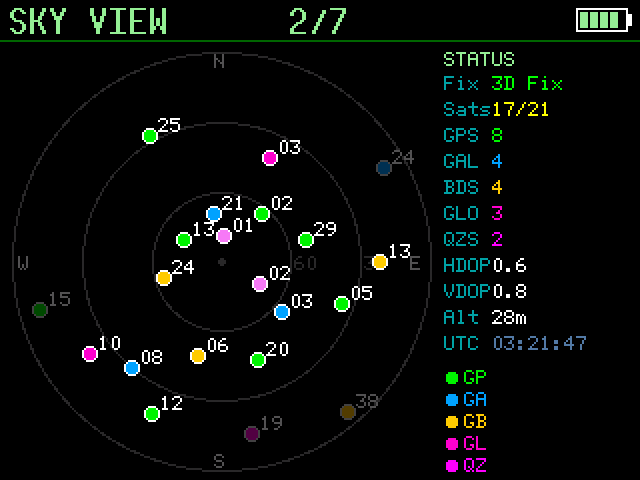
Sky view
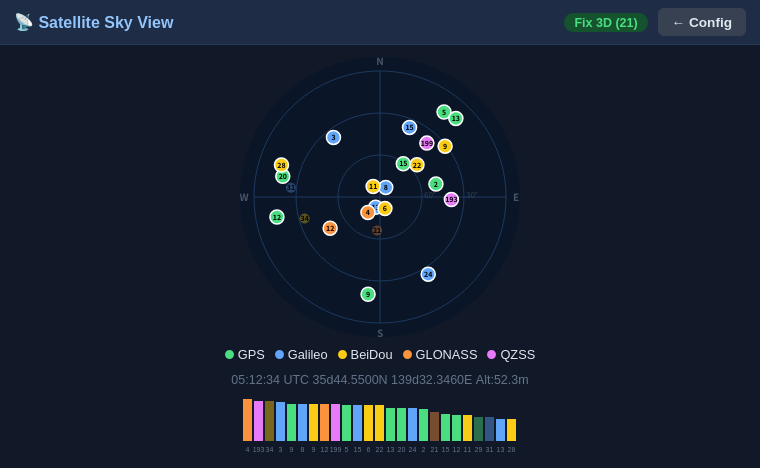
Polar plot of every tracked satellite by azimuth/elevation, coloured by constellation, with an SNR bar chart
Live map
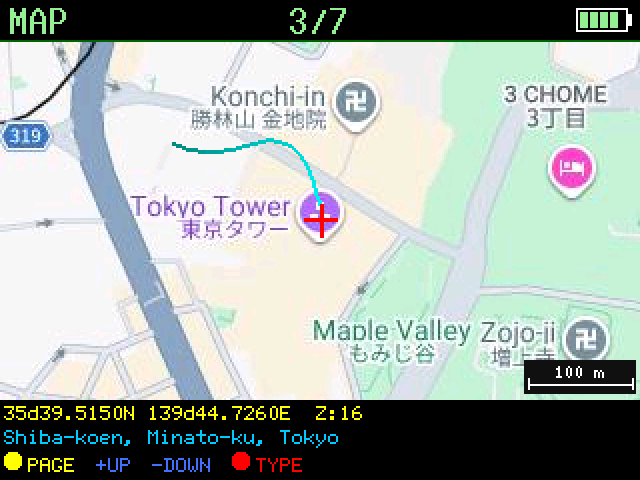
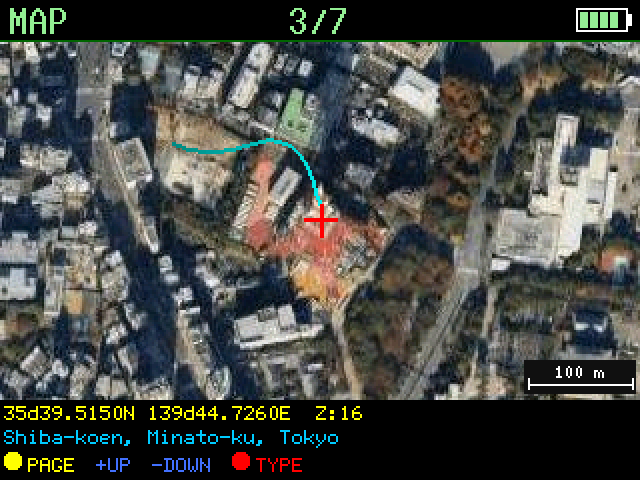
Google Maps Static API tile (satellite or roadmap) centred on the current fix, with a position trail, crosshair and scale bar
Offline map cache
Every downloaded tile is cached on eMMC; the nearest cached tile is shown when Wi-Fi or the API key is unavailable
Track log
Fixes are logged to a daily CSV on eMMC and can be browsed and replayed on the map (see Track playback)
Reverse geocoding
Street address for the current position via OpenStreetMap Nominatim
Earthquakes / EEW
Optional (quake_enable): recent earthquakes and emergency earthquake warnings from P2P地震情報, shown on a TFT page, plotted on the map and listed in the Web UI (see Earthquakes and EEW)
Time sync
System time from the GNSS receiver, plus NTP (up to 4 servers)
Web UI
Browser-based configuration, map, sky view, GNSS status and serial terminal
SSH console
Transparent SSH access to the receiver's serial port (ssh … console com1)
WPS
Wi-Fi Protected Setup (PBC mode) via cfg.toml or the Web UI
UDP Syslog
RFC 5424 remote logging over UDP
NVS settings
Persistent configuration stored in NVS; editable via the Web UI at runtime
Hardware
The reference hardware is a custom board; the KiCad design files and
production data (BOM, placement, netlist) are in hw/.
Part
Notes
MCU
ESP32-S3 with 16 MB flash and octal PSRAM
GNSS receiver
u-blox MAX-F10S on UART1 (COM1), 9600 baud default
Display
ST7789V 320×240 SPI TFT
Storage
64 GB eMMC on the 8-bit SDMMC bus, mounted at /emmc (map tile cache and track log)
Battery
LiPo, 1100 mAh, on a JST-PH 2-pin connector; MCP73831 charge controller on board. Voltage is read on GPIO13 (see adc_conversion_factor)
1PPS output
Internal 1PPS (time-pulse) output port from the MAX-F10S TIMEPULSE1 pin. 1 Hz by default; the frequency (disabled, 1 Hz … 10 MHz) is set under GPS TIMEPULSE in the Web UI configuration page, saved in NVS and re-applied to the receiver at every boot
Fusion 360 design data (source of the STL files; open it in Autodesk Fusion to modify the enclosure and re-export)
Pin assignment
Function
GPIO
GNSS UART1 TX / RX
42 / 41 (com1_tx_pin / com1_rx_pin)
TFT SCLK / MOSI / CS / DC / RST
48 / 45 / 40 / 39 / 38
eMMC CLK / CMD
46 / 3
eMMC D0–D7
47, 21, 10, 9, 17, 18, 8, 7
Battery voltage (ADC)
13
Power-source detect
1 (high = DC jack, low = USB)
Buttons
0 (BOOT/Page), 4 (+), 5 (−), 6 (MAP mode)
Display Pages
The BOOT button cycles through the pages in this order:
#
Page
Content
1
GNSS
Fix info, position, location name and satellite SNR bar chart
2
SKY VIEW
Polar satellite plot and per-satellite panel
3
MAP
Live map with trail, or the track being replayed
4
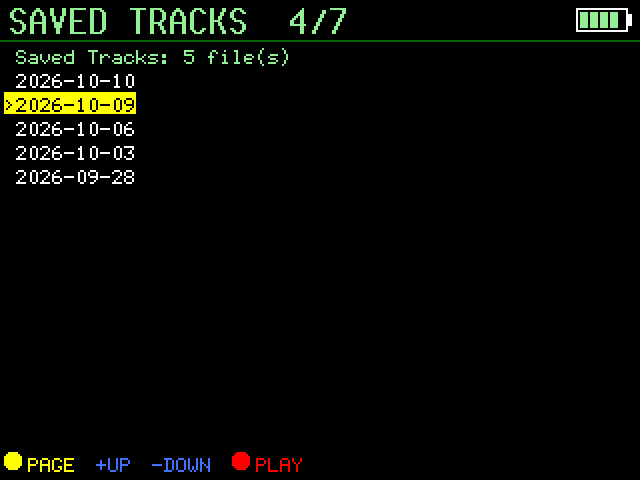
SAVED TRACKS
List of recorded tracks
5
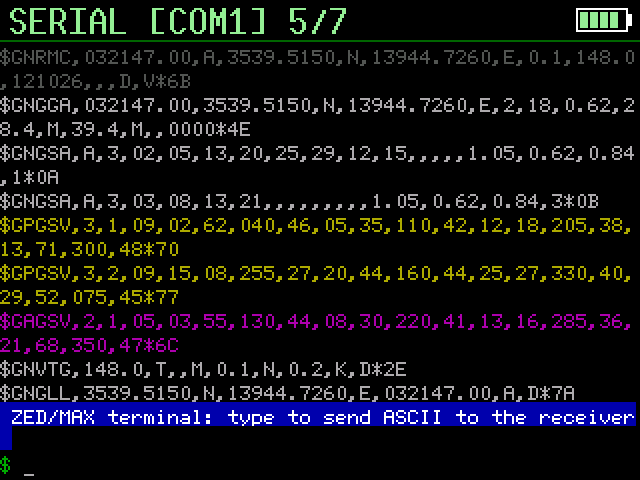
SERIAL [COM1]
Raw terminal view of the receiver's serial stream
6
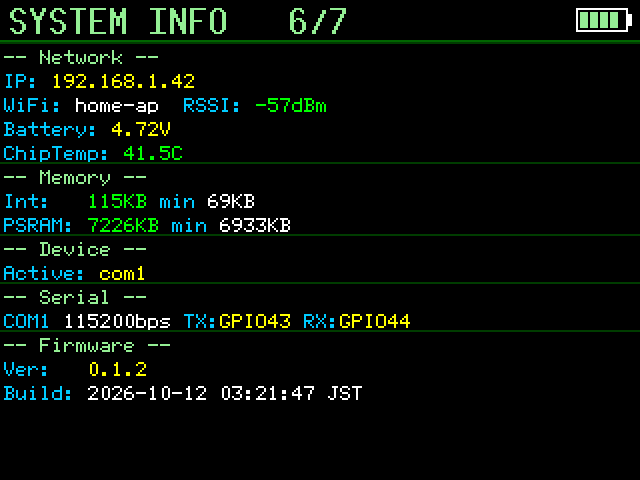
SYSTEM INFO
IP address, SSID, RSSI, battery voltage, chip temperature, free heap, serial settings, firmware version and build date/time
7
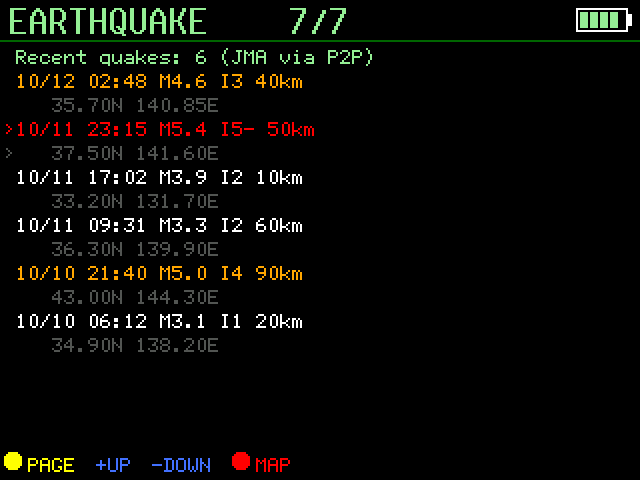
EARTHQUAKE
Recent earthquakes (only with quake_enable = "true")
Buttons
The button hint at the bottom of the MAP, SAVED TRACKS and EARTHQUAKE pages uses
the same symbols everywhere:
GPIO
On-screen legend
Short press
Hold
0 (BOOT)
yellow ● PAGE (EXIT during track playback or an alert)
Next page — or end track playback
≥ 10 s: factory reset
4
blue +UP
Context dependent (below)
Auto-repeat
5
blue -DOWN
Context dependent (below)
Auto-repeat
6
red ● TYPE / PLAY / MAP
Toggle satellite ↔ roadmap (TYPE) — start playback on the track list (PLAY) — show the highlighted epicenter on the quake page (MAP)
—
GPIO4/5 act as follows:
Where
GPIO4 (UP, +) / GPIO5 (DOWN, −)
MAP page, live
Zoom in / out
MAP page, track playback
Next / previous point (×10 once the button auto-repeats)
SAVED TRACKS page
Move the highlight up / down
EARTHQUAKE page
Move the highlight up / down
Buttons are debounced at 50 ms; auto-repeat starts after 400 ms and repeats
every 300 ms.
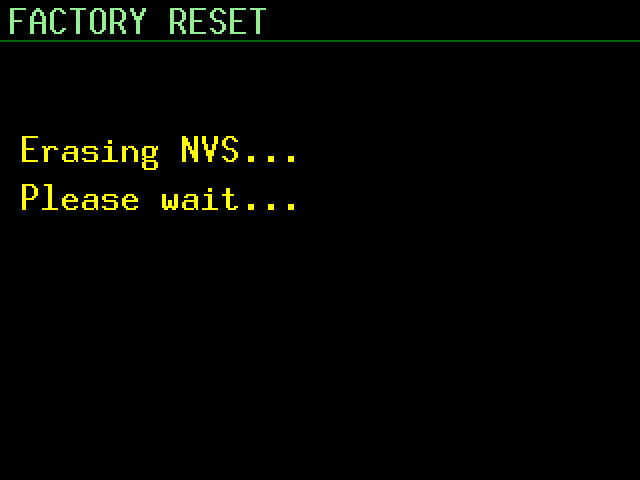
Factory reset — hold BOOT for 10 s. From 6 s the display shows a
"FACTORY RESET" countdown; at 10 s it erases NVS, restores the cfg.toml
defaults and reboots.
TFT screenshots
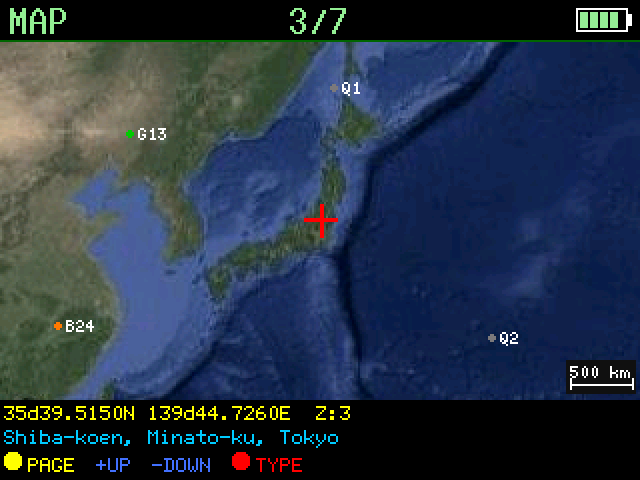
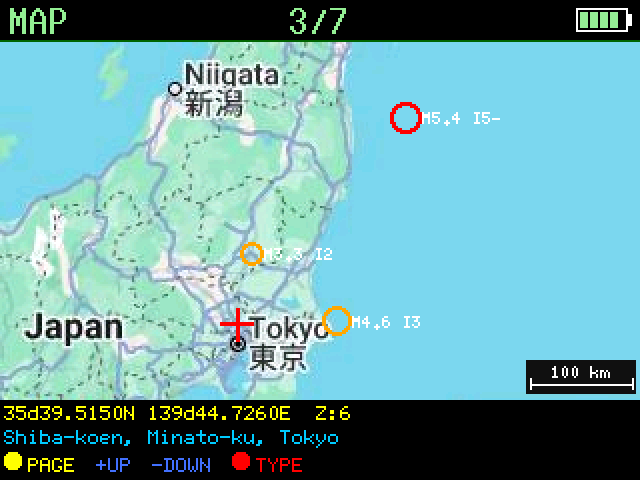
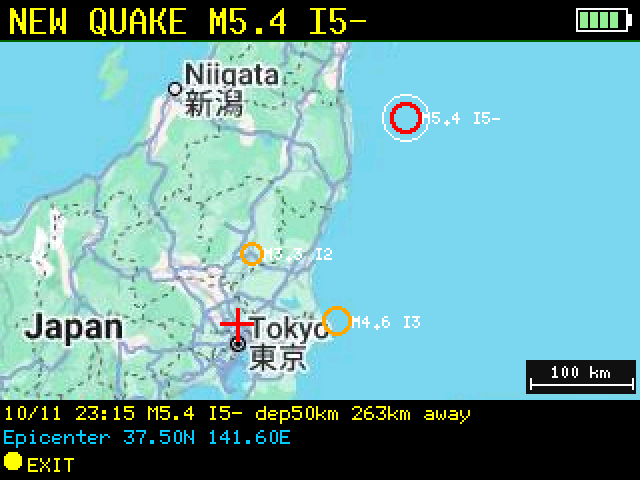
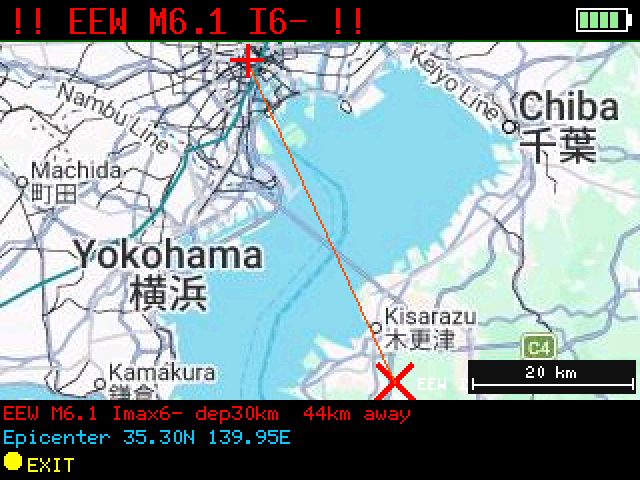
Samples of every page, rendered at 2× with synthetic data (Tokyo Tower area,
made-up satellites and earthquakes) and real Google Static Maps tiles. They
are generated by tools/screenshots — see
Regenerating the TFT screenshots.
GNSS
SKY VIEW
MAP (roadmap)
MAP (satellite)
MAP, zoom ≤ 5: ground point under each satellite
SAVED TRACKS
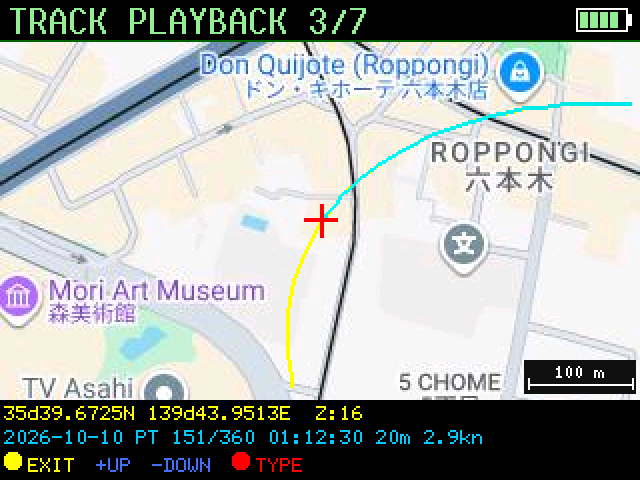
TRACK PLAYBACK
SERIAL [COM1]
SYSTEM INFO
EARTHQUAKE
MAP framed on the selected quake
NEW QUAKE on the MAP
EEW alert
System message overlay
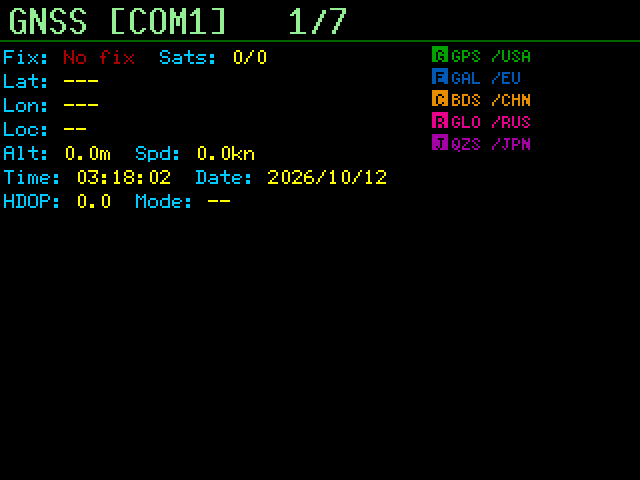
GNSS, no fix
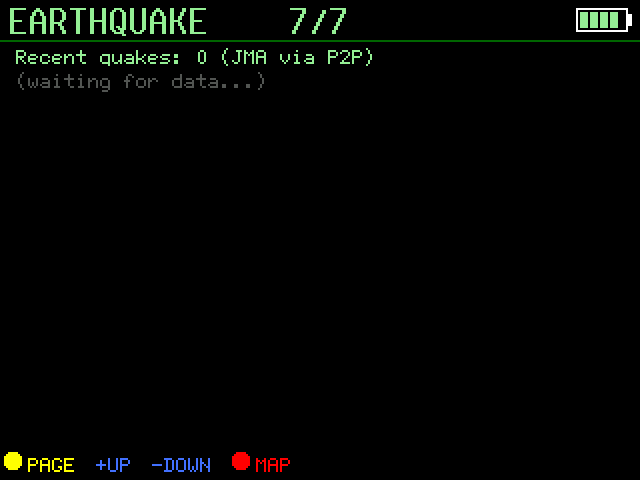
EARTHQUAKE, waiting for data
Track Playback
While a fix is valid, the position is logged at most once every 5 s to
/emmc/tracks/YYYY-MM-DD.csv (UTC date, one file per day):
Press BOOT until the SAVED TRACKS page is shown (newest date first).
Use + / − to highlight a day and press MAP mode to start.
For the first 5 seconds the map is zoomed out to show the whole route (yellow
line) and the end point (E). It then returns to your normal tracking
scale, starting at the first point.
+ / − step through the recorded points — hold the button to move ten at a
time. The info bar shows the date, point number, time, altitude and speed.
Press BOOT to end playback and return to the live map.
Tracks can be deleted from the Web UI (Storage section).
Browsing tracks in the Web UI
Open Tracks from the configuration page (or http://<device_ip>/tracks).
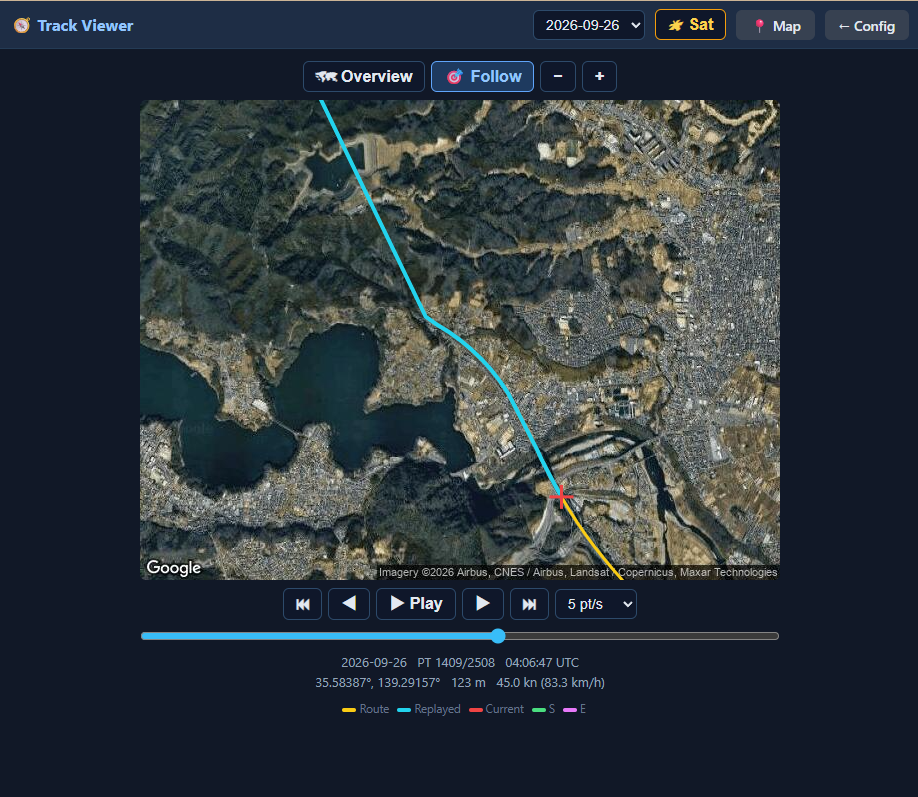
Pick a day from the drop-down; the whole route (yellow) is shown first with its
start (S) and end (E). Use ◀ ▶ / ⏮ ⏭ (±1 / ±10 points), the slider, or the
arrow keys (Shift = ±10) to move through the points, or Play to replay at
1–20 points per second. Overview keeps the whole route in view; Follow
(selected automatically by Play and by the zoom buttons) centres on the current
point at the zoom you choose.
The viewer runs in the browser and is independent of the device: it does not
change what the LCD is showing, and the LCD's track playback does not affect it.
Like the Map page, it loads the map image straight from Google using the
maps_api_key (without a key the route is still drawn, on a plain background).
Earthquakes and EEW (P2P地震情報)
With quake_enable = "true" in cfg.toml (default "false") the unit shows
recent earthquakes and emergency earthquake warnings (緊急地震速報, EEW) from
P2P地震情報 (JSON API v2). The data is
originally issued by the Japan Meteorological Agency (気象庁). It needs Wi-Fi
and a synced clock (GNSS or NTP), because the connection is TLS.
Where
What you get
EARTHQUAKE page (TFT, page 7)
The 8 most recent events: time (JST), magnitude, maximum intensity (I5- = 5弱, I5+ = 5強, …), depth and epicenter coordinates; tsunami warnings are flagged. + / − move the highlight, MAP mode (GPIO6) shows the highlighted epicenter on the MAP page
MAP page
Epicenters of recent earthquakes inside the visible map are drawn as circles — sized by magnitude, coloured by maximum intensity — with a label such as M5.2 I5-
Web UI (configuration page)
A Recent Earthquakes card with the epicenter name (Japanese), magnitude, intensity, depth and tsunami status. The epicenter name opens the Web UI map (/map?lat=…&lon=…&zoom=…) centred on it
EEW alert
On a warning the TFT switches to the MAP page by itself and frames the epicenter and this unit's own position at the largest zoom that shows both: the epicenter is a large red X, joined to your position by a line, the header turns red (!! EEW M6.3 I5- !!) and the info bar shows magnitude, maximum forecast intensity, depth and the distance in km. The Web UI shows a red banner with the forecast areas and a link to the same map view. The alert stays up for 2 minutes, or until it is cancelled or BOOT is pressed
The TFT font is ASCII only, so Japanese epicenter and area names appear in the
Web UI only; the TFT shows coordinates. Without a GNSS fix the alert still
shows the epicenter, but cannot mark your position or give a distance.
How it works (src/quake.rs):
A WebSocket (wss://api.p2pquake.net/v2/ws) receives the events as they are
registered. Warnings (code 556) raise the alert, earthquake reports (551) are
merged into the list. Test messages and warnings older than 3 minutes (by
their issue time) are ignored, so a boot in the middle of an old event does
not alert.
REST (/v2/history) loads the initial list at boot, re-syncs it every
30 minutes, and takes over — polling every 10 s (EEW) / 60 s (list) — while
the WebSocket is down.
Memory: the TLS WebSocket holds roughly 30 KB of internal RAM, which
competes with the map tile download. The WebSocket is therefore dropped for
the duration of every map fetch and re-created once the map has been idle for
about 12 s; any warning issued in the gap is recovered by a REST check right
after it reconnects. REST polling is skipped while internal RAM is low or a
map fetch is running. Watch Free Heap (Internal) in the Web UI and
[HEAP] / [WS] / [QUAKE] in the log.
The WebSocket needs the esp_websocket_client ESP-IDF component, pulled from
the component registry at build time (declared in Cargo.toml), so the first
build needs network access.
Testing without a real earthquake. Build with the sandbox feature:
bash
cargo build --release --features quake-sandbox
This points the feed at the P2P sandbox, which replays old data (including a
2023 Hokkaido EEW) and skips the "older than 3 minutes" check, so the whole
alert path fires right after boot. Never ship a sandbox build.
Not a safety device. Delivery is not guaranteed and can be delayed; the
warning only covers what the Meteorological Agency issues as a warning. Do
not rely on this unit for life-safety decisions. Use the official channels.
Use of the data is subject to the P2P地震情報
terms for secondary use: credit the
Japan Meteorological Agency and P2P地震情報 (the Web UI card already does).
cfg.toml.tmp is the only template. Before building, copy it to cfg.toml
(which is not committed, since it holds your Wi-Fi credentials and API key):
bash
cp cfg.toml.tmp cfg.toml
Then edit cfg.toml for your environment. The table name must match the crate
name, [satellite-viewer], or the values are ignored. Hardware variants are
selected with the settings below rather than separate templates:
Setting
Default
Change it when
com1_tx_pin / com1_rx_pin
42 / 41
The GNSS receiver is wired to other pins (XIAO ESP32S3: 43 / 44)
display_enable
"true"
There is no ST7789V TFT
emmc_enable
"true"
This unit has no eMMC fitted
quake_enable
"false"
You want the recent-earthquake list and EEW (緊急地震速報, emergency earthquake warning) alerts from P2P地震情報. Off by default: it keeps a TLS WebSocket open (~30 KB of internal RAM) and needs Wi-Fi plus a synced clock. Read at boot only, so rebuild after changing it — see Earthquakes and EEW
Values in cfg.toml are compiled into the firmware as defaults.
After boot they can be overridden via the Web UI or direct NVS writes; NVS values take priority.
Google Maps API key
The map pages (LCD and Web UI) download images from the Maps Static API, so
they need a Google Maps Platform API key. Without maps_api_key the MAP page
can still display tiles already stored in the eMMC cache, but will not download
new ones.
Link a billing account to the project. Maps Platform APIs require one,
even though usage within the free monthly allowance is not charged — see the
Google Maps Platform pricing page
for the current allowance.
Open APIs & Services → Library, search for Maps Static API and click
Enable.
Open APIs & Services → Credentials, click Create credentials → API key
and copy the key. Step-by-step instructions are in Google's
Maps Static API documentation.
Enter the key in the Web UI: Config page → Map Settings → Google Maps API
Key, then Save. It takes effect immediately (no reboot) and is stored
in NVS. To have a key built in as the default instead (for a fresh or
factory-reset device), set it in cfg.toml and rebuild:
toml
maps_api_key = "your-api-key"
Notes
The key is stored in NVS and can be changed from the Web UI at any time.
maps_api_key in cfg.toml is only the default, used until a key is saved
and restored by a factory reset (saving an empty field also falls back to it).
The Web UI map pages load images directly from Google in your browser, so the
device hands the key to any logged-in browser (/api/mapkey). Keep the
device login password strong, and do not share firmware images built with your
own key (build-flash-images.sh builds from cfg.toml.tmp, whose key is empty).
In the Cloud console, restrict the key under API restrictions to the
Maps Static API only, and set a budget alert or quota so a leaked key cannot
run up a bill. An application restriction (HTTP referrer / IP) is awkward here
because requests come both from the device and from browsers on your LAN.
cfg.toml is not committed. Never put a real key in cfg.toml.tmp, which is
the template that gets committed. Because the Web UI can set the key, you can
leave cfg.toml empty and keep the key out of the build entirely.
Wi-Fi Setup with WPS
WPS (Wi-Fi Protected Setup) allows you to connect to a Wi-Fi network without manually entering the SSID and password. This device supports WPS Push Button Configuration (PBC) mode.
Method 1: Using cfg.toml and Factory Reset (Recommended for initial setup)
If you don't have Wi-Fi credentials yet or want to reconfigure via WPS without Web UI access:
Edit cfg.toml before building (or rebuild the firmware):
toml
wifi_ssid = ""# Set to empty string
wps_enable = "true"# Enable WPS mode on boot
Flash the firmware to the device
On boot, the device will automatically enter WPS mode and wait for you to press the WPS button on your Wi-Fi router (timeout: 2 minutes)
Upon successful WPS connection, the credentials are saved to NVS and the device reboots
Alternative: Trigger WPS via Factory Reset
If the device is already running with Wi-Fi configured but you want to switch to WPS:
Edit cfg.toml to set wps_enable = "true" and wifi_ssid = ""
Rebuild and flash the firmware
Perform a Factory Reset: Press and hold the BOOT button (GPIO 0) for ≥10 seconds
The device will erase NVS, restore cfg.toml defaults, and reboot into WPS mode
Press the WPS button on your Wi-Fi router within 2 minutes
Note: Web UI is not accessible until Wi-Fi is connected, so this method is essential for initial setup or when you lose Wi-Fi access.
Method 2: Using the Web UI (when already connected to Wi-Fi)
Navigate to the configuration page at http://<device_ip>/
Find the WPS section
Click the "Start WPS" button
Press the WPS button on your Wi-Fi router within 2 minutes
The device will automatically receive and save the Wi-Fi credentials and reboot
WPS Fallback
If WPS fails or times out, the device will revert to the previously configured Wi-Fi credentials (from cfg.toml or NVS).
Notes
WPS PBC mode is the only supported WPS method (PIN mode is not supported)
After successful WPS configuration, the new credentials are saved to NVS and persist across reboots
You can still manually configure Wi-Fi credentials via cfg.toml or the Web UI if WPS is not available on your router
Environment Setup
Run setup_env.shonce on a fresh Ubuntu / Debian machine (or WSL2) before
building. The script performs all steps below automatically.
bash
bash setup_env.sh
After the script finishes, open a new terminal (or reload your shell config) so
the environment variables take effect:
bash
source "$HOME/.cargo/env"
source ~/export-esp.sh
What the script does
Step
Action
1
Install system packages via apt
2
Install Rust toolchain via rustup (skipped if already present)
3
Install ldproxy, espup, cargo-espflash via Cargo
4
Install & update the ESP32-S3 Xtensa toolchain via espup
5
Source ~/export-esp.sh (generated by espup)
6
Add udev rule for ESP32 USB device (303a:1001) and reload rules
If you prefer to run the steps manually, expand the section below.
ESP-IDF v5.4.2 (fetched automatically by the build)
Initial component setup
Run once after cloning, or after a clean wipe of components/:
bash
cd esp32-s3/satellite-viewer
bash setup_components.sh
This clones wolfssh and wolfssl at the verified commits, places the
ESP-IDF-specific CMakeLists.txt and include/user_settings.h on top, and
patches the FAT filesystem configuration to enable exFAT for the eMMC.
Build
bash
cargo build --release
The first build downloads the esp_websocket_client component (used by the
earthquake feed), so it needs network access.
Add --features quake-sandbox to test that feed against the P2P sandbox.
Flash and monitor
bash
espflash flash --release --monitor
Creating a complete flash binary image
To create a single binary file that includes all partitions (bootloader, partition table, nvs, phy_init, and factory app) for distribution or web-based flashing:
To build a merged image from the cfg.toml.tmp defaults in one go (Wi-Fi and
API key unset, for distribution), run build-flash-images.sh. It builds two
variants, written to flash_images/: flash_satellite-viewer.bin
(quake_enable = "false") and flash_satellite-viewer-quake.bin
(quake_enable = "true", with the earthquake / EEW feed). Your own cfg.toml is
restored afterwards.
Important: When flashing a merged image, always write it to offset 0x0, not 0x9000. Writing to 0x9000 will result in a boot failure with "invalid header: 0xffffffff" error.
Flash the complete binary
bash
# Using esptool.py
esptool.py --chip esp32s3 --port /dev/ttyACM0 write_flash 0x0 complete_flash.bin

# Using espflash
espflash write-bin 0x0 complete_flash.bin
Web-based flashing (no command line required)
You can also flash the binary via a web browser using the ESP Web Flasher:
Click "Connect" and select your ESP32-S3 device from the serial port list
Click "Choose File" and select complete_flash.bin
Set the flash address to 0x0 (very important!)
Click "Program" to start flashing
Wait for the process to complete and click "Reset Device"
Flash layout
Partition
Offset
Size
nvs
0x9000
24 KB
phy_init
0xF000
4 KB
factory (app)
0x10000
~16 MB
Flash: 16 MB, DIO mode, 40 MHz.
Regenerating the TFT screenshots
tools/screenshots is a small host-side crate (separate from the firmware, built
with the stable toolchain for your PC) that compiles the firmware's own
src/display_pages.rs and renders each page into a 320×240 framebuffer, then
writes PNGs. GPS, quake, track and map data are replaced by stubs filled with
sample data.
bash
cd tools/screenshots
cargo run --release -- [OUT_DIR][SCALE]# default: ../../docs/images/tft, 2
Map pages fetch real tiles with the same Static Maps request the firmware uses.
The key is taken from the GOOGLE_MAPS_API_KEY environment variable, else
maps_api_key in cfg.toml; tiles are cached in tools/screenshots/.tile-cache/
(gitignored). Without a key a schematic map is drawn instead. The firmware
version on the SYSTEM INFO sample is read from Cargo.toml.
Web UI Screenshots
Once the device is on Wi-Fi, these pages are available in any browser at
http://<device_ip>/ (login required).
The screenshots were rendered from the firmware's actual page HTML against a
mock of the device API with synthetic sample data (a made-up route and
satellite set), not captured from a live receiver. They are shown without map
imagery, which the pages load from Google using your maps_api_key; with a
key set, the map appears behind the route.
Sky View — /skyview
Every tracked satellite plotted by azimuth and elevation, coloured by
constellation (filled = used in the fix), with an SNR bar per satellite.
GPS Status — /gpsstatus
Fix type, position, UTC time, altitude, speed, course, DOP values and the
per-satellite table with signal strength, plus a per-constellation count.
Track Viewer — /tracks
Overview shows the whole recorded route (yellow) with its start S and end
E; the part already replayed is drawn in cyan up to the current point (red
cross). Use the buttons, slider or arrow keys to move through the points.
Follow centres on the current point at a zoom you choose (− / +) and is
selected automatically by Play.
Web UI Endpoints
URL
Method
Description
/login
GET / POST
Login
/logout
GET
Logout
/
GET
Configuration page (auth required)
/map
GET
Live map page; ?lat=&lon=&zoom= views an arbitrary point (e.g. an epicenter)
/skyview
GET
Sky view page
/tracks
GET
Track viewer page
/gpsstatus
GET
GNSS status page
/terminal
GET
WebSocket serial terminal (auth required)
/api/gps
GET
Current GNSS data (JSON)
/api/tracks
GET
List of recorded track dates, newest first (JSON)
/api/track?date=YYYY-MM-DD
GET
All points of one day, streamed (JSON)
/api/mapinfo
GET
Map centre, zoom, trail and satellites (JSON)
/api/quakes
GET
Recent earthquakes and the active EEW, if any (JSON; enabled:false when quake_enable is off)
/api/map/pixels
GET
Current map image
/api/map/zoomin, /api/map/zoomout
POST
Change map zoom
/api/map/toggletype
POST
Toggle satellite / roadmap
/api/config
POST
Save configuration to NVS
/api/status
GET
Device / Wi-Fi status, heap, firmware version and build date (JSON)
/api/reset
POST
Erase NVS and restore cfg.toml defaults
/api/reboot
POST
Reboot the device
/api/boot_log
GET
Boot history with reset reasons from NVS (JSON)
/api/storage/clear_mapcache
POST
Delete all cached map tiles
/api/storage/clear_tracklog
POST
Delete all recorded tracks
/api/storage/format_emmc
POST
Format the eMMC
SSH Console
The SSH server (port 22) gives transparent access to the GNSS receiver's serial
port, so it can be configured with u-center or similar tools over the network.
Item
Detail
Port
22 (TCP)
Auth method
Password only (public-key authentication is not supported)
Username
Any string is accepted — only the password is checked
Password
Set via ssh_password in cfg.toml or Web UI
Concurrent sessions
1 (a second connection is rejected while a session is active)
Security note: Change the default password before deploying the device
on a shared network.
bash
ssh -tt admin@<device_ip> console com1
The -tt flag forces pseudo-TTY allocation, which is required for correct
terminal behaviour.
Disconnect with the standard OpenSSH escape sequence: press Enter, then
type ~.
Serial data received before the first keystroke from the SSH client is
discarded to prevent stale output flooding the terminal on login.
Dependencies
Component / Library
Version
License
Purpose
satellite-viewer (this project)
0.1.2
MIT
Firmware (Rust)
ssh_bridge component
0.1.0
MIT
SSH server C wrapper
esp-idf-hal
0.45.2
MIT / Apache-2.0
ESP32-S3 hardware abstraction
esp-idf-svc
0.51
MIT / Apache-2.0
Wi-Fi, HTTP server/client, SNTP, etc.
wolfSSH
commit 157cb01f
GPLv3 (or commercial)
SSH server protocol
wolfSSL / wolfCrypt
commit b7e7e755
GPLv3 (or commercial)
Cryptography library
jpeg-decoder
0.3
MIT / Apache-2.0
Map tile decoding
mipidsi
0.8.0
MIT
ST7789V display driver
embedded-graphics
0.8.1
MIT
Display rendering
chrono
0.4
MIT / Apache-2.0
Date and time
@xterm/xterm
6.0.0 (bundled)
MIT
Browser WebSocket terminal
@xterm/addon-fit
0.11.0 (bundled)
MIT
xterm.js terminal fit addon
Map imagery is provided by the Google Maps Static API, addresses by
OpenStreetMap Nominatim, and earthquake / EEW data by P2P地震情報
(originally Japan Meteorological Agency data); all are subject to their own
terms of use.
Note on wolfSSH / wolfSSL licensing:
Both wolfSSH and wolfSSL are dual-licensed under GPLv3 (open source) or a
commercial license (for use in proprietary products).
ESP32-S3 firmware for a small earthquake-information display. It shows recent earthquakes and emergency earthquake warnings (緊急地震速報, EEW) from [P2P地震情報](https://www.p2pquake.net/), draws the epicenters on a Google map…
Firmware for the ESP32-S3 that bridges an SSH connection (over Wi-Fi) to UART and USB CDC serial ports. Written in Rust (esp-idf-hal / esp-idf-svc) with a C component (wolfSSH) for the SSH server.
Mini-Power is a small, portable DC power supply unit designed to provide a convenient and reliable source of adjustable voltage for your electronic devices and breadboard experiments.
52 parts3
Questions
How big is the GNSS satellite viewer PCB?
It measures 100 × 50 mm and has 4 copper layers, 1.6 mm thick.
What parts does the GNSS satellite viewer use?
72 parts, built around the ESP32-S3-WROOM-1-N16R8, MAX-F10S-00B, EM64VSUKN-BA000-2 and SPX3819M5-L. The full list of its parts is on this page, with links to each part's symbol and footprint where PCBKit's library has them.
Where can I download the GNSS satellite viewer KiCad files?
From the hnz1102/GNSS-viewer repository on GitHub, at the commit this page was made from: the board is hw/GNSS-satellite-viewer.kicad_pcb and its schematic hw/GNSS-RF.kicad_sch. PCBKit opens the board in the browser, with nothing to install.
Can I use the GNSS satellite viewer design in my own project?
Its repository states no licence, so its author keeps all rights: ask hnz1102 before reusing the design.