2 layers57.3 × 19 mm

 mirkosertic/Megahub7
Megahub is an ESP32-based alternative hub designed for LEGO© enthusiasts and robotics builders.
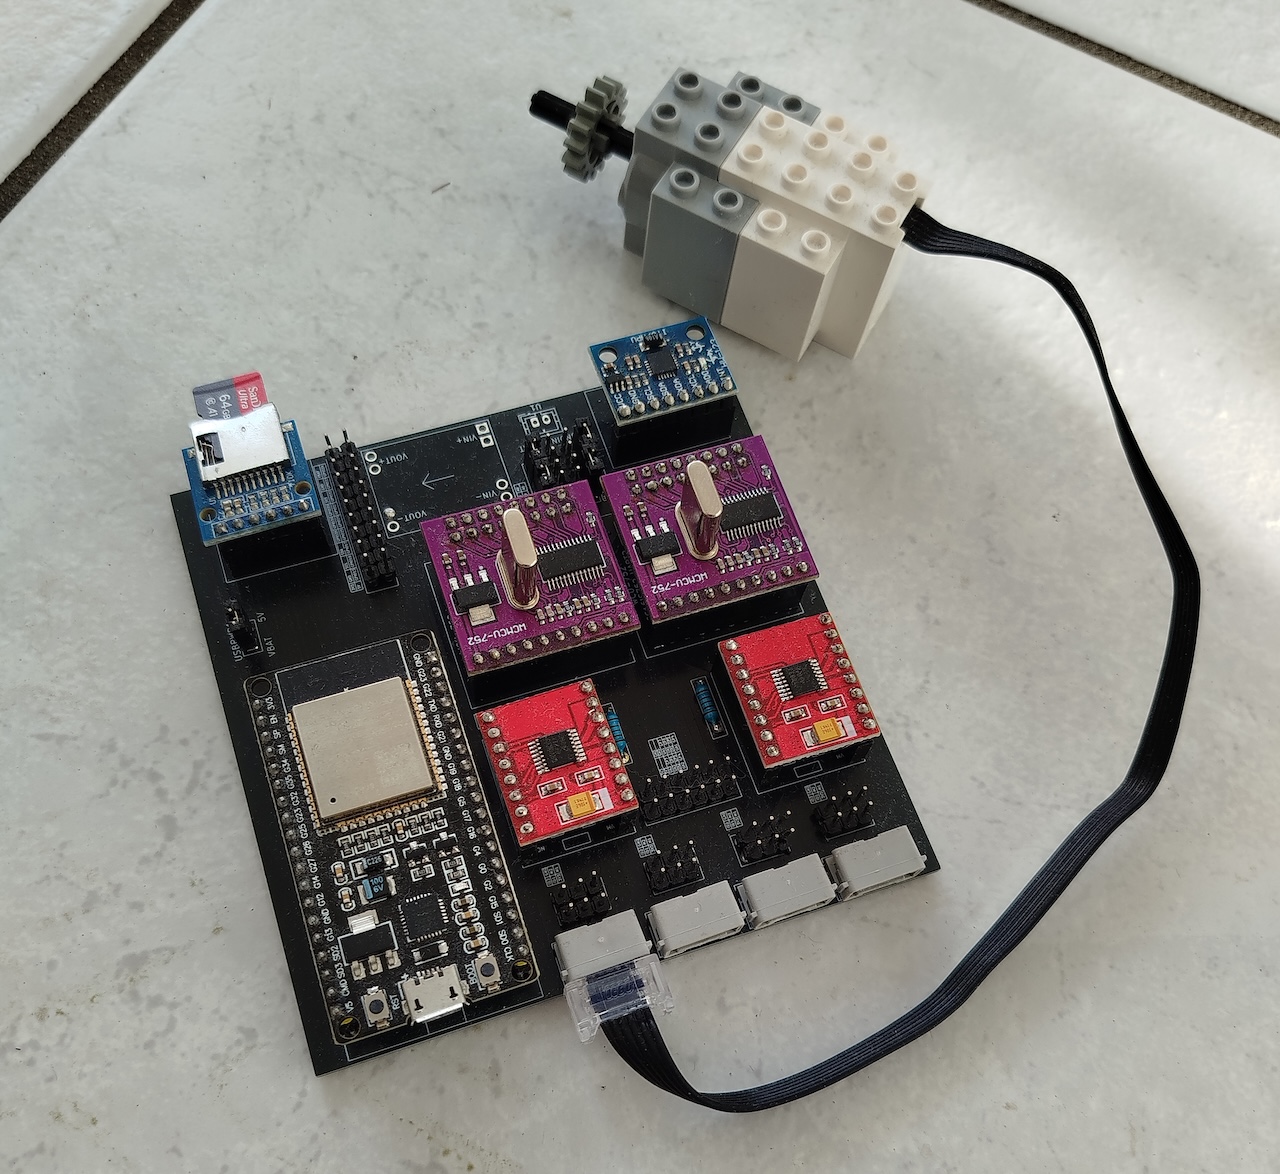
Legoesp32 is an open-source printed circuit board by mirkosertic, from the mirkosertic/Megahub repository on GitHub. It is a 2-layer board of 97.5 × 96.7 mm with 26 parts on 100 nets, routed with 777 tracks and 58 vias.
Its parts include 4 resistors, 4 connectors and 1 IC. It belongs with the robots and motor control boards and the ESP32 boards of this library.

Megahub is an ESP32-based experimentation platform for robotics enthusiasts and makers. It combines native support for LEGO WeDo/Powered Up devices with a web-based IDE featuring Lua scripting and Blockly visual programming. The project is fully open source and ships with hardware schematics, PCB production files, and firmware as a PlatformIO project.
Build and use it at your own risk.
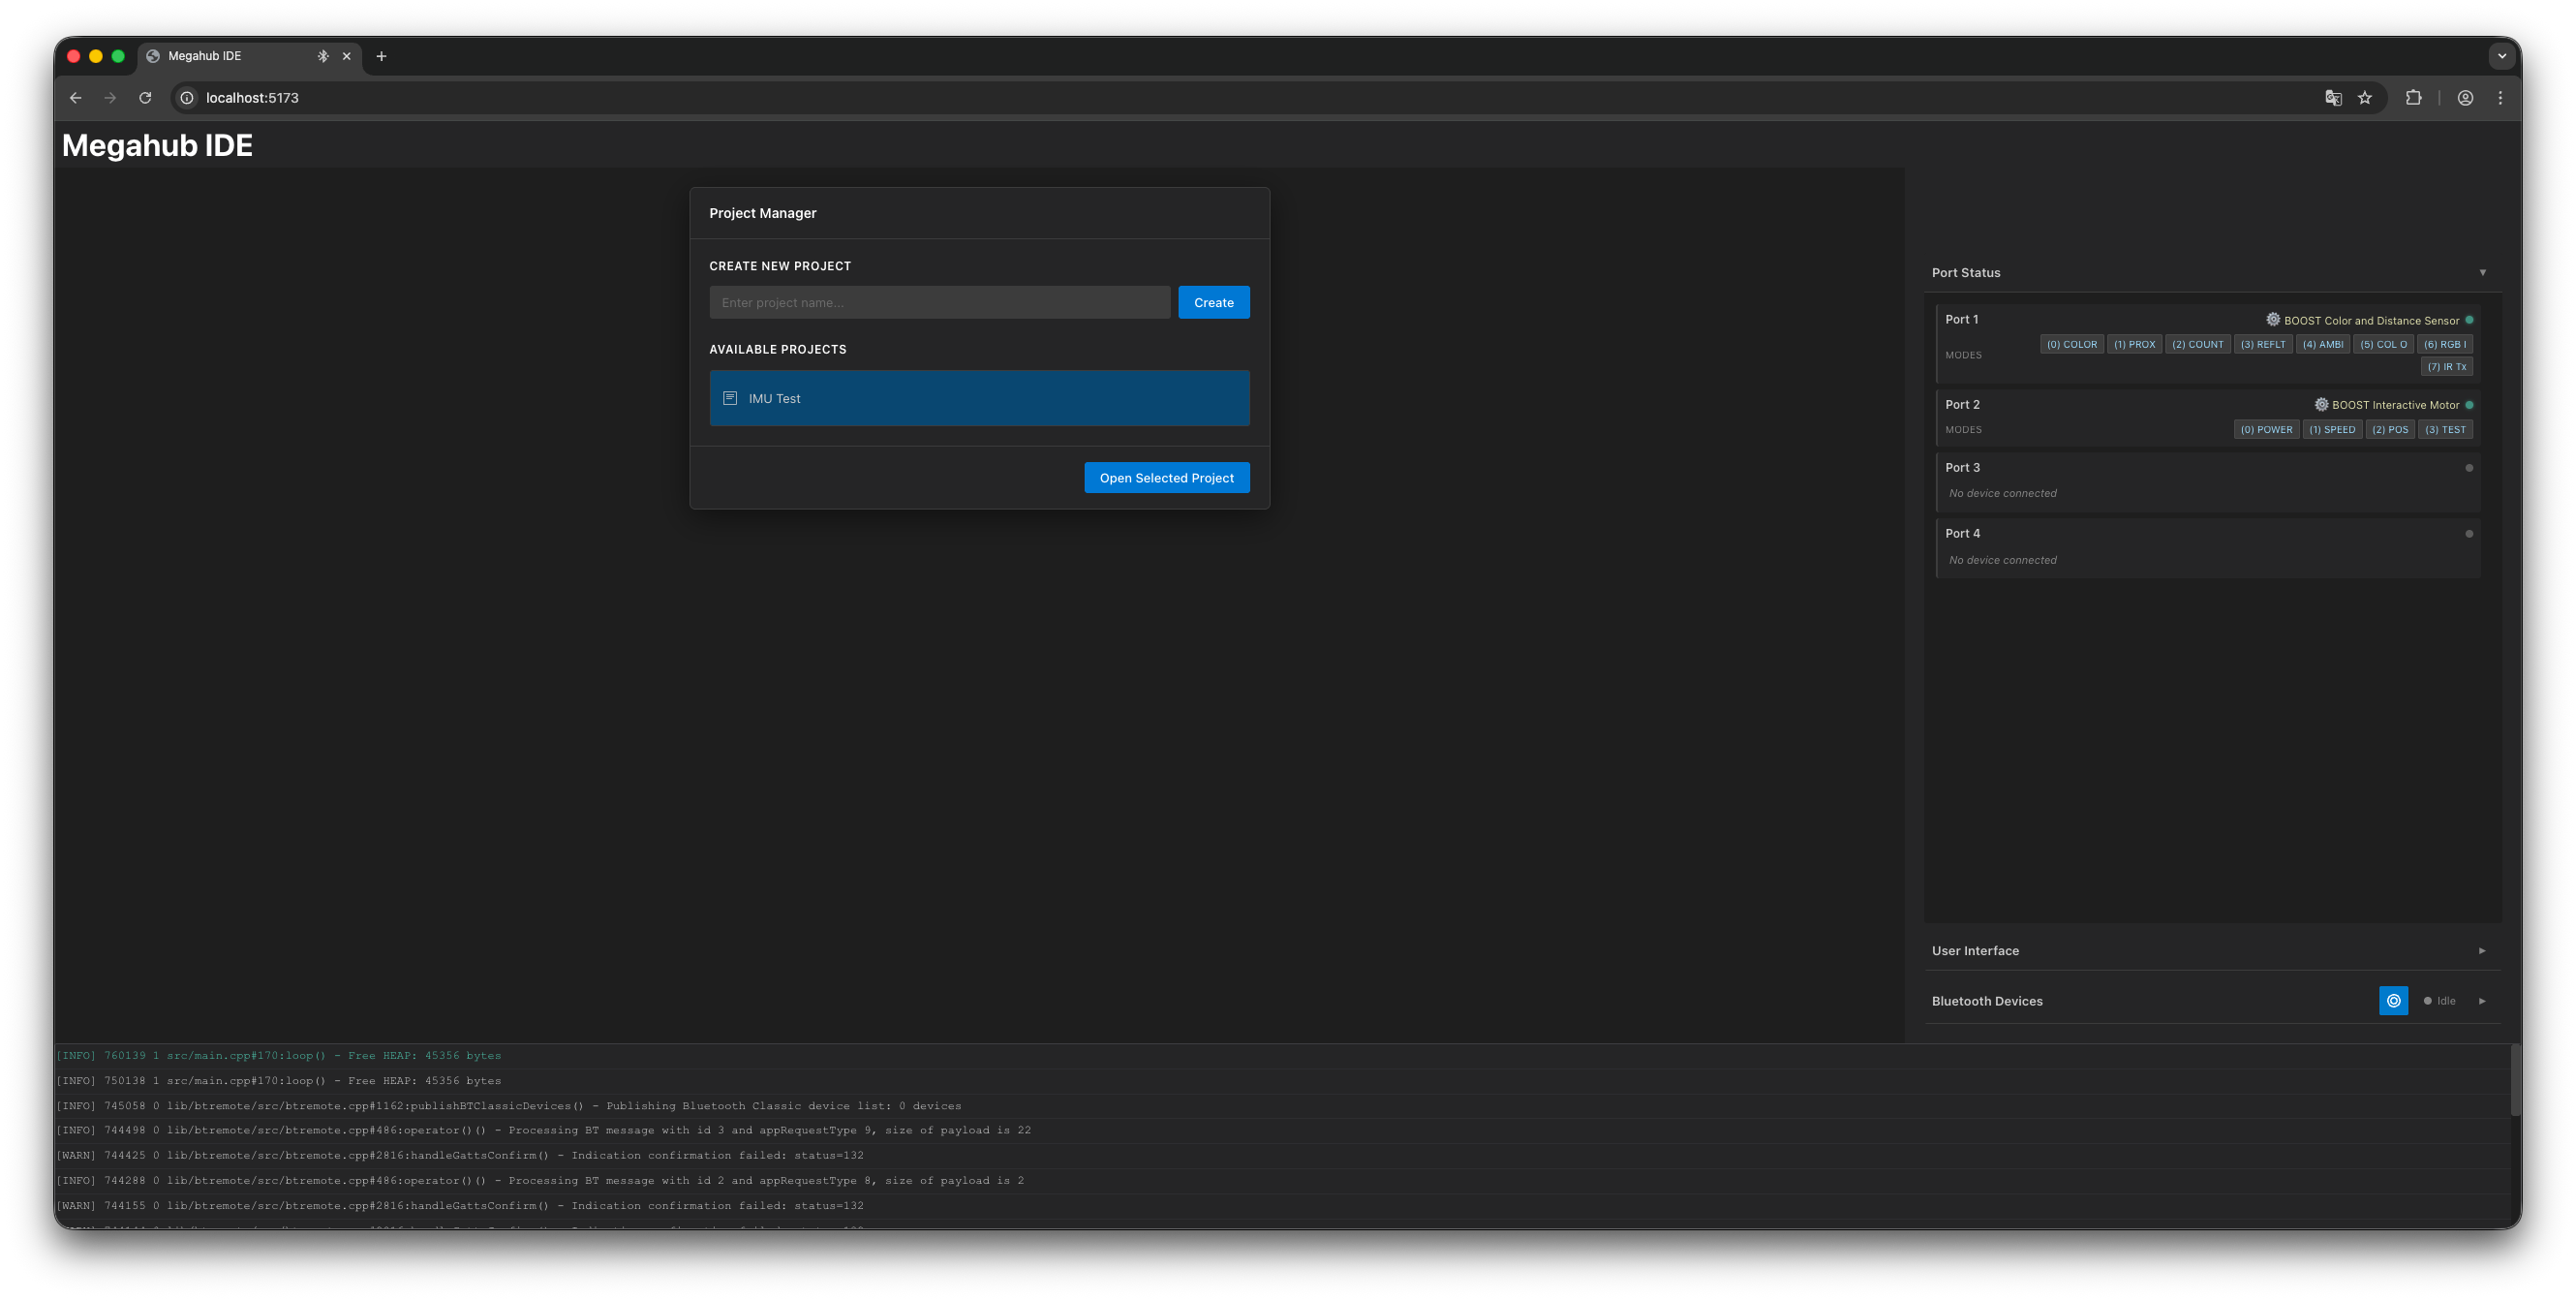
Project management
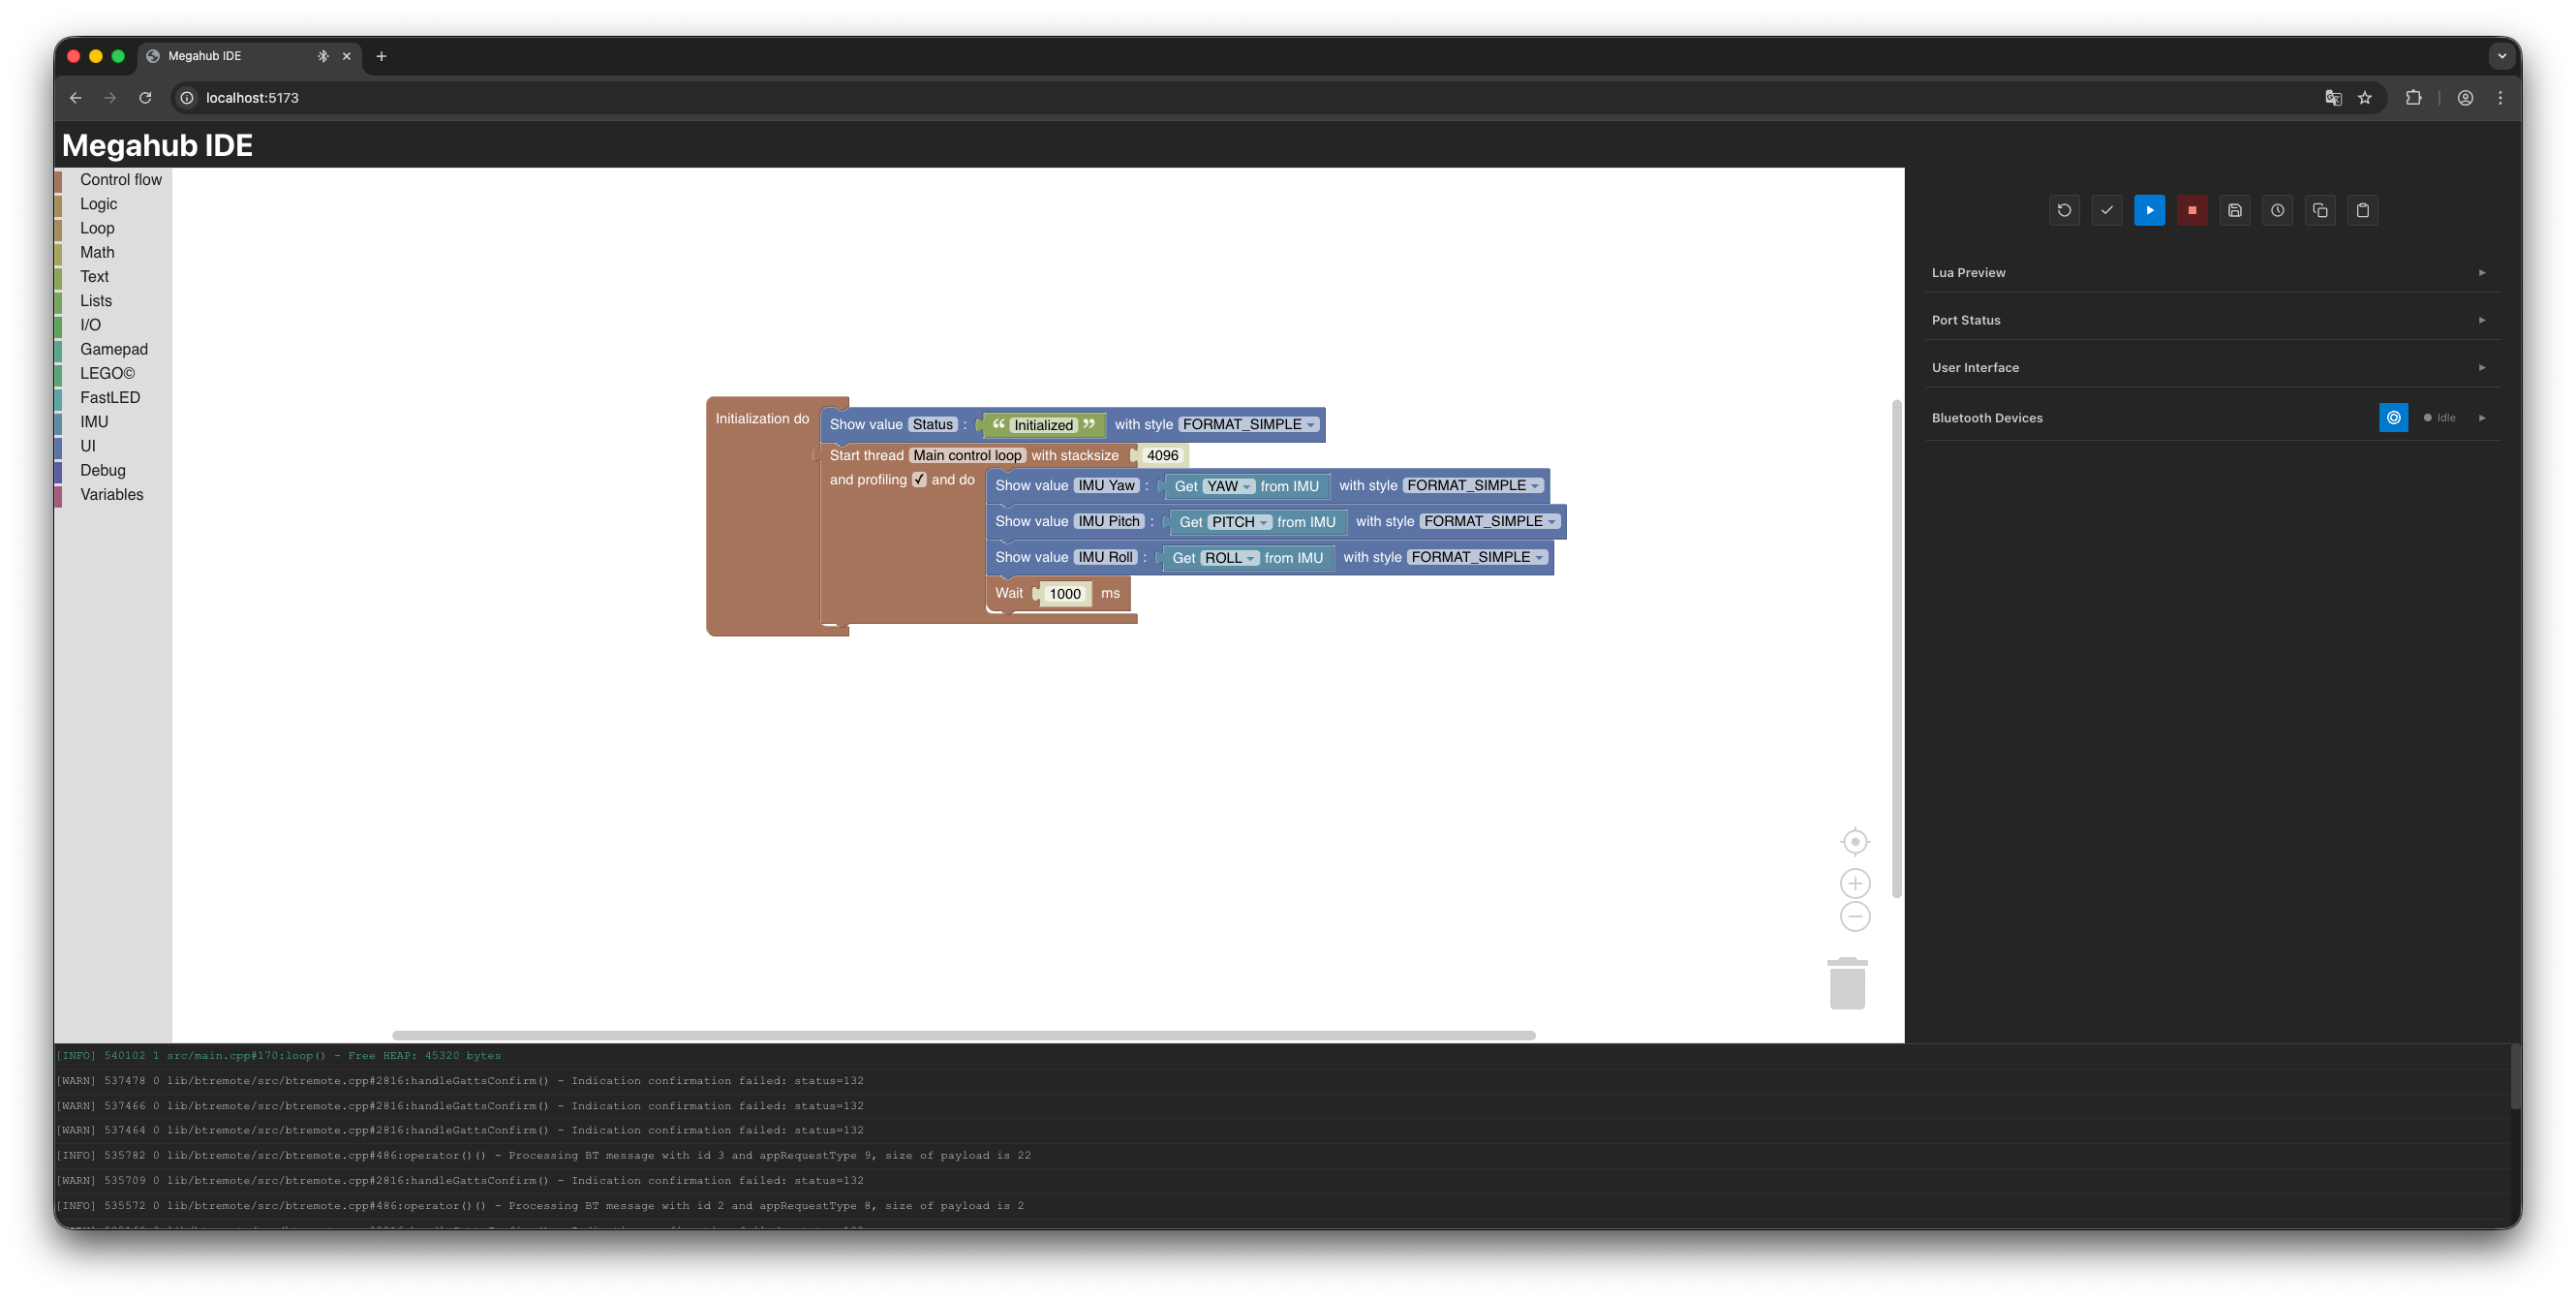
IMU interaction
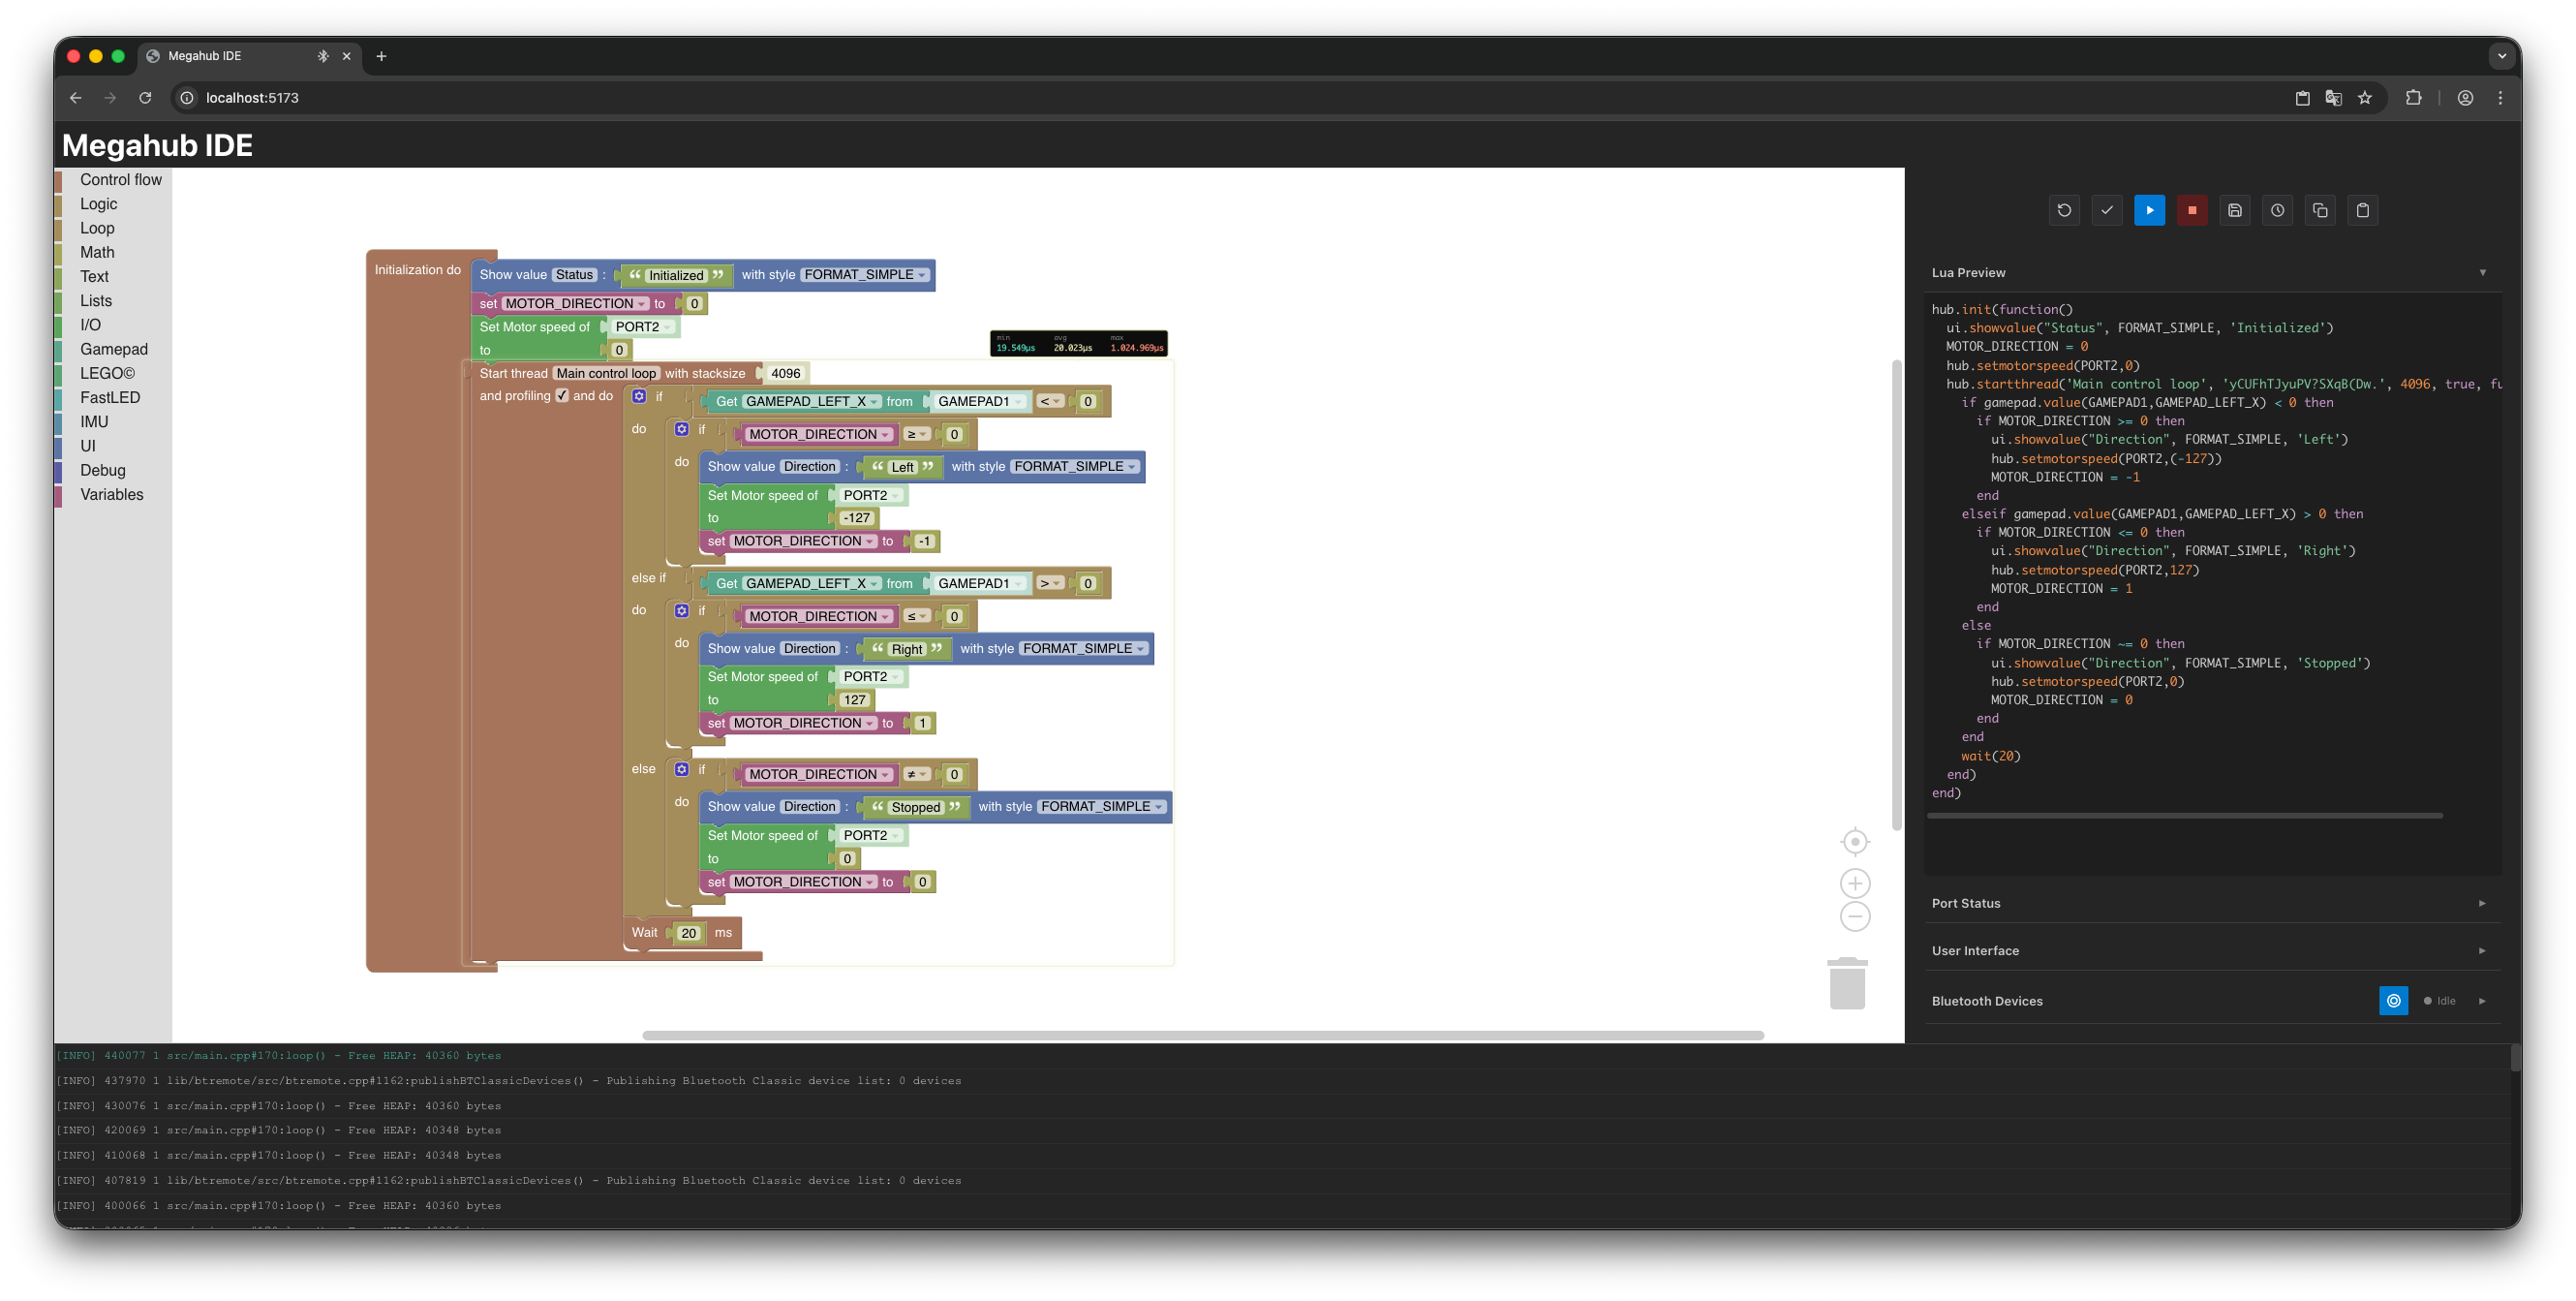
LEGO and Gamepad interaction
Clone the repository:
git clone https://github.com/mirkosertic/Megahub.git
cd Megahub
Build the project:
pio runOr click Build in the PlatformIO toolbar inside VSCode.
Connect the ESP32 board via USB.
Flash the firmware:
pio run --target uploadOr click Upload in the PlatformIO toolbar inside VSCode.
The device starts in Bluetooth mode by default.
View diagnostic output from the board:
pio device monitorDefault baud rate: 115200.
You can run the Megahub IDE locally in your browser without a physical board. This is useful for exploring the interface, building Blockly programs, and inspecting generated Lua code — no firmware flashing required.
cd frontend
npm install
npm run dev
Vite starts a local development server (typically at http://localhost:5173). Open that URL in any browser.
What works in dev mode:
What does not work:
Megahub provides 4 LEGO device ports, numbered 1 to 4. Each port uses the LEGO Powered Up UART protocol. Two SC16IS752 I2C-to-UART bridge chips translate between the ESP32 and the LEGO connectors: bridge chip 1 (UART1) drives ports 1 and 2, bridge chip 2 (UART2) drives ports 3 and 4. Each chip also exposes four additional GPIO pins (GP4–GP7) that can be used for custom sensors or buttons — see UART1_GP4–UART2_GP7 in LUAAPI.md. All four ports are available from Blockly.
Motor speed range: -127 (full reverse) to +127 (full forward). Zero stops the motor.
FastLED / NeoPixel output — use any of these GPIO pins for WS2812B LED strips: 13, 16, 17, 25, 26, 27, 32, 33.
SD card (SPI bus):
| Signal | GPIO |
|---|---|
| CLK | 18 |
| MOSI | 23 |
| MISO | 19 |
| CS | 4 |
IMU (I2C): The MPU6050 is connected to the I2C bus. Its address and pins are fixed in hardware.
Megahub supports LEGO WeDo 2.0 and Powered Up devices that communicate over the LEGO Powered Up UART (LUMP) protocol. This includes motors, color and distance sensors, tilt sensors, and other compatible devices. See the LUMP Protocol Documentation for the full technical specification.
The Megahub IDE runs entirely in your browser and communicates over BLE when the device is in Bluetooth mode.
Supported browsers: Chrome, Edge, Opera (desktop only). Firefox and Safari do not support the Web Bluetooth API and cannot connect to the device.
Steps:
The Blockly workspace lets you build programs visually without writing code.
For a visual reference of every available block, see BLOCKS.md.
The toolbox is divided into these categories:
| Category | What it contains |
|---|---|
| Control flow | Initialization block, Start thread, Wait, Stop thread |
| Logic | If/else, comparisons (=, ≠, <, >), AND/OR, NOT, boolean values |
| Loop | Repeat N times, count-for loop, break/continue |
| Math | Arithmetic, rounding, trigonometry, random numbers, constrain |
| Text | String operations; Print to Logger |
| Lists | Create, read, write, sort, and split lists |
| I/O | Set motor speed, GPIO read/write, pin mode, port selector |
| LEGO© | Select sensor mode on a port, read sensor dataset |
| Gamepad | Button pressed, analog axis values, connection check |
| FastLED | Initialize LED strip, set individual LED colour, show, clear |
| IMU | Read yaw, pitch, roll, or acceleration from the on-board sensor |
| UI | Display a labelled value in the IDE Logger panel, map visualization (plot position, clear) |
| Algorithms | PID controller (init/compute/reset), dead reckoning (init/update/get/reset/set pose), moving average filter, map/scale, hysteresis, debounce, rate limiter, 1D Kalman filter |
| Debug | Free heap memory, milliseconds since boot |
Common gotcha: The Set motor speed block is in the I/O category — not LEGO©. The LEGO© category only contains sensor blocks (selecting a measurement mode and reading the sensor dataset). If you want to drive a motor, open I/O.
You can mark a project as the autostart project. When the IDE connects to the device, it reads the autostart setting and opens that project automatically.
In the IDE project list, find the project you want and toggle the autostart switch. This writes the following file to the SD card:
{ "project": "your-project-id" }The file is stored at /autostart.json on the SD card. To clear the autostart selection, toggle the switch off in the IDE or delete the file from the SD card.
By default Megahub runs in Bluetooth mode. You can switch to WiFi mode to access the web interface over your local network.
config.json in the root of the SD card with the following content:
{
  "bluetoothEnabled": false,
  "wifiEnabled": true,
  "ssid": "YourNetwork",
  "pwd": "YourPassword"
}You can also run both Bluetooth and WiFi simultaneously by setting both bluetoothEnabled and wifiEnabled to true.
| Field | Type | Default | Description |
|---|---|---|---|
bluetoothEnabled | boolean | true | Enable BLE and Bluetooth Classic |
wifiEnabled | boolean | false | Connect to WiFi and start web server |
ssid | string | — | WiFi network name |
pwd | string | — | WiFi password |
Once the device is connected to WiFi:
http://<device-ip>/ in any browser, orhttp://<device-uid>.local/ (requires mDNS support — works on macOS, Linux, and Windows 10+)The web UI provides the same project management, Blockly programming, and execution features as the Bluetooth-connected IDE. For the full REST API reference used by the web server, see HUBAPI.md.
Scanning and pairing are done from the IDE while the device is connected in Bluetooth mode.
To remove a pairing, click Remove Pairing on the paired device entry in the panel.
Any Bluetooth Classic HID-compatible gamepad should work. The 8BitDo M30 has been tested and confirmed to work.
Gamepad input available in Blockly:
| Input | Range / Values |
|---|---|
| Buttons (1–16) | pressed / not pressed |
| D-pad | directional state |
| Left stick X/Y | -32768 to +32767 |
| Right stick X/Y | -32768 to +32767 |
The Gamepad category in the Blockly toolbox provides 5 blocks for reading button states, D-pad direction, and analog stick values. See BLOCKS.md for the full visual reference.
Megahub speaks the LEGO Powered Up UART protocol (LUMP) natively. Each of the 4 ports independently detects a connected device, negotiates its capabilities, and streams sensor data. Motors accept a speed value from -127 to +127. Sensors report values according to the mode you select in your Blockly program.
The LEGO category in the Blockly toolbox provides blocks for:
Motor speed is set using the Set motor speed block in the I/O category.
See LUMP.md for the complete protocol specification.
Connect a WS2812B LED strip to any of the supported GPIO pins (13, 16, 17, 25, 26, 27, 32, or 33). The FastLED category in the Blockly toolbox provides 4 blocks for:
The on-board MPU6050 provides 6-axis motion data, updated every 100 ms. Read it in Blockly using the IMU block:
| Output | Unit | Description |
|---|---|---|
| YAW | ° | Rotation around vertical axis |
| PITCH | ° | Forward/back tilt |
| ROLL | ° | Left/right tilt |
| ACCELERATION_X | m/s² | Acceleration along X axis |
| ACCELERATION_Y | m/s² | Acceleration along Y axis |
| ACCELERATION_Z | m/s² | Acceleration along Z axis |
The Algorithms category provides blocks for closed-loop control and position tracking.
PID controller: A proportional-integral-derivative controller for motor speed regulation, line following, or any closed-loop control. Uses an explicit lifecycle:
Store the handle from Init PID in a variable and pass it to PID compute in your control loop.
Dead reckoning (DR): Estimates the robot's (x, y, heading) pose by integrating wheel encoder ticks and IMU yaw. The following blocks are available:
| Block | Description |
|---|---|
Init DR | Creates a new dead reckoning instance and returns a handle. Call once before your main loop. |
DR update | Updates pose from left/right encoder ticks and IMU yaw. Takes 7 inputs: handle, left ticks, right ticks, yaw (deg), m/tick, wheelbase (m), IMU weight. Does not return a value. |
DR pose X/Y/HEADING of | Reads one component of the pose from a handle — X and Y in meters, HEADING in degrees. |
Reset DR pose of | Resets pose to origin (0, 0, 0°). Re-bootstraps encoder baselines so the next update produces zero delta. |
Set DR pose of | Injects a known (x, y, heading) position for landmark-based drift correction. |
Moving average filter: Smooths noisy sensor readings using a sliding window of the last N samples. Uses the same explicit handle pattern as PID and DR — call Initialize moving average once before your loop, store the handle in a variable, then pass it to Moving average on each update.
| Block | Description |
|---|---|
Initialize moving average | Creates a new moving average filter instance and returns a handle. Store in a variable. Call once before your loop. |
Moving average | Adds a new sample and returns the arithmetic mean of the last N values. Inputs: handle, sensor value, window size (2–50; default 10). On first call the buffer is pre-filled so there is no startup ramp. |
Map / Scale: Linearly maps a value from one numeric range to another. Stateless — no initialization required.
| Block | Description |
|---|---|
Map | Maps value from [inMin, inMax] to [outMin, outMax]. Equivalent to Arduino map() with float support. Output is not clamped — values outside the input range extrapolate linearly. |
LEGO motor POS mode prerequisite: DR reads absolute encoder positions. Before using DR blocks, call lego select mode with mode 2 (POS) on the motor ports in hub.init(), then wait briefly for the sensor to settle.
For a full explanation including the math, calibration procedure, coordinate conventions, and example programs, see DEADRECKONING.md.
Signal conditioning filters: Four filters for cleaning up noisy or jerky signals before they reach your control logic. All use the same explicit handle pattern as PID and DR.
| Block pair | Description |
|---|---|
Initialize hysteresis + Hysteresis | Schmitt trigger — output latches to 0 or 1, only switching when the input crosses a high or low threshold. Eliminates chatter at sensor boundaries. |
Initialize debounce + Debounce | Waits for a digital signal to be stable for a minimum number of milliseconds before updating output. Eliminates mechanical button bounce and contact noise. |
Initialize rate limiter + Rate limit | Limits how fast the output value can change per call, producing smooth acceleration ramps. Prevents wheel slip and encoder errors from sudden motor commands. |
Initialize Kalman filter + Kalman filter | 1D Kalman filter — weighted sensor smoothing based on process noise Q and measurement noise R. More principled than moving average for sensors with known noise characteristics. |
For intuition, math, tuning guidance, and pipeline examples, see FILTERS.md.
The IDE sidebar includes a live map panel that renders the robot's trail as it moves. Use the UI category blocks to drive it:
| Block | Description |
|---|---|
Map: plot position | Sends an (x, y, heading) pose to the map panel. Wire in DR get blocks for x, y, and heading. The firmware rate-limits sends to 5 Hz — call at any rate in your loop. |
Map: clear | Clears the trail from the map panel. Call this at the start of each run alongside Reset DR pose. |
Projects created in the IDE are saved to the SD card. The SD card connects over SPI (CLK=18, MOSI=23, MISO=19, CS=4). Use a standard microSD card formatted as FAT32. Configuration files (config.json, autostart.json) also live in the root of the SD card.
SD card is required. If the SD card is absent or fails to mount at boot, the device halts immediately and cannot start.
Understanding this sequence explains many "why isn't it working?" situations.
config.json is read from the SD card root. WiFi and/or Bluetooth are started based on its content.Autostart does not run a program at boot. The autostart setting only tells the IDE which project to navigate to when you connect. The device always starts with no program running — you must click Execute in the IDE to start a program.
hub.init() — runs synchronously and completes before anything else.hub.startthread() — each call spawns a background task that loops independently.If a Lua runtime error occurs inside a thread:
Key point: every time a program stops — by request, by crashing, or because a new Execute is sent — all motors stop and all ports reset. You never need to manually zero motors before stopping.
Connect the device via USB and run:
pio device monitorThe log (115200 baud) shows boot messages, port detection results, BLE connection events, and any errors from running Lua programs. Copy the relevant lines when reporting a bug.
| Document | Description |
|---|---|
| BLOCKS.md | Complete visual reference for all Blockly blocks, auto-generated with screenshots |
| LUAAPI.md | Lua scripting API — all modules, functions, and constants available in Megahub programs |
| BLEPROTOCOL.md | BLE protocol reference — GATT profile, framing, request/response and event formats |
| HUBAPI.md | REST API and Server-Sent Events reference for WiFi mode |
| LUMP.md | LEGO Powered Up UART protocol technical specification |
| MEGAHUBIDE.md | Frontend IDE architecture — module structure, state, events, components, testing |
| DEADRECKONING.md | Dead reckoning guide — intuition, kinematics, math, coordinate conventions, Blockly usage, and calibration |
| FILTERS.md | Signal conditioning filters guide — hysteresis, debounce, rate limiter, and 1D Kalman filter: intuition, math, tuning, and pipeline patterns |
| Qty | Value | Footprint | References |
|---|---|---|---|
| 4 | 1k | CustomFootprints:Resistor | R1, R2, R3, R4 |
| 4 | ~ | CustomFootprints:LegoWedoConnector | Port1, Port2, Port3, Port4 |
| 2 | ~ | CustomFootprints:DRV8833 | DRV8833_1, DRV8833_2 |
| 2 | ~ | CustomFootprints:SC16IS752 | SC16IS752_UART1, SC16IS752_UART2 |
| 1 | ESP32IO | CustomFootprints:Header_10x2 | ESP32IO1 |
| 1 | Port1Debug | CustomFootprints:Header_3x2 | J2 |
| 1 | Port2Debug | CustomFootprints:Header_3x2 | J3 |
| 1 | Port3Debug | CustomFootprints:Header_3x2 | J6 |
| 1 | Port4Debug | CustomFootprints:Header_3x2 | J7 |
| 1 | UART1_I2C_ADR | CustomFootprints:Header_4x2 | UART1_I2C_ADR1 |
| 1 | UART2_I2C_ADR | CustomFootprints:Header_4x2 | UART2_I2C_ADR1 |
| 1 | UARTIO | CustomFootprints:Header_6x2 | UARTIO1 |
| 1 | USBPWR | CustomFootprints:Jumper | USBPWR1 |
| 1 | ~ | CustomFootprints:MPU6050 | MPU6050 |
| 1 | ~ | CustomFootprints:BuckConverter | BuckConverter1 |
| 1 | ~ | CustomFootprints:SDCardReader | SDCardReader1 |
| 1 | ~ | Connector_JST:JST_PH_B2B-PH-K_1x02_P2.00mm_Vertical | U1 |
| 1 | ~ | CustomFootprints:ESP32DevKit | ESP32 |
It measures 97.5 × 96.7 mm and has 2 copper layers, 1.6 mm thick.
26 parts. The full list of its parts is on this page, with links to each part's symbol and footprint where PCBKit's library has them.
From the mirkosertic/Megahub repository on GitHub, at the commit this page was made from: the board is kicad/esp32_devkit/legoesp32.kicad_pcb and its schematic kicad/esp32_devkit/legoesp32.kicad_sch. PCBKit opens the board in the browser, with nothing to install.
Its repository states no licence, so its author keeps all rights: ask mirkosertic before reusing the design.

hackclub/OnBoard
💡 Join 1,000 teenagers and make your first PCB with a $100 grant!


harbaum/galagino
A Galaga, Pac-Man and Donkey Kong arcade emulator for the ESP32

Luos-io/luos_engine
Open-source and real-time orchestrator for cyber-physical-systems, to easily design, test and deploy embedded applications and digital twins.

google/walt
A device for measuring latency of physical sensors and outputs on phones and computers
