
2 layers101.5 × 83 mm

 hansrune/HeatPumpControl3
ESP32c3 board with IR blaster and serial ports for heat pump control over local WiFi with ESPHome or ESPEasy firmwares
HeatPumpControl is an open-source printed circuit board by hansrune, from the hansrune/HeatPumpControl repository on GitHub. It is a 2-layer board of 34.3 × 40.9 mm with 34 parts on 25 nets, routed with 155 tracks and 7 vias.
It is built around the 2N2222A. Its parts include 13 resistors, 10 diodes, 3 connectors, 2 ICs and 1 capacitor. It belongs with the home automation and IoT and radio and wireless boards and the ESP32 boards of this library.
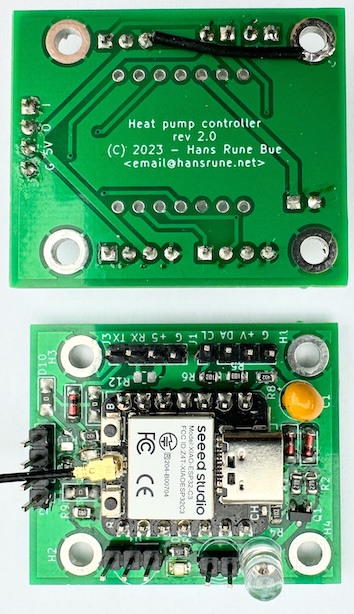
A small generic mini IO based on ESP32c3. This one has an IR blaster, IR receiver, and serial port with a simple 5V - 3.3V level shifter suitable for Mitsubishi CN105 port. Other ESP32c3 pins are available with pin headers for I2C, 1-wire, and other general purposes
This small IO board was made to easily fit inside a small DYI box, a heat pump or other.
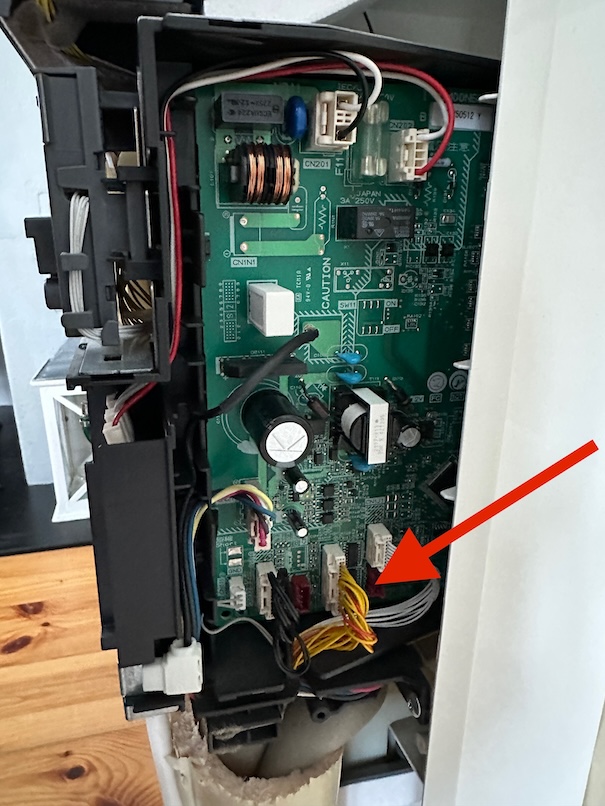
For Mitsubushi heat pumps, the CN105 connector is used for serial port communications and for power supply.
Some of the main features and benefits
The version 2.0 PCB needs an extra grounding wire if you use the IR receiver ground pin:
The wiring for a Mistubushi heat pump:
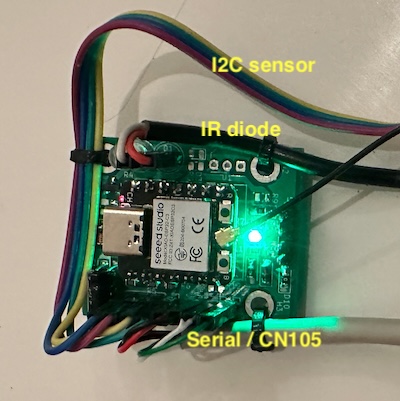
A visible LED can be used in series with the IR LED - just in case you want to see the activity
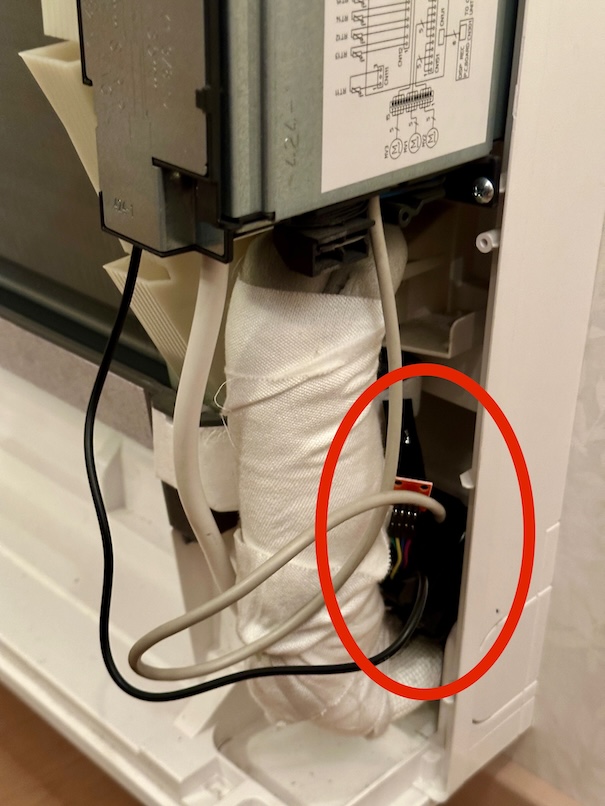
Any small platic DYI box that fits easily inside the heat pump should do:
The serial port - CN105 - on our Mitsubishi heat pumps:
The IR sender led fits inside the receiver housing:
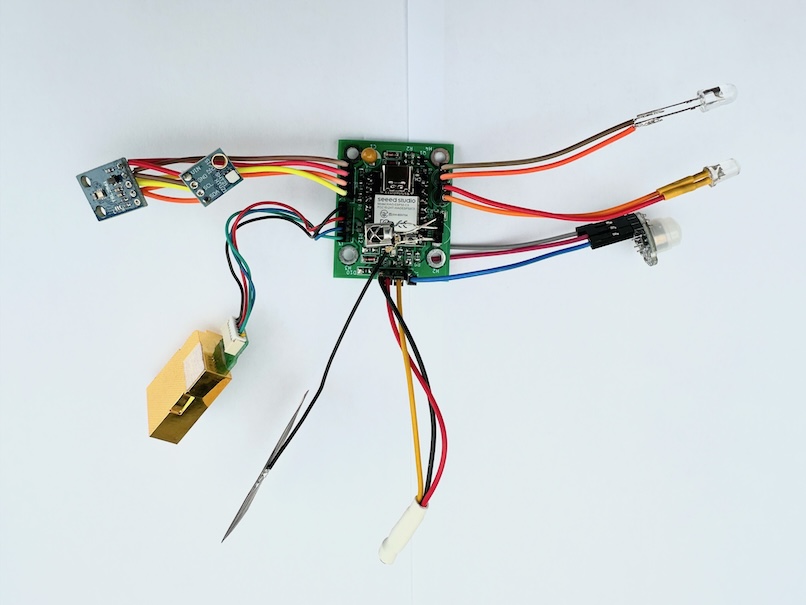
The same PCB can be used for many other purposes. Here is for a firmware build test with CO2 sensor, I2C temp/humid and light, PIR sensor and a 1-wire temp sensor
The schematic diagram is available here. The KiCad EDA project is in the same folder
| PIN | Capabilty | Function |
|---|---|---|
| GPIO2 | Pulled up | N/A |
| GPIO3/A1 | Generic IO | On IR receiver pin header |
| GPIO4 | Actice high out | IR sender |
| GPIO5 | Generic IO | Pull-up possible |
| GPIO6 | I2C | SDA |
| GPIO7 | I2C | SCL |
| GPIO9 | Active low out | Internal status LED |
| GPIO10 | Generic IO | Pull-up possible |
| GPIO20 | RX | Serial to heatpump TX |
| GPIO21 | TX | Serial to heatpump RX |
This project uses my KiCad-lib-ESP32 repository as a git submodule. To check this out, use the following:
git clone --recurse-submodules https://github.com/hansrune/HeatPumpControl.git This project uses the Seed Studio XIAO ESP32C3 RISC-V module. This tiny device has proven to be more reliable than most ESP8266 modules. This module also comes with an IPX connector for an external antenna, and is delivered with a simple external antenna for good range.
5V power can be supplied over USB-C or the serial port pin headers
For more information, use this KiCad BOM
Soldering a prototype by hand is possible if you have a steady hand and a small solder iron tip. A microscope is recommended to propely inspect the solder joints.
Recommend to do the SMD parts first, then other components.
The version 2.0 PCB has some flaws that fairly easy to work around:
This project is licensed under the GNU General Public License v3.0 for the software, CERN-OHL-W for the hardware, and CC BY-SA for the documentation and ideas.

| Qty | Value | Footprint | References |
|---|---|---|---|
| 6 | 1N4148 | Diode_SMD:D_MiniMELF | D4, D5, D7, D8, D9, D10 |
| 6 | 4k7 | Resistor_SMD:R_0805_2012Metric | R8, R9, R10, R11, R12, R13 |
| 4 | MountingHole_Pad | MountingHole:MountingHole_3.2mm_M3_ISO14580_Pad | H1, H2, H3, H4 |
| 3 | Conn_01x04_Male | Connector_PinHeader_2.54mm:PinHeader_1x04_P2.54mm_Vertical | J1, J2, J3 |
| 2 | 10k | Resistor_SMD:R_0805_2012Metric | R5, R6 |
| 2 | 27 | Resistor_SMD:R_0805_2012Metric | R1, R2 |
| 2 | IR LED | LED_THT:LED_D5.0mm_Clear | D1, D2 |
| 2 | ~ | LED_SMD:LED_0805_2012Metric | D3, D6 |
| 1 | 1.2k | Resistor_SMD:R_0805_2012Metric | R4 |
| 1 | 10uF | Capacitor_THT:CP_Radial_D5.0mm_P2.50mm | C1 |
| 1 | 2N2222A | Package_TO_SOT_SMD:SOT-23 | Q1 |
| 1 | 430 | Resistor_SMD:R_0805_2012Metric | R7 |
| 1 | 470 | Resistor_SMD:R_0805_2012Metric | R3 |
| 1 | SeedStudio XIAO ESP32 C3 v1 | LOCAL1:XIAO_ESP32C3_THT | U2 |
| 1 | TSOP23xx | OptoDevice:Vishay_MOLD-3Pin | U1 |
It measures 34.3 × 40.9 mm and has 2 copper layers, 1.6 mm thick.
34 parts, built around the 2N2222A. The full list of its parts is on this page, with links to each part's symbol and footprint where PCBKit's library has them.
From the hansrune/HeatPumpControl repository on GitHub, at the commit this page was made from: the board is KiCad/HeatPumpControl.kicad_pcb and its schematic KiCad/HeatPumpControl.kicad_sch. PCBKit opens the board in the browser, with nothing to install.
Its repository states no licence, so its author keeps all rights: ask hansrune before reusing the design.

lynchaj/rhyophyre
Single Board Computer featuring Zilog Z180 processor and NEC µPD7220 Graphics Display Controller

alvaroalea/QL_QsoundQprint_clone
A clone board of the Sound card for the Sinclair QL Computer.

profdc9/NixieClock
A Nixie clock that uses IN-14 tubes and very generic components that can be easily sourced.

jensma-de/MM58167-ISA-RTC
RTC module for the ISA slot. With schematics, project files in kicad and open source software to drive the clock.


gidim/e61-gauge
An analog temperature gauge for E61 espresso machines. A custom PCB drives a VID6606 stepper motor gauge needle, reading temperature from an NTC thermistor.

cnobile2012/Li-IonBatteryProtection
Circuit to protect Li-Ion and Li-Po batteries at the cell level.