2 layers156.5 × 67.5 mm
NixieScanDisplay
profdc9/NixieClock
A Nixie clock that uses IN-14 tubes and very generic components that can be easily sourced.
106 parts10

 hansrune/BallValveController4
Ball valve controller for irrigation, water automations and leak prevention. Supports CR05 feedback wiring. Based on ESP32c3. ESPEasy and ESPHome based firmware build instructions included
BallValveController is an open-source printed circuit board by hansrune, from the hansrune/BallValveController repository on GitHub. It is a 2-layer board of 55.6 × 43.2 mm with 46 parts on 29 nets, routed with 216 tracks and 3 vias.
It is built around the L7805 and 2N2222A. Its parts include 13 resistors, 11 connectors, 8 diodes, 4 capacitors and 2 ICs. It belongs with the home automation and IoT and audio and music boards and the ESP32 boards of this library.


A DYI ball valve controller for CR05 wiring based on ESP32c3. This device is mainly intended for irrigation and main water valve automation, but is also very suitable for water leak prevention. For safety, a battery helps make sure the device returns to its default state upon reset or power failure. The device can be directly controlled to the default state by external signals such as a local water leak sensor, or you can use your home automation system to cut off water supply based on more advanced conditions.
The default state can be normally open or normally closed, and is automatically detected on restart. The safety battery voltage is also monitored and available to read remotely.
This board is tested with ESPhome and ESPEasy firmware (build instructions below), and is easily used with home automation systems that support MQTT auto discovery, the native Home Assistant API, and the many controllers that ESPEasy supports
Some of the main features and benefits
A typical small electic junction box is used for an easy and affordable way for housing the PCB and battery. These boxes often also support using glands for humidity protection and strain releave.
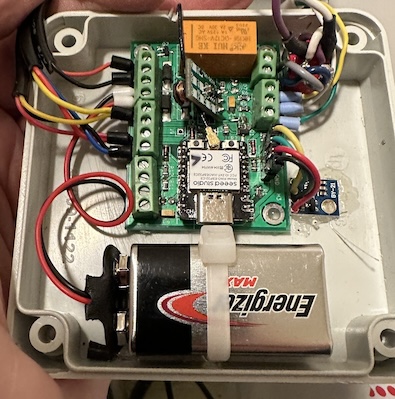
Please note the positioning of the battery. The battery can be easily removed to provide room for a USB-C cable connection, in case an OTA update should fail. Failure to OTA is usually recovered by a power cycle, but bugs in OTA libaries need a physical connection for recovery.
The switch (see wiring below) is used to select between normally open and normally closed operation. As the ball valve will return to it's default position during reset, the valve position feedback switches are used to automatically determine if the setup is normally open or normally closed.
One of my permanent setups look like this:
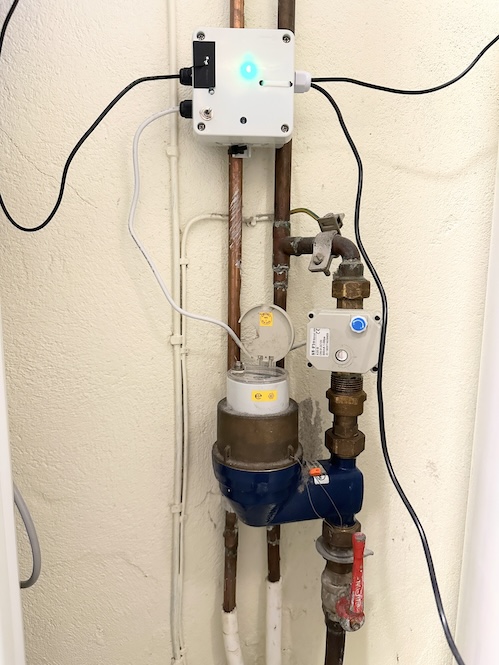
... where the 1-wire sensors are attached to top and bottom of our electric water boiler.
The 5mm LEDs are suggested to be reverse mounted for the following purposes:
The easiest way to view the controller is probably this block level wiring diagram:
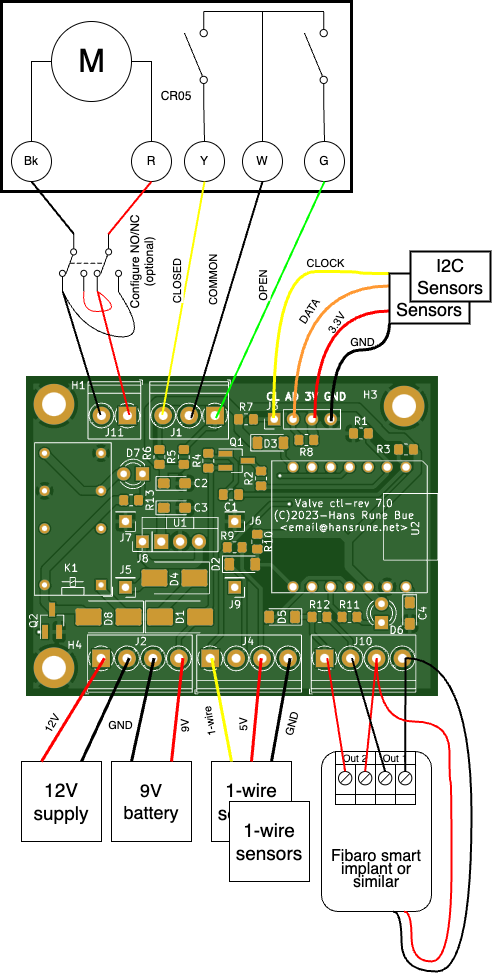
This is just a typical setup for the various external components. The schematic diagram is available here. The KiCad EDA project is in the same folder
If you use more than one 1-wire sensor, it is easier in ESPHome to use both inputs (RX+TX in diagram) with automatic sensor address detection.
| PIN | Capabilty | Function |
|---|---|---|
| GPIO2 | Active low out | Activate battery read |
| GPIO3/A1 | Analog in | Battery read input |
| GPIO4 | Active low in | Valve open |
| GPIO5 | Active low in | Valve closed |
| GPIO6 | I2C | SDA |
| GPIO7 | I2C | SCL |
| GPIO9 | Active low out | Internal status LED |
| GPIO10 | Active high out | Valve activate to non-default state |
| GPIO20 | RX / 1-wire | Serial or 1-wire sensor |
| GPIO21 | TX / 1-wire | Serial or 1-wire sensor |
J10 is used to interface leak detectors:
| PIN | Name | Function |
|---|---|---|
| 1 | Activate | Pull high to force non-default state |
| 2 | Deactivate | Battery read input |
| 3 | Vcc | Supply voltage, 3.3V, 5V or 12V strap |
| 4 | GND | Ground |
A Fibaro implant may be associated with Fibaro leak detector(s). This type of device to device can work even without the Z-Wave hub being operational
VCC - strap JP1 to the 12V supply as illustrated here, or just feed the Implant directly from the 12V power supplyDeactivate - connect to one side of Out1 - the other side to GNDGND for implant power and Out1Typical Arduino water leak detectors are open collector outputs. Connect as follows:
VCC - strap/solder JP1 to the 3.3V side for sensor powerDeactivate - connect to sensor output. This will force the valve to default state when activatedGND - sensor power groundThis project uses my KiCad-lib-ESP32 repository as a git submodule. To check this out, use the following:
git clone --recurse-submodules https://github.com/hansrune/BallValveController.git This project uses the Seed Studio XIAO ESP32C3 RISC-V module. This tiny device has proven to be more reliable than most ESP8266 modules used in earlier versions. This module also comes with an IPX connector for connecting an external antenna, and is delivered with a simple external antenna for good range. This device is also EMI shielded and certified.
A ball valve like these HSH-FLO valves uses metal gears, and also have a manual override possibility. Despite the moderate cost, I have found them very reliable. Manufacturer claims 100k operations. I typically use a 2 or some times 3-port version, size 3/4" DN20, DC12/24V and with CR05-01 wiring, including a manual overrride whell option.
Any available 12V DC power supply delivering 1A or more should do.
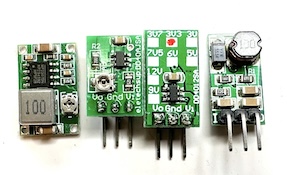
There are many options and possible pinouts for DC-DC converters for the 12V to 5V conversion. A linear regulator (L7805) will need a heatsink, so a DC-DC converter is recommended.
The MOSFETs need a low Vgs trigger voltage, i.e. well under 3V on full load. I have used Si2301/A1SHB for the P-channel, and Si2302/N025P for the N-channel, and 2N2222/1P - all SOT-23 packages.
Resistors are 0805 size. Screw terminals are 3.5mm, which is a tight fit when ferrules are being used.
For more information, use this KiCad BOM
Soldering a prototype by hand is possible if you have a steady hand and a small solder iron tip. A microscope is recommended to inspect the solder joints properly.
Recommend to do the SMD parts first, then other components. I prefer to mount the 5mm LEDs on the back side.
You should test at least the following before adding the ESP32 module:
ESPHome firmware can be set up from this ESPHome configuration repository using the test_ball_valve as a template
Follow the README for instructions on what you will likely want to change.
By default, MQTT auto discovery is being used. This should work out of the box with Home Assistant, Domoticz and other that support Home Assistant MQTT Auto Discovery
In Home Assistant, the device has these controls:
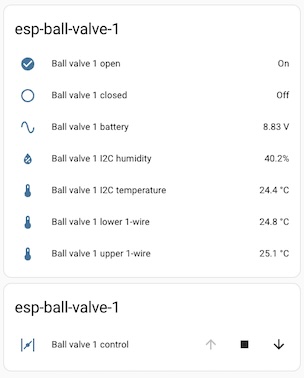
... and information / diagnostics panel:
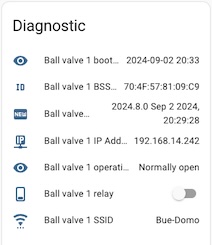
ESPEasy can be used with a number of different controllers / home automation systms. A custom firmware build description is available here
ESPEasy requires many settings. For configuration settings and rule files, you can upload the files from this page as a starting point. Please make sure to change name, unit number, controller IP addresses, NTP, syslog host and latitude/longitude. This configuration uses both a MQTT controller and a Domoticz controller. Change to what you need.
A Fibaro Smart implant needs a 9-30V power supply. To accomodate that, you can supply 12V by running a wire on the back of the PCB as follows:
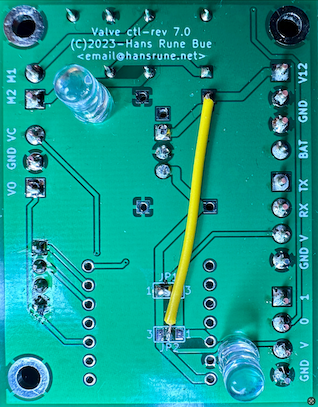
... or just connect to the 12V input terminal
This project is licensed under the GNU General Public License v3.0 for the software, CERN-OHL-W for the hardware, and CC BY-SA for the documentation and ideas.
| Qty | Value | Footprint | References |
|---|---|---|---|
| 5 | Conn_01x01_Male | Connector_PinHeader_2.54mm:PinHeader_1x01_P2.54mm_Vertical | J5, J6, J7, J8, J9 |
| 4 | 10k | Resistor_SMD:R_0805_2012Metric_Pad1.20x1.40mm_HandSolder | R3, R4, R7, R8 |
| 4 | 4.7k | Resistor_SMD:R_0805_2012Metric_Pad1.20x1.40mm_HandSolder | R5, R6, R9, R10 |
| 3 | 10uF | Capacitor_Tantalum_SMD:CP_EIA-3216-18_Kemet-A_Pad1.58x1.35mm_HandSolder | C2, C3, C4 |
| 3 | 1N4007 | Diode_SMD:D_SMB_Handsoldering | D1, D4, D8 |
| 3 | 1N4148 | Diode_SMD:D_MiniMELF | D2, D3, D5 |
| 3 | MountingHole_Pad | MountingHole:MountingHole_3.2mm_M3_ISO14580_Pad | H1, H3, H4 |
| 3 | Screw_Terminal_01x04 | TerminalBlock_Phoenix:TerminalBlock_Phoenix_PT-1,5-4-3.5-H_1x04_P3.50mm_Horizontal | J2, J4, J10 |
| 2 | LED | LED_THT:LED_D3.0mm_Clear | D6, D7 |
| 2 | SolderJumper_3_Open | Jumper:SolderJumper-3_P1.3mm_Open_Pad1.0x1.5mm_NumberLabels | JP1, JP2 |
| 1 | 1k | Resistor_SMD:R_0805_2012Metric_Pad1.20x1.40mm_HandSolder | R12 |
| 1 | 270 | Resistor_SMD:R_0805_2012Metric_Pad1.20x1.40mm_HandSolder | R11 |
| 1 | 2N2222A | Package_TO_SOT_SMD:SOT-23_Handsoldering | Q2 |
| 1 | 33k | Resistor_SMD:R_0805_2012Metric_Pad1.20x1.40mm_HandSolder | R1 |
| 1 | 68k | Resistor_SMD:R_0805_2012Metric_Pad1.20x1.40mm_HandSolder | R2 |
| 1 | 910 | Resistor_SMD:R_0805_2012Metric_Pad1.20x1.40mm_HandSolder | R13 |
| 1 | C_Small | Capacitor_SMD:C_0805_2012Metric_Pad1.18x1.45mm_HandSolder | C1 |
| 1 | G5V-2 | Relay_THT:Relay_DPDT_Omron_G5V-2 | K1 |
| 1 | L7805 | Package_TO_SOT_THT:TO-220-3_Vertical | U1 |
| 1 | Q_PMOS_GDS | Package_TO_SOT_SMD:SOT-23_Handsoldering | Q1 |
| 1 | Screw_Terminal_01x02 | TerminalBlock_Phoenix:TerminalBlock_Phoenix_PT-1,5-2-3.5-H_1x02_P3.50mm_Horizontal | J11 |
| 1 | Screw_Terminal_01x03 | TerminalBlock_Phoenix:TerminalBlock_Phoenix_PT-1,5-3-3.5-H_1x03_P3.50mm_Horizontal | J1 |
| 1 | Screw_Terminal_01x04 | Connector_PinHeader_2.54mm:PinHeader_1x04_P2.54mm_Vertical | J3 |
| 1 | SeedStudio XIAO ESP32 C3 v1 | LOCAL1:XIAO_ESP32C3_THT | U2 |
It measures 55.6 × 43.2 mm and has 2 copper layers, 1.6 mm thick.
46 parts, built around the L7805 and 2N2222A. The full list of its parts is on this page, with links to each part's symbol and footprint where PCBKit's library has them.
From the hansrune/BallValveController repository on GitHub, at the commit this page was made from: the board is KiCad/BallValveController.kicad_pcb and its schematic KiCad/BallValveController.kicad_sch. PCBKit opens the board in the browser, with nothing to install.
Its repository states no licence, so its author keeps all rights: ask hansrune before reusing the design.
profdc9/NixieClock
A Nixie clock that uses IN-14 tubes and very generic components that can be easily sourced.


hansrune/RelayBoardX3
3x relay board used for garage door control and ventilator motors

jastikai/Embedded-System-Project
Repository for Embedded System Project course of University of Oulu, Spring 2024.


lynchaj/rhyophyre
Single Board Computer featuring Zilog Z180 processor and NEC µPD7220 Graphics Display Controller