6 layers38.1 × 38.1 mm

 adamm/starman3
Starman Christmas Tree Topper PCB
Starman is an open-source printed circuit board by adamm, from the adamm/starman repository on GitHub. It is a 4-layer board of 182 × 150 mm with 248 parts on 259 nets, routed with 1,920 tracks and 241 vias.
It is built around the ESP32-S3-MINI-1-N8, PAM8302AASCR and BA33BC0FP-E2, with the M20-8771246, PH2-06-UA and PJ-063AH among its other parts. Its parts include 145 diodes, 40 capacitors, 26 resistors, 13 ICs and 12 connectors. It belongs with the lEDs and displays boards and the ESP32 boards of this library.


Disclaimer: This work is a work-in-progress. While this project is still under active development, version 2.1 was released December 1st, 2022. What you see here is code that is largely incomplete, buggy, crashes, and could catch fire. The PCB board is largely inefficient, expensive, broken, and could catch fire.
Version 1 of the star is a POC I created a few years ago which was literally a 3d-printed star with 24 LEDs hot-glued onto it, driven by a LED PWM module from Adafruit, 3 PWM channels for audio, running from an Arduino Uno.
Version 2 is a complete redesign for 2022, including a custom PCB, 144 LEDs, 235 components, ESP32-S3 MCU, esp-idf framework, and WiFi/Bluetooth support. Audio is driven by 4 PWM channels, featuring a volume control and a class-D amplifier.
Version 2.1 includes over-the-air firmware updates. I plan on releasing new themes and songs every Holiday season.
As of December 2023, there are 7 themes and 81 arranged songs.
[!NOTE] I'll be demoing the Starman project, as well demoing its build process at Calgary Maker Faire, May 4 & 5 2024. Come talk to me if you are interested in purchasing a pre-built Starman for Christmas 2024!
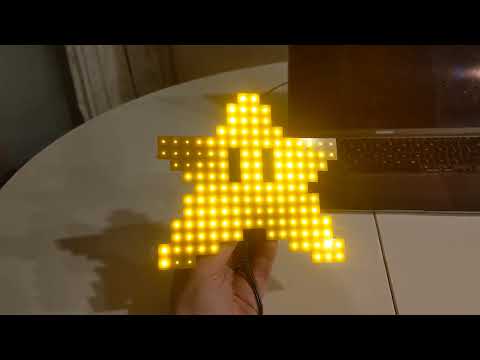
You can see v2 in action here: https://www.youtube.com/watch?v=h6fquYPDars
The PCB is created using KiCad:
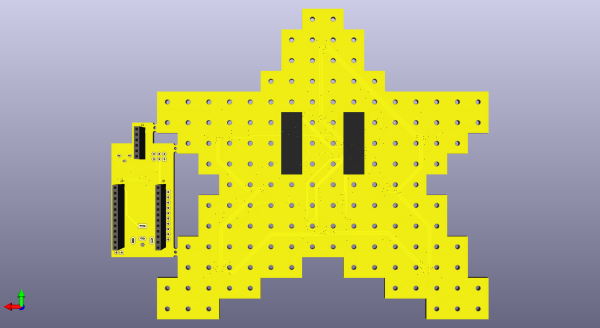
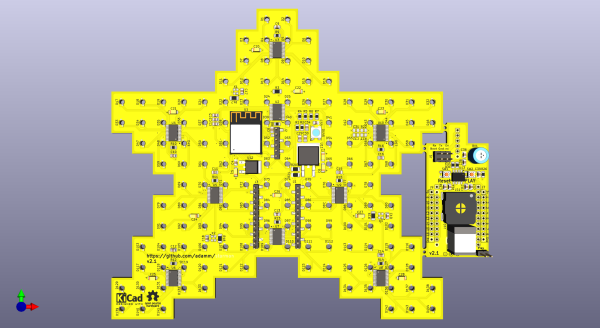
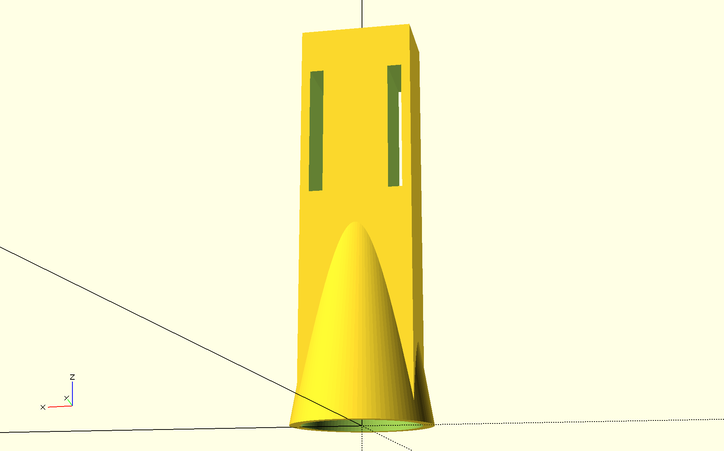
The sound module connects to the spine of the star through 20mm pin socket risers. Finally, a 3d-printed mount secures the display to the christmas tree's top branch via the risers:
I plan on producing 10 units for friends and family for Christmas 2022. Right now the costs are too high to mass produce, so perhaps sometime in 2023 I can simplify the design and cut costs for general orders.
If you ever want to factory reset Starman, follow this procedure:
2022-09-01
2022-09-25
2022-09-27
2022-09-29
2022-10-09
2022-10-29
2022-11-02
2022-11-27
ESP32-S3-Mini module
9x LED1642GW drivers
144 OSRAM LY P47 2mm LEDs
PAM8302A amplifer
239 total components (35 unique)
Translate MIDI to Playtune C array
| Qty | Value | Footprint | References |
|---|---|---|---|
| 144 | LED | starman:LED_Osram_Lx_P47F_D2mm_ReverseMount | D1, D10, D11, D100, D101, D102, D103, D104, D105, D106, D107, D108, D109, D110, D111, D112 +128 |
| 18 | 1uF | Capacitor_SMD:C_0805_2012Metric | C3, C4, C10, C11, C12, C13, C14, C15, C16, C17, C18, C19, C33, C35, C36, C39 +2 |
| 9 | 11k | Resistor_SMD:R_0805_2012Metric | R8, R9, R10, R11, R12, R13, R14, R15, R16 |
| 9 | 47uF | Capacitor_Tantalum_SMD:CP_EIA-3216-10_Kemet-I | C20, C21, C22, C23, C24, C25, C26, C27, C28 |
| 9 | LED1642GWTTR | Package_SO:TSSOP-24_4.4x7.8mm_P0.65mm | U2, U3, U4, U5, U6, U7, U8, U9, U10 |
| 4 | 500k | Resistor_SMD:R_1206_3216Metric | R3, R17, R18, R19 |
| 4 | 75 | Resistor_SMD:R_0805_2012Metric | R4, R5, R6, R7 |
| 3 | 10uF | Capacitor_Tantalum_SMD:CP_EIA-3216-10_Kemet-I | C5, C6, C40 |
| 3 | ECS-2333-300 | Oscillator:Oscillator_SMD_ECS_2520MV-xxx-xx-4Pin_2.5x2.0mm | X1, X2, X3 |
| 2 | 0.1uF | Capacitor_SMD:C_0805_2012Metric | C29, C34 |
| 2 | 100 | Resistor_SMD:R_0805_2012Metric | R24, R25 |
| 2 | 100 nc | Resistor_SMD:R_0805_2012Metric | R22, R23 |
| 2 | 100pF nc | Capacitor_SMD:C_0805_2012Metric | C31, C32 |
| 2 | 10k | Resistor_SMD:R_0805_2012Metric | R1, R2 |
| 2 | 10uF | Capacitor_SMD:C_0805_2012Metric | C1, C2 |
| 2 | 220pF | Capacitor_SMD:C_0805_2012Metric | C37, C38 |
| 2 | Conn_01x10 | Connector_PinHeader_2.54mm:PinHeader_1x10_P2.54mm_Vertical | J7, J9 |
| 2 | Conn_02x01 | Connector_PinHeader_2.54mm:PinHeader_1x02_P2.54mm_Vertical | J11, J12 |
| 2 | ESW-112-44-T-S | Connector_PinSocket_2.54mm:PinSocket_1x12_P2.54mm_Vertical | J6, J8 |
| 2 | FerriteBead | Capacitor_SMD:C_0805_2012Metric | FB1, FB2 |
| 2 | M20-8771246 | Connector_PinHeader_2.54mm:PinHeader_1x12_P2.54mm_Vertical_SMD_Pin1Right | J1, J3 |
| 2 | PTS810 SJM 250 SMTR LFS | Button_Switch_SMD:SW_SPST_PTS810 | SW1, SW2 |
| 1 | 10k | Potentiometer_THT:Potentiometer_Bourns_3339P_Vertical | RV1 |
| 1 | 1k | Resistor_SMD:R_0805_2012Metric | R26 |
| 1 | 22uF | Capacitor_SMD:C_0805_2012Metric | C30 |
| 1 | 22uF | Capacitor_Tantalum_SMD:CP_EIA-3216-10_Kemet-I | C7 |
| 1 | 250 | Resistor_SMD:R_1206_3216Metric | R21 |
| 1 | 750 | Resistor_SMD:R_1206_3216Metric | R20 |
| 1 | AZ1084CS2-ADJ | Package_TO_SOT_SMD:TO-263-2 | U11 |
| 1 | BA33BC0FP-E2 | Package_TO_SOT_SMD:TO-252-2 | U12 |
| 1 | ESP32-S3-MINI-1 | Espressif:ESP32-S3-MINI-1 | U1 |
| 1 | ESW-106-44-T-S | Connector_PinSocket_2.54mm:PinSocket_1x06_P2.54mm_Vertical | J4 |
| 1 | KiCad-Logo2_5mm_SilkScreen | Symbol:KiCad-Logo2_5mm_SilkScreen | LOGO1 |
| 1 | M20-8771246 | Connector_PinHeader_2.54mm:PinHeader_1x06_P2.54mm_Vertical_SMD_Pin1Right | J2 |
| 1 | OSHW-Logo_7.5x8mm_SilkScreen | Symbol:OSHW-Logo_7.5x8mm_SilkScreen | LOGO2 |
| 1 | PAM8302AAS | Package_SO:SOP-8_3.9x4.9mm_P1.27mm | U13 |
| 1 | PH2-06-UA | Connector_PinHeader_2.54mm:PinHeader_2x03_P2.54mm_Vertical | J5 |
| 1 | PJ-063AH | Connector_BarrelJack:BarrelJack_CUI_PJ-063AH_Horizontal | J10 |
| 1 | SMS-1508MS-HT-R | starman:SPKR_SMS-1508MS-HT-R | LS1 |
| 1 | WS2812B | LED_SMD:LED_WS2812B_PLCC4_5.0x5.0mm_P3.2mm | D145 |
The 247 most common of 248 parts.
It measures 182 × 150 mm and has 4 copper layers, 1.6 mm thick.
248 parts, built around the ESP32-S3-MINI-1-N8, PAM8302AASCR, BA33BC0FP-E2 and M20-8771246. The full list of its parts is on this page, with links to each part's symbol and footprint where PCBKit's library has them.
From the adamm/starman repository on GitHub, at the commit this page was made from: the board is pcb/starman.kicad_pcb and its schematic pcb/expansion.kicad_sch. PCBKit opens the board in the browser, with nothing to install.
Its repository states no licence, so its author keeps all rights: ask adamm before reusing the design.

gregory-chekler/Volume-Adjusting-Speaker-PCB
The circuit takes in a signal from an audio jack, that is of a frequency from about 40 Hz to 22 kHz (the range of human hearing). The LM 378 is supplied with 9 volts and the gain is at most 200 times.


bitdivision/GPIB-wifi-pcb
A GPIB adapter using an ESP8266 for wifi functionality and a Cortex M0.


borkdlabs/hoppy_clock
STM32-based alarm clock and RGB lamp: custom alarms wake you with light and your own songs, configured over USB from the browser or a Python tool

CounterPillow/achterart
An 8-way USB-to-UART converter board based on the CH348 chip