
4 layers85.9 × 85.9 mm
Pd1180-epr r0.3
techmannih/pd1180-epr
PD1180-EPR — NEMA 34 Smart Motor-Mounted Stepper Controller with USB-C PD 3.1 EPR
277 parts

 CopycatMusic/ComposerMIDICV2
4 HP Eurorack USB/TRS MIDI-to-CV module: RP2354A firmware, KiCad hardware and v1.0 manufacturing files.
ComposerMIDICV is an open-source printed circuit board by CopycatMusic, from the CopycatMusic/ComposerMIDICV repository on GitHub, published under the AGPL-3.0 licence. It is a 2-layer board of 20 × 110 mm with 87 parts on 93 nets, routed with 736 tracks and 74 vias.
It is built around the RP2354A, 74AHCT244PW and MCP4822-E/SN, with the 78L05G-AB3-R, ABM8-272-T3 and HT7533-1 among its other parts. Its parts include 29 resistors, 28 capacitors, 11 ICs, 10 connectors and 4 switches. It belongs with the audio and music boards and the RP2350 boards of this library.


A four-channel MIDI-to-CV/Gate Eurorack module, built around the RP2354A.
Composer connects a DAW or MIDI instrument to analog synthesizers through USB MIDI or a 3.5 mm TRS MIDI input. Four CV outputs and four Gate outputs provide pitch, velocity, modulation, random voltages and clock signals across six hardware-selected modes.
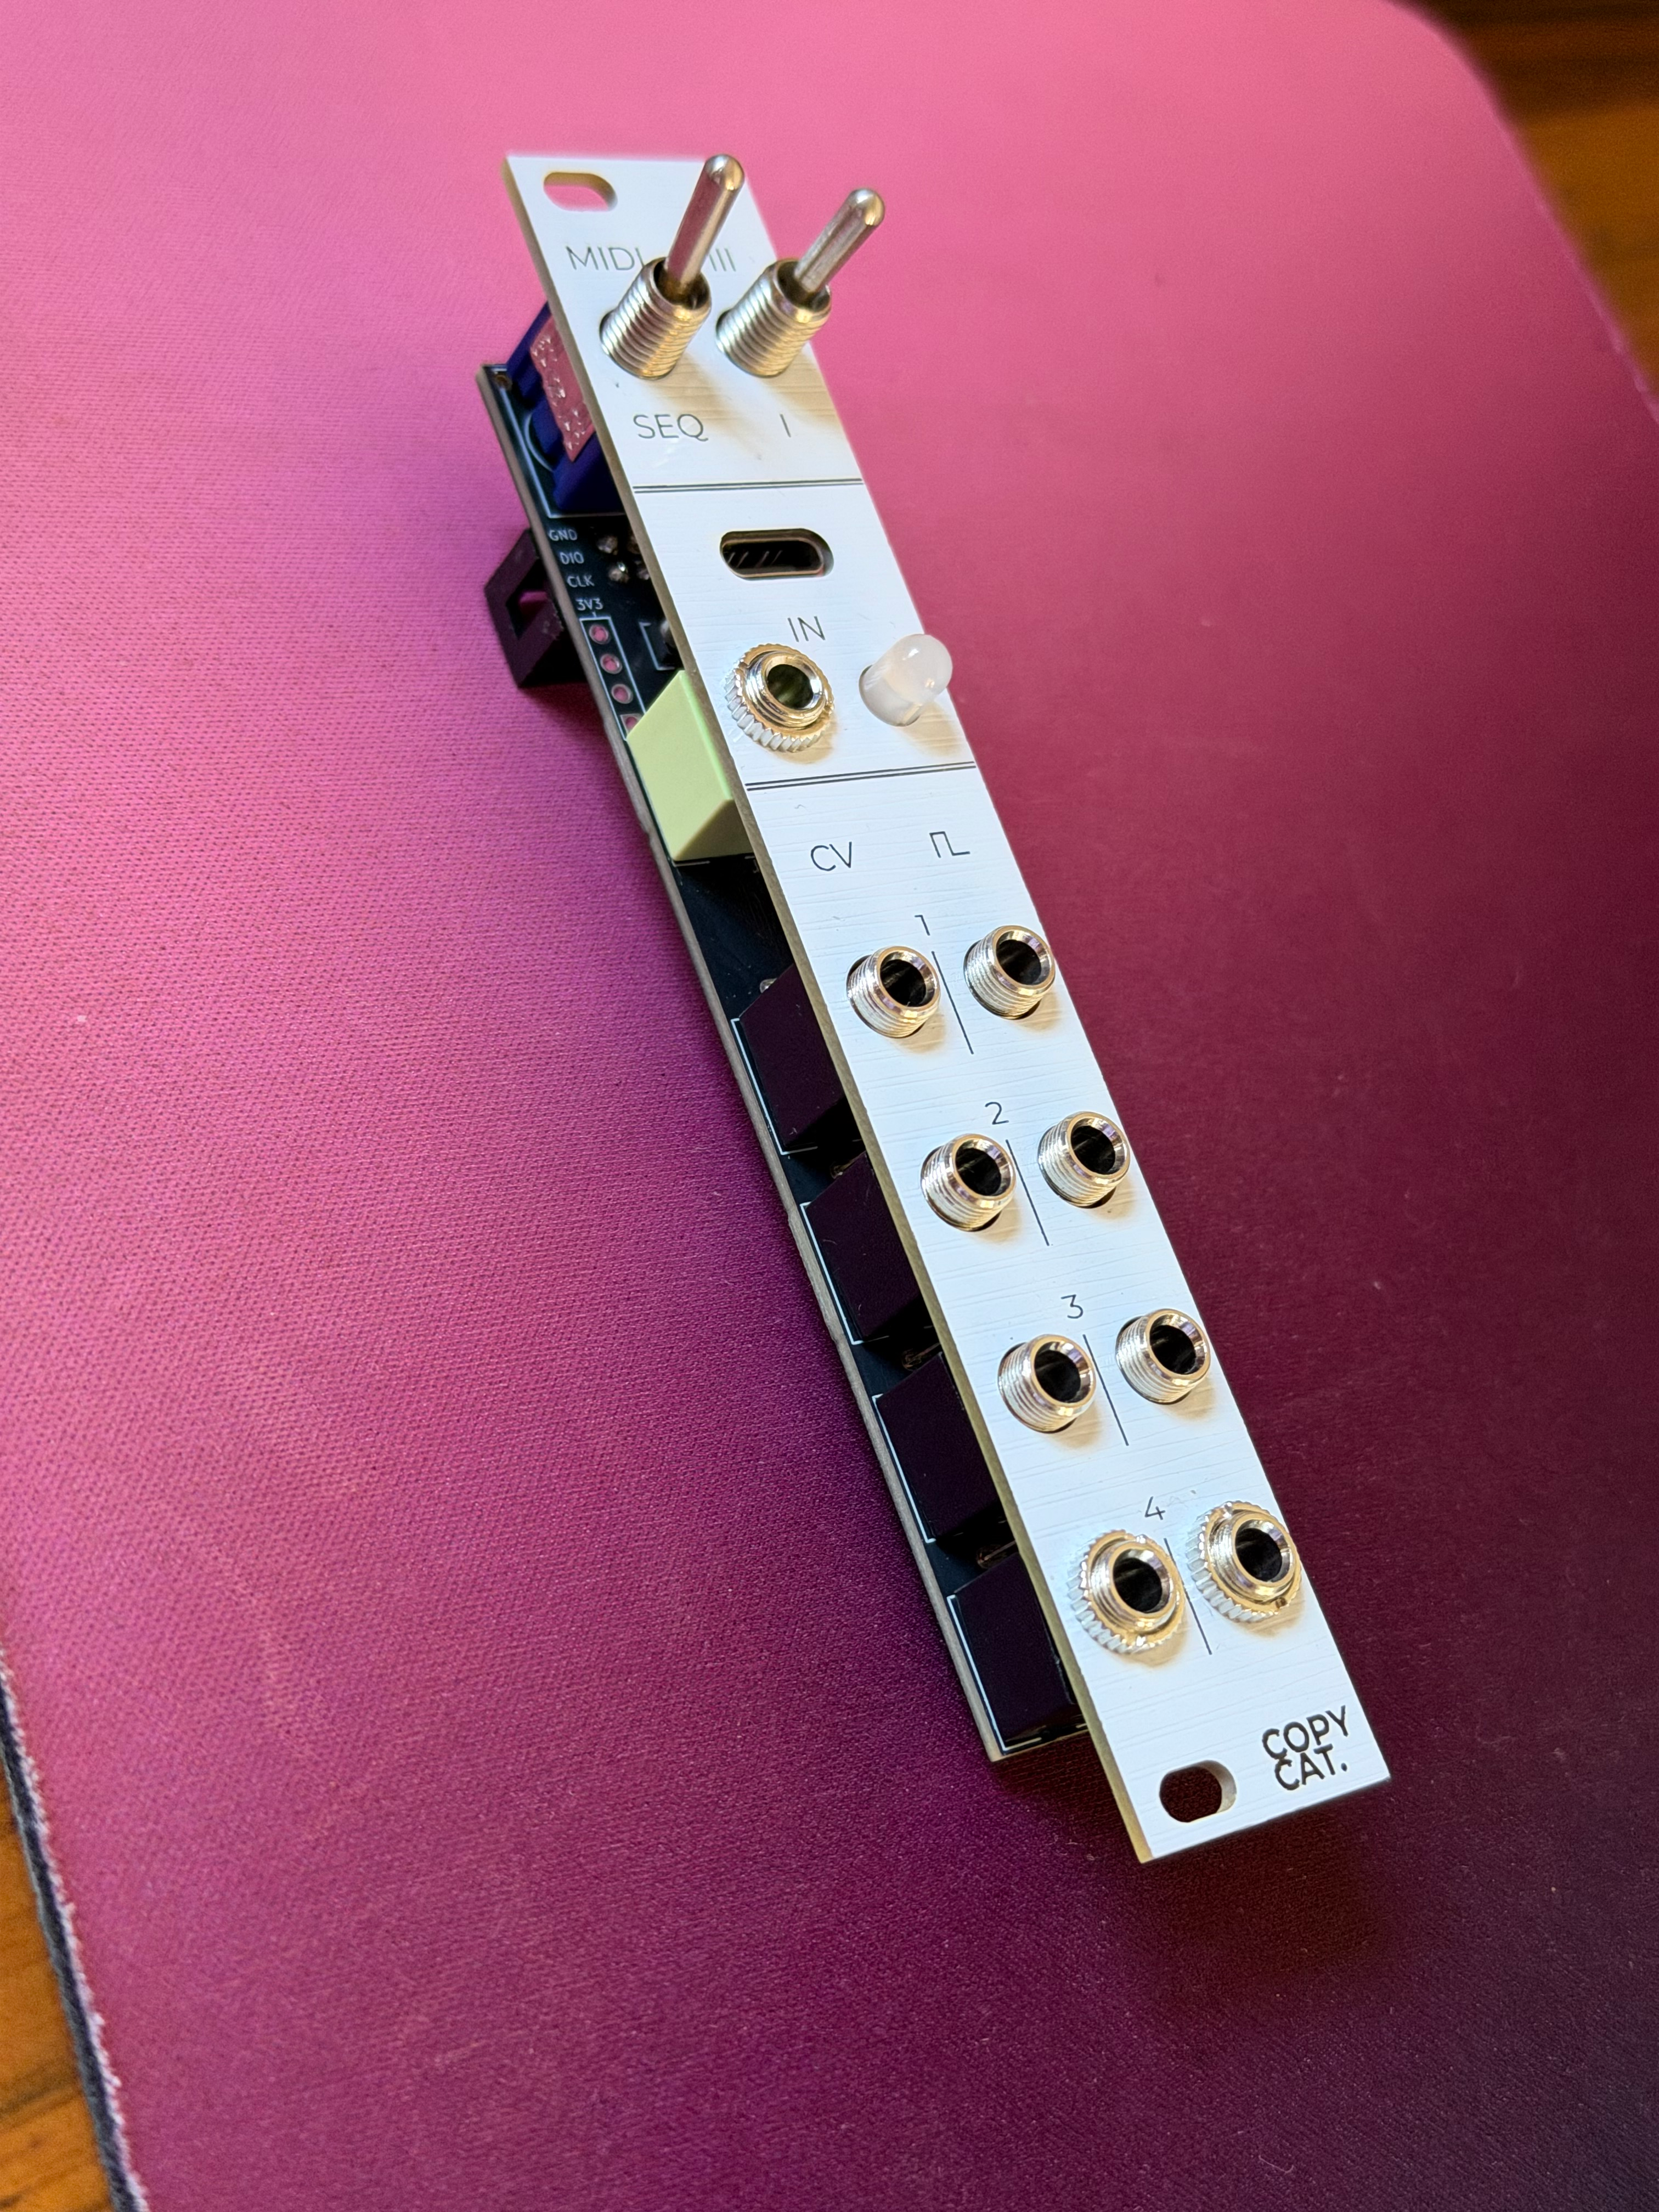
USER_MANUAL · Firmware guide · ManufacturingGuide
| Parameter | Specification |
|---|---|
| Hardware revision | v1.0 |
| Format | 3U Eurorack, 4 HP |
| Front-panel dimensions | 20.3 × 128.5 mm |
| Mainboard dimensions | 20 × 110 mm |
| Power supply | +12 V via a 10-pin Eurorack header |
| Typical +12 V current draw | 20 mA |
| Recommended +12 V supply allocation | 50 mA |
| MIDI inputs | USB MIDI device and 3.5 mm TRS MIDI Type A |
| CV outputs | 4 channels, 0–8 V, unipolar |
| Pitch scaling | 1 V/oct; MIDI note 36 = 0 V |
| Pitch bend | ±2 semitones, fixed |
| Gate outputs | 4 channels, nominal 0/5 V |
| Trigger pulse width | 10 ms for note-on and clock triggers |
| DAC resolution | 12 bits per channel; two MCP4822 dual-channel DACs |
| Panel modes | 6 |
| Calibration | Per-channel two-point correction, saved to flash |
Modes are selected by the two panel switches, not by changing the MIDI channel. MIDI channels select voices within the active mode.
| Mode | Name | CV1 / CV2 / CV3 / CV4 | Gate1 / Gate2 / Gate3 / Gate4 |
|---|---|---|---|
| 1 | midi1 | Pitch / Velocity / CC1 / Random S&H | Gate / Gate / Note trigger / Note trigger |
| 2 | midi2 | Voice 1 pitch / Velocity / Voice 2 pitch / Velocity | Voice 1 gate / Trigger / Voice 2 gate / Trigger |
| 3 | midi3 | Voice 1 / 2 / 3 / 4 pitch | Voice 1 / 2 / 3 / 4 gate |
| 4 | sequencer1 | Voice 1 pitch / Velocity / Voice 2 pitch / Velocity | Run / Reset / 1 PPQN / 8 PPQN |
| 5 | sequencer2 | Voice 1 pitch / Velocity / Voice 2 pitch / Velocity | Run / Reset / 2 PPQN / 12 PPQN |
| 6 | sequencer3 | Voice 1 pitch / Velocity / Voice 2 pitch / Velocity | Run / Reset / 4 PPQN / 24 PPQN |
In the dual-voice modes, MIDI channels 1–8 control Voice 1 and 9–16 control Voice 2. In midi3, the channel groups are 1–4, 5–8, 9–12 and 13–16. Each group controls one voice; playing a chord on a single channel does not automatically distribute it across four outputs.
Pitch conversion uses MIDI note 36 = 0 V, with one octave per volt and a fixed pitch-bend range of approximately ±2 semitones. Velocity and CC1 map linearly from 0–127 to 0–8 V. The manual includes complete routing tables and patch examples.
midi1. In your DAW, choose Composer MIDICV / MIDICV MIDI as the MIDI output destination; the exact displayed name depends on the host.See the user manual for power pin assignments, the mode selector, dual/four-voice patches, clock routing, flashing, calibration and troubleshooting.
The firmware is written in C, using Raspberry Pi Pico SDK 2.2.0 and TinyUSB. USB packets and the UART MIDI stream are decoded into a common event format, then dispatched to the selected mode. The mode engine updates a shared output state; a 1 ms service loop handles switches, triggers, LEDs and output updates.
Two MCP4822 dual-channel 12-bit DACs provide four CV channels through SPI frames generated by GPIO. An OPA4991 analog stage scales the DAC outputs, while a 74AHCT244 buffer drives the DAC interface and Gate signals. The TRS input uses a TLP2361 optocoupler. The mainboard and front panel are maintained as KiCad 10 projects.
The firmware separates hardware drivers, MIDI parsing/routing, musical modes, pitch/calibration and UI feedback. The six default modes are defined in mode_config.c.
Install CMake 3.22+, Ninja, Python 3 and an Arm GNU embedded toolchain with newlib and nosys.specs. The local build uses Arm GNU 14.2.Rel1. Put arm-none-eabi-gcc and the accompanying tools on PATH.
From the project root, initialize the SDK dependency:
git submodule update --init --recursive third_party/pico-sdkmacOS / Linux:
export PICO_SDK_PATH="$PWD/third_party/pico-sdk"
cmake -S firmware -B firmware/build-arm -G Ninja \
  -DPICO_PLATFORM=rp2350-arm-s -DPICO_BOARD=pico2 \
  -DCMAKE_BUILD_TYPE=Release
cmake --build firmware/build-arm --parallel
Windows PowerShell:
$env:PICO_SDK_PATH = Join-Path $PWD "third_party/pico-sdk"
cmake -S firmware -B firmware/build-arm -G Ninja -DPICO_PLATFORM=rp2350-arm-s -DPICO_BOARD=pico2 -DCMAKE_BUILD_TYPE=Release
cmake --build firmware/build-arm --parallel
The build produces firmware/build-arm/composer_midicv.uf2 and copies it to firmware/dist/composer_midicv.uf2. pico2 supplies the SDK build configuration for the custom RP2354A board; the module's pin mapping is defined in the firmware.
With module power available, enter USB boot mode by holding BOOTSEL while resetting the board with RUN. Connect USB and copy the UF2 to the mounted RP2350 boot drive, then allow the board to reboot. See the flashing instructions for the full sequence.
Use the v1.0 mainboard files together with the current panel files:
| Resource | Location |
|---|---|
| Mainboard KiCad project | ComposerMIDICV.kicad_pro |
| Mainboard schematic | ComposerMIDICV.kicad_sch |
| Mainboard PCB | ComposerMIDICV.kicad_pcb |
| v1.0 production BOM | COMPOSERv1.0_bom.csv |
| v1.0 Gerber and drill files | COMPOSERv1.0Gerber.zip |
| v1.0 pick-and-place coordinates | COMPOSERv1.0_positions.csv |
| Front-panel KiCad project | ComposerPanel.kicad_pro |
| Front-panel manufacturing files | ComposerPanel.zip |
| Front-panel artwork | Panel silkscreen SVG |
| Earlier revisions | hardware/legacy |
Use the v1.0 production BOM linked above for the current revision. Some BOM entries require separate sourcing, including the jacks and RP2354A; the L3 supplier field contains a manufacturer part number rather than an LCSC C... identifier.
The symbols and custom footprints used in v1.0 are included as project-local snapshots. Install the standard KiCad 10 libraries; optional 3D models still use external library variables. See the manufacturing guide for file selection and library details.
The author's original source and design files use AGPL-3.0-only; see LICENSE. Third-party material retains its own licence; see THIRD_PARTY_NOTICES.md.
Email: tg3299182383@gmail.com
| Qty | Value | Footprint | References |
|---|---|---|---|
| 12 | 100nF | PCM_JLCPCB:C_0402 | C2, C5, C6, C7, C8, C9, C10, C11, C12, C13, C14, C15 |
| 10 | 10kΩ | PCM_JLCPCB:R_0603 | R7, R21, R22, R23, R24, R25, R26, R27, R28, R29 |
| 10 | 1kΩ | PCM_JLCPCB:R_0603 | R8, R9, R10, R11, R12, R13, R14, R15, R16, R17 |
| 8 | AudioJack2_SwitchT | AudioJacks:Jack_3.5mm_QingPu_WQP-PJ301M-12_Vertical | J1, J2, J3, J4, J5, J6, J7, J8 |
| 5 | 100nF | PCM_JLCPCB:C_0603 | C18, C26, C29, C31, C33 |
| 2 | 100kΩ | PCM_JLCPCB:R_0402 | R19, R20 |
| 2 | 10uF | PCM_JLCPCB:C_0603 | C27, C28 |
| 2 | 10uF | PCM_JLCPCB:C_0805 | C16, C21 |
| 2 | 15pF | PCM_JLCPCB:C_0402 | C3, C4 |
| 2 | 33Ω | PCM_JLCPCB:R_0402 | R2, R3 |
| 2 | 5.1kΩ | PCM_JLCPCB:R_0603 | R5, R6 |
| 2 | MCP4822-E/SN | EasyEDA:SOIC-8_L4.9-W3.9-P1.27-LS6.0-BL | U8, U9 |
| 2 | TS-1088-AR02016 | EasyEDA:SW-SMD_L3.9-W3.0-P4.45 | SW1, SW2 |
| 1 | 100nF | PCM_JLCPCB:C_0805 | C20 |
| 1 | 1N4148WS | PCM_JLCPCB:D_SOD-323 | D2 |
| 1 | 1N5819WS | EasyEDA:SOD-323_L1.8-W1.3-LS2.5-RD | D1 |
| 1 | 1kΩ | PCM_JLCPCB:R_0402 | R1 |
| 1 | 1uF | PCM_JLCPCB:C_0805 | C1 |
| 1 | 220Ω | PCM_JLCPCB:R_0603 | R18 |
| 1 | 3.3uH | Resistor_SMD:R_0805_2012Metric | L3 |
| 1 | 4.7uF | PCM_JLCPCB:C_0402 | C17 |
| 1 | 4.7uF | PCM_JLCPCB:C_0805 | C19 |
| 1 | 4.7uF | PCM_JLCPCB:C_0603 | C32 |
| 1 | 470Ω | PCM_JLCPCB:R_0603 | R4 |
| 1 | 74AHCT244PW | EasyEDA:TSSOP-20_L6.5-W4.4-P0.65-LS6.4-BL | U7 |
| 1 | 78L05G-AB3-R | EasyEDA:SOT-89-3_L4.5-W2.5-P1.50-LS4.2-BR | U4 |
| 1 | ABM8-272-T3_C20625731 | EasyEDA:CRYSTAL-SMD_4P-L3.2-W2.5-BL | U2 |
| 1 | AudioJack3 | AudioJacks:Jack_3.5mm_QingPu_WQP-PJ366ST_Vertical | J9 |
| 1 | HDR-IDC-2.54-2X5P | EasyEDA:IDC-TH_10P-P2.54_C5665 | P1 |
| 1 | HT7533-1_C14289 | EasyEDA:SOT-89-3_L4.5-W2.5-P1.50-LS4.2-BR | U5 |
| 1 | MT-0-102-A101-M200-RS+PJ | EasyEDA:SW-TH_MT-0-103-A101-M200-RS | SW3 |
| 1 | MT-0-103-A101-M200-RS+PJ | EasyEDA:SW-TH_MT-0-103-A101-M200-RS | SW4 |
| 1 | OPA4991IPWR | EasyEDA:TSSOP-14_L5.0-W4.4-P0.65-LS6.4-BL | U6 |
| 1 | PH2.54-01-04PZD | EasyEDA:HDR-TH_4P-P2.54-V-M-1 | H1 |
| 1 | RP2354A | Package_DFN_QFN:QFN-60-1EP_7x7mm_P0.4mm_EP3.4x3.4mm | U1 |
| 1 | TJ-L5FPTXHMCYLCRGB-A5 | EasyEDA:LED-TH_4P-BD5.8-P1.30 | U3 |
| 1 | TLP2361 | EasyEDA:OPTO-SMD-5_L3.7-W4.6-P1.27-LS7.0-BR | U11 |
| 1 | TYPE-C 14PLC-H10.0 | EasyEDA:USB-C-TH_SHOUHAN_TYPE-C-14PLC-H10.0 | U10 |
The 86 most common of 87 parts.
techmannih/pd1180-epr
PD1180-EPR — NEMA 34 Smart Motor-Mounted Stepper Controller with USB-C PD 3.1 EPR

Corteil/rp2350-hdmi-hexpansion
RP2350 HDMI hexpansion for the EMF Tildagon badge -- mirrors the badge's display to a monitor over HSTX/DVI

ciborg971/KISSE-1
A homebuilt aicraft made with the same philosophy as the linux kernel ... and electric

UC-Aerospace/Electrical-Tut-26
2026 Avionics tutorial example boards for UC Aerospace

FujiNetWIFI/fujinet-hardware
Schematics and design files for FujiNet hardware

SK-Electronics-Consulting/electronics-widgets
Small, Custom Tools for Electronics


It measures 20 × 110 mm and has 2 copper layers, 2.09 mm thick.
87 parts, built around the RP2354A, 74AHCT244PW, MCP4822-E/SN and 78L05G-AB3-R. The full list of its parts is on this page, with links to each part's symbol and footprint where PCBKit's library has them.
From the CopycatMusic/ComposerMIDICV repository on GitHub, at the commit this page was made from: the board is hardware/ComposerMIDICV/ComposerMIDICV.kicad_pcb and its schematic hardware/ComposerMIDICV/ComposerMIDICV.kicad_sch. PCBKit opens the board in the browser, with nothing to install.
Its repository publishes it under the AGPL-3.0 licence: you may reuse it on that licence's terms (keep the author's notice, and for a copyleft licence share your changes alike).