
2 layers87.6 × 100.8 mm
EtherKraken
karmakrafts/EtherKraken
A RP3A0 SiP based controller with 34 programmable IOs, Cortex M0 co-processor, 2MB of flash, SPI, I²C, UART and 100Base-T connectivity.
84 parts3Apache-2.0
 ArnaanShah/GameboyGo
A handheld console for playing retro games with an interesting sliding mechanism.
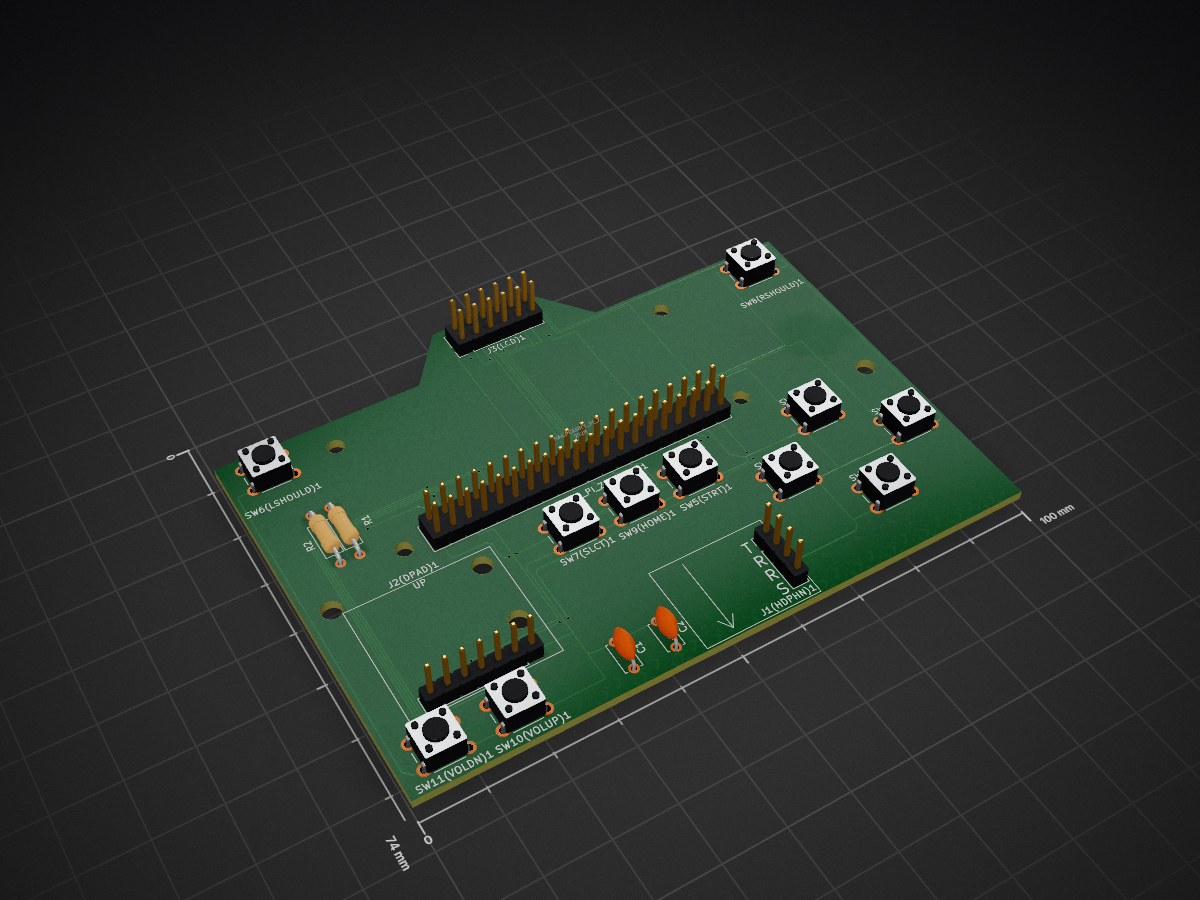
HandheldGameConsole is an open-source printed circuit board by ArnaanShah, from the ArnaanShah/GameboyGo repository on GitHub, published under the MIT licence. It is a 2-layer board of 100 × 74 mm with 28 parts on 44 nets, routed with 384 tracks and 25 vias.
It is built around the RASPBERRY PI ZERO 2 W. Its parts include 11 switches, 3 connectors, 2 capacitors, 2 resistors and 1 IC. It belongs with the retro computing and games boards and the Raspberry Pi (Linux) boards of this library.
A handheld console for playing retro games with an interesting sliding mechanism. The console has aspects of a Gameboy and a PSP Go, which led to the name. I made this as a part of Hackclub's Stasis program which funds custom hardware projects. I decided to make a game console because I thought it could teach me a lot of new things and allow me to explore topics I'd been interested in for a long time. It also seemed like it would be very fun, and I could continue using it after I finished the build.
I modeled in fusion 360 but I also got a lot of models for components online. In total, this will require 21 screws and 17 nuts. 7 will be used to hold parts of the case together, 2 will be used for the PCB, and 8 will be used for the hinges. There are 3 separate parts in the main case. The bottom, the middle, and the top. The other portion has 2 parts to sandwich the screen so just a top and bottom. The parts are held together by 4 hinges. The wires for the screen are routed through the back and there is also a hole there for power.
Images:
I made my PCB in KiCad. I used it before for other projects so I already knew the basics. My schematic was pretty simple but included things like a low-pass filter for the audio. The PCB layout was also easy to make but I just had to work around a lot of the constraints with making a PCB of this size with this many components.
Schematic:
PCB:
3d Renders:
There wasn't much to do on the software/programming side of this project. I had planned from the start to use an emulator called RetroPie for the console. It handles almost everything and you just need to set it up and change some things to match your console.
In order to get RetroPie working on the Gameboy Go, you have to add audio functionality, configure the WaveShare screen, and use RetroGame for button inputs.
First, get your screen up and running by accessing the pi from your computer and following these instructions from the official wiki.
Then, add these lines to your config.txt file to get audio on the headphone jack working:
dtparam=audio=on

audio_pwm_mode=2
(This may be on by default but if not add it)
Finally, for the buttons, you need to install RetroGame from Adafruit in order to convert button inputs from GPIO pins to key presses. Then, you need to edit the retrogame.cfg file to match the one provided in the configuration folder.
That should be everything needed to get the console running nicely.
| Name | Amount | Link |
|---|---|---|
| Raspberry pi Zero 2 w | 1 | Raspberry pi |
| 3.5inch RPi LCD (G) | 1 | WaveShare |
| 6mm Push Buttons | 11 | Adafruit |
| 270 ohm resistors | 2 | MicroCenter |
| 33nF Capacitors | 2 | Aliexpress |
| M3 Hex Nuts | 17 | Home Depot |
| M3 Screws | 17 | Home Depot |
| M2.5 Screws | 4 | Home Depot |
| Sparkfun 5-way Switch | 1 | Aliexpress |
| Sparkfun TRRS Breakout | 1 | Sparkfun |
| 40 Pin Header | 1 | Adafruit |
| 12 Pin Header | 1 | Aliexpress |
| 3d printed case and components | 1 | N/A |
I made the logo with the help of chat gpt and then edited it in Canva.
These are some photos of my original brainstorming sketches in my notebook:
I think I succesfully made what I originally envisioned in these sketches and I had a lot of fun coming up with them.
This design was inspired a lot by the PSP Go and Gameboy, but also by a build I saw from Marcin Plaza where he made a sliding phone.
Some changes I could still make -
| Qty | Value | Footprint | References |
|---|---|---|---|
| 4 | MountingHole_3.2mm_M3 | MountingHole:MountingHole_3.2mm_M3 | MOUNTING HOLE, MOUNTING HOLE, MOUNTING HOLE, MOUNTING HOLE |
| 2 | 270 | Resistor_THT:R_Axial_DIN0207_L6.3mm_D2.5mm_P10.16mm_Horizontal | R1, R2 |
| 2 | 33nF | Capacitor_THT:C_Disc_D5.0mm_W2.5mm_P5.00mm | C1, C2 |
| 1 | Conn_01x04_Pin (TRRS) | Connector_PinHeader_2.54mm:PinHeader_1x04_P2.54mm_Vertical | J1(HDPHN)1 |
| 1 | Conn_01x07_Pin (DPAD) | Connector_PinHeader_2.54mm:PinHeader_1x07_P2.54mm_Vertical | J2(DPAD)1 |
| 1 | Conn_02x06_Odd_Even (LCD) | Connector_PinHeader_2.54mm:PinHeader_2x06_P2.54mm_Vertical | J3(LCD)1 |
| 1 | LOGO | LOGO | G*** |
| 1 | RASPBERRY_PI_ZERO_2_W | Connector_PinHeader_2.54mm:PinHeader_2x20_P2.54mm_Vertical | U1(RASB_PI_ZERO_2W)1 |
| 1 | SW_Push (A) | Button_Switch_THT:SW_PUSH_6mm | SW4(A)1 |
| 1 | SW_Push (B) | Button_Switch_THT:SW_PUSH_6mm | SW3(B)1 |
| 1 | SW_Push (HOME) | Button_Switch_THT:SW_PUSH_6mm | SW9(HOME)1 |
| 1 | SW_Push (SLCT) | Button_Switch_THT:SW_PUSH_6mm | SW7(SLCT)1 |
| 1 | SW_Push (START) | Button_Switch_THT:SW_PUSH_6mm | SW5(STRT)1 |
| 1 | SW_Push (X) | Button_Switch_THT:SW_PUSH_6mm | SW2(X)1 |
| 1 | SW_Push (Y) | Button_Switch_THT:SW_PUSH_6mm | SW1(Y)1 |
| 1 | SW_Push(LSHOULD) | Button_Switch_THT:SW_PUSH_6mm | SW6(LSHOULD)1 |
| 1 | SW_Push(RSHOULD) | Button_Switch_THT:SW_PUSH_6mm | SW8(RSHOULD)1 |
| 1 | SW_Push(VOLDN) | Button_Switch_THT:SW_PUSH_6mm | SW11(VOLDN)1 |
| 1 | SW_Push(VOLUP) | Button_Switch_THT:SW_PUSH_6mm | SW10(VOLUP)1 |
The 24 most common of 28 parts.
karmakrafts/EtherKraken
A RP3A0 SiP based controller with 34 programmable IOs, Cortex M0 co-processor, 2MB of flash, SPI, I²C, UART and 100Base-T connectivity.


dihermos/GaiaBeronia
Gaia Beronia is an inspired on Flipper Zero embeeded system. It uses a system based on Python running on Linux in a Raspberry Pi Zero 2W.

impatrq/TEARIS
TEARIS (TEA + auris, latín: oído) es un sistema innovador de auriculares con cancelación activa de ruido adaptativa, creado para personas con Trastorno del Espectro Autista (TEA), PTSD, fibromialgia, migrañas crónicas y…


Sierra-College-Robotics-Club/GlowClock
PCB and Code for Sierra College Robotics Club Glow Clock

Stogalosu/Smart-Chess-Board
A smart chess board that connects to your phone and automatically makes moves

It measures 100 × 74 mm and has 2 copper layers, 1.6 mm thick.
28 parts, built around the RASPBERRY PI ZERO 2 W. The full list of its parts is on this page, with links to each part's symbol and footprint where PCBKit's library has them.
From the ArnaanShah/GameboyGo repository on GitHub, at the commit this page was made from: the board is PCB/handheldGameConsole.kicad_pcb and its schematic PCB/handheldGameConsole.kicad_sch. PCBKit opens the board in the browser, with nothing to install.
Its repository publishes it under the MIT licence: you may reuse it on that licence's terms (keep the author's notice, and for a copyleft licence share your changes alike).