2 layers160 × 100 mm
Test Board
Alfaa123/Arduino-Thermostat
This is a project to create a Arduino powered home thermostat. Version 1 PCB schematic and design is complete.
41 parts2

 Alfaa123/Arduino-Thermostat2
This is a project to create a Arduino powered home thermostat. Version 1 PCB schematic and design is complete.
Adafruit 2.9in eInk FeatherWing is an open-source printed circuit board by Alfaa123, from the Alfaa123/Arduino-Thermostat repository on GitHub. It is a 2-layer board of 79.4 × 47.2 mm with 59 parts on 54 nets, routed with 334 tracks and 48 vias.
It is built around the 23K256-I/SN, AXP803 and MBR0530, with the IRLML0100 among its other parts. Its parts include 12 capacitors, 5 resistors, 4 diodes, 4 switches and 2 ICs. It belongs with the home automation and IoT and lEDs and displays boards of this library.


This is a project to create a Arduino (or Arduino compatible) powered home thermostat. Version 2 PCB schematic and design is complete.
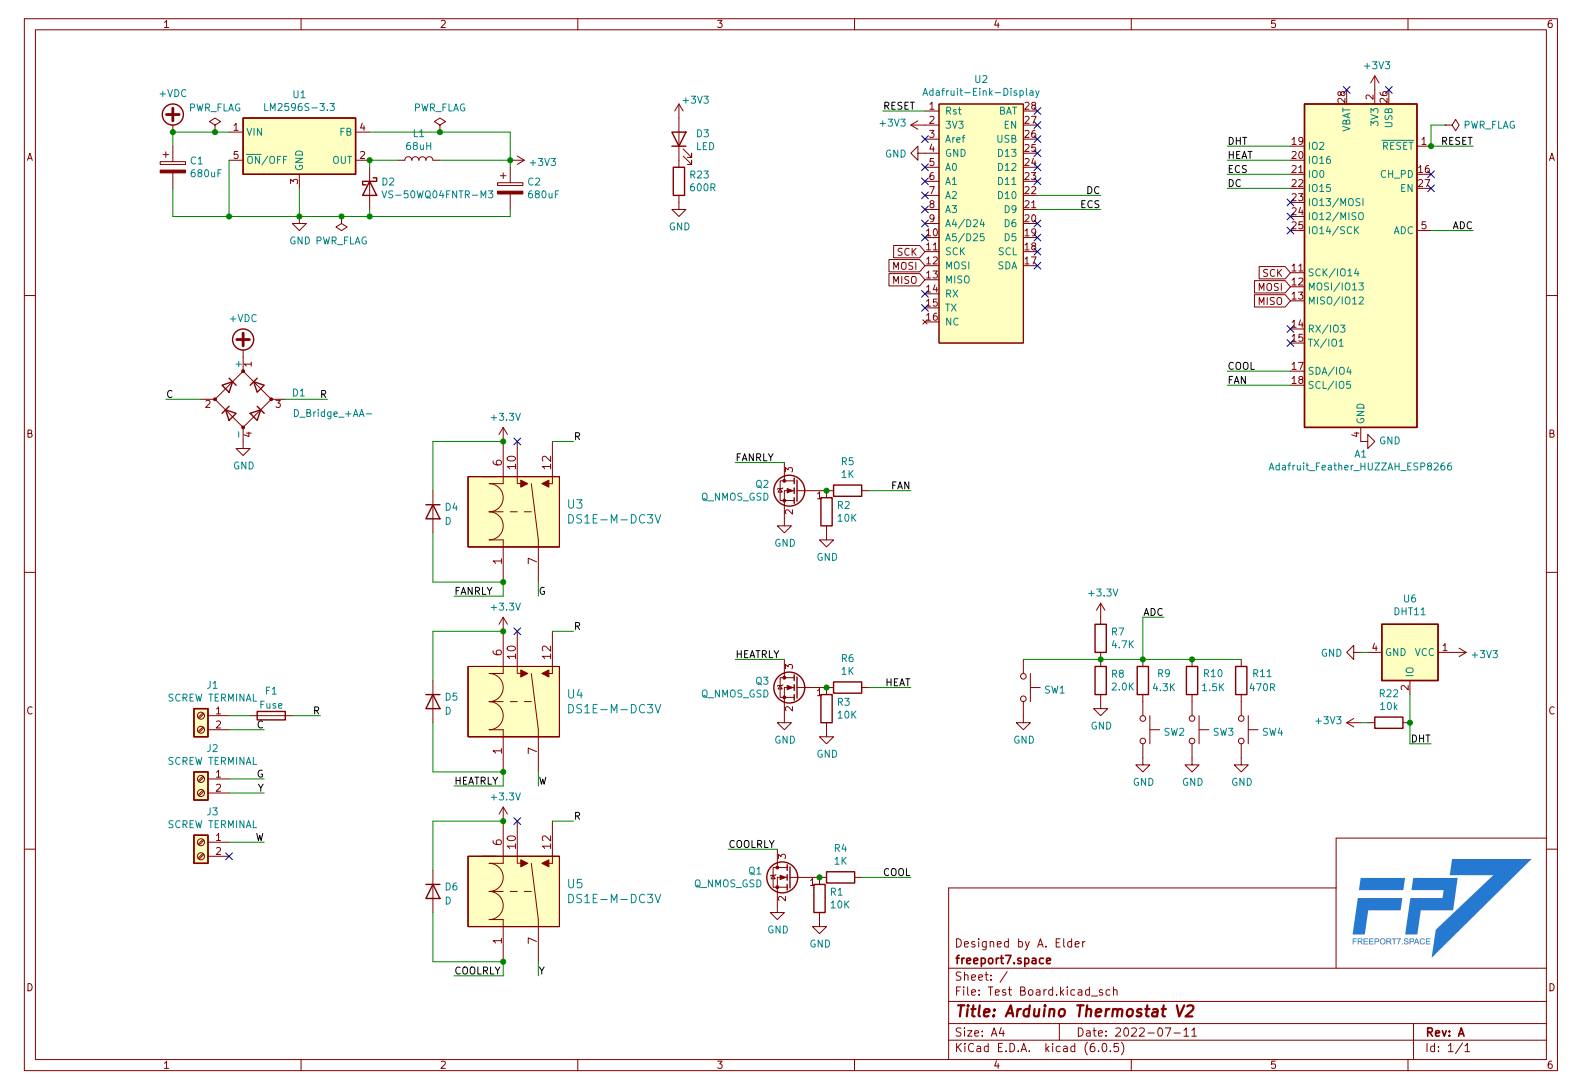
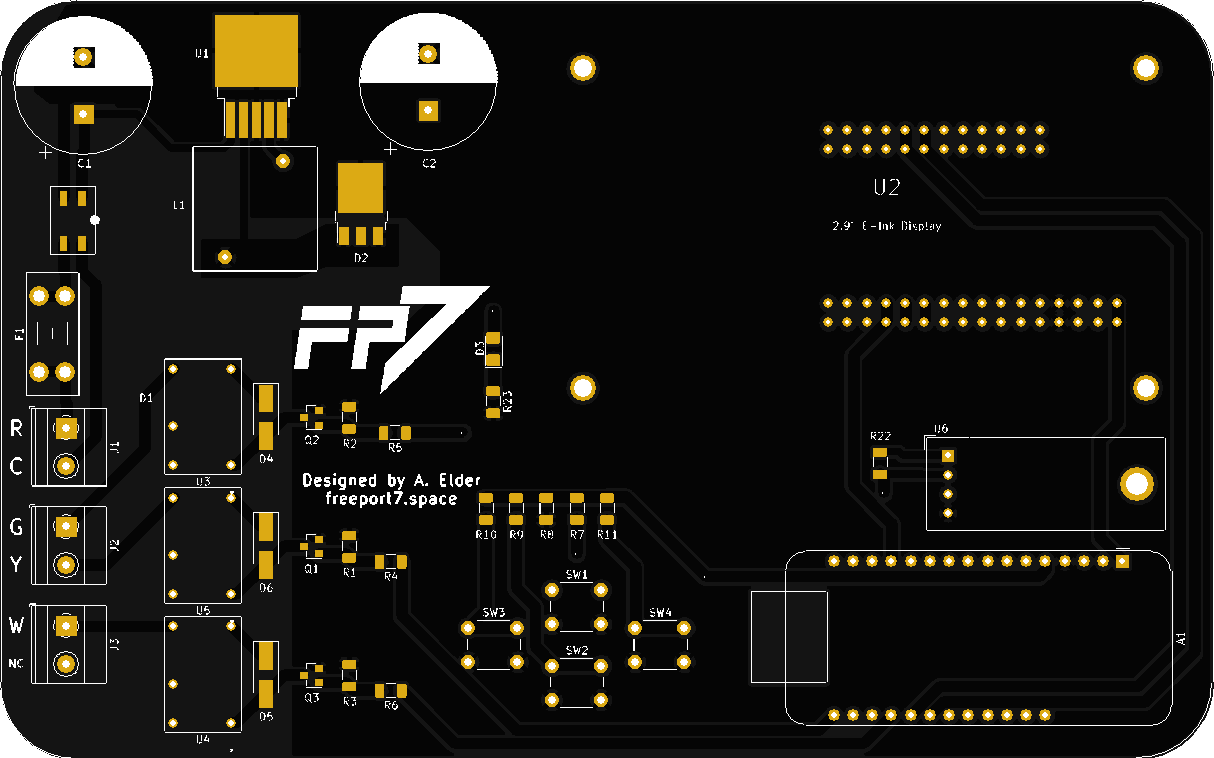
Version 2 has been updated and upgraded to use many SMD components. The board has shrunk, extra protections added and lots of the lessons learned from V1 were implemented as changes to V2.
This takes the 24v AC from the air handler transformer and rectifies it to create a high voltage DC bus. This is then smoothed and an LM2596 is used as a switching regulator to create a 3.3v supply.
Power for the feather is supplied via the 3.3v pin from the onboard voltage regulator.
The regulator can handle up to 3a of current and would be accurately described as "way overkill" for the power requirements of the low voltage section of this board. However, the LM2596 regulators are so simple and easy to effectively use (thanks TI!) that it was worth the extra cost to just have something "easy."
Because the circuitry in the air handler requires the relays to be switched on with the supplied 24v AC, it is routed down the board to supply the common terminal of the three main relays.
In order to drive the relays, small logic level MOSFETS are utilized with the feather board outputs acting as gate drivers for the three MOSFETs. The current requirements for the selected relays are very low and can easily be sunk by the selected MOSFETs.
An Adafruit Feather HUZZAH ESP8266 will be used to run the thermostat. This was selected because it was cheap, easy to work with and included a WiFi stack (allowing for some internet connected thermostat features in the future). One limitation of the ESP8266 is the extremely limited IO compared to the Arduino Nano of the V1 design. This lead to lots of design challanges, including the use of the onboard ADC for ladder buttons to save IO.
The central feature of the V2 design is the inclusion of a 2.9 inch e-ink display instead of a standard LCD. This high resolution, low power display will be ideal for a thermostat as the display needs minimal updates during normal usage.
The physical outline of the board was designed to mimic my current thermostat. No mounting holes are included in the V2 design due to the success of the board edge mount that was used on the V1 design.
No V2 programming has been written yet.
TBD once V2 programming is underway
| Qty | Value | Footprint | References |
|---|---|---|---|
| 13 | TPTP15SQ | Adafruit 2.9in eInk FeatherWing:TP15SQ | BUSY1, TP1, TP2, TP3, TP4, TP5, TP6, TP7, TP8, TP9, TP11, TP12, TP13 |
| 4 | 100K | Adafruit 2.9in eInk FeatherWing:0603-NO | R1, R6, R7, R8 |
| 4 | 1uF/25V | Adafruit 2.9in eInk FeatherWing:0805-NO | C3, C4, C22, C23 |
| 4 | MOUNTINGHOLE2.5 | Adafruit 2.9in eInk FeatherWing:MOUNTINGHOLE_2.5_PLATED | U$3, U$4, U$5, U$6 |
| 4 | SOLDERJUMPER_CLOSED | Adafruit 2.9in eInk FeatherWing:SOLDERJUMPER_CLOSEDWIRE | SJ1, SJ2, SJ3, SJ4 |
| 4 | SWITCH_SPST_TACT_RA | Adafruit 2.9in eInk FeatherWing:SPST_TACTILE_RA | SW1, SW2, SW3, SW4 |
| 3 | FIDUCIAL_1MM | Adafruit 2.9in eInk FeatherWing:FIDUCIAL_1MM | FID1, FID2, FID3 |
| 3 | MBR0530 | Adafruit 2.9in eInk FeatherWing:SOD-123 | D1, D2, D3 |
| 2 | 1uF | Adafruit 2.9in eInk FeatherWing:0805-NO | C16, C24 |
| 2 | 1uF/10V | Adafruit 2.9in eInk FeatherWing:0805-NO | C2, C6 |
| 1 | Adafruit 2.9in eInk FeatherWing:THINKINK_1.25IN | U$8 | |
| 1 | Adafruit 2.9in eInk FeatherWing:ADAFRUIT_TEXT_20MM | U$17 | |
| 1 | Adafruit 2.9in eInk FeatherWing:PCBFEAT-REV-040 | U$9 | |
| 1 | .47ohm | Adafruit 2.9in eInk FeatherWing:0805_10MGAP | R4 |
| 1 | 10uF/10V+ | Adafruit 2.9in eInk FeatherWing:0805-NO | C15 |
| 1 | 10uF/25V | Adafruit 2.9in eInk FeatherWing:0805-NO | C5 |
| 1 | 10uH | Adafruit 2.9in eInk FeatherWing:INDUCTOR_4X4MM_NR401 | L1 |
| 1 | 10µF | Adafruit 2.9in eInk FeatherWing:0805-NO | C21 |
| 1 | 1N4148 | Adafruit 2.9in eInk FeatherWing:SOD-323F | D4 |
| 1 | 1uF | Adafruit 2.9in eInk FeatherWing:0805_10MGAP | C1 |
| 1 | 23K256-I/SN | Adafruit 2.9in eInk FeatherWing:SOIC8_150MIL | U4 |
| 1 | AXP803 | Adafruit 2.9in eInk FeatherWing:SOT23 | IC5 |
| 1 | EINK_24PIN_290IN | Adafruit 2.9in eInk FeatherWing:EINK_290IN | EINK1 |
| 1 | FEATHERWING_SMTDUALNOHOLES | Adafruit 2.9in eInk FeatherWing:FEATHERWING_SMT_NOHOLES | MS1 |
| 1 | IRLML0100 | Adafruit 2.9in eInk FeatherWing:SOT23-3 | Q5 |
| 1 | MICROSD | Adafruit 2.9in eInk FeatherWing:MICROSD | X1 |
Alfaa123/Arduino-Thermostat
This is a project to create a Arduino powered home thermostat. Version 1 PCB schematic and design is complete.

cgallizzi/inkterface
Steam Machine e-ink faceplate with a Now Playing mode: box art, playtime, achievements. Fork of Valve's Inkterface.

gpgreen/eink-breakout
Kicad project for a Dalian Good Display Epaper breakout board for prototyping


oomlout/oomlout_oomp_project_bot_v_2

JGAguado/Smart_Plant
The Smart Plant is a board that can be plugged directly on the soil, close to the plant, that allows the measurement of the environment (soil moisture, environment temperature & illuminance), and presents the…

joeycastillo/The-Open-Book
For details on how to build, test and use Open Book, I've made documentation available here.

TalismanDesign/PocketMage_PDA
An E-Ink PDA device using the ESP32 S3.

Michael-Manning/E-Paper-Climate-Logger
Firmware, PCB, and enclosure for the Weathergotchi E-Paper climate logger.
It measures 79.4 × 47.2 mm and has 2 copper layers, 1.6 mm thick.
59 parts, built around the 23K256-I/SN, AXP803, MBR0530 and IRLML0100. The full list of its parts is on this page, with links to each part's symbol and footprint where PCBKit's library has them.
From the Alfaa123/Arduino-Thermostat repository on GitHub, at the commit this page was made from: the board is Board/Adafruit Eink Display/Adafruit 2.9in eInk FeatherWing.kicad_pcb and its schematic Board/Test Board.kicad_sch. PCBKit opens the board in the browser, with nothing to install.
Its repository states no licence, so its author keeps all rights: ask Alfaa123 before reusing the design.