2 layers77.8 × 39.4 mm
Play cue btn
usr-ein/TriMixxx
Open source standalone DJ multimedia player, compatible with Rekordbox
36 parts44GPL-3.0
 usr-ein/TriMixxx44
Open source standalone DJ multimedia player, compatible with Rekordbox
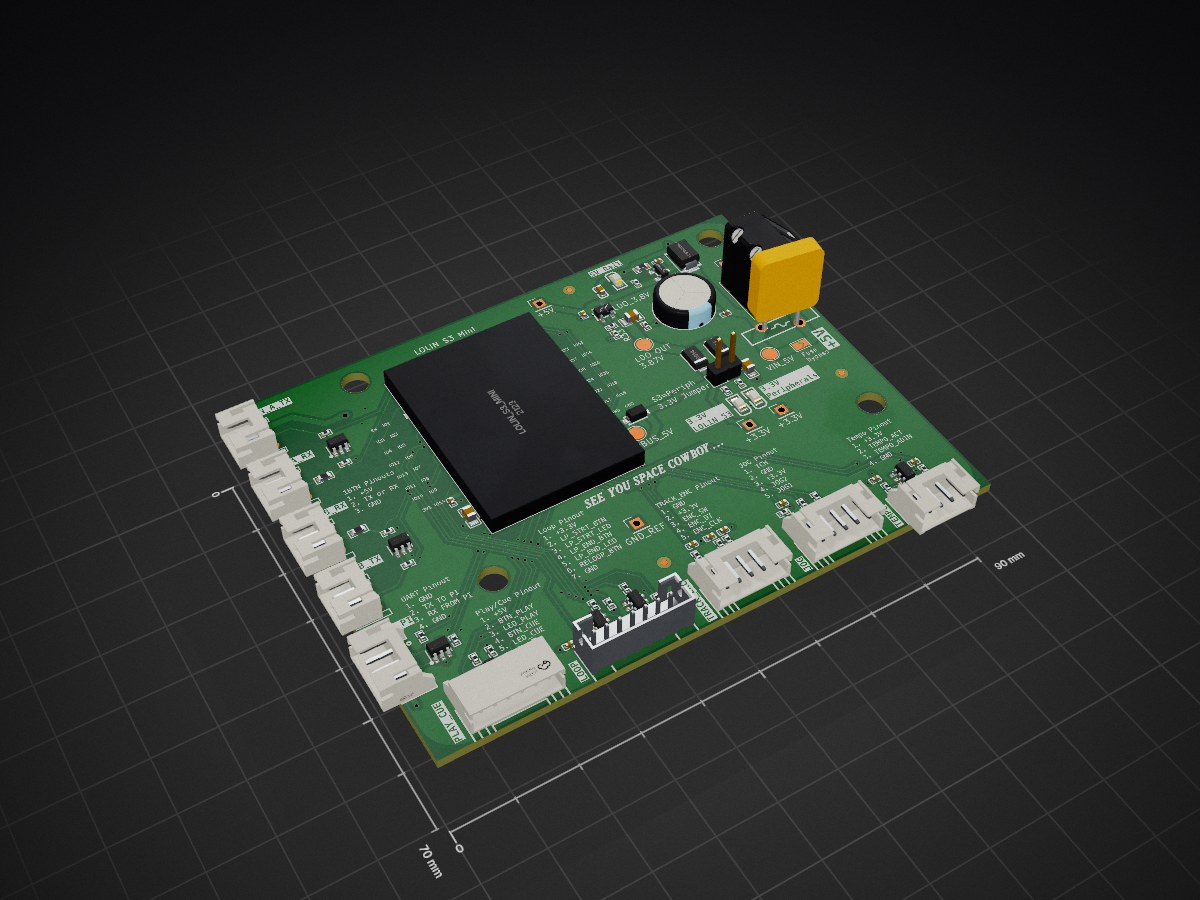
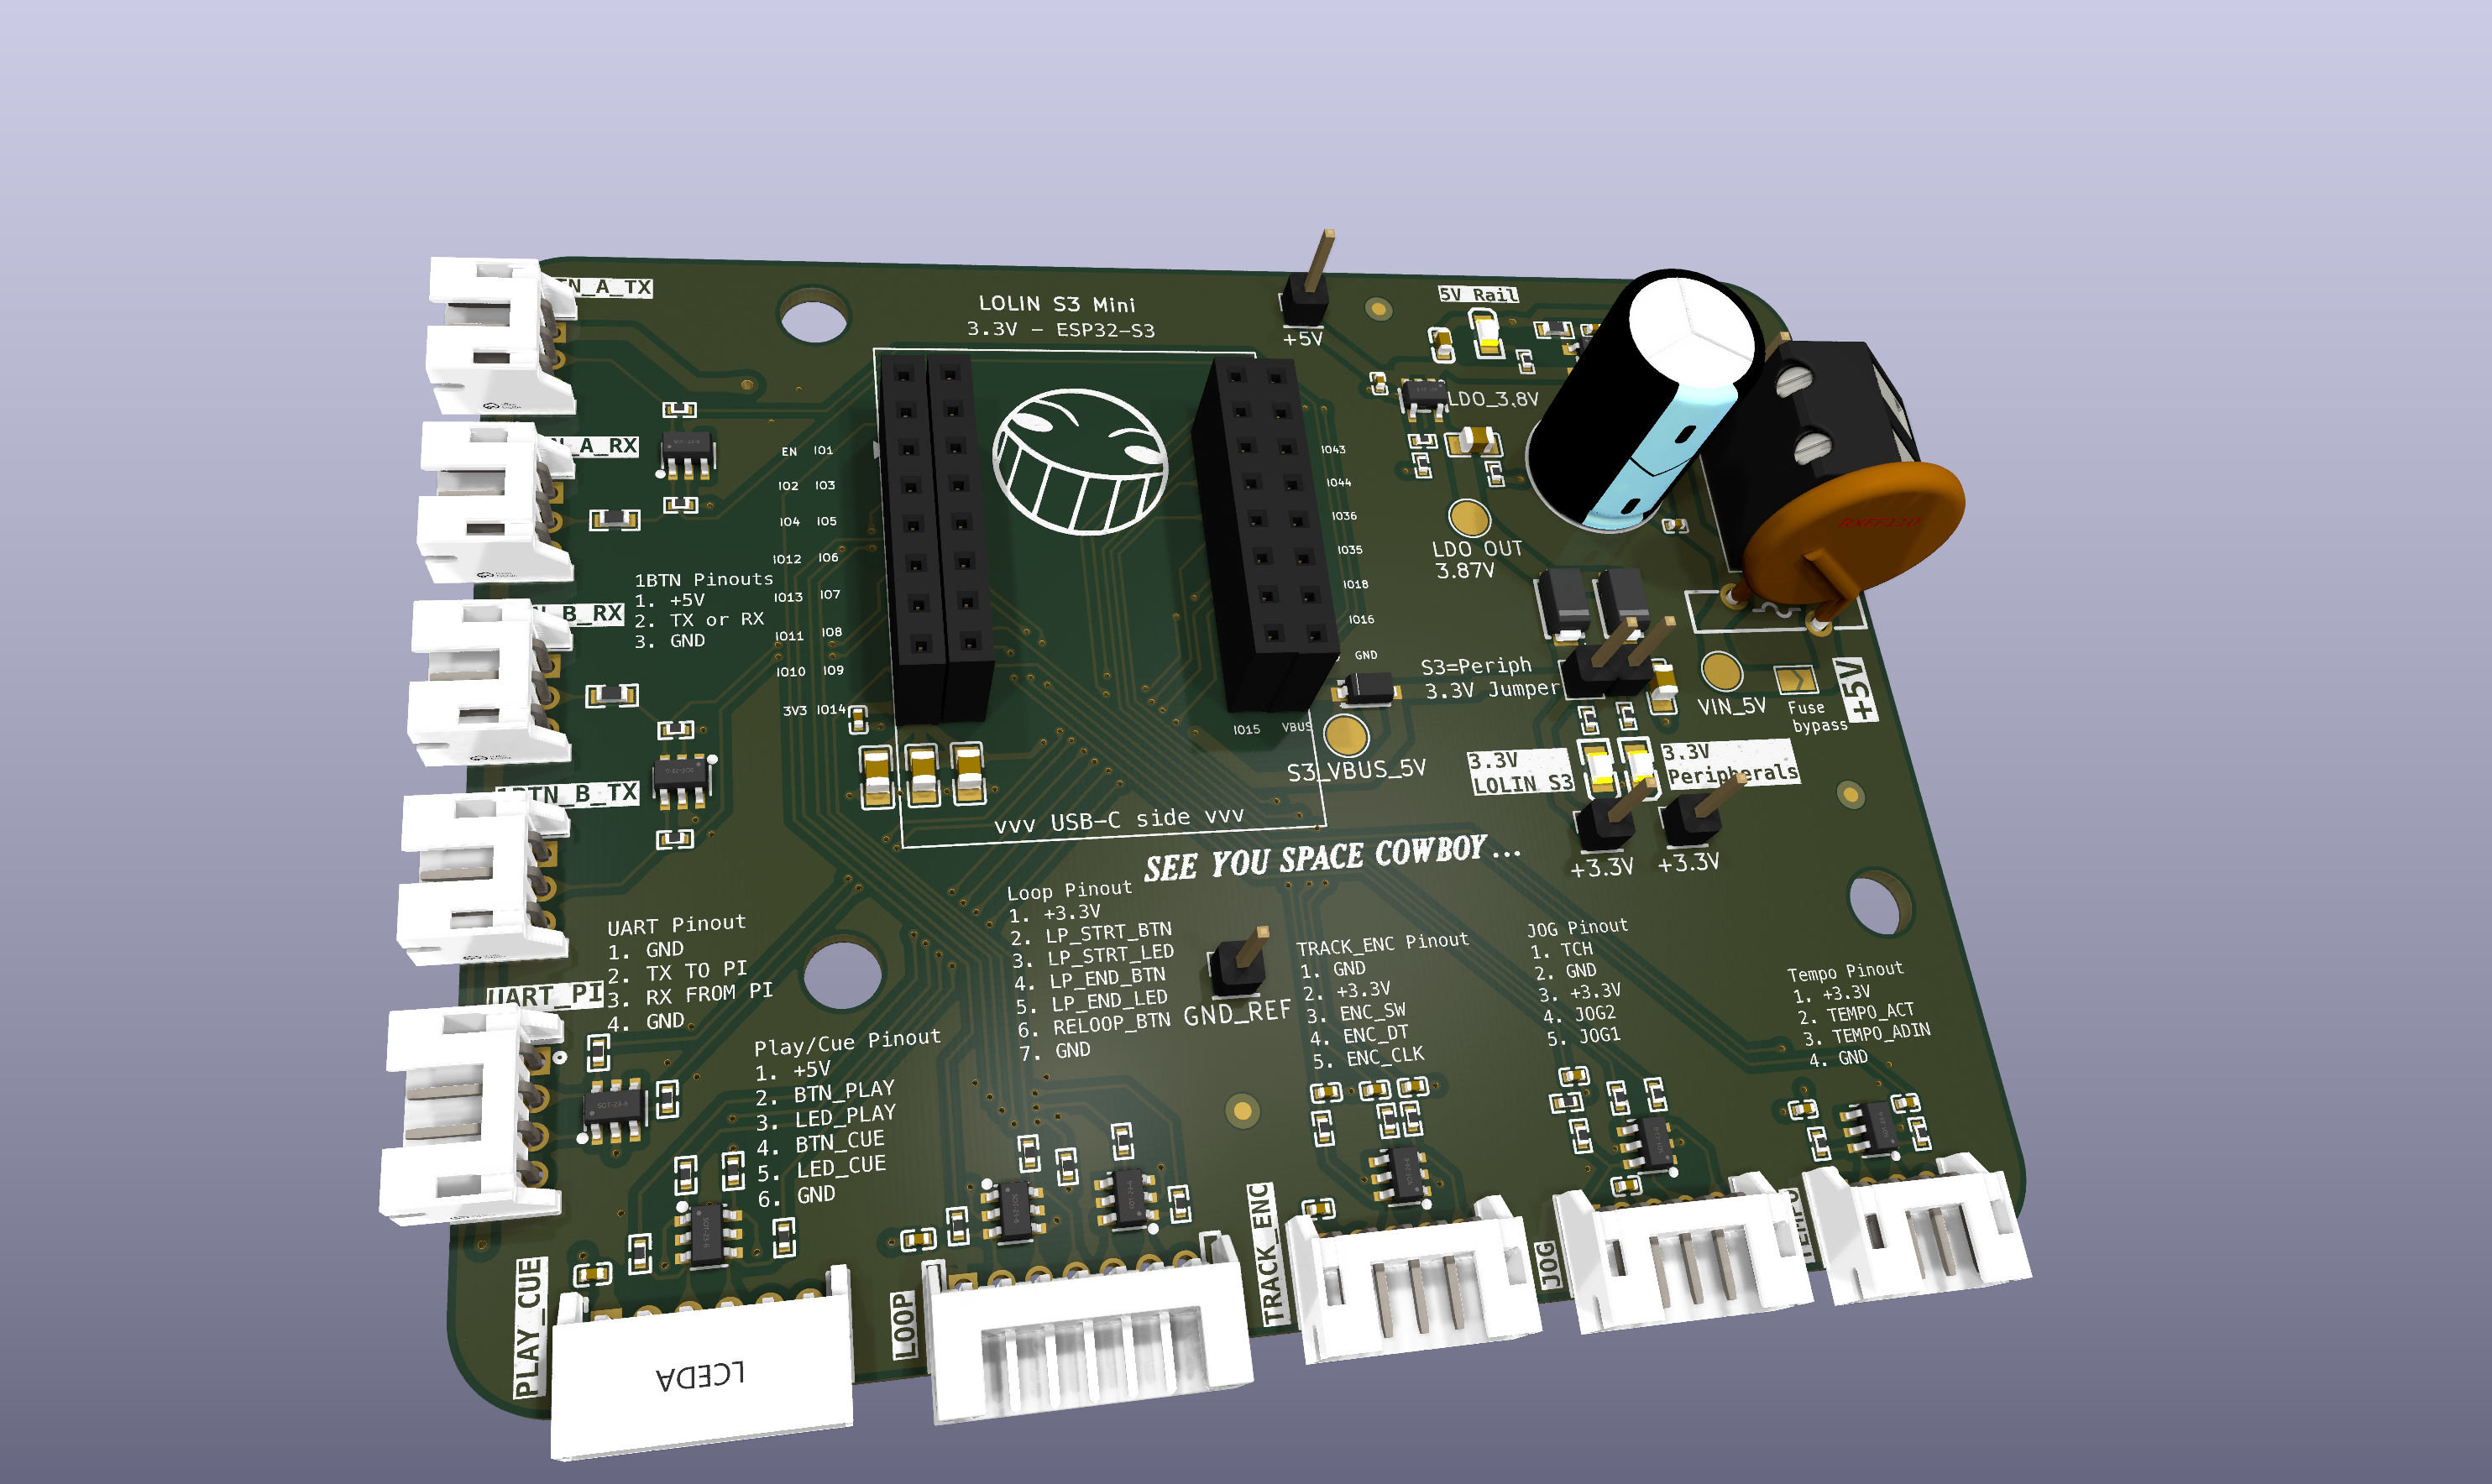
Midi s3 mini is an open-source printed circuit board by usr-ein, from the usr-ein/TriMixxx repository on GitHub, published under the GPL-3.0 licence. It is a 2-layer board of 90 × 70 mm with 102 parts on 78 nets, routed with 664 tracks and 110 vias.
It is built around the SPX3819M5-L/TR, CL05B104KB54PNC and SRV05-4, with the CL21A226MAQNNNE, SS14 and ERR1VM102G20OT among its other parts. Its parts include 33 resistors, 19 capacitors, 16 connectors, 4 diodes and 2 ICs. It belongs with the audio and music boards of this library.


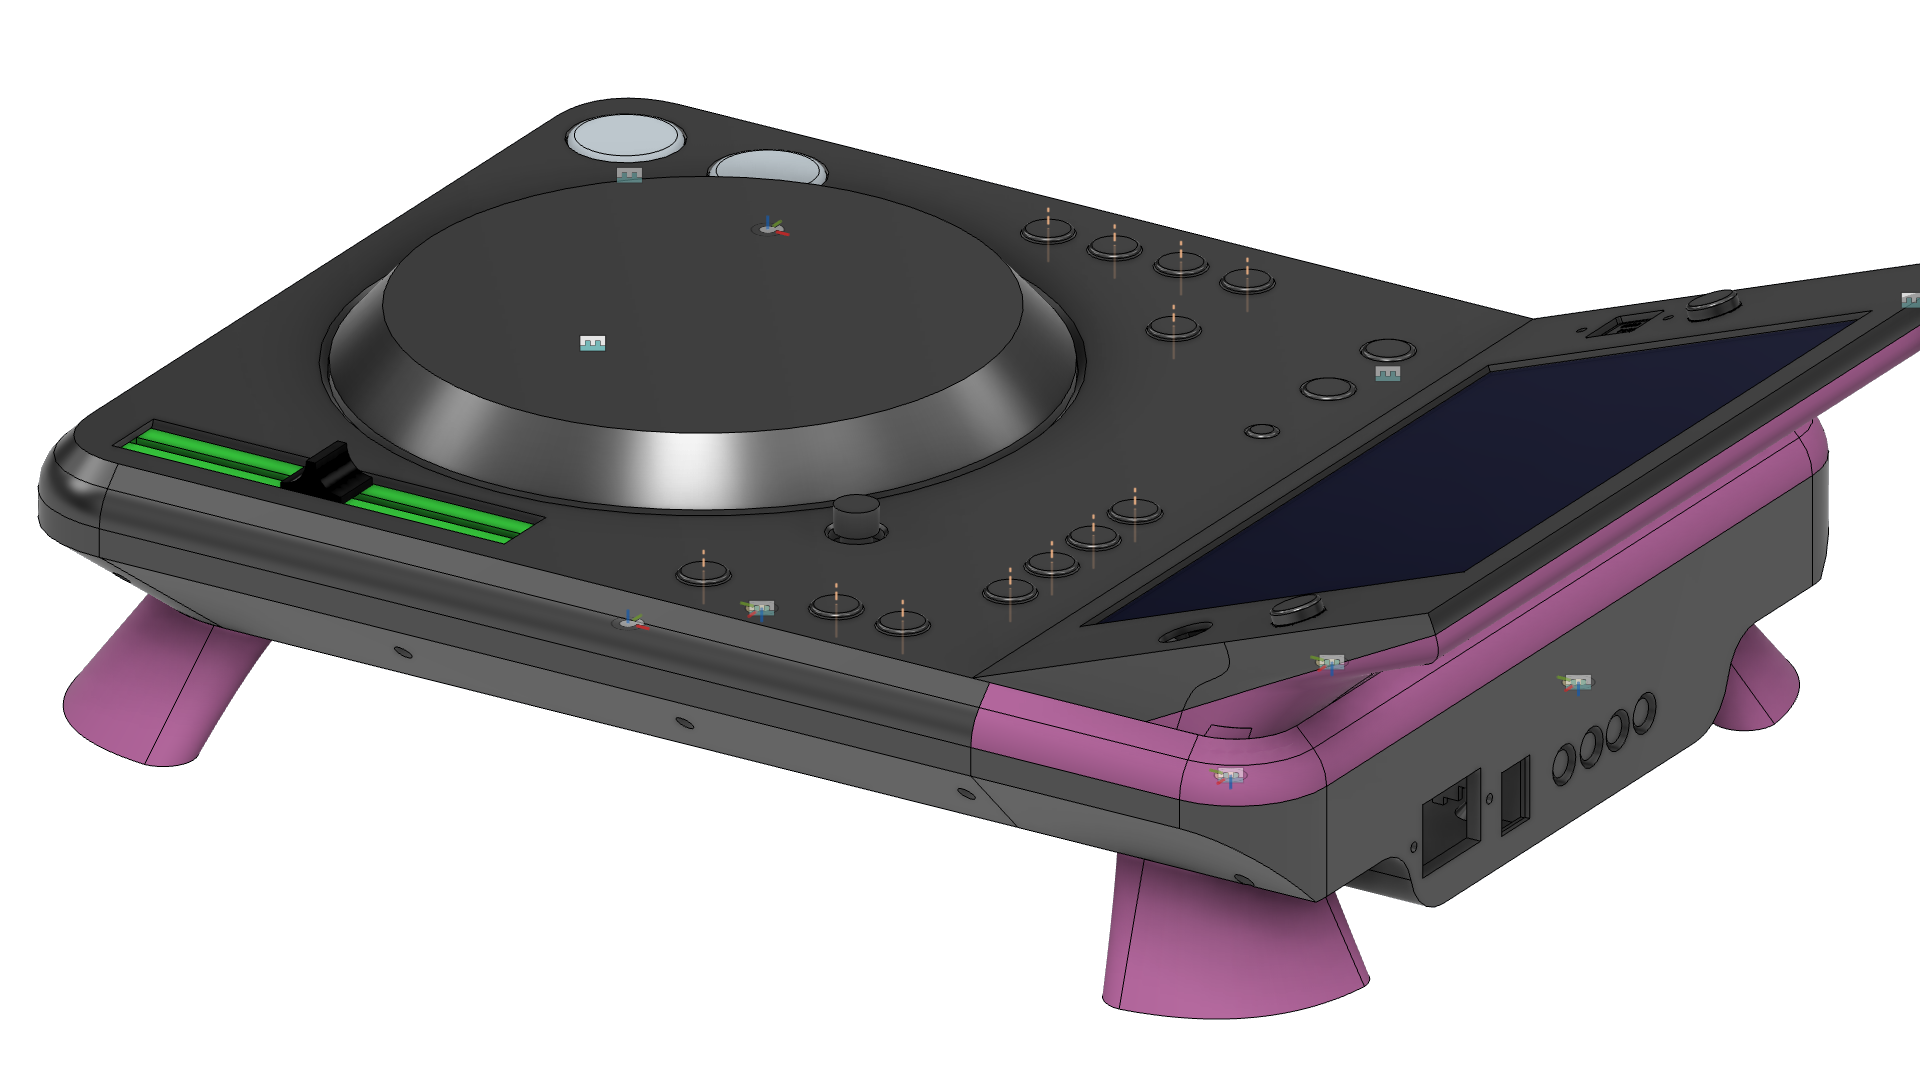
A custom DJ media player — a CDJ-style deck — built from scratch around a Raspberry Pi, designed to run Mixxx DJ software. It reuses an original Pioneer CDJ's buttons and jog wheel behind custom PCBs and a 3D-printed chassis for an authentic DJ feel, and reads Rekordbox-formatted USB sticks — no laptop required.
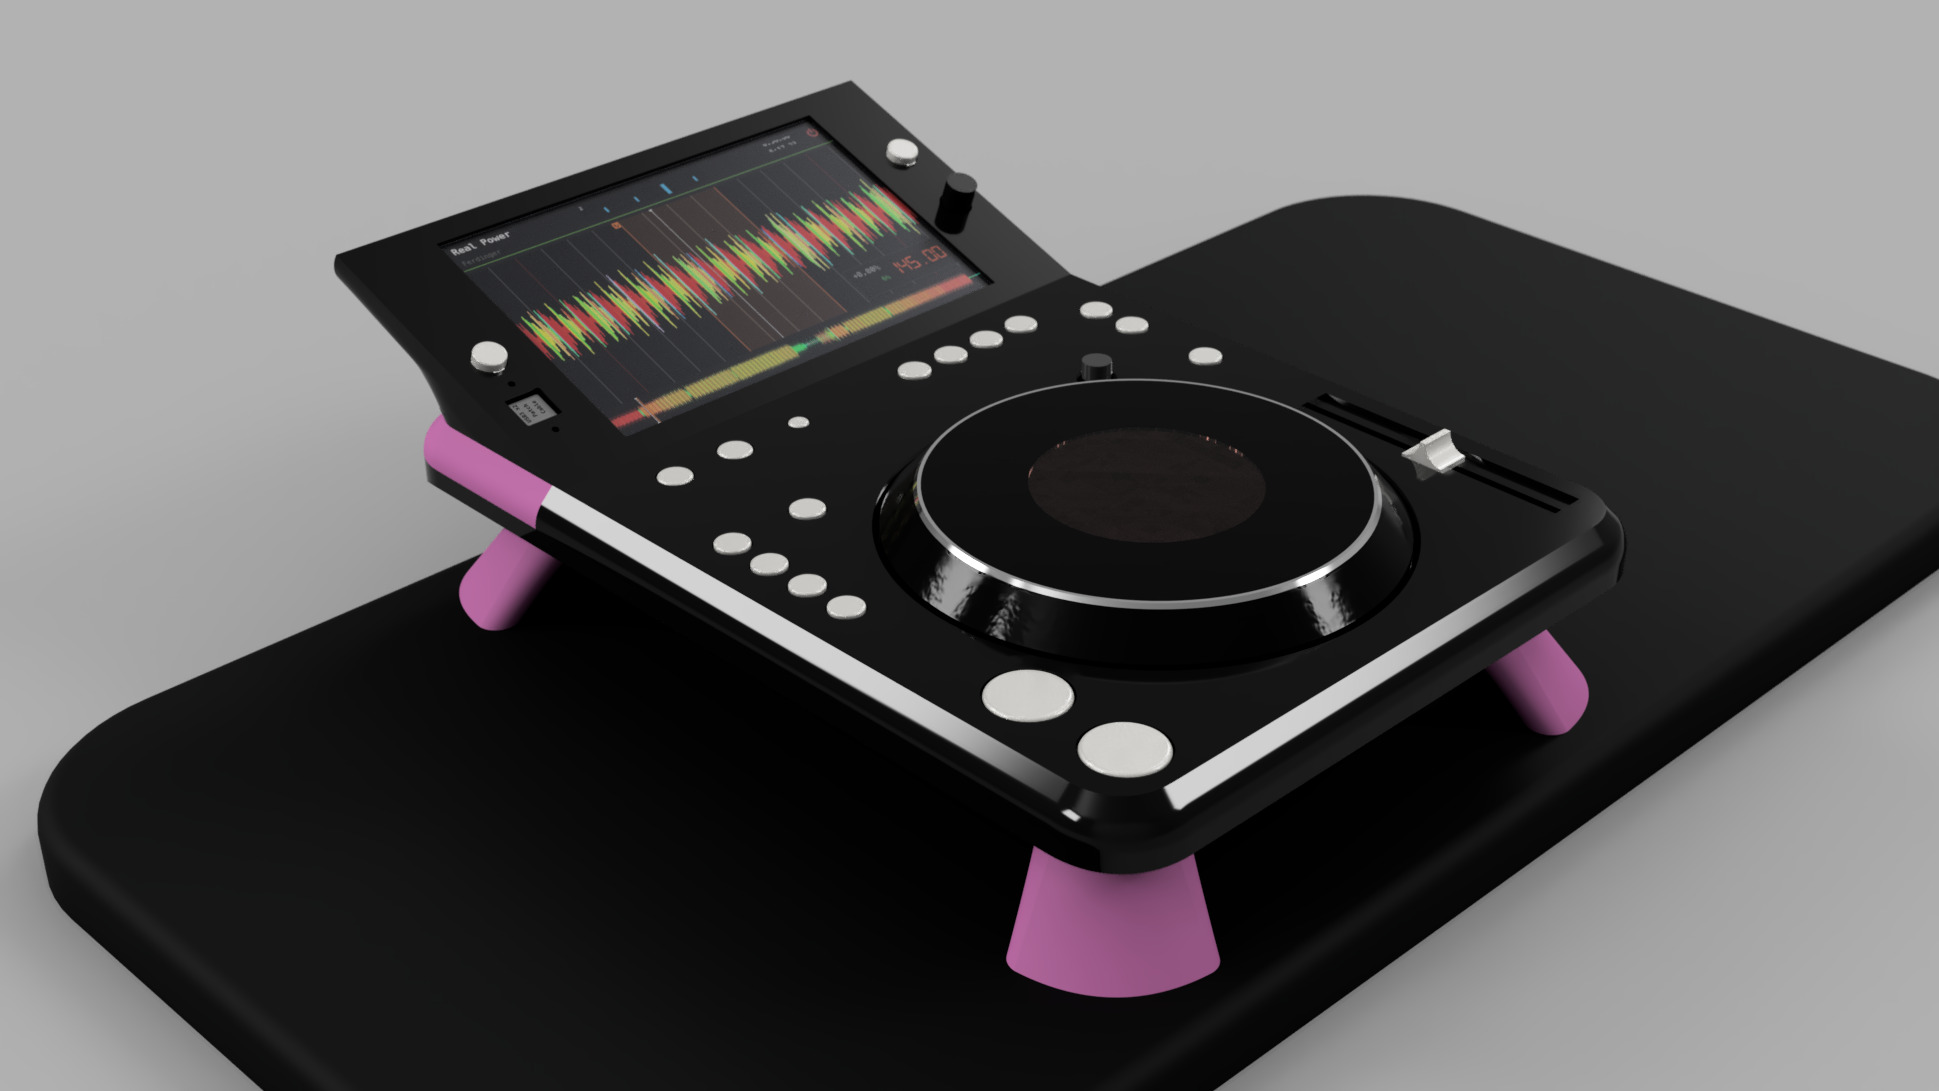
The 1024×600 touchscreen runs a purpose-built Mixxx skin (mixxx_config/TriMixxx_skin). There is no mouse and no laptop: every control is either on the deck or under a thumb, so the UI is built around big targets and the browse encoder rather than around pointer precision.
| Playing | Browsing |
|---|---|
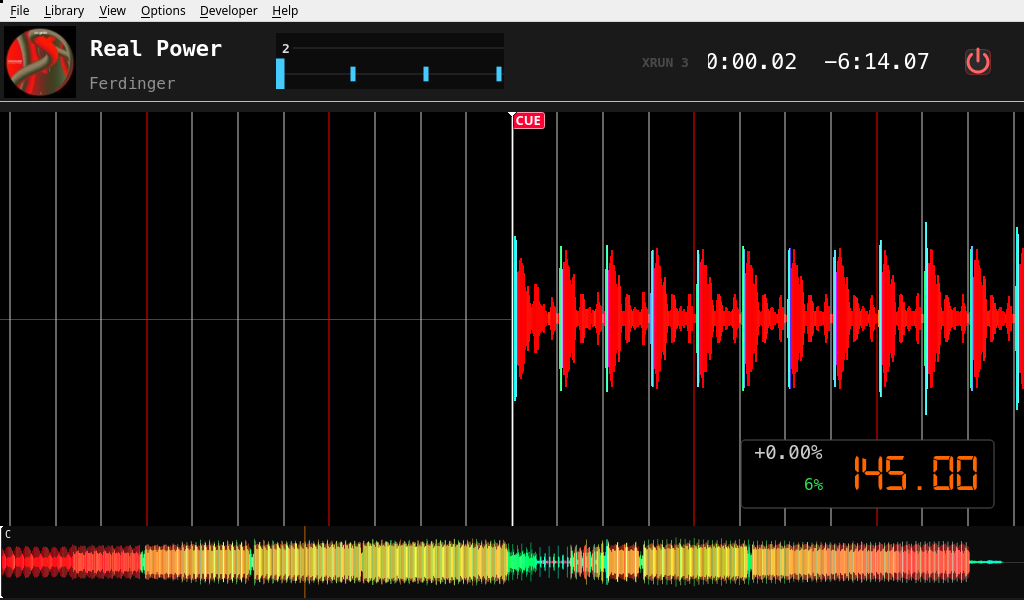 | 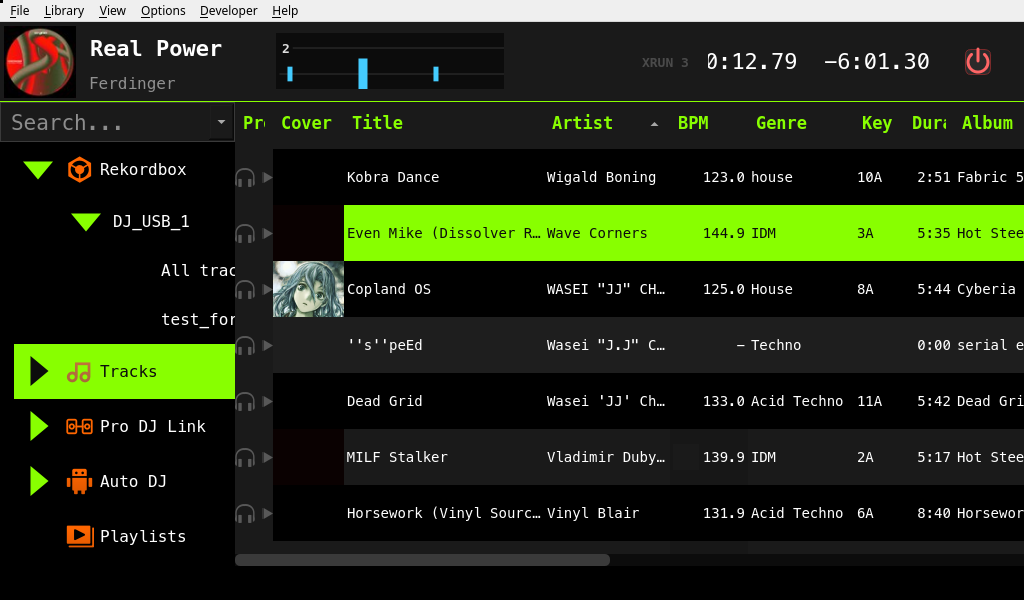 |
| Scrolling waveform with the beat grid, red downbeats anchored on the intro cue, and the whole-track overview underneath. Tempo and pitch sit bottom-right; the header carries artwork, title/artist, the phase meter, elapsed/remaining and the underrun counter. | Rekordbox USBs, the local collection and the Pro DJ Link players lead the menu — the three a deck actually reaches for. The left column sizes itself to its content and follows the selection, and neither pane has a scrollbar: the encoder scrolls them. |
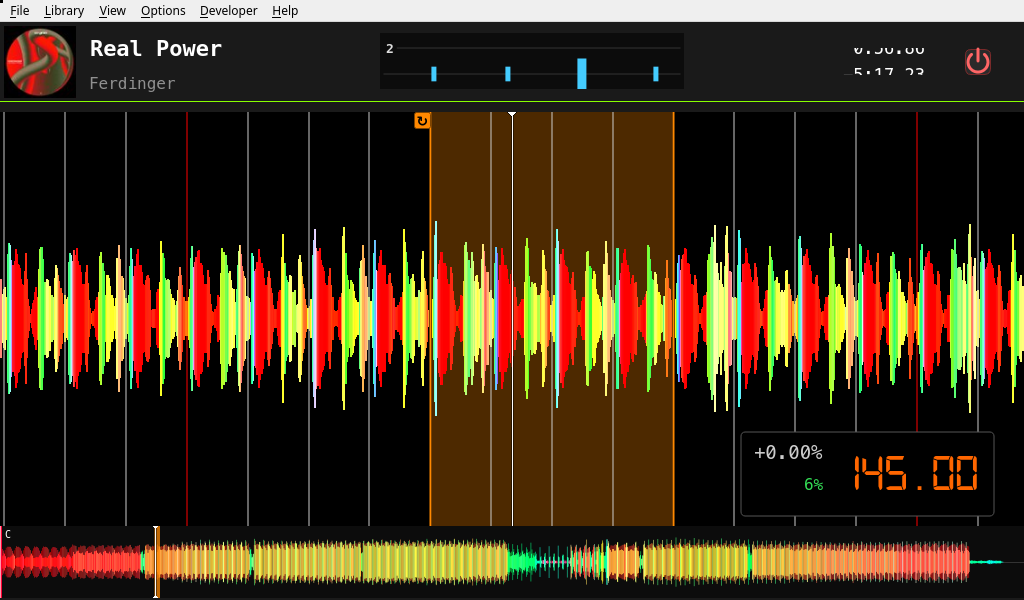
An active loop, set from the deck's hardware loop-in/out buttons, drawn as an amber window over the waveform. Nothing sits below it — the transport, hotcues, loop sizing and tempo range are all physical controls, so the screen gives that space back to the waveform.
TriMixxx replaces the internals of a Pioneer CDJ with modern, open-source-friendly hardware while keeping the physical controls that DJs know and love. Plug in a Rekordbox-formatted USB stick, and you're ready to mix.
Where the CDJ's original main board did everything, TriMixxx today is a small distributed system: a Raspberry Pi runs a patched Mixxx behind a custom CDJ-style skin, an ESP32-S3 acts as the controller brain that reads every physical control and speaks MIDI, and a swarm of tiny satellite boards handle the buttons and the LED rings. They all talk over plain TTL UART.
It is a working deck, not a plan: the Pi boots straight into Mixxx, the USB stick automounts, the S3's controls drive it, and Mixxx's feedback drives the LEDs back. Alongside that, prolinks-compat/ has reverse-engineered Pioneer's ProLink protocol far enough that a real CDJ-2000NXS browses and plays tracks served by this project.
This project has been through several complete redesigns. It's worth keeping the lineage straight:
One board to rule them all. The first idea was a single monolithic PCB carrying everything: a Raspberry Pi CM5, a TI PCM5242 I²S DAC with RCA + headphone outputs, USB-C PD power (CH224K + SY8368AQQC buck), dual micro-HDMI, the USB stick ports, and an ATmega32U4 presenting the CDJ's buttons/jog/fader to the Pi as a USB-MIDI device — all on one board. It was fully routed (screenshots/CDJ-MainBoard-v1_fully_routed.png, and the *_2026-02-17.png schematic captures) but never became the working unit; cramming compute, audio, power, and a controller onto one board made every revision expensive and every mistake fatal.
Breaking it apart. The controller was split out onto its own board. boards/midi-laser-pcb was the first standalone MIDI-controller PCB — it was fabricated, then abandoned in favour of a cleaner design.
Where it is now. boards/midi_s3_mini is the current controller board (fabricated), hosting a LOLIN S3 Mini (ESP32-S3). The audio DAC and power delivery are no longer TriMixxx's job — a Raspberry Pi handles Mixxx and audio directly, and the S3 is purely the controller brain. The controls are spread across small purpose-built satellite boards, all of them already fabricated.
The old monolithic design is preserved in this README's history and in screenshots/ as a record of the road not taken.
flowchart LR
    subgraph PiBox["Raspberry Pi (deck)"]
        Mixxx["Mixxx (patched fork)<br/>+ TriMixxx skin"]
        Tty["ttymidi<br/>trimixxx-bridge.service"]
        Daemon["trimixxx-launchd<br/>(launch manager +<br/>SysEx to the OS)"]
        Usb["dj-usb automount<br/>/media/DJ_USB_*"]
        Doom["Doom (1993)<br/>hold PLAY at boot"]
        Keys["trimixxx-deckkeys<br/>MIDI -> /dev/uinput"]
    end

    S3["midi_s3_mini<br/>LOLIN S3 Mini / ESP32-S3<br/>(controller brain)"]
    RingA["OneButton ring A<br/>CH32V003 nodes<br/>button + 2xWS2812 each"]
    RingB["OneButton ring B<br/>CH32V003 nodes"]
    PlayCue["play_cue_btn<br/>Play / Cue + LEDs"]
    Loop["loop_btn<br/>Loop In/Out/Reloop + LEDs"]
    Jog["Jog wheel<br/>quadrature + touch"]
    CDJ["Real CDJs<br/>(ProLink, Ethernet)"]

    Mixxx <--> Tty
    Mixxx <-->|SysEx| Daemon
    Usb --> Daemon
    Daemon -->|"picks the boot mode"| Mixxx
    Daemon -->|"picks the boot mode"| Doom
Daemon --> Keysmixxx/ submodule), branched off the 2.5.6 tag and carrying deck-specific patches. ttymidi turns the UART link into an ALSA MIDI device, so Mixxx sees TriMixxx as a standard MIDI controller. That link is 3.3 V on both ends (Pi GPIO ↔ S3), so no level shifting is needed.firmwares/trimixxx-midi.A worked example of what happens end-to-end, from copper to Mixxx. Every other button on the deck follows the same path.
Press. The switch closes and shorts the on-board 100 nF debounce cap to ground, so the GPIO (held high by the S3's internal pull-up) falls low over the RC's time constant — the buttons are active-low. buttonPollTask on core 1 samples the pin every BTN_POLL_MS = 2 ms and needs DEBOUNCE = 3 consecutive stable samples before it accepts the edge, so the RC's slow ramp and any contact bounce are both ignored (~6 ms to accept). Polling is deliberate here rather than an edge interrupt, which slow RC edges tend to upset on the ESP32. On accepting the edge, poll() updates the debounced level and sets a sticky press latch, so the press can't be missed even if the main loop stalls. The main loop (CTRL_POLL_MS = 2 ms) calls playCue.pressed(), which consumes the latch, and btnToNote() hands it to PiLink, which writes a Note-On (note 0x3C, velocity 127) to UART0 at 115200 baud. ttymidi on the Pi turns those raw MIDI bytes into an ALSA MIDI event; Mixxx matches 0x3C in TriMixxx.midi.xml and calls TriMixxx.play, which toggles the deck's play control.
Held. Nothing repeats. The sticky latch fires exactly once per press; btnToNote keeps a pending flag so it knows a Note-Off is still owed. Meanwhile Mixxx sends play_indicator back on the same note 0x3C — pi.poll() runs every main-loop pass (no 2 ms gate, for the lowest LED latency) and drives the button's LED from that feedback, so the LED reflects Mixxx's actual state rather than the button's.
Release. The switch opens, the pull-up recharges the cap through the RC, and the pin rises. The poll task sees 3 stable high samples, clears level, and the next main-loop pass sees pending && !held and sends the Note-Off. Mixxx's TriMixxx.play ignores value 0, so the release is a no-op there — it just keeps the On/Off pairing well-formed on the wire.
All MIDI addresses live in one place — firmwares/trimixxx-midi/lib/PiLink/MidiMap.hpp — and the Mixxx mapping (mixxx_config/TriMixxx.midi.xml) matches them exactly. One deck (v1) → MIDI channel 1.
| Control | MIDI | Mixxx |
|---|---|---|
| Ring A pads (node i) | Note 0x00 + i | Tempo range, keylock, 8/4-beat loops, loop double/halve, back |
| Ring B pads (node i) | Note 0x43 + i | Hotcues 1–4, slip, key-sync indicator |
| Play / Cue | Notes 0x3C / 0x3D | play (toggle) / cue_default |
| Loop In / Out / Reloop | Notes 0x3E / 0x3F / 0x40 | loop_in / loop_out / reloop_toggle |
| Track encoder | Note 0x41 (press) + CC 0x10 (relative: 1=up, 127=down) | Browse + load |
| Jog wheel | Note 0x42 (touch/scratch) + CC 0x11 (relative ticks) | Scratch when touched, pitch bend otherwise |
| Tempo fader | CC 0x12 MSB + CC 0x32 LSB (14-bit absolute 0..16383, 8192 = center) | rate |
Both pad ranges reserve 50 notes even though fewer nodes are populated today, so growing a ring never renumbers anything.
The tempo fader follows the standard MIDI 14-bit convention — the LSB rides on MSB + 32 (18 + 32 = 50 = 0x32) — and Mixxx binds the pair to [Channel1] rate with <fourteen-bit-msb/> / <fourteen-bit-lsb/>. The extra resolution is worth the second CC: a single 7-bit CC would quantise the whole pitch range to 128 steps. The fader is read ratiometrically (wiper minus a live center-tap reference) so the center detent lands on 8192 without calibration.
LED feedback comes back on the same notes. A Note-On velocity only sets white brightness, so full RGB travels as SysEx instead — F0 7D <cmd> <node> <colour nibbles> F7, with each 8-bit channel split into two data bytes so a 7-bit SysEx payload can still express 0..255 per channel (0x01 = ring A, 0x03 = ring B). 0x02 reboots the S3, and requires the magic "RST" so a stray SysEx can't reset the deck mid-set.
All KiCad projects live under boards/. Every board below has been fabricated.
| Board | Role | MCU | Status |
|---|---|---|---|
midi_s3_mini | Controller brain: reads all controls, MIDI bridge to the Pi, drives LEDs, jog-wheel input | LOLIN S3 Mini (ESP32-S3) | Current |
one_button | Ring node: one button + 2× WS2812, cut-through UART relay. Every node is identical. | CH32V003F4U6 | Current |
play_cue_btn | Play + Cue buttons with LEDs (driven by the S3) | none | Current |
loop_btn | Loop In/Out/Reloop buttons with LEDs (driven by the S3) | none | Current |
midi-laser-pcb | First standalone MIDI-controller board | — | Fabricated, abandoned (superseded by midi_s3_mini) |
| Firmware | Runs on | What it is |
|---|---|---|
trimixxx-midi | midi_s3_mini (ESP32-S3) | The master. PlatformIO/Arduino. Reads both OneButton rings + jog wheel + deck controls and bridges them to the Pi as MIDI. Master of both rings. |
onebutton | one_button ring nodes (CH32V003) | Bare-metal ch32fun. onebutton_node (the identical binary every ring node runs) and onebutton_selftest (single-board bring-up). |
swio-adapter | A spare Pro Micro | Turns an Arduino into a minichlink SWIO programmer for flashing the CH32V003 nodes — no dedicated programmer needed. Git submodule. |
ArduinoMIDI | (historical) | Early ATmega-based MIDI + jog-wheel test sketches from the monolithic-board era. |
Every driver in trimixxx-midi is written and live: both rings, jog wheel, tempo fader, track encoder, play/cue board and loop board. A single DECK_DEBUG switch at the top of main.cpp swaps the MIDI loop for each module's own self-test.
The button rings run a purpose-built cut-through UART ring protocol. A single fixed-length frame, authored by the S3 master, circulates once around the ring and returns carrying every node's button state; LED colours travel outward on the same frame. Each node forwards bytes as they arrive, editing only the bytes in its own slot, so latency scales as frame_time + N·byte_time rather than N·frame_time. Node addresses are assigned positionally at boot, so all nodes run an identical binary with no per-unit configuration.
Full wire format, timing, and failure model: firmwares/onebutton/onebutton-protocol.md.
The deck's software is split into four pieces, each with its own README:
| Piece | What it is |
|---|---|
mixxx/ (submodule) | Our Mixxx fork. Forked at 2.5.6, carrying deck patches: downbeat highlighting in the waveform (DownbeatColor skin node), Rekordbox beat-grid phase preserved via the intro cue, and a [Rekordbox], refresh control so a stick mounted mid-set can be picked up from a script. Built for arm64 in Docker and installed over SSH. |
mixxx_config/ | Everything under ~/.mixxx: the controller mapping (TriMixxx.midi.xml + .scripts.js), the PiMidiDaemon mapping, soundconfig.xml, and TriMixxx_skin/ — a single-deck CDJ-style skin for the 1024×600 touchscreen. Its deploy step, pi-qemu/deploy/005_config.sh, validates every XML before anything leaves the machine, because Qt silently falls back to the default skin on a malformed one. |
pi_config/ | The system side: trimixxx-bridge.service (ttymidi, ordered before Mixxx so the MIDI port exists when Mixxx enumerates devices), cpu-governor.service (the performance governor — ondemand was the measured cause of xruns while scratching), the session entry points (bash_profile, xinitrc) that start whichever app the launch manager chose, and dj-usb/ (udev + systemd read-only automount of DJ sticks). |
trimixxx-launcher/ | Two small Go daemons. trimixxx-launchd does the things Mixxx cannot — its script engine has no file, process or network access, so MIDI is the only channel out, and the daemon takes SysEx commands (shutdown, reboot, switch mode) and reports events back (a DJ stick was mounted). It is also the launch manager: it reads the deck's own buttons at boot and decides what the deck becomes. trimixxx-deckkeys replays the deck's MIDI into /dev/uinput as a virtual keyboard and mouse. Both ship as fully static musl binaries, so there is nothing to install on the Pi. |
doom/ | The deck plays DOOM (1993). Hold PLAY while it boots. The jog wheel turns, the tempo fader is the throttle, ring A is the seven weapons. Doom itself is a stock chocolate-doom — the controls arrive as a virtual keyboard and mouse, so there is no engine fork here to maintain. |
prolinks-compat/ reverse-engineers Pioneer's proprietary CDJ ProLink Ethernet protocol so TriMixxx can share libraries with real CDJs on the same network. It is a substantial subproject in its own right — a Python proof-of-concept plus a written specification — and both directions now work against real hardware (two CDJ-2000NXS):
export.pdb over NFS and list its tracks. The fetched database is byte-identical to the same file read off the physically ejected stick.The protocol as observed is written up in prolinks-compat/docs/PROTOCOL.md, with the evidence behind every claim in docs/FINDINGS.md and current state in STATUS.md. The end goal is to port the validated approach into Mixxx (C++/Qt) and upstream it.
ProLink can also be tried without the booth: emulated CDJ-2000NXSs, on Pioneer's own firmware, run on a Mac on one network with emulated TriMixxx decks. docs/cdj-emulator-quickstart.md starts one.
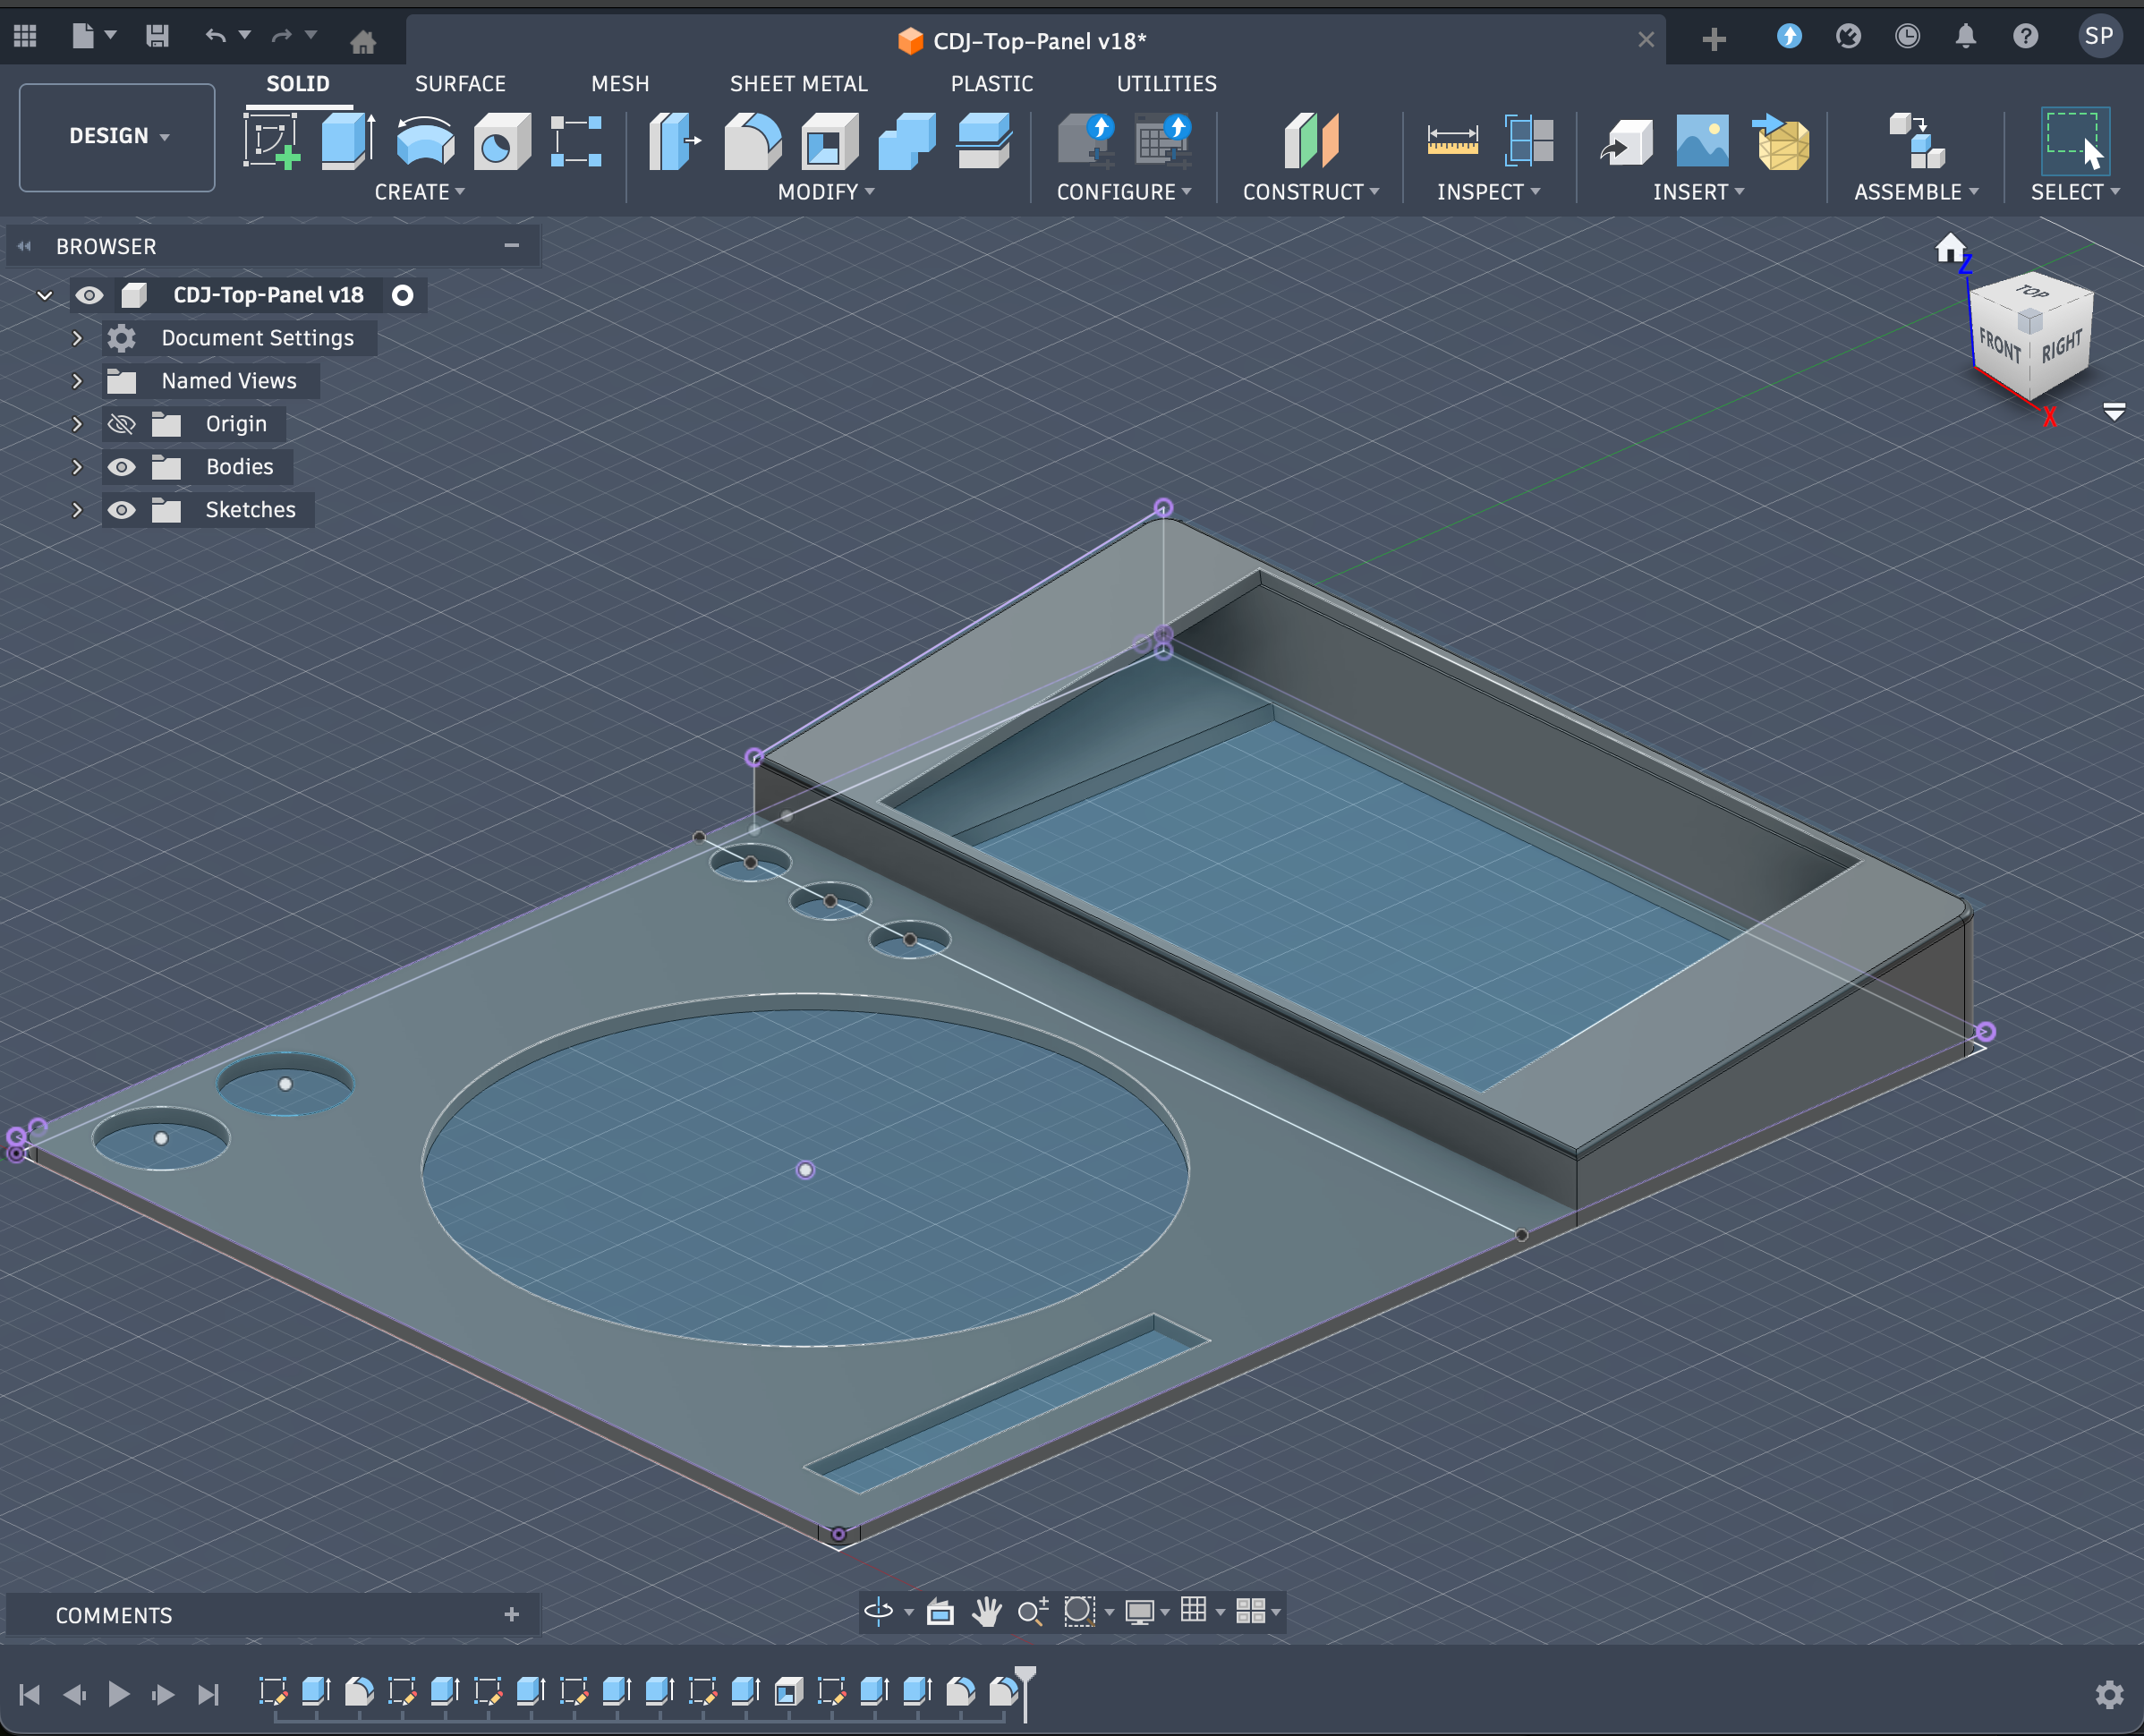
Designed in Fusion 360 to fit the original CDJ form factor — a custom top panel with cutouts for the jog wheel, buttons, and connectors, plus a bottom tray. ref_sizes/ holds the measured references (CDJ-1000MK3 / 2000NXS2 / 3000 dimensions, jog wheel, screen) the design is built from.
boards/                     KiCad PCB projects
├── midi_s3_mini/               Current controller board (ESP32-S3)
├── one_button/                 OneButton ring node (CH32V003)
├── play_cue_btn/               Play + Cue buttons
├── loop_btn/                   Loop buttons
└── midi-laser-pcb/             Abandoned first controller board

firmwares/                  Embedded firmware
├── trimixxx-midi/              S3 master (PlatformIO / Arduino)
├── onebutton/                  Ring node + selftest (ch32fun)
├── swio-adapter/               CH32V003 SWIO programmer (submodule)
└── ArduinoMIDI/                Historical ATmega sketches

mixxx/                      Our Mixxx fork -- the build the deck runs (submodule)
mixxx_config/               ~/.mixxx: mapping, scripts, skin, sound config
pi_config/                  Pi system config: systemd units, udev, USB automount
trimixxx-launcher/          Go daemons: boot-mode launch manager, SysEx <-> OS,
                            and the MIDI -> virtual keyboard/mouse bridge
doom/                       DOOM (1993) on the deck: WAD, engine config, wrapper

prolinks-compat/            Pioneer ProLink protocol research + Python PoC
ch32fun/                    ch32fun toolkit (submodule)
handmade_pcb/               Hand-etched PCB experiments
datasheet/                  Datasheets for the parts used
ref_sizes/                  Measured CDJ dimensions the chassis is built from
screenshots/ Renders + schematics (incl. the monolithic-board history)minichlink flashinguv) — Pi daemon and ProLink proof-of-conceptTriMixxx is an independent project with no affiliation with, sponsorship by, or endorsement from AlphaTheta Corporation (formerly Pioneer DJ) or the Mixxx project.
CDJ, rekordbox, Pro DJ Link, DJM, NXS/nexus and Pioneer DJ are trademarks of AlphaTheta Corporation. They appear here only to refer to that company's own products — which hardware this project interoperates with, which protocol it speaks, and which units the chassis was measured against. Mixxx is the name of the independent open-source project at mixxx.org; "TriMixxx" is this project's own name and is not a Mixxx project product.
The ProLink work in prolinks-compat/ is reverse engineering for interoperability, from observation of network traffic between devices the author owns. Protocol facts are not copyrightable, and no code from any reference implementation is copied — see prolinks-compat/research/10 for the working discipline.
Copyright (C) 2026 Samuel Prevost and contributors.
TriMixxx is free software: you can redistribute it and/or modify it under the terms of the GNU General Public License version 3 or (at your option) any later version. The full text is in LICENSE. This covers everything in the repository — firmware, host software, hardware sources and documentation alike — except:
prolinks-compat/, which is GPLv2-or-later on purpose, so it stays compatible with Mixxx and can be upstreamed. GPLv2-or-later code may be used under GPLv3, so this is compatible with the rest of the project; see prolinks-compat/LICENSE.mixxx/, ch32fun/, firmwares/swio-adapter/, mixxx_config/ttymidi/, the Keebio libraries), which keep their own upstream licenses.The original single-board design is no longer built, but its details are recorded here for posterity. It centred on a Raspberry Pi CM5 (dual DF40 100-pin connectors), a TI PCM5242 I²S DAC feeding RCA + 6.35 mm + 3.5 mm outputs, an ATmega32U4 USB-MIDI controller reading all the CDJ controls, USB-C PD power (CH224K negotiating 20 V @ 3 A, SY8368AQQC buck to 5 V, AP2112K LDOs), dual micro-HDMI, gigabit Ethernet, and the USB stick ports (HD3SS3220/HD3SS3212 muxing, USBLC6-2SC6 ESD protection) — roughly 160 components on one PCB.
| Sheet | File |
|---|---|
| Audio outputs (DAC, RCA, headphones) | screenshots/audio_2026-02-17.png |
| MIDI / ATmega controller | screenshots/midi_arduino_2026-02-17.png |
| Power delivery (USB-C PD, buck, LDOs) | screenshots/power_delivery_2026-02-17.png |
| USB ports (mux, ESD) | screenshots/usb_2026-02-17.png |
| Fully routed PCB | screenshots/CDJ-MainBoard-v1_fully_routed.png |
screenshots/dac_spice.pngscreenshots/buck_converter_spice.png| Qty | Value | Footprint | References |
|---|---|---|---|
| 21 | 1KΩ ±1% | easyeda2kicad:R0402 | R1, R2, R10, R11, R12, R13, R14, R15, R16, R18, R19, R20, R21, R22, R23, R24 +5 |
| 13 | 100n | easyeda2kicad:C0402 | C1, C2, C4, C5, C6, C7, C8, C9, C10, C13, C15, C19, C21 |
| 9 | SRV05-4 | easyeda2kicad:SOT-23-6_L2.9-W1.6-P0.95-LS2.8-BL | TVS1, TVS2, TVS3, TVS4, TVS5, TVS6, TVS7, TVS8, TVS9 |
| 4 | MountingHole | MountingHole:MountingHole_4.3mm_M4_ISO7380 | H1, H2, H3, H4 |
| 3 | 22uF 25V | easyeda2kicad:C0805 | C16, C17, C18 |
| 3 | 3.3KΩ ±1% | easyeda2kicad:R0402 | R4, R6, R30 |
| 3 | Fiducial | Fiducial:Fiducial_1mm_Mask2mm | FID1, FID2, FID3 |
| 2 | 1.8KΩ ±1% | easyeda2kicad:R0603 | R3, R5 |
| 2 | SS14 | easyeda2kicad:SMA_L4.2-W2.6-LS5.0-RD_1 | D3, D4 |
| 1 | 1.5KΩ ±1% | easyeda2kicad:R0402 | R36 |
| 1 | 1000uF / 35 V | easyeda2kicad:CAP-TH_BD10.0-P5.00-D1.0-FD | C14 |
| 1 | 100KΩ ±1% | easyeda2kicad:R0603 | R31 |
| 1 | 10KΩ ±1% | easyeda2kicad:R0402 | R17 |
| 1 | 10nF ±10% 50V | easyeda2kicad:C0402 | C3 |
| 1 | 1BTN_A_RX | easyeda2kicad:CONN-TH_3P-P2.00_S3B-PH-K-S-LF-SN | J2 |
| 1 | 1BTN_A_TX | easyeda2kicad:CONN-TH_3P-P2.00_S3B-PH-K-S-LF-SN | J1 |
| 1 | 1BTN_B_RX | easyeda2kicad:CONN-TH_3P-P2.00_S3B-PH-K-S-LF-SN | J3 |
| 1 | 1BTN_B_TX | easyeda2kicad:CONN-TH_3P-P2.00_S3B-PH-K-S-LF-SN | J4 |
| 1 | 1uF ±10% 50V | easyeda2kicad:C0603 | C_LDO_in1 |
| 1 | 1Ω ±1% | easyeda2kicad:R0402 | R33 |
| 1 | 2.2uF ±10% 50V | easyeda2kicad:C0805 | C_LDO_out1 |
| 1 | 22KΩ ±1% | easyeda2kicad:R0402 | R34 |
| 1 | 4.7uF ±10% 25V | easyeda2kicad:C0805 | C20 |
| 1 | 470Ω ±1% | easyeda2kicad:R0402 | R35 |
| 1 | 47KΩ ±1% | easyeda2kicad:R0402 | R32 |
| 1 | AO3401A | easyeda2kicad:SOT-23_L2.9-W1.3-P1.90-LS2.4-BR | Q1 |
| 1 | B5819W_C8598 | easyeda2kicad:SOD-123_L2.7-W1.6-LS3.7-RD-1 | D2 |
| 1 | GND_IN | Connector_PinHeader_2.54mm:PinHeader_1x01_P2.54mm_Vertical | J15 |
| 1 | GND_PERI | Connector_PinHeader_2.54mm:PinHeader_1x01_P2.54mm_Vertical | J18 |
| 1 | Green | easyeda2kicad:LED0805-R-RD | LED_3V3_S1 |
| 1 | JOG | easyeda2kicad:CONN-TH_S5B-PH-K-S-LF-SN | J10 |
| 1 | LDO_OUT | TestPoint:TestPoint_Pad_D2.5mm | TP3 |
| 1 | LOLIN_S3_Mini | S3_mini_LOLIN:LOLIN_S3_Mini | U1 |
| 1 | LOOP | easyeda2kicad:CONN-TH_7P-P2.00_S7B-PH-K-S-LF-SN | J7 |
| 1 | MF-R250 | easyeda2kicad:FUSE-TH_L12.8-W3.0-P5.80-D1.2-S2.20 | F1 |
| 1 | P6SMB6.8CA | easyeda2kicad:SMB_L4.6-W3.6-LS5.3-BI | D1 |
| 1 | PLAY_CUE | easyeda2kicad:CONN-TH_6P-P2.00_S6B-PH-K-S-LF-SN | J8 |
| 1 | Power3V3_from_USB | Connector_PinHeader_2.54mm:PinHeader_1x02_P2.54mm_Vertical | JP1 |
| 1 | PowerIn | TerminalBlock_Altech:Altech_AK300_1x02_P5.00mm_45-Degree | J13 |
| 1 | Red | easyeda2kicad:LED0805-RD | LED_5V1 |
| 1 | SPX3819M5-L/TR | easyeda2kicad:SOT-23-5_L3.0-W1.7-P0.95-LS2.8-TL | U2 |
| 1 | SolderJumper_2_Open | Jumper:SolderJumper-2_P1.3mm_Open_TrianglePad1.0x1.5mm | JP2 |
| 1 | TEMPO | easyeda2kicad:CONN-TH_4P-P2.00_S4B-PH-K-S-LF-SN | J9 |
| 1 | TEST_3V3_PERI | Connector_PinHeader_2.54mm:PinHeader_1x01_P2.54mm_Vertical | J17 |
| 1 | TEST_3V3_S3 | Connector_PinHeader_2.54mm:PinHeader_1x01_P2.54mm_Vertical | J16 |
| 1 | TEST_5V | Connector_PinHeader_2.54mm:PinHeader_1x01_P2.54mm_Vertical | J14 |
| 1 | TRACK_ENC | easyeda2kicad:CONN-TH_S5B-PH-K-S-LF-SN | J6 |
| 1 | UART_PI | easyeda2kicad:CONN-TH_4P-P2.00_S4B-PH-K-S-LF-SN | J5 |
| 1 | VBUS_S3 | TestPoint:TestPoint_Pad_D2.5mm | TP1 |
| 1 | VIN_5V | TestPoint:TestPoint_Pad_D2.5mm | TP2 |
| 1 | Yellow | easyeda2kicad:LED0805-R-RD | LED_3V3_PERI1 |
usr-ein/TriMixxx
Open source standalone DJ multimedia player, compatible with Rekordbox

usr-ein/TriMixxx
Open source standalone DJ multimedia player, compatible with Rekordbox

usr-ein/TriMixxx
Open source standalone DJ multimedia player, compatible with Rekordbox

usr-ein/TriMixxx
Open source standalone DJ multimedia player, compatible with Rekordbox


JuanPoueriet/automatic-spork
Máquina de ruleta física de casino. 6 PCBs: pic32main (cerebro), wheel (rueda de LEDs), displaysa/b/c (paneles de 7 segmentos en cascada) y buttons (botonera).


FreeSK8/FreeSK8-NRF52-BLE-Hardware
KiCAD Design Files for NRF52 BLE Module - Based on Fanstel 840

Dhruv2212-star/Motor-driver
it is a very simple motor driver that will recive the data from another micro-controller


It measures 90 × 70 mm and has 2 copper layers, 1.6 mm thick.
102 parts, built around the SPX3819M5-L/TR, CL05B104KB54PNC, SRV05-4 and CL21A226MAQNNNE. The full list of its parts is on this page, with links to each part's symbol and footprint where PCBKit's library has them.
From the usr-ein/TriMixxx repository on GitHub, at the commit this page was made from: the board is boards/midi_s3_mini/midi_s3_mini.kicad_pcb and its schematic boards/loop_btn/loop_btn.kicad_sch. PCBKit opens the board in the browser, with nothing to install.
Its repository publishes it under the GPL-3.0 licence: you may reuse it on that licence's terms (keep the author's notice, and for a copyleft licence share your changes alike).