2 layers28.3 × 39.8 mm
LevelShifter
gusmanb/logicanalyzer
24 channel, 100Msps logic analyzer hardware and software
21 parts5.1kGPL-3.0
 UnitedCode/synth-phone-e-v2-rust1
This guide will help you set up your environment for embedded development using Rust. We'll cover the installation of necessary tools and libraries, and show you how to flash your program to a microcontroller and debug…
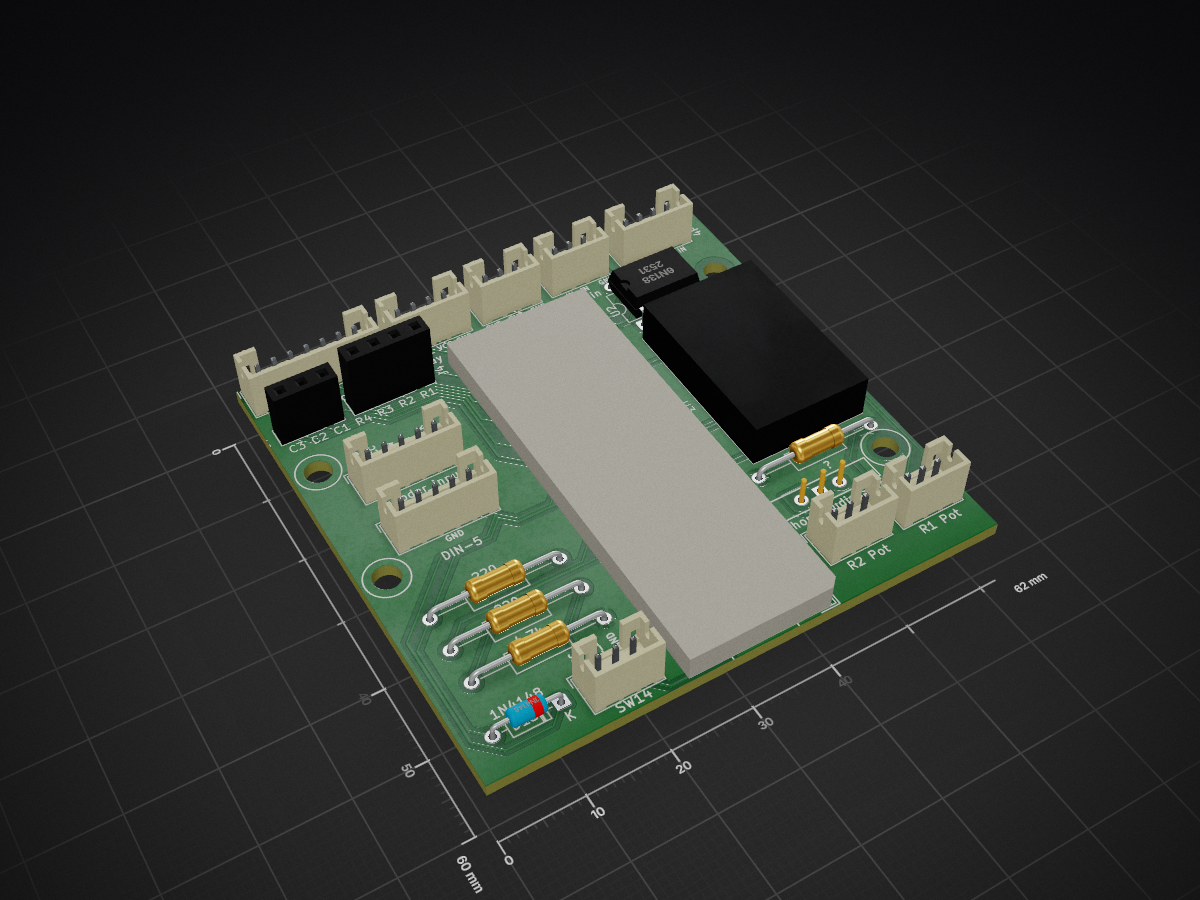
Synth phone e v2-hardware v2 is an open-source printed circuit board by UnitedCode, from the UnitedCode/synth-phone-e-v2-rust repository on GitHub. It is a 2-layer board of 62 × 60 mm with 21 parts on 56 nets, routed with 353 tracks and 7 vias.
Its parts include 9 connectors, 4 resistors, 2 ICs, 2 switches and 1 diode. It belongs with the audio and music boards of this library.
This guide will help you set up your environment for embedded development using Rust. We'll cover the installation of necessary tools and libraries, and show you how to flash your program to a microcontroller and debug it.
Ensure you have Rust installed on your system. If not, you can install it from the official Rust website.
Add the Rust Target for ARM Cortex-M microcontrollers:
rustup target add thumbv7em-none-eabihfAdd LLVM Tools:
rustup component add llvm-tools-previewInstall cargo-binutils:
cargo install cargo-binutilsInstall cargo-embed (actually probe-rs):
https://probe.rs/docs/getting-started/installation/
cargo-embed is used for flashing your program to the microcontroller and provides a basic debugger.
To flash your program to a microcontroller, navigate to your project directory in the terminal and run:
cargo xtask embedThis command reads your Embed.toml configuration file (if present) and flashes the program accordingly.
The Rust audio lab runs the firmware's pinned vocal DSP on your computer, replays WAV recordings, and sweeps 720 pitch/key/formant settings. It measures pitch error and audio defects without flashing the Daisy.
LAB_HOST=$(rustc -vV | sed -n 's/^host: //p')
cargo test --release --locked --manifest-path tools/audio-lab/Cargo.toml --target "$LAB_HOST"
cargo run --release --locked --manifest-path tools/audio-lab/Cargo.toml --target "$LAB_HOST" -- sweep audio-lab-results
# Execute the ARM DSP in QEMU (requires qemu-system-arm):
cargo run --release --locked --manifest-path tools/audio-lab/Cargo.toml --target "$LAB_HOST" -- emulate audio-lab-results/arm
The virtual Daisy now boots the actual production ELF under Renode, feeds audio through modeled codec/SAI/DMA peripherals and records stereo WAV output. Its regression command checks tuning, boot completion and audio continuity, then verifies detection of silent input and lost RX DMA.
cargo run --release --locked --manifest-path tools/virtual-daisy/Cargo.toml --target "$LAB_HOST" -- run /absolute/path/to/renode-runtime audio-lab-results/daisy --board rev5The ARM emulation guide covers the complementary QEMU DSP parity tests. Physical hardware is still needed to calibrate performance and analog codec behavior. The audio-testing guide documents known quality failures and how CI distinguishes regressions from unresolved issues.
Select the physical Seed revision: rev4 (AK4556), rev5 (WM8731), or rev7
(PCM3060). See the conformance evidence and remaining gaps
before interpreting a simulated pass as evidence about real hardware.
Install gdb-multiarch to debug a wide range of architectures:
sudo apt-get install gdb-multiarcharm-none-eabi-gdb, which is the debugger for ARM microcontrollers.Use Homebrew to install the ARM version of GDB:
brew install arm-none-eabi-gdbTo start a debug session, you need a GDB server running for your specific microcontroller. This might be provided by cargo embed, OpenOCD, or JLinkGDBServer, depending on your setup.
Start the GDB Server (if not automatically started by cargo embed):
This step varies depending on your hardware and the software you're using as a GDB server. Refer to your hardware's documentation or the documentation of the GDB server software.
Connect to the GDB Server:
gdb-multiarch or arm-none-eabi-gdb respectively.arm-none-eabi-gdb from the GNU Arm Toolchain.Open a terminal and run:
gdb-multiarch target/thumbv7em-none-eabihf/debug/synth-phone-e-v2-rustReplace gdb-multiarch with arm-none-eabi-gdb if you're on Windows or macOS
Inside GDB, connect to the local GDB server:
target remote :1337The port 1337 is an example; use the port number on which your GDB server is running.
You're now ready to debug your program using GDB commands!
├── .cargo
│   └── config.toml # <- contains no build target, just command alias
├── .github
│   ├── workflows
│   │   ├── nightly.yml
│   │   ├── rustfmt.yml # <- linter
│   │   └── test.yml
├── .vscode
│   └── settings.json
├── Cargo.toml # <- outer Cargo workspace
├── autotune # <- auto tune library, can be run on host
│   ├── Cargo.toml
│   └── src
├── cross # <- Embedded workspace cannot be ran on host
│   ├── Cargo.toml # <- inner Cargo workspace
│   ├── memory.x
│   ├── .cargo
│   │   └── config.toml # <- build target for daisy seed
│   ├── app
│   ├── board
│   ├── Embed.toml
│   ├── self-tests
│   └── target
├── docs| Qty | Value | Footprint | References |
|---|---|---|---|
| 2 | 220 | Resistor_THT:R_Axial_DIN0207_L6.3mm_D2.5mm_P15.24mm_Horizontal | R1, R5 |
| 2 | R_Potentiometer_Trim_US | Connector_JST:JST_PH_B3B-PH-K_1x03_P2.00mm_Vertical | RV2, RV3 |
| 1 | 1N4148 | Diode_THT:D_DO-35_SOD27_P7.62mm_Horizontal | D13 |
| 1 | 4.7k | Resistor_THT:R_Axial_DIN0207_L6.3mm_D2.5mm_P15.24mm_Horizontal | R4 |
| 1 | 4P4C | Connector_JST:JST_PH_B4B-PH-K_1x04_P2.00mm_Vertical | J16 |
| 1 | 6N138 | Package_DIP:DIP-8_W7.62mm | U2 |
| 1 | ? | Resistor_THT:R_Axial_DIN0207_L6.3mm_D2.5mm_P15.24mm_Horizontal | R2 |
| 1 | DIN-5 | Connector_JST:JST_PH_B5B-PH-K_1x05_P2.00mm_Vertical | J3 |
| 1 | Electrosmith_Daisy_Seed_Rev4 | Module:Electrosmith_Daisy_Seed | A1 |
| 1 | Jack-in | Connector_JST:JST_PH_B3B-PH-K_1x03_P2.00mm_Vertical | J5 |
| 1 | Keypad_column_output | Connector_PinSocket_2.54mm:PinSocket_1x04_P2.54mm_Vertical | J4 |
| 1 | SW_Push_SPDT | Connector_JST:JST_PH_B3B-PH-K_1x03_P2.00mm_Vertical | SW14 |
| 1 | SW_Wuerth_450301014042 | Button_Switch_THT:SW_Slide-03_Wuerth-WS-SLTV_10x2.5x6.4_P2.54mm | SW13 |
| 1 | display socket | Connector_JST:JST_PH_B4B-PH-K_1x04_P2.00mm_Vertical | J12 |
| 1 | encoder_input | Connector_JST:JST_PH_B5B-PH-K_1x05_P2.00mm_Vertical | J15 |
| 1 | jack-out | Connector_JST:JST_PH_B3B-PH-K_1x03_P2.00mm_Vertical | J8 |
| 1 | keypad socket | Connector_JST:JST_PH_B7B-PH-K_1x07_P2.00mm_Vertical | J6 |
| 1 | keypad_row_output | Connector_PinSocket_2.54mm:PinSocket_1x03_P2.54mm_Vertical | J7 |
| 1 | ~ | koobook:ssm2167 | U3 |
It measures 62 × 60 mm and has 2 copper layers, 1.6 mm thick.
21 parts. The full list of its parts is on this page, with links to each part's symbol and footprint where PCBKit's library has them.
From the UnitedCode/synth-phone-e-v2-rust repository on GitHub, at the commit this page was made from: the board is kicad/synth-phone-e-v2-hardware-v2/synth-phone-e-v2-hardware-v2.kicad_pcb and its schematic kicad/synth-phone-e-v2-hardware-v2/synth-phone-e-v2-hardware-v2.kicad_sch. PCBKit opens the board in the browser, with nothing to install.
Its repository states no licence, so its author keeps all rights: ask UnitedCode before reusing the design.
gusmanb/logicanalyzer
24 channel, 100Msps logic analyzer hardware and software

mntmn/amiga2000-gfxcard
MNT VA2000, an Open Source Amiga 2/3/4000 Graphics Card (Zorro II/III), written in Verilog


hackclub/OnBoard
💡 Join 1,000 teenagers and make your first PCB with a $100 grant!

drandyhaas/KiCadRoutingTools
A set of Python/Rust tools to aid routing in KiCad

Arrow-air/project-quiver
Project Quiver documentation, designs, and project artifacts.

