2 layers65 × 70 mm
AudioLux
udellc/Vibrosonics
Documentation (Doxygen) \ Hardware: Adafruit ESP32 Feather, MAX9744 Amplifier board, TT25-8 puck transducer, 3.5mm audio jack cable \ Dependencies: AudioLab · AudioPrism · Fast4ier
41 parts6GPL-3.0

 udellc/Vibrosonics6
Documentation (Doxygen) \ Hardware: Adafruit ESP32 Feather, MAX9744 Amplifier board, TT25-8 puck transducer, 3.5mm audio jack cable \ Dependencies: AudioLab · AudioPrism · Fast4ier
ViBravo September 2024 is an open-source printed circuit board by udellc, from the udellc/Vibrosonics repository on GitHub, published under the GPL-3.0 licence. It is a 2-layer board of 65 × 70 mm with 54 parts on 57 nets, routed with 195 tracks and 46 vias.
It is built around the LMV358IDR, MAX7403CSA+ and MAX7480ESA+. Its parts include 19 resistors, 18 capacitors, 7 connectors and 4 ICs.


Vibrosonics is a real-time audio-to-haptics system with an interactive web interface that allows deaf, hard-of-hearing, and sensory-focused users feel sound through vibrarions.
Documentation (Doxygen)
Hardware: Adafruit ESP32 Feather, MAX9744 Amplifier board, TT25-8 puck
transducer, 3.5mm audio jack cable
Dependencies: AudioLab
· AudioPrism
· Fast4ier
Millions of people experience barriers when it comes to audio-based media such as music, games, alerts, or live events. Vibrosoncis transforms those experiences by converting sound into meaningful tactile feedback.
Instead of hearing a beat, you feel it.
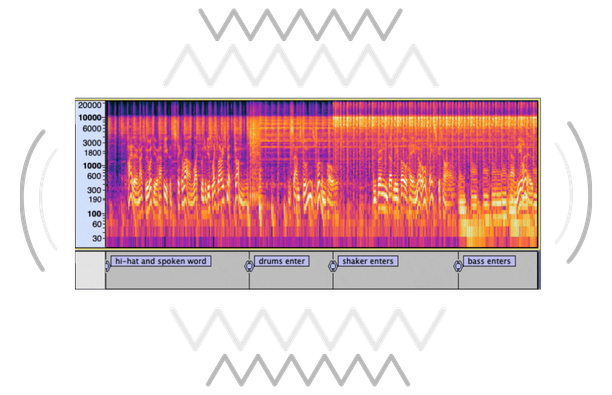
Built in collaboration with Cymaspace, an organization whose goal is to make culture and arts accessible for the deaf and hard-of-hearing community, Vibrosonics is designed to make music, entertainment, and environments more inclusive while also opening up new immersive experiences for everyone. This group makes up our primary audience, as haptic feedback can be used to replace or enhance audio. Some secondary users would be employers whose work environments make pure audio based communication difficult. They could instead receive important audio cues through haptics.
Real-Time Audio Conversion Transforms live audio input directly into haptic vibration with minimal latency.
Configurable Settings Through Web Application A browser-based app allows users to adjust haptic feedback in real-time with no recompiling or device flashing required.
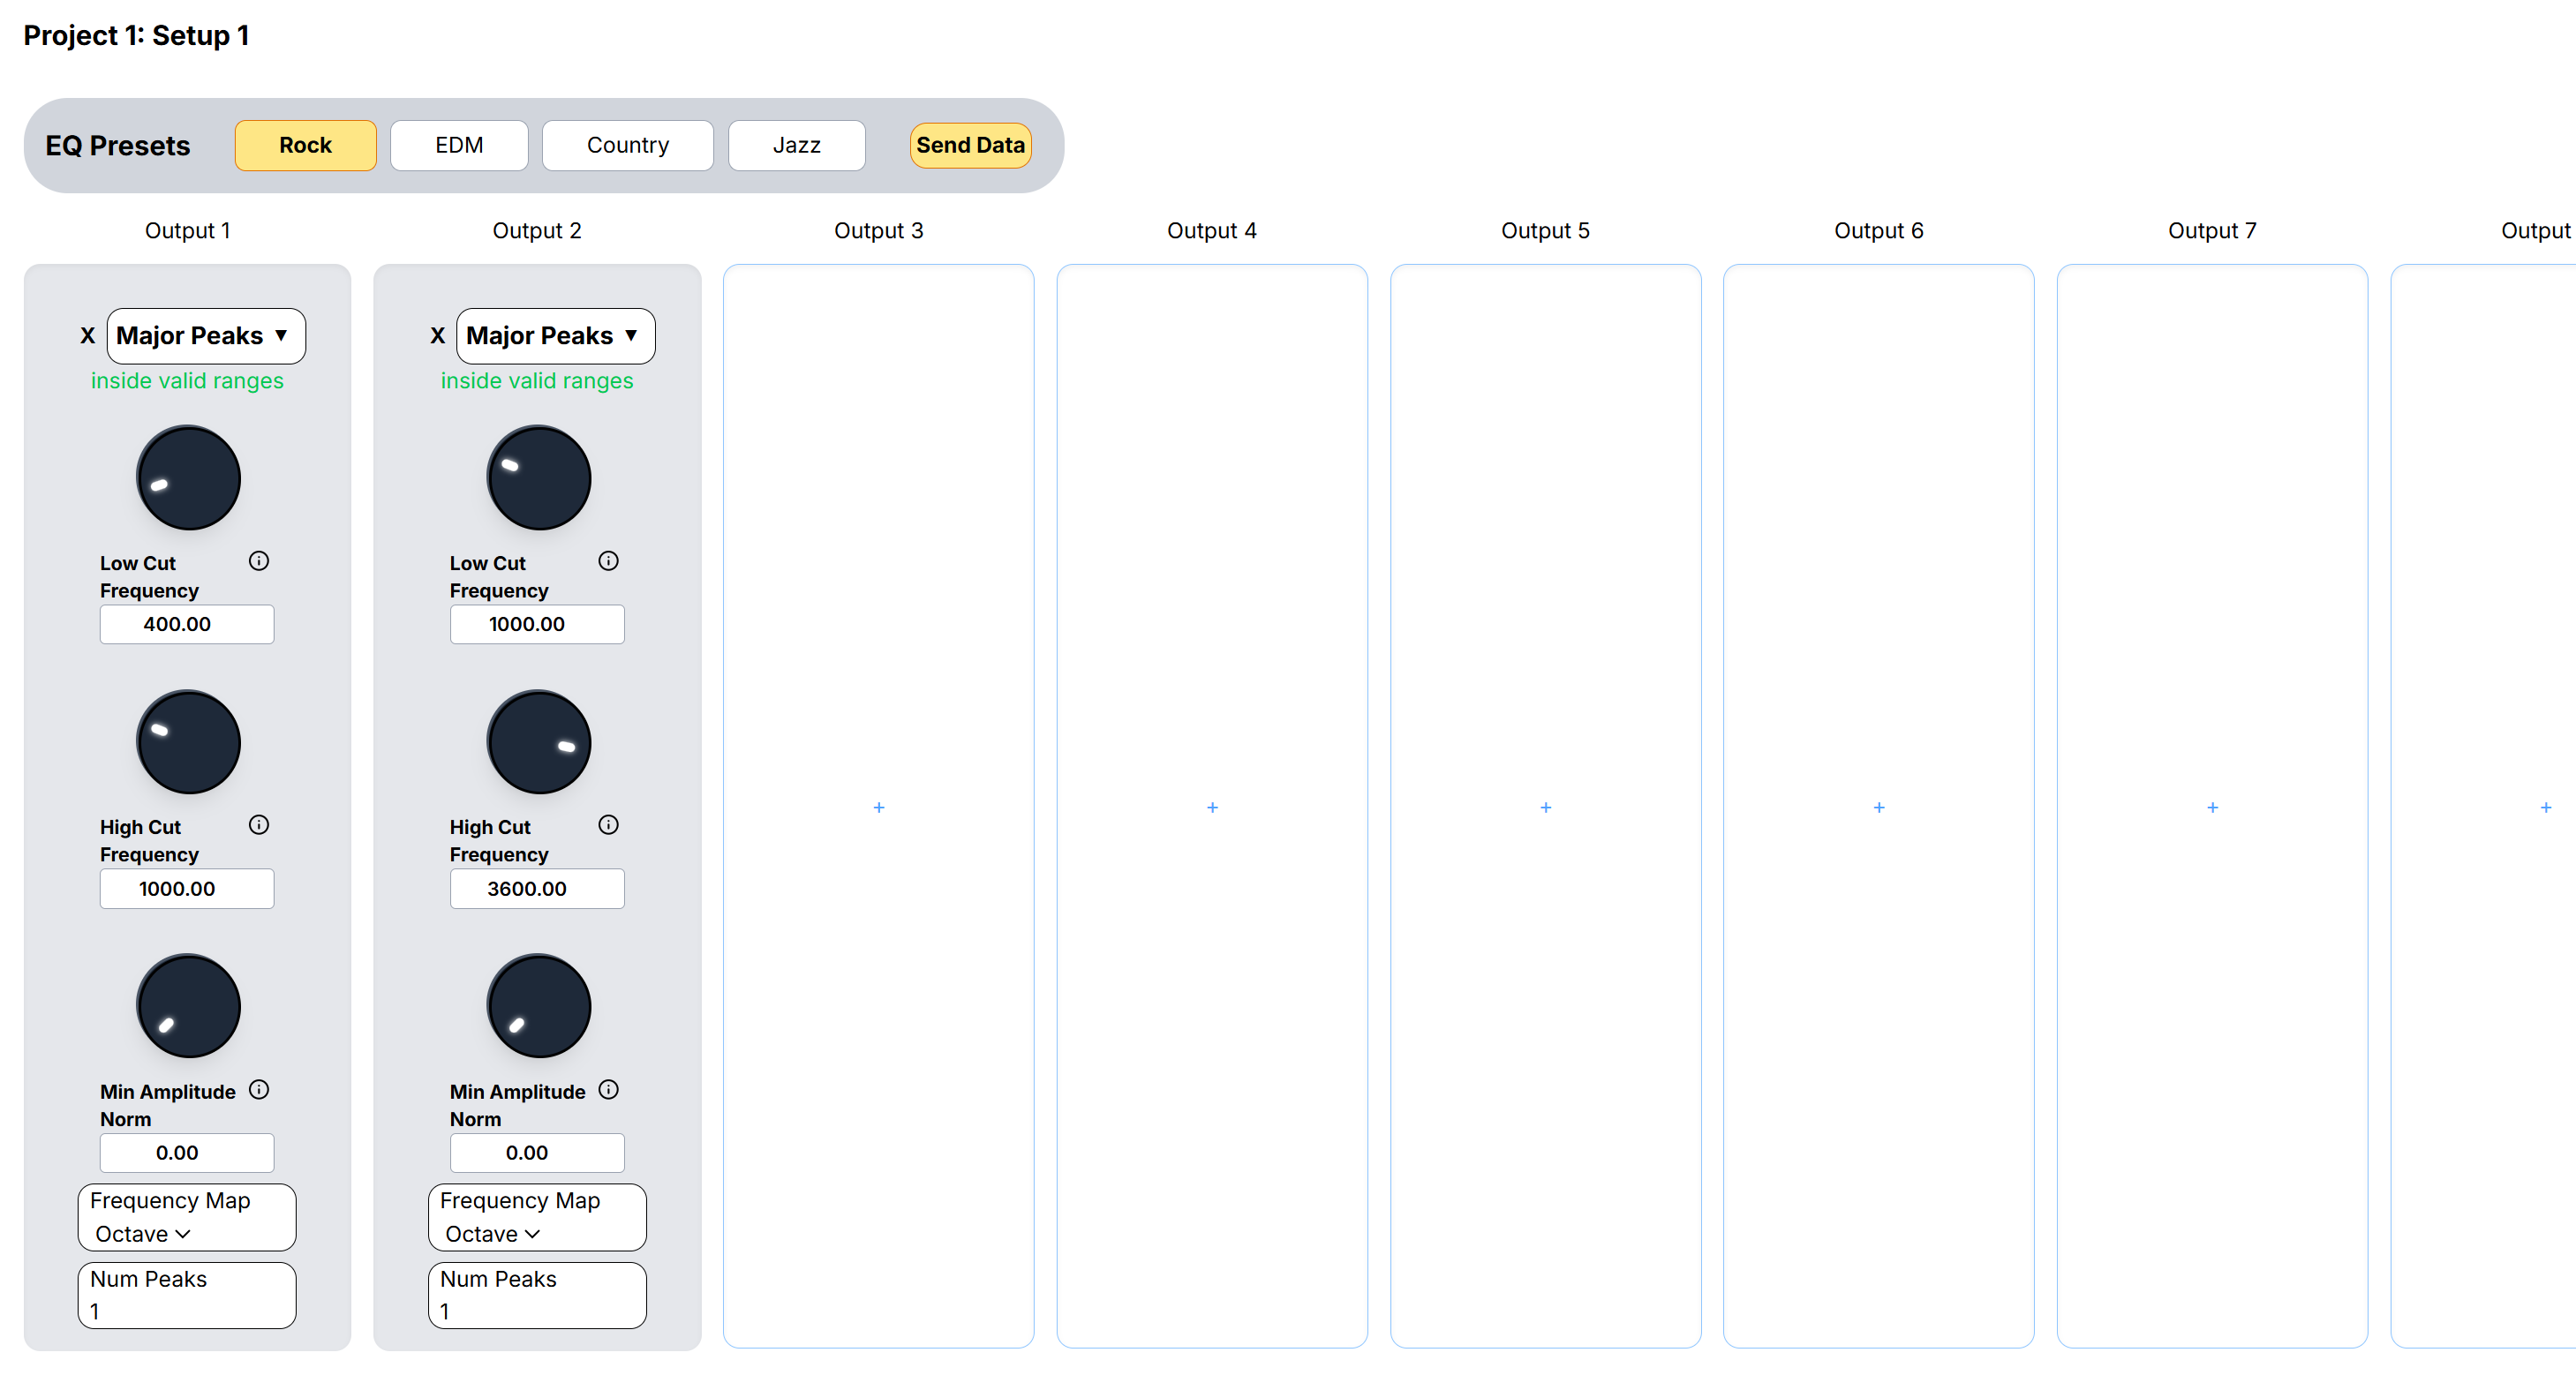
Frequency-Aware Feedback Different pitches and intensities map to distinct vibration patterns, preserving musical structure and adding depth.
Accessible by Design Built specifically for deaf and hard-of-hearing users, while also enhancing experiences for others.
View the most stable version on GitHub
esp32 by Espressif Systems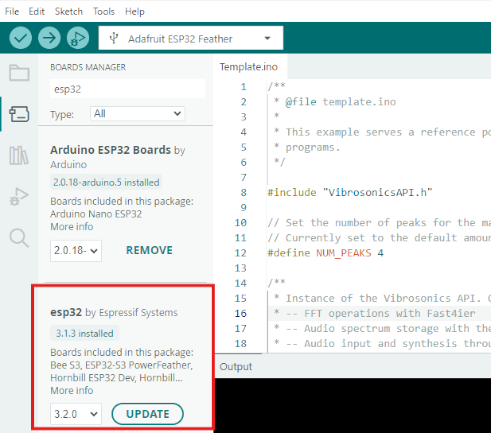
Select other board and port...Adafruit ESP32 Feather and select it along
with COMX for port where X is a number 0-6
ch341 driver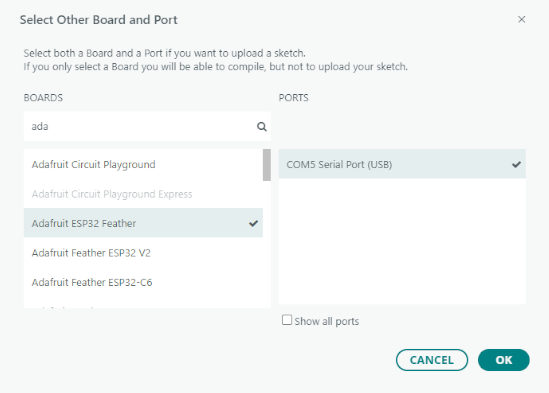
Navigate to the Arduino libraries folder. This is usually located in
Documents/Arduino/libraries/ for Windows and ~/Arduino/libraries/ for Mac and Linux.
Clone the repositories into the libraries folder:
cd "/path/to/Arduino/libraries/"
git clone https://github.com/synytsim/AudioLab.git
git clone https://github.com/udellc/AudioPrism.git
git clone https://github.com/jmerc77/Fast4ier.git
Verify that the libraries are installed by opening Arduino IDE and going to
Sketch > Include Library > Manage Libraries.... You should see AudioLab,
AudioPrism, and Fast4ier in the list.
You should be ready to use the example sketches or create your own! To upload a sketch to the Vibrosonics hardware:
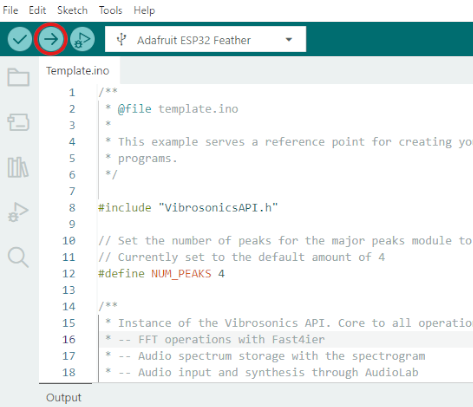
Open a terminal and navigate to the WebApp/ directory of the repository.
Run the following command to install the required dependencies:
npm install# This will start the server and provide a local URL at localhost. Once the server is running,
npm run dev
# Opens the application in your default web browser.
o
# Manually restarts the server
r
# Stops the server
qProduction Build: To build the application for production, run:
# This will produce optimized files in the `dist/` directory
npm run build

# This will preview the production build locally
npm run preview
Run Linter Tool: To run ESLint for .js and .jsx files, run:
# This will scan the target files for any syntax issues or potential bugs
npm run lint

# This will automatically fix any fixable issues found by ESLint
npm run lint.fixIf you encounter any issues during setup or development, consider the following steps:
node -v and npm -v in your terminal.npm ci for a clean install. If issues still persist, try deleting the node_modules/ directory and running npm install again.SD File System Setup:
To deploy the WiFi web app onto the ESP32, we'll need to store the web app onto a micro SD card connected to the ESP32. View WebApp/main/fileSys.h for the pin connections, these directions assume that the pins are connected properly.
Note: Uploading the web app onto the SD card only needs to be done everytime a new build of the web app is needed.
WebApp/main/config.h file and uncomment the following line to setup the ESP32 in upload mode#define DEV_MODE_ENmain.ino in the ArduinoIDE once connected to a COM port.http://vibrosonics/dev.DEV_MODE_EN macro and rebuild and upload main.ino.http://vibrosonics.The Vibrosonics library aims to streamline three processes to enable translating audio into the haptic range: audio signal processing, audio analysis and finally audio synthesis. We utilize a few libraries to achieve this.
The first is AudioLab, which handles the audio signals between the external hardware and the processor. It reads audio from the analog-to-digital converters (ADC) and writes signals to the digital-to-analog converters (DAC) for synthesis. The captured audio signals from the ADC are analyzed using the other two library dependencies.
Fast4ier is used to perform the Fast Fourier Transform (FFT) on the signal data, which converts it from a representation of the signal over time (time domain) to a representation of how the signal is distributed over a range of frequency bands (frequency domain). The bandwidth of the frequency domain, or the max frequency, is equal to half of the sample rate of the ADC. Similarly, the number of different frequency bands is equal to half of the window size of the ADC.
AudioPrism is a library which analyzes the frequency domain data using various algorithms. By filtering this data for different AudioPrism analysis modules, we can detect certain elements of the audio signal. With music, this allows us to detect percussion, isolate prominent vocals and melodies, and more. With this analysis, distinct vibrations can be made to model elements of music by re-synthesizing these findings through AudioLab translated down into the haptic frequency range (0-230Hz).
The VibroSonics application utilizes both cores on the ESP32 for efficient real-time audio processing and web-based configuration.
http://vibrosonics when connected to the device's WiFi AP/network/*: WiFi network scanning and connection/analysis/*: Audio analysis configuration managementHapticSettings singletonQueueMessageHapticSettingsAnalysisConfigAnalysisConfig updated via message queueWeb App (Browser) → HTTP Request → Web Server (Core 0) → Message Queue → Audio Loop (Core 1) → Haptic Output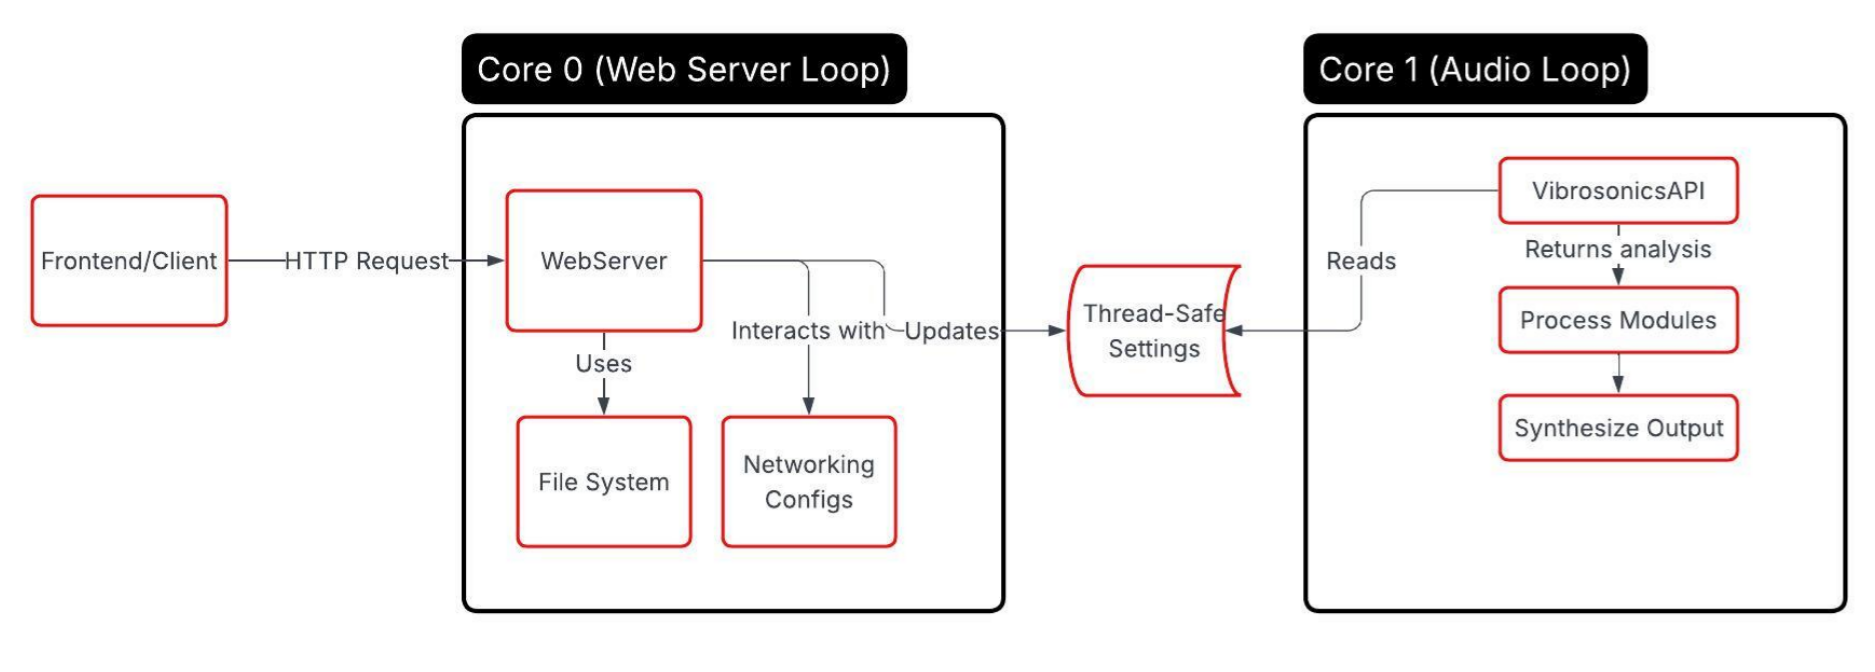
VibrosonicsAPI: This is the core class; it is a unified interface for audio
processing, analysis and synthesisGrain, GrainList, and GrainNode: These are the components for granular
synthesis. Grain is the main grain class, and the list and node classes provide a
way to manage a linked list of grains.We have an examples folder which contains individual programs that each
showcase a different feature or technique possible using Vibrosonics and
AudioPrism.
Template example to see basic use of the API and for a
starting point for your own program.Grains example demonstrates using the provided classes for granular
synthesis with a frequency and amplitude sweep, duration changes and wave shape
variations.Percussion showcases our current percussion detection method, which uses a
specially filtered frequency domain representation as input for an AudioPrism
percussion module. It utilizes grains to create haptic feedback corresponding
to the detected percussive hits.Melody is a similar example of strategic frequency domain processing, but
to bring out melodic elements of music. These elements are resynthesized by
translating the most prominent frequency peaks into the haptic range.Vibrosonics is our example demonstrating a combination of multiple
techniques (Percussion and Melody) to provide a real-time translation of
music to tactile feedback. Look here for an in-depth example utilizing the full
capabilities of our library.| Qty | Value | Footprint | References |
|---|---|---|---|
| 10 | 10k | Resistor_SMD:R_1206_3216Metric | R1, R2, R3, R4, R7, R8, R12, R13, R18, R19 |
| 7 | 0.1uF | Capacitor_SMD:C_0805_2012Metric | C3, C4, C12, C13, C15, C16, C18 |
| 7 | 10uF | Capacitor_SMD:C_0805_2012Metric | C1, C2, C6, C7, C8, C10, C11 |
| 4 | Screw_Terminal_01x03 | TerminalBlock_TE-Connectivity:TerminalBlock_TE_282834-3_1x03_P2.54mm_Horizontal | J1, J3, J4, J8 |
| 2 | 1.5k | Resistor_SMD:R_1206_3216Metric | R16, R17 |
| 2 | 3.3k | Resistor_SMD:R_1206_3216Metric | R14, R15 |
| 2 | LMV358IDR | footprints:21-0041B_8_MXM | IC1, IC3 |
| 1 | 100nF | Capacitor_SMD:C_0805_2012Metric | C9 |
| 1 | 100pF | Capacitor_SMD:C_0805_2012Metric | C5 |
| 1 | 150 | Resistor_SMD:R_1206_3216Metric | R11 |
| 1 | 22k | Resistor_SMD:R_1206_3216Metric | R9 |
| 1 | 5k | Resistor_SMD:R_1206_3216Metric | R6 |
| 1 | 6.2k | Resistor_SMD:R_1206_3216Metric | R10 |
| 1 | 6.8nF | Capacitor_SMD:C_0805_2012Metric | C14 |
| 1 | 7.5k | Resistor_SMD:R_1206_3216Metric | R5 |
| 1 | C_Polarized | Capacitor_THT:CP_Radial_D8.0mm_P3.50mm | C17 |
| 1 | Conn_01x12_Socket | Connector_PinSocket_2.54mm:PinSocket_1x12_P2.54mm_Vertical | J7 |
| 1 | Conn_01x16_Socket | Connector_PinSocket_2.54mm:PinSocket_1x16_P2.54mm_Vertical | J6 |
| 1 | MAX7403CSA+ | footprints:21-0041B_8_MXM | IC2 |
| 1 | MAX7480ESA+ | MAX7403CSA:21-0041B_8_MXM | IC4 |
| 1 | Screw_Terminal_01x02 | TerminalBlock_TE-Connectivity:TerminalBlock_TE_282834-2_1x02_P2.54mm_Horizontal | J5 |
| 1 | Screw_Terminal_01x04 | TerminalBlock_TE-Connectivity:TerminalBlock_TE_282834-4_1x04_P2.54mm_Horizontal | AUD_OUT |
| 1 | ~ | adafruit_1660_microsd:CONN_1660_ADA | SD1 |
The 50 most common of 54 parts.
udellc/Vibrosonics
Documentation (Doxygen) \ Hardware: Adafruit ESP32 Feather, MAX9744 Amplifier board, TT25-8 puck transducer, 3.5mm audio jack cable \ Dependencies: AudioLab · AudioPrism · Fast4ier


UzixLS/zxevo1010-board
10x10cm PCB variant of ZX-Evolution project for G738/G706 enclosure

UzixLS/zxuno1010-board
10x10cm PCB variant of ZX-UNO project for G738/G706 enclosure


KAVIRAJec/Smart-Water-Quaity-Measurement-Kit
🚰 Smart Water Quality Monitoring System Real-time insights into drinking water quality! This repository contains the code and documentation for our innovative water quality monitoring system.


Phil-CIA/Development-Station-Power-Supply
3 channel bench supply with current and voltage plotting
It measures 65 × 70 mm and has 2 copper layers, 1.6 mm thick.
54 parts, built around the LMV358IDR, MAX7403CSA+ and MAX7480ESA+. The full list of its parts is on this page, with links to each part's symbol and footprint where PCBKit's library has them.
From the udellc/Vibrosonics repository on GitHub, at the commit this page was made from: the board is schematics/ViBravo_September_2024/ViBravo_September_2024.kicad_pcb and its schematic fmRadio/FMRadio Schematic/FMRadio Schematic.kicad_sch. PCBKit opens the board in the browser, with nothing to install.
Its repository publishes it under the GPL-3.0 licence: you may reuse it on that licence's terms (keep the author's notice, and for a copyleft licence share your changes alike).