2 layers26 × 18 mm

 seiken-dev/TinyStick
TS Core is an open-source printed circuit board by seiken-dev, from the seiken-dev/TinyStick repository on GitHub, published under the BSD-3-Clause licence. It is a 2-layer board of 58.4 × 22.6 mm with 59 parts on 49 nets, routed with 487 tracks and 39 vias.
It is built around the ATTINY3217-MF, LIS2DH12 and 1N5819WS, with the AO3400A, CR2032 and PKLCS1212E2000-R1 among its other parts. Its parts include 12 capacitors, 8 resistors, 7 connectors, 7 switches and 2 ICs. It belongs with the AVR (ATmega, ATtiny) boards of this library.


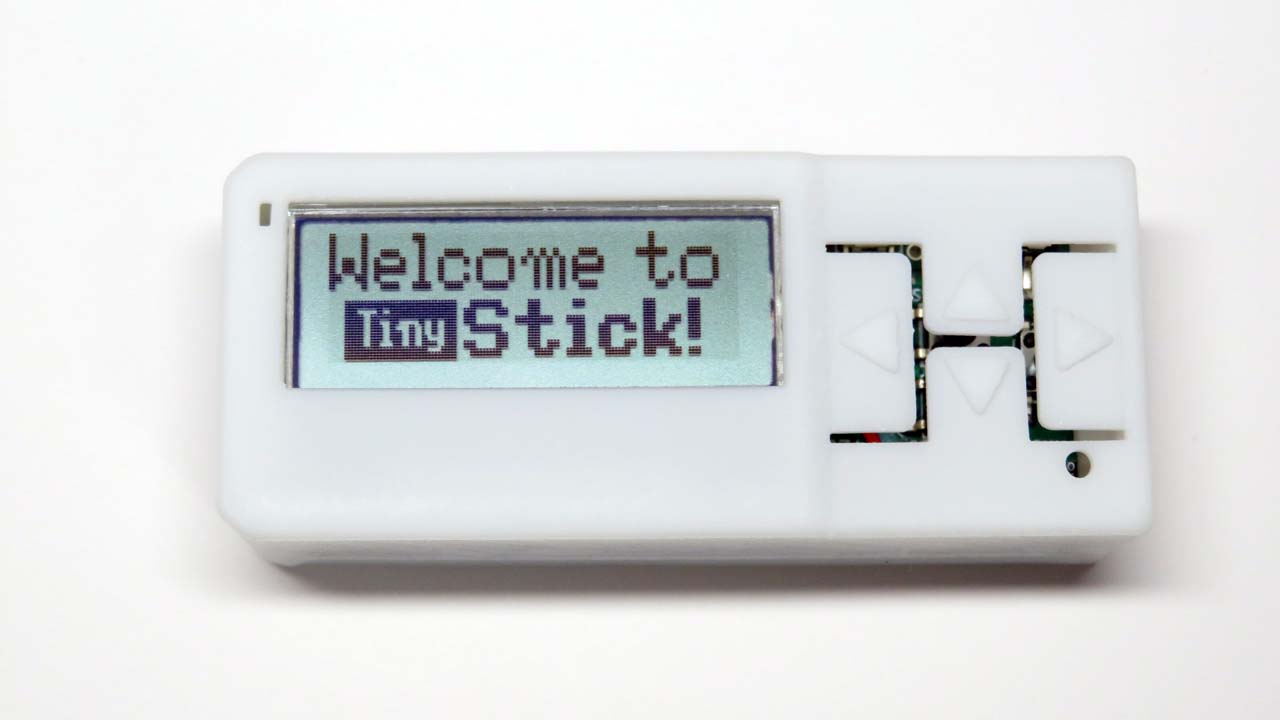
TinyStickは、ATtiny3217(32KB Flash, 2KB SRAM, 256B EEPROM)を搭載した、Arduino互換の開発キットです。消費電流は約4.5mA(クロック10MHz。スリープ時は0.1mA未満)と小さく、コイン電池で長期間動作します。プログラムの書き込みは、付属のUSBシリアル変換基板(CH340E搭載)で行います。詳しくは、 tinystick.jpをご覧ください。
TinyStickのプログラミングは、PlatformIOで行います。Arduino IDEは、2.3版ではTinyAVR用のボードマネージャーの定義が読み込めない等の理由で推奨しません。(→参考)
プロジェクトのルートにある設定ファイルです。重要な項目について説明します。
board_build.f_cpu = 10000000
CPUクロックを設定します。初期値は10MHz、最大は20MHzです。必ず5の倍数にしてください。そうしないとシリアル通信が文字化けします。また5MHzにすると、I2Cが正常に動作しません。記述しないと16MHzになります。
main.cpp
メインプログラムで、初期化、タイトル表示、サイドボタン(Button5)によるデモの切り替え、長押しによるバックライトのオンオフを処理します。
TinyStickDef.h
共通の#define、ピン定義です。
TinyStick.h .cpp
ボタン、圧電ブザーのクラス、スリープ関連のグローバル関数です。
TinyLCD.h .cpp
バックライト付きLCD AQM1248Aに、ビットマップまたは文字を表示するクラスです。文字は、拡大・ボールド・白黒反転・縦・プロポーショナル表示に対応しています。
font8x8.h
8x8ドットフォントです。0x20から0x7Fまでの英数記号です。
TinyApp.h .cpp
複数のアプリを切り替えるときは、このクラスの派生クラスを作成してmain.cppに定義するだけで、サイドボタン(Button5)で切り替えられます。
I2Cbase.h .cpp
本体内蔵の加速度センサ(LIS2DH12)と、M5StickC用のENV Hat(SHT30)の基底クラスです。
octave.h
ドレミの周波数を定義したファイルです。
playDigit.h .cpp
2桁の整数値をドレミの音程で鳴らす関数です。
app/
6つのデモアプリです。TinyAppの派生クラスです。
EnvHat.h .cpp
ENV Hatで温度/湿度を表示します。Button1で次のアプリに切り替えます。装着されていないときはスキップします。
KitchenTimer.h .cpp
キッチンタイマーです。最大99分。スタートすると、分をEEPROMに保存します。
AccelDemo.h .cpp
加速度センサのデモです。傾けると玉が転がります。
FontTest.h .cpp
8x8ドットフォントをダンプします。Button1で拡大、Button2,3でスクロールします。
Tetris.h .cpp
お馴染みのゲームで、縦向きで遊びます。
Maze3D.h .cpp
Line関数を利用した3次元迷路です。
一定時間のスリープが出来ます。いずれかのボタンを押すと、スリープから復帰します。
enum SleepTimeの時間しか設定できません。| Qty | Value | Footprint | References |
|---|---|---|---|
| 16 | , , , , , , , , , , , , , , , | ||
| 9 | 1u | Capacitor_SMD:C_0402_1005Metric | C1, C2, C3, C4, C5, C6, C7, C8, C9 |
| 5 | 10K | Resistor_SMD:R_0402_1005Metric | R1, R2, R6, R7, R8 |
| 4 | Tactile | JSB01_Lib:SW-SMD_4P-L4.5-W4.5-P3.00-LS7.5 | SW1, SW2, SW3, SW4 |
| 2 | 0.1u | Capacitor_SMD:C_0402_1005Metric | C10, C11 |
| 1 | 100K | Resistor_SMD:R_0402_1005Metric | R4 |
| 1 | 10u | Capacitor_SMD:C_0603_1608Metric | C12 |
| 1 | 1N5819WS | JSB01_Lib:SOD-323_L1.8-W1.3-LS2.5-RD | D1 |
| 1 | 20K | Resistor_SMD:R_0402_1005Metric | R3 |
| 1 | 2K | JSB01_Lib:RES-ADJ-SMD_G32AT | RV1 |
| 1 | 470 | Resistor_SMD:R_0603_1608Metric | R5 |
| 1 | AO3400A | JSB01_Lib:AO3400A | Q1 |
| 1 | AQM1248A | JSB01_Lib:AQM1248A | J3 |
| 1 | ATtiny3217 | JSB01_Lib:HVQFN-24_L4.0-W4.0-P0.50 | U1 |
| 1 | CR2032 | JSB01_Lib:BAT-CR2032-2 | BT1 |
| 1 | DIP | JSB01_Lib:SW-SMD_TSD101EZ | SW7 |
| 1 | Grove Connector | JSB01_Lib:Grove_Connector | J6 |
| 1 | LCD BackLight | JSB01_Lib:CONN-SMD_HC-1.0-2PWT | J7 |
| 1 | LIS2DH12 | JSB01_Lib:LGA-12_L2.0-W2.0-P0.50-BL | U2 |
| 1 | M5StickC Hat | JSB01_Lib:PinSocket_M5StickHat | J2 |
| 1 | PKLCS1212E2000 | JSB01_Lib:BUZ-SMD_2P-L12.0-W12.0-L | BZ1 |
| 1 | SML-D12P8WT86 | JSB01_Lib:LED0603-RD_GREEN | D2 |
| 1 | Slide | JSB01_Lib:SW-SMD_K3-1280S-K1 | SW6 |
| 1 | SolderJumper_2_Open | JSB01_Lib:SolderJumper-2_Open_mini | JP1 |
| 1 | Tactile(Side) | JSB01_Lib:SW-SMD_BZCN_TSA002A35 | SW5 |
| 1 | TinyStick_Ext1 | Connector_PinSocket_2.54mm:PinSocket_1x07_P2.54mm_Vertical | J4 |
| 1 | TinyStick_Ext2 | Connector_PinSocket_2.54mm:PinSocket_1x06_P2.54mm_Vertical | J5 |
| 1 | USB Serial | JSB01_Lib:USB Serial | J1 |
It measures 58.4 × 22.6 mm and has 2 copper layers, 1.6 mm thick.
59 parts, built around the ATTINY3217-MF, LIS2DH12, 1N5819WS and AO3400A. The full list of its parts is on this page, with links to each part's symbol and footprint where PCBKit's library has them.
From the seiken-dev/TinyStick repository on GitHub, at the commit this page was made from: the board is KiCad/TS_Core.kicad_pcb and its schematic KiCad/TS_Core.kicad_sch. PCBKit opens the board in the browser, with nothing to install.
Its repository publishes it under the BSD-3-Clause licence: you may reuse it on that licence's terms (keep the author's notice, and for a copyleft licence share your changes alike).

74hc595/Numitron-Clock
An alarm clock using 9-segment numitron displays


plinkysynth/plinky_public
a public release of the plinky sw and hw


samp38/koboy
Kit to turn a Kobo mini into a flight instrument (XCSoar)

bytesizedengineering/PCB-tile-based-game
🧰 What You Need - Adafruit UPDI Friend - Arduino IDE - ATtiny3217 board - USB-C cable 1. Install MegaTinyCore 2. Select the Board 3. Connect the UPDI Friend 4. Select the Serial Port 5. Upload Code