2 layers84 × 93 mm

 Phunkafizer/OT-Thing28
A compact universal OpenTherm WiFi Interface
OTThing is an open-source printed circuit board by Phunkafizer, from the Phunkafizer/OT-Thing repository on GitHub. It is a 2-layer board of 51 × 71 mm with 111 parts on 68 nets, routed with 555 tracks and 157 vias.
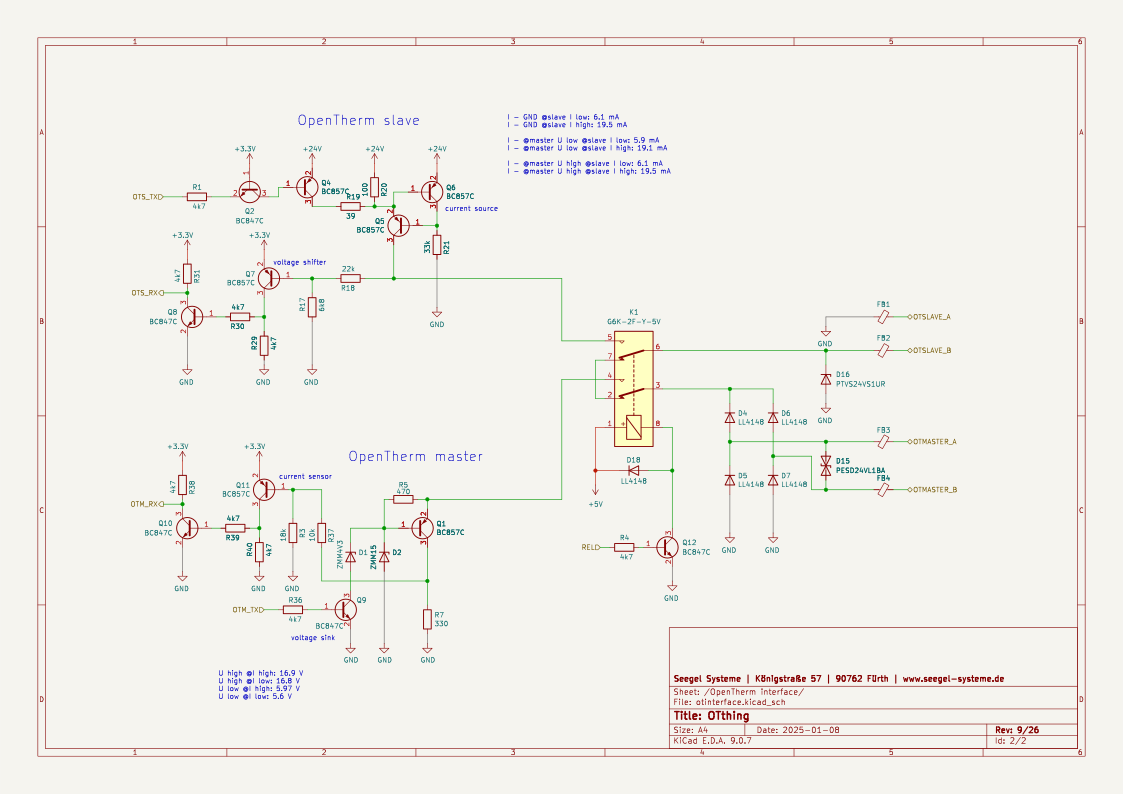
It is built around the ESP32-C3-WROOM-02-H4, TPS61041DBV and AMS1117-3.3, with the USBLC6-2SC6, BC847C and BC857C among its other parts. Its parts include 38 resistors, 18 diodes, 12 transistors, 10 capacitors and 4 ICs. It belongs with the radio and wireless and interfaces and adapters boards and the ESP32 and RISC-V boards of this library.


A compact WiFi <-> OpenTherm (master & slave) interface
https://www.seegel-systeme.de/2025/01/05/ot-thing-das-universelle-wifi-opentherm-interface/
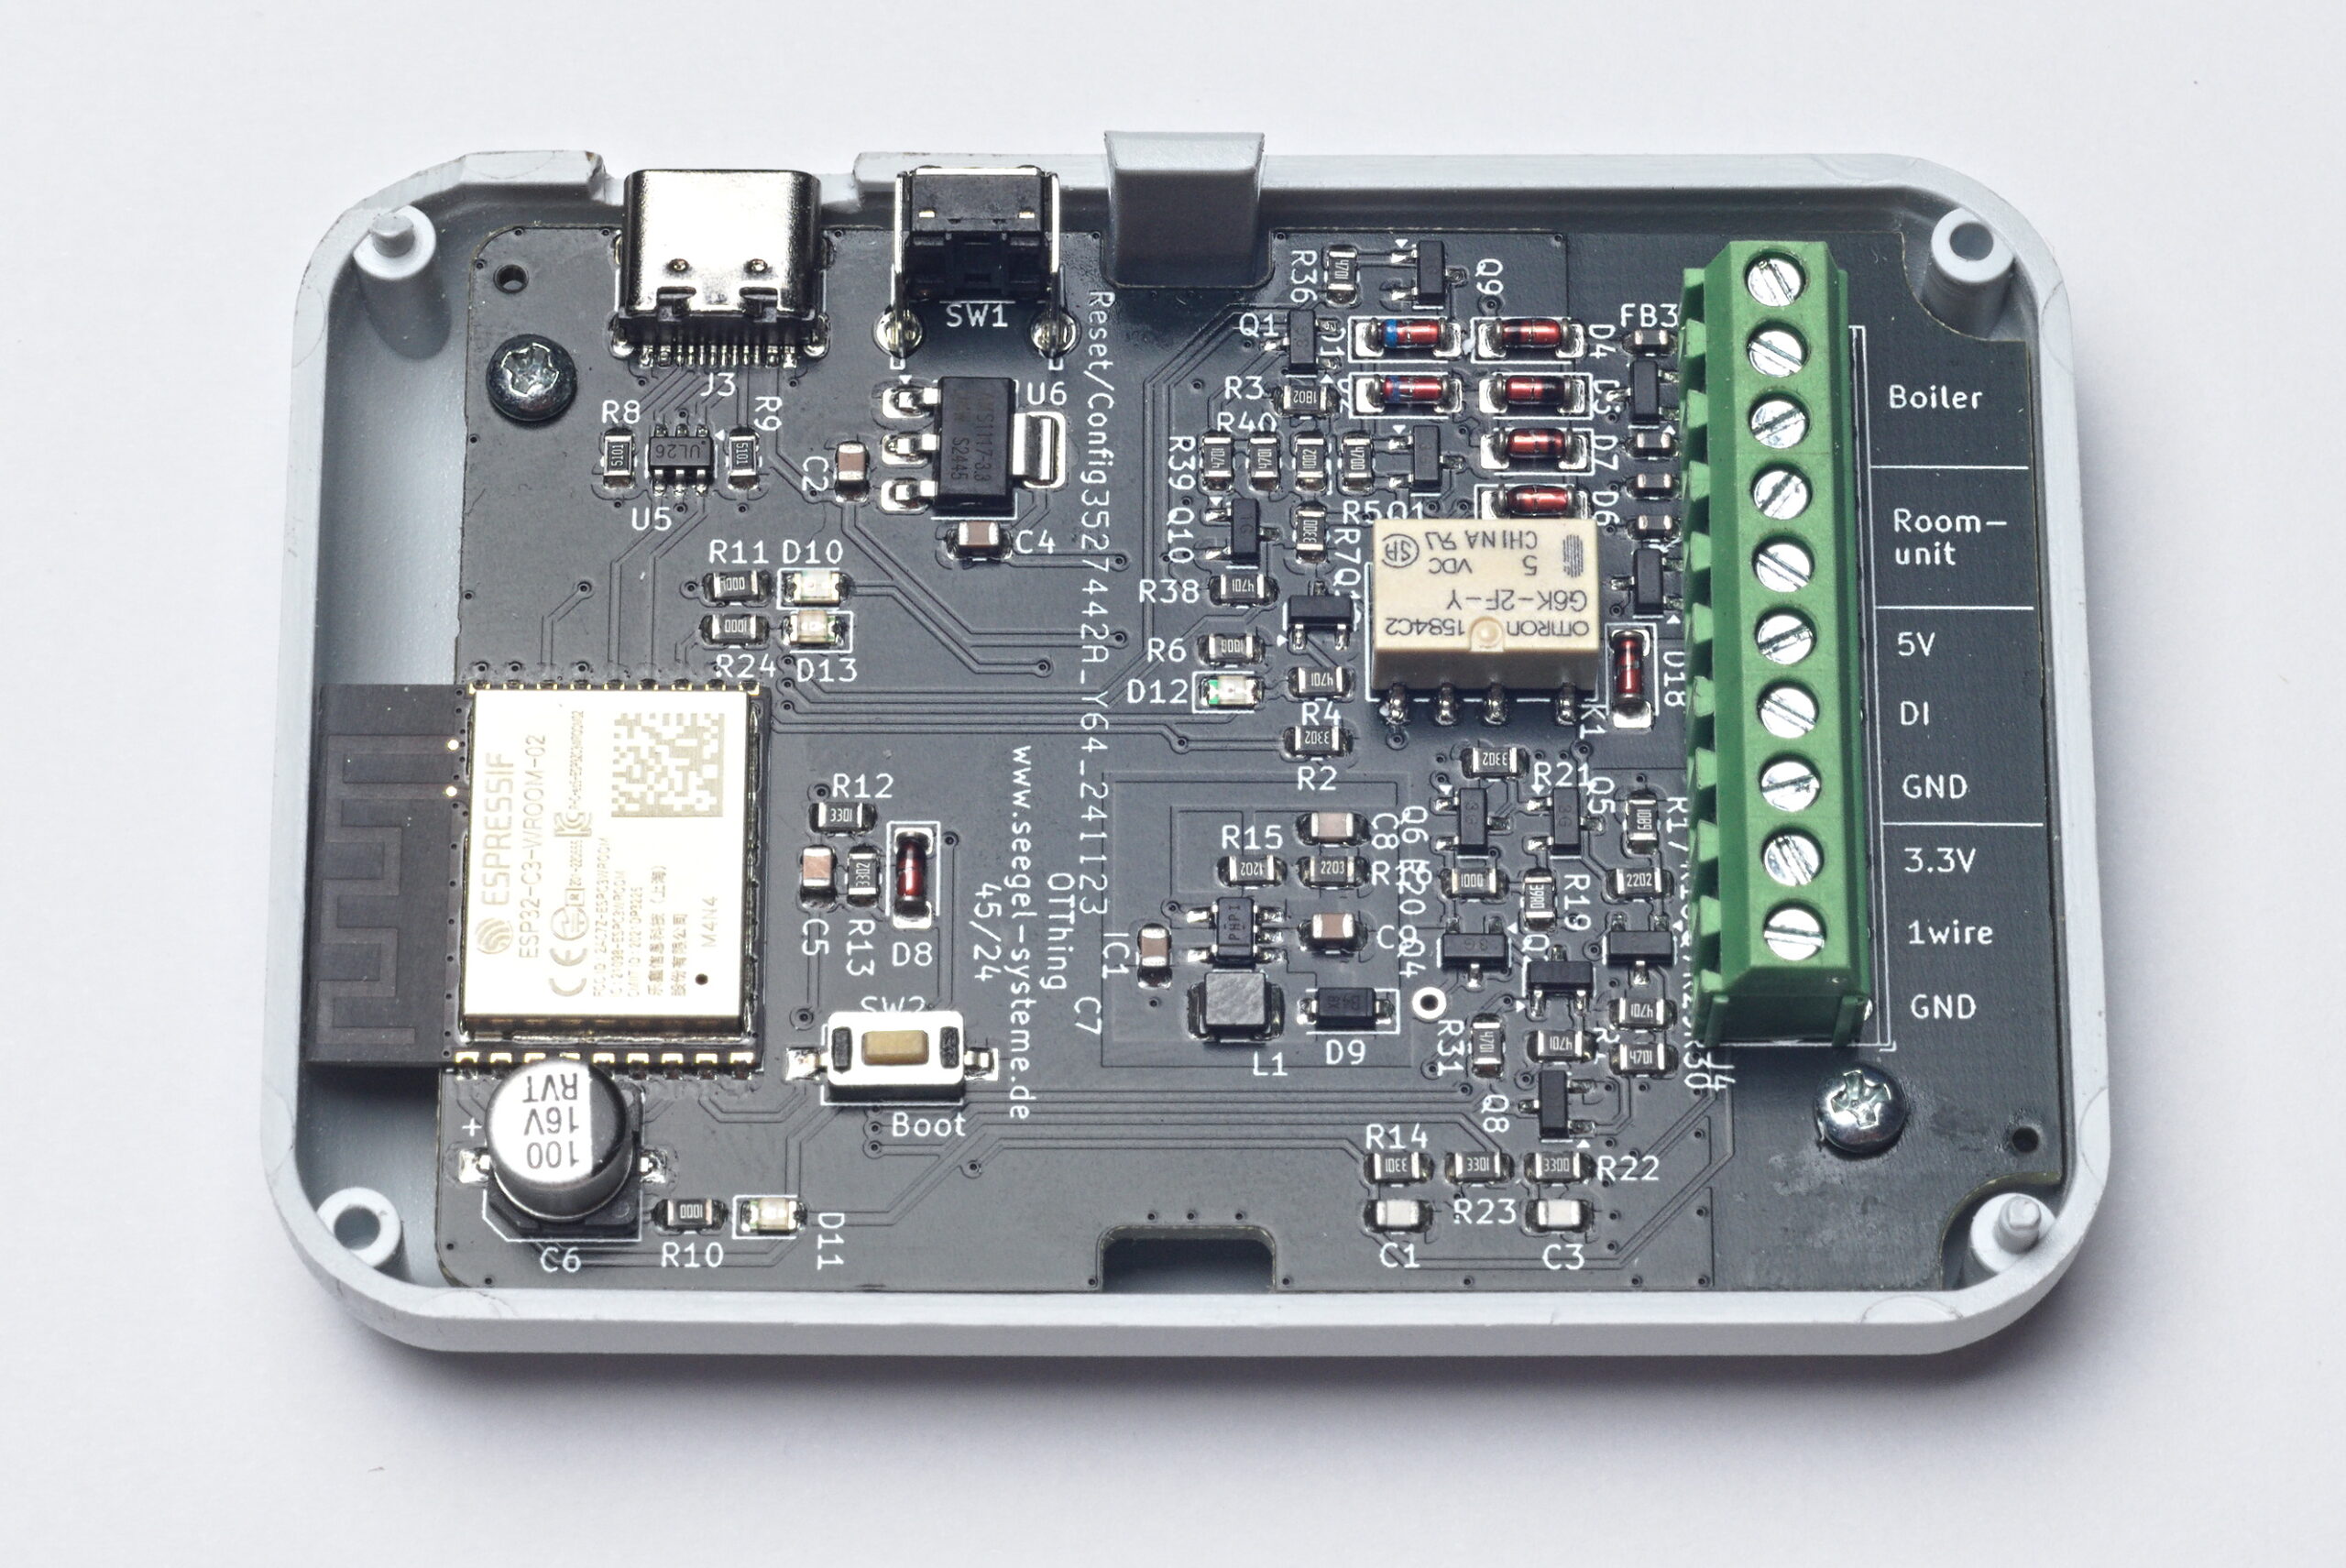 OTthing board
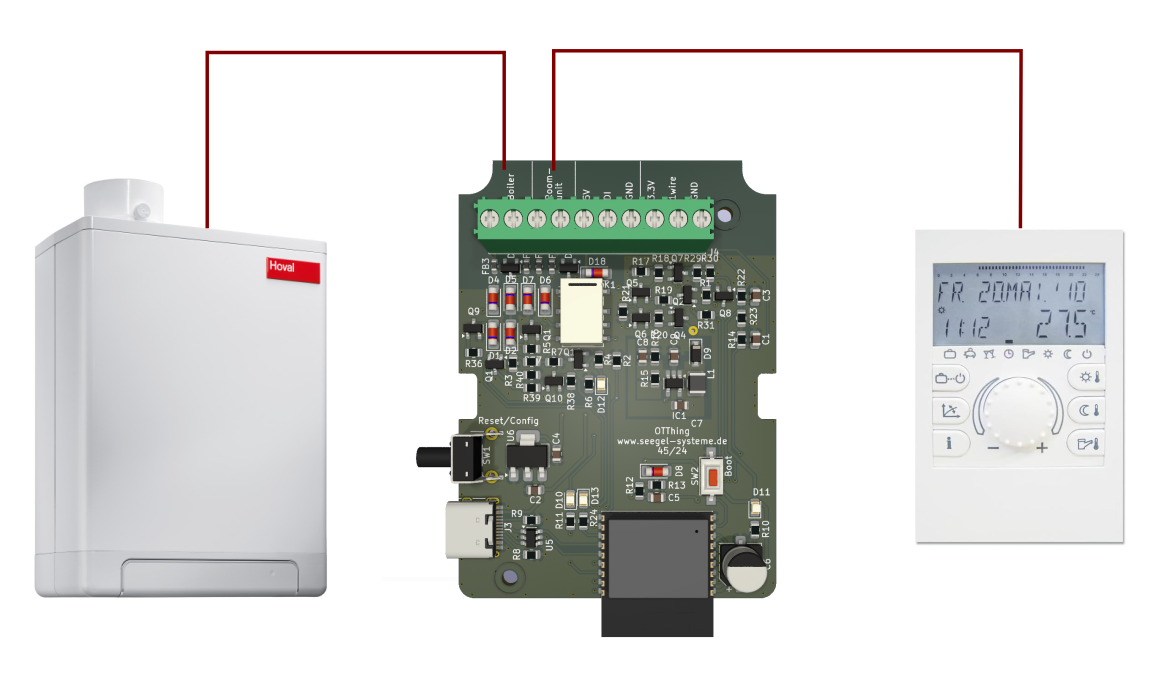 OTthing wiring
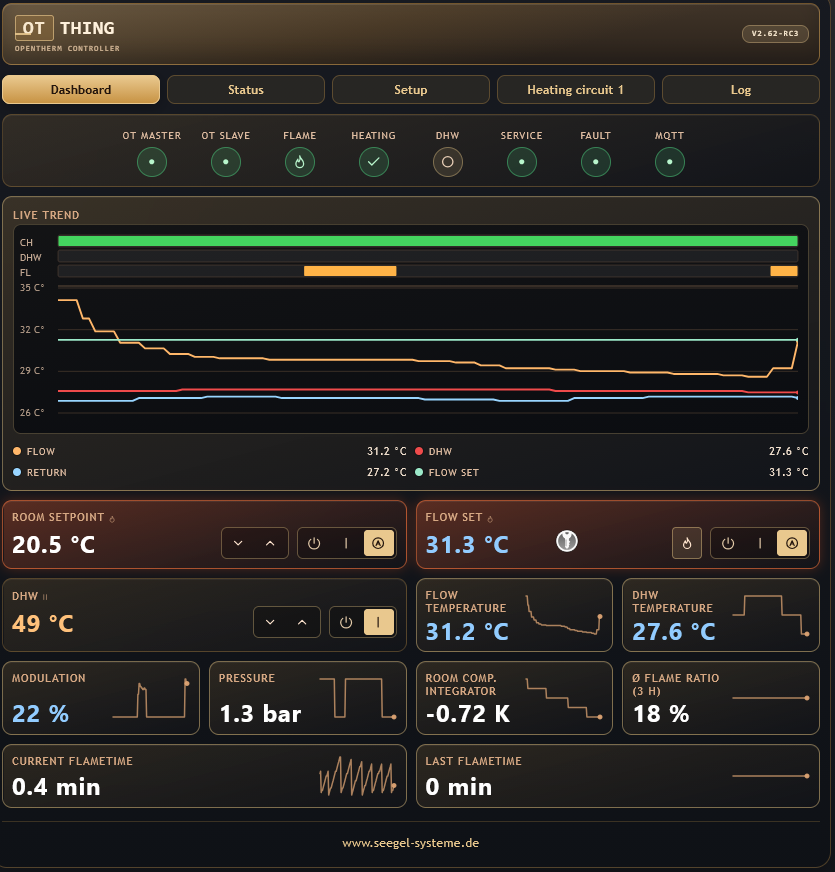 OTthing web interface
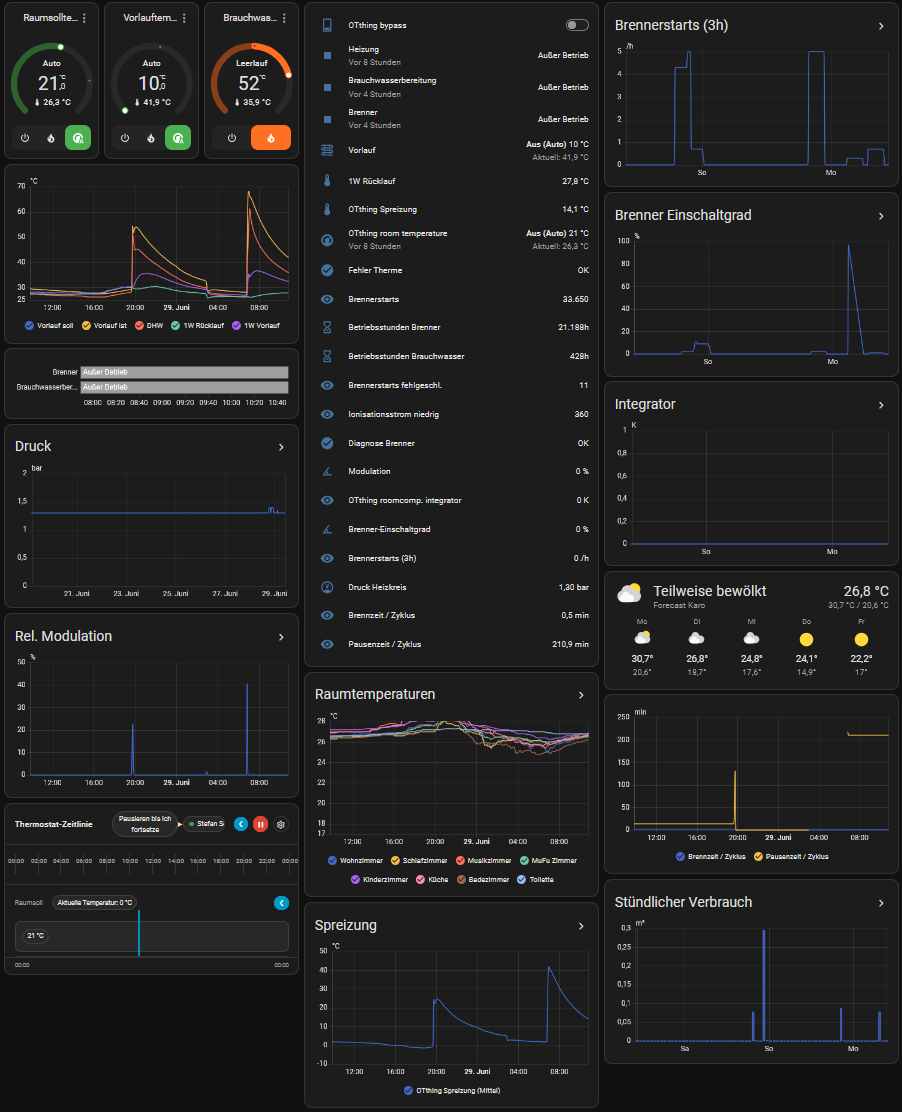 Home Assistant integration
OTthing is a versatile OpenTherm gateway that connects your heating system to the Internet via WiFi. It acts as an OpenTherm master (controlling your boiler) and/or slave (integrating with room thermostats), providing real-time monitoring and control through a modern web interface and Home Assistant integration.
The firmware consists of several functional modules:
otcontrol.cpp): Manages master/slave communication with the boilermasterrequests.cpp): Builds and schedules OpenTherm master requests and polling cyclesotvalues.cpp): Stores, normalizes, and exposes decoded OpenTherm data pointsheatingcurve.cpp): Calculates the target flow temperature from heating-curve parametersmqtt.cpp): Publishes device state and subscribes to control topicsdevstatus.cpp): Tracks runtime health, connectivity, and status flagsauxInput.cpp): Handles external input signals for additional control logicportal.cpp): Serves the responsive dashboard and API endpointsCHcontrol.cpp): Manages heating circuits, setpoints, and modessensors.cpp): Collects data from external sensorsdevconfig.cpp): Handles persistent device settingsOpenTherm support and available controls depend on the boiler or other equipment. Check the device documentation and OTthing schematics before installation. Disconnect equipment from mains power before wiring; have boiler wiring performed by a qualified installer where required. Connect OpenTherm through the board's designated terminals, never directly to MCU GPIO pins.
Hardware Setup:
Access the Web Interface:
12345678; change it before deploymenthttp://<otthing-ip>/ (default: 4.3.2.1)Configure:
Install PlatformIO, then run these commands from the Firmware/ directory:
platformio run --environment release
platformio run --environment release --target upload
The first command builds the firmware. The next two upload the firmware and the LittleFS web assets; perform both uploads when installing a complete build. The firmware project reads access point SSID, password, and hostname from default.ini unless overridden by the build environment. Set a unique access point password before deploying devices.
OTthing exposes the following REST endpoints and WebSocket connection:
When web authentication is configured, protected endpoints require a valid login session. Requests without a valid session return 401; log in through the web UI before using these endpoints.
GET / - Web dashboard (HTML)GET /status - Current device and boiler status (JSON)GET /config - Device configuration and settings (JSON)POST /config - Update device configuration (JSON body)GET /otitems - Raw OpenTherm items and values from master and slave (JSON)GET /topics - List all available MQTT control topics (text/plain)GET /set?key=value - Update settings via query parameters
/set?chSetTemp1=50, /set?chMode1=heat/topics to discover supported control keys. URL-encode values when they contain reserved characters.GET /slaverequest?id=X&rw=Y&data=HEX - Send a raw OpenTherm slave request
id: OpenTherm message ID (integer)rw: 1 for READ_DATA, 0 for WRITE_DATAdata: Hex-encoded data valueGET /scan - Scan for available WiFi networks
POST /setwifi - Configure WiFi credentials
ssid and pass (URL-encoded)GET /reboot - Trigger a device reboot
POST /update - Firmware update (binary upload)
WebSocket /ws - Real-time updates and log streaming
A Python mock server is included for local UI and API testing. Install its dependencies and start it from the Firmware/ directory:
python -m pip install -r requirements.txt
python tools/mock_otthing.py
The server listens on http://127.0.0.1:8081/. It is useful for UI development and API integration, but it does not replace testing against physical OpenTherm hardware.
The device subscribes to control topics under otthing/<device-id>/<key>/set; /topics lists the supported keys. Home Assistant discovery is provided through MQTT when a broker is configured.
Changes sent through the web API are also published to the corresponding MQTT /set topic as retained messages. A broker can replay retained commands when the device reconnects, including after a reboot. Keep this in mind for temporary controls such as Turbo mode, and clear any stale retained command from the broker when needed.
/set command is replaying it.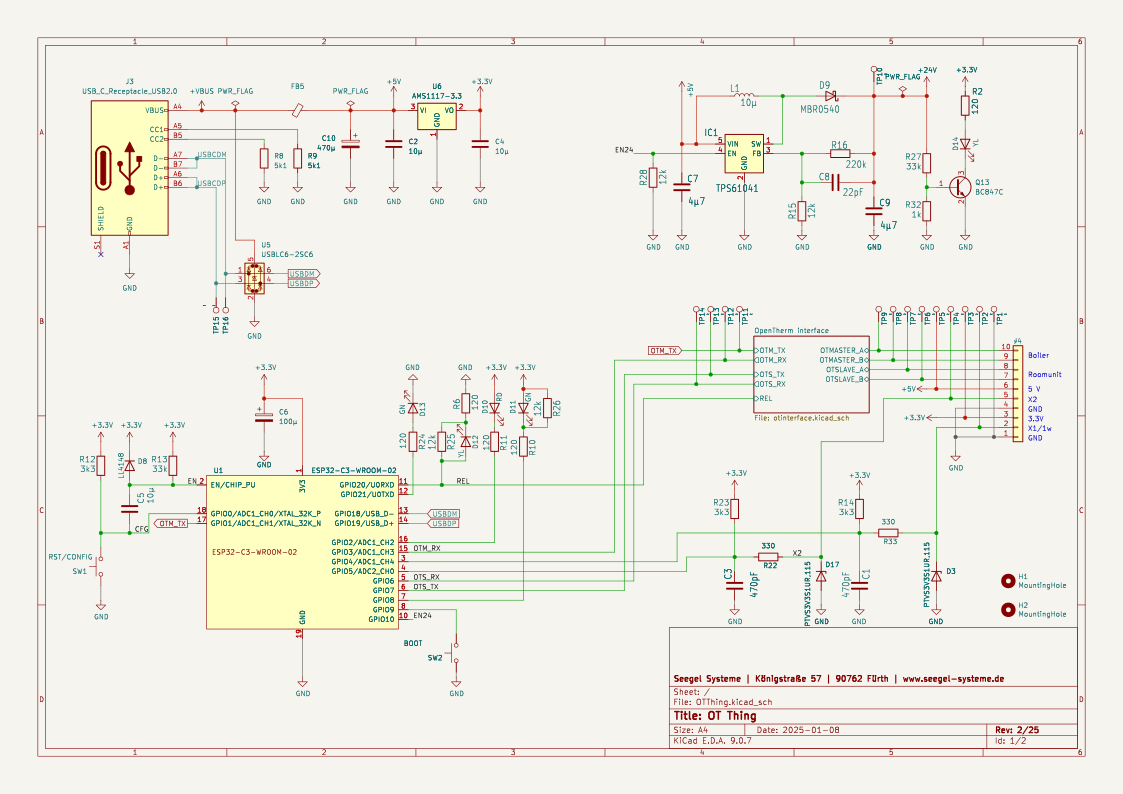
When reporting issues, please supply:
All of this data can be exported from the OTthing using the export function at the bottom of the web UI. Only one concern per issue!
develop branch.develop branch.Below is an excerpt of hardware devices reported to work successfully with OTthing. If you have verified additional devices, contributions and reports are very welcome!
Feel free to open a Pull Request or issue to report additional compatible devices!
| Qty | Value | Footprint | References |
|---|---|---|---|
| 16 | ~ | TestPoint:TestPoint_THTPad_D1.5mm_Drill0.7mm | TP1, TP2, TP3, TP4, TP5, TP6, TP7, TP8, TP9, TP10, TP11, TP12, TP13, TP14, TP15, TP16 |
| 9 | 4k7 | Resistor_SMD:R_0805_2012Metric | R1, R4, R29, R30, R31, R36, R38, R39, R40 |
| 6 | BC847C | Package_TO_SOT_SMD:SOT-23 | Q2, Q8, Q9, Q10, Q12, Q13 |
| 6 | BC857C | Package_TO_SOT_SMD:SOT-23 | Q1, Q4, Q5, Q6, Q7, Q11 |
| 6 | LL4148 | Diode_SMD:D_MiniMELF | D4, D5, D6, D7, D8, D18 |
| 5 | 120 | Resistor_SMD:R_0805_2012Metric | R2, R6, R10, R11, R24 |
| 5 | ~ | Inductor_SMD:L_0603_1608Metric | FB1, FB2, FB3, FB4, FB5 |
| 4 | 12k | Resistor_SMD:R_0805_2012Metric | R15, R25, R26, R28 |
| 3 | 10µ | Capacitor_SMD:C_0805_2012Metric | C2, C4, C5 |
| 3 | 330 | Resistor_SMD:R_0805_2012Metric | R7, R22, R33 |
| 3 | 33k | Resistor_SMD:R_0805_2012Metric | R13, R21, R27 |
| 3 | 3k3 | Resistor_SMD:R_0805_2012Metric | R12, R14, R23 |
| 2 | 470pF | Capacitor_SMD:C_0805_2012Metric | C1, C3 |
| 2 | 4µ7 | Capacitor_SMD:C_0805_2012Metric | C7, C9 |
| 2 | 5k1 | Resistor_SMD:R_0805_2012Metric | R8, R9 |
| 2 | GN | LED_SMD:LED_0805_2012Metric | D11, D13 |
| 2 | MountingHole | MountingHole:MountingHole_2.5mm | H1, H2 |
| 2 | PTVS3V3S1UR,115 | Diode_SMD:D_SOD-123 | D3, D17 |
| 2 | YL | LED_SMD:LED_0805_2012Metric | D12, D14 |
| 1 | 100 | Resistor_SMD:R_0805_2012Metric | R20 |
| 1 | 100µ | Capacitor_SMD:CP_Elec_6.3x5.4 | C6 |
| 1 | 10k | Resistor_SMD:R_0805_2012Metric | R37 |
| 1 | 10µ | Inductor_SMD:L_1210_3225Metric | L1 |
| 1 | 18k | Resistor_SMD:R_0805_2012Metric | R3 |
| 1 | 1k | Resistor_SMD:R_0805_2012Metric | R32 |
| 1 | 220k | Resistor_SMD:R_0805_2012Metric | R16 |
| 1 | 22k | Resistor_SMD:R_0805_2012Metric | R18 |
| 1 | 22pF | Capacitor_SMD:C_0805_2012Metric | C8 |
| 1 | 39 | Resistor_SMD:R_0805_2012Metric | R19 |
| 1 | 470 | Resistor_SMD:R_0805_2012Metric | R5 |
| 1 | 470µ | Capacitor_SMD:CP_Elec_6.3x7.7 | C10 |
| 1 | 6k8 | Resistor_SMD:R_0805_2012Metric | R17 |
| 1 | AMS1117-3.3 | Package_TO_SOT_SMD:SOT-223-3_TabPin2 | U6 |
| 1 | BOOT | Button_Switch_SMD:SW_SPST_CK_RS282G05A3 | SW2 |
| 1 | ESP32-C3-WROOM-02 | User:ESP32-C3-WROOM-02 | U1 |
| 1 | G6K-2F-Y-5V | Relay_SMD:Relay_DPDT_Omron_G6K-2F-Y | K1 |
| 1 | MBR0540 | Diode_SMD:D_SOD-123 | D9 |
| 1 | PESD24VL1BA | Diode_SMD:D_SOD-323 | D15 |
| 1 | PTVS24VS1UR | Diode_SMD:D_SOD-123 | D16 |
| 1 | RD | LED_SMD:LED_0805_2012Metric | D10 |
| 1 | RST/CONFIG | Button_Switch_THT:SW_Tactile_SPST_Angled_PTS645Vx83-2LFS | SW1 |
| 1 | TPS61041 | Package_TO_SOT_SMD:SOT-23-5 | IC1 |
| 1 | USBLC6-2SC6 | Package_TO_SOT_SMD:SOT-23-6 | U5 |
| 1 | USB_C_Receptacle_USB2.0 | Connector_USB:USB_C_Receptacle_HRO_TYPE-C-31-M-12 | J3 |
| 1 | ZMM15 | Diode_SMD:D_MiniMELF | D2 |
| 1 | ZMM4V3 | Diode_SMD:D_MiniMELF | D1 |
| 1 | ~ | TerminalBlock_Phoenix:TerminalBlock_Phoenix_PT-1,5-10-3.5-H_1x10_P3.50mm_Horizontal | J4 |
It measures 51 × 71 mm and has 2 copper layers, 1.6 mm thick.
111 parts, built around the ESP32-C3-WROOM-02-H4, TPS61041DBV, AMS1117-3.3 and USBLC6-2SC6. The full list of its parts is on this page, with links to each part's symbol and footprint where PCBKit's library has them.
From the Phunkafizer/OT-Thing repository on GitHub, at the commit this page was made from: the board is PCB/OTThing.kicad_pcb and its schematic PCB/OTThing.kicad_sch. PCBKit opens the board in the browser, with nothing to install.
Its repository states no licence, so its author keeps all rights: ask Phunkafizer before reusing the design.


z2amiller/pedalfx
Replaces the Panasonic MN3102 (clock generator for MN3204/05/07/08/09 BBDs) with a CD4047B plus four passives. Two ways to use it:

GuavTek/M2IDI_TANGLE_HW
A multiplexer module for the M2IDI system

samba09/camper-pir-switch
PIR motion switch for Revotion NODE Ambient (AM312, PhotoMOS, KiCad)


Phunkafizer/RFM-gateway
Hard- and software for the RFM-gateway, a universal platform for integrating sub-GHz radio into your WiFi network

balazsbencs/ardor
This is a DIY multieffects project with a Raspberry Pi and and Codec Zero and a Raspberry Pi Display 2. With Full NAM A2 support.

b5463/kino-d4
Open-source four-lens digital camera with synchronized capture, original-frame storage, and a USB control workbench.