DeltaVR
DeltaVR is an open-source, lightweight PCVR headset built to be a step up from the hadesvr headset while being more oriented towards technical users due to the smd components, it uses almost all custom hardware aside from the microcontroller, cameras, lenses, screens and drivers, and like linear rods ig, other than that everything is made by us with customs pcbs, and a almost entirely 3d printable design aside from again the ⌀5mm x 160mm stainless steel linear rods, the overarching goal of deltavr was an advanced opensource VR headset with large ipd accommodation, with inside out SLAM tracking and constellation tracked controllers with actually analog triggers on our custom controllers, all under 500 if you have the tools (we got all the way down to 390 actually!)
our headset:

our pcbs:


Table of Contents
Features
-
2x OV9281 global shutter cameras at 120 fps, combined by a usb hub with the hmd pcb all into one 3.2 gen 2 cable to your pc
-
custom hmd pcb, mostly smd (hence the technical users bit)
-
pseudo pancake optics with 2x fresnels per eye giving better dimensions for just 20 euros for all 4 of the lenses
-
a big ipd range, accommodating for all possible human ipd ranges that aren't legit 1 in a trillion
-
made to be printed with asa from my own modified ender 3 so like hopefully anyone can print as long as u have an enclosure for the printer, the cushions also are just tpu-lw
-
steamvr pcvr compatible
-
custom controllers as a part of the project unlike other projects with 3rd party controllers
-
high quality imus and mcus, LSM6DSV16Xs and nRF52840s respectively
-
tmr joysticks so they never drift and use less battery
-
2 hall effect triggers with an actual analog range for inputs
-
ir constellation tracked controllers
-
NRF24L01 on nordic's esb protocol for good range and battery also u.fl support if you want
-
under 500 euros if you own the tools, we got all the way down to 390 euros
*note: deltavr is still and will for a while still be in development, some of these features aren't ready but all listed are being worked on, also in the future there could be more features.
Hardware-Overview
DeltaVR is a custom designed headset with a pair of also custom controllers, its a combination of commercially available components with custom pcbs and mostly 3d printed mechanical parts.
Headset
The headset uses 2x OV9281 global shutter cameras at 120fps for SLAM tracking and tracking.
The cameras and main hmd pcb all connect back to the headset over a usb 3.2 gen 2 hub or if u want ig u can connect them just by 3 cables.
Each of the controllers and the headset pcb have have their own LSM6DSV16X imu and a nRF24L01 gt-24 smd radio module.
The mechanical design is mainly 3d printed with the exception of 2 5mm stainless steel linear rods, other than that its all asa or for cushions and some flexible parts tpu-lw.


Controllers
The DeltaVR controllers use custom designed PCBs and 3d printed enclosures and parts.
The controllers are designed around the nRF52840 based microcontrollers (nRF52840 pro micro) and the LSM6DSV family of imus, for us we used the LSM6DSV16X specifically in the qfn package.
The inputs for the controllers are:
- a tmr joystick
- 2 hall effect sensors for triggers
- 3 buttons, 2 as A,B or X,Y and one for system
- imu inertial tracking
- led constellation tracking
- wireless communication via nRF ESB
*The tmr sticks and hall effect triggers are there to provide reliable analog input while not dealing with the issues of traditional potentiometer based triggers and sticks like stick drift and wear.
Optics
DeltaVR uses a pair of pseudo pancake lenses, while they have issues and aren't perfect, they allow us to offer optics that take a lot less space than a traditional fresnel lens while still providing good visual quality and only costing the price of 2 pairs of fresnels.
The main reason above all others we went for pseudo pancakes was to have a cheap and also compact optical system, because making a lighter headset means longer sessions are more comfortable, we cant make a bigscreen beyond but something to be maybe similar to a quest 3 was our goal.

Communication
Since only the headset's pcb is wired into the pc that means that the controllers need to communicate with the hmd's pcb and tell it where they are according to the imus along with data about user inputs, the syncing of the led flashes with the cameras on the headset and other stuff like battery data, so we wouldn't want to have wires to the controllers so we have them wireless and they use the nRF ESB (Enhanced Shock-Burst) protocol to communicate with the headset efficiently and in a way that doesnt drain too much battery.
PCBs
After i figured out how i wanted to make the headset as a rough sketch in my mind and then on paper i started with the PCBs, i wanted the controller boards when assembled and in use not to drain much battery because that would allow for long play sessions which was a personal gripe i had with the rechargeable batteries i have for my Quest 3's controllers.
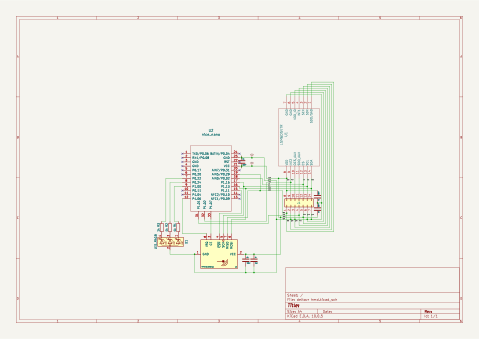
So for the PCBs the main thing you choose and that id talk abt here would be what they look like and what components they use, so starting with the controllers they use a mosfet which is wired to the mcu which then gets pulsed rapidly to be able to feed the leds their peak power for a fraction of a second before they turn back off and then on again, basically strobing very fast, the mosfet i chose was a IRLZ44N, the leds were just simple 5mm emitters, the imu i chose was because i made slime trackers before this headset and for slimevr the imu i used in my trackers was a LSM6DSR and it was a great imu so i decided for this to step up to using LSM6DSV16Xs, the choice of sticks and triggers was simple cuz i wanted to have efficient ones that don't wear out, SS49Es are cheap and so is the ginful tmr ps5 replacement stick so i went with those, the last thing is the radio module, the nRF24L01 in the form of the gt-24 smd board, its small, have a antenna plug if u wanna use it and also works well and is cheap, so that was a no brainer.
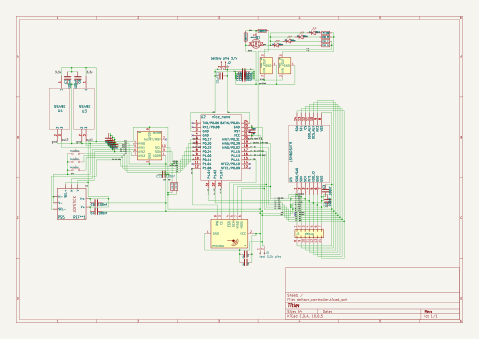
For the hmd pcb all the choices were the same as for the controllers, just theres a rgb led for status and like no battery.
here are the schematics:
Design-Decisions
A run down of all the reasons of the things that were picked and why they were, etc.
Cameras
The OV9281 cameras i chose for this project, namely they have a tiny sensor, the issue with this is finding proper lenses for them is quite the endeavor so the thing is, you can actually just get this camera with great lenses but you'll only find lenses above 90º on ones that output MIPI for some reason, its prolly because of the factories in which they are made but yeah, so now there's an issue either search forever to find the right lens at a good price, spend a fortune on the right lens or figure out how to get your MIPI back to like usb using something like a raspberry pi cm5 or sum.
So what did we do, we found the right lens at a very good price, with one caveat, one small caveat, unless i have it shipped through to a friend and then from the friend to me it will cost hundreds of euros to ship, so that's what we are doing, so we get easy to connect usb cameras with good lenses, all i had to do was a couple write ups on logistics.
Wireless-Communication
So like if you're in the know with slimevr you'll understand all this but basically something like an esp32 works over wifi which is good and it works well don't get me wrong but its first and foremost very draining on battery, or at least it is in comparison to what we are using, that being ESB, so basically for controllers you wouldn't want them to run out of battery fast so like ESB is perfect, ESB stands for Enhanced Shock-Burst it's a sadly proprietary protocol developed by Nordic for use with their wireless microcontrollers and devices, a basic explanation of what it does would be is that its a 2.4 GHz communication protocol that differs from things like Bluetooth because it has absolutely NO native security and its interference handling is pretty basic, which those two things are both sum Bluetooth does very well, anyways so now the upsides of ESB for us are massive because the latency is like actually non-existent with ESB and along with that the power consumption is so low that for example my nRF52840 pro micro based smolslime vr trackers still turn on even though i charged them literally like multiple months ago, though tbf i don't use them often, but basically they are very efficient is what I'm trying to say.
Optical-System
I will keep this one short because it's rather big as a actual topic, but basically real pancake lenses are INCREDIBLY INCREDIBLY expensive, especially custom made ones, although high quality PMMA fresnel lenses are very cheap and can well just be cut up as long as you do it right, so basically if you have a standard fresnel like in the quest 2 for example, in the quest 2 there is just one thick fresnel and its rather far from the screen due to the nature of fresnels, so the result is a thicker headset because a normal fresnel needs more space to be able to work with the light, now our solution is pancake lenses, a very smart trick with fresnels first seen made by a guy named WalkerDev, check out the article here, anyways so basically by stacking two fresnels the ability for them to bend light is far far stronger and hence they can be far far closer to the display meaning you get a way smaller headset, although they do have caveats and aren't perfect neither are they as good as actual pancake lenses, the issue with them is they can split light slightly at the edges meaning they can produce chromatic aberration or god rays, and if the alignment isn't done well its quite bad, however in my opinion it works well and is a good tradeoff to make for what you get back.
Mechanical-Design
Last up is the mechanical design, mechanically this headset is pretty simple, we have the displays mounted on linear rods with a tiny bit of grease and then the display mounts have a rack and a pinion is between the racks and connects to a lil thing on the outside though u can just adjust them by moving one display thing inward or outward, the other will do the same cuz they are connected with the racks and pinion, then other than that is the head strap and the adjustable part for it, the adjustable part is again just a rack and pinion system with a big thing on the outside to turn easily and then the head strap needs its flexible parts and cushions which are done with the wonderful TPU-LW filament that eSUN makes which is TPU but its got sum stuff inside it that make it like make tiny tiny bubbles under high heat so like by modulating the nozzle temp on my printer i can get softer and more expanded / bigger parts with higher temps and get normal hard TPU with lower temps, great stuff honestly just look out for clogs.
Firmware
So firmware, we are actively working on is as I'm writing this, its just very hard, we have decided to use renode, renode is amazing but we aren't very good at using it or we are still learning lol, anyways also we are using the Visual System Designer too which is sum i set up but it has like absolutely ZERO documentation as far as i have seen.
Assembly
You'll need some nuts and m3 screws and then, well we don't actually have like the headset in person or built yet so its hard to say but basically you'd print all the parts and then fit the display gantry things in and put the rods in and through them then secure the rods in with the rod end stops, then put on the camera mounts and then put the cameras in and screen them into place, then just place the display driver board on the top flat spot on the head strap and screen it in with heat set inserts or like me just heat the screws and shove em in, then lastly put the splitter in at the top inside of the headset shell and plug the displays and driver boards in, then put the usb hub on top and plug everything in and have the hdmi from the driver board and usb 3.2 gen 2 cable from the hub go back to your pc and plug em in and your ready to go!
Bill-of-Materials
check out the BoM folder in the root of the repo.
Development-Status
rn we are working on well i was working on this readme, and we just need to buy and build the headset but before that we need our controllers done, rn what we are doing is firmware and the basics for the software tho cuz we wanna leave controller modeling for the end cuz its kinda easy
Known-Issues
uhh not many, we try to fix the issues yk, but uh like we got some issues with vsd and renode rn thats abt it tho
Project-Links
You can check me, oxy-2 out on my site at oxygenated.uk and you can check out my friend grand at nesaule.dev and you can see the work i did with stardance here and lastly heres our repo on github, deltavr
Credits
This project was made firstly by me oxy-2 and also my 2 friends helped out for the thirdspace program, so big thanks to grand and john!
This project was inspired by the Quest 3 made by Meta, the Bigscreen Beyond and HadesVR also a couple other small things i can't really remember, we wrote most our code ourselves and modeled everything ourselves according to the design i made so its not stolen.
Other than that we used tools like renode, blender, onshape and kicad along side very common programming languages like C, C++, Python and C#.
And lastly but certainly not least a MASSIVE thanks to Hack Club they really are what let me make this project, with the rewards for the programs I've worked with motivating me to work on this as my dream project and in general they are a very awesome bunch of people and ill always be thankful to have had worked with them <3
License
Legal Notice
Copyright (c) 2026 oxy-2 and the DeltaVR Project Contributors.
This repository is distributed under a split-licensing model. All custom software, tracking scripts, and firmware components are licensed under the GNU General Public License v3.0 (GPL-3.0). All custom schematic diagrams, KiCad layouts, 3D printable enclosures, and hardware manufacturing files are licensed under the CERN Open Hardware Licence Version 2 - Strongly Reciprocal (CERN-OHL-S v2). Handwritten engineering documentation and Obsidian notes are licensed under Creative Commons Attribution-ShareAlike 4.0 International (CC BY-SA 4.0).
This project is provided "as is" without warranty of any kind, express or implied. For full path breakdowns and legal terms, see the root LICENSE file.
made with love.
by oxy


