Skip to the content
PCBKitNew board
2 layers39 × 52 mmBoard2, the printed circuit board in 3D

a controller system to operate motors and microscope XYZ stage

Size
39 × 52 mm
Copper layers
2
Thickness
1.6 mm
Parts
14
Nets
6
Pads
28
Tracks, vias
51, 0
Pours
5
Routed
Yes
KiCad
KiCad 6 (file 20211014)
Created
16 Jun 2022
Updated
30 Sep 2025

Overview

Board2 is an open-source printed circuit board by Open-2-Photon-Microscope, from the Open-2-Photon-Microscope/3-axis-controller repository on GitHub. It is a 2-layer board of 39 × 52 mm with 14 parts on 6 nets, routed with 51 tracks and 0 vias.

Its parts include 6 resistors, 2 capacitors and 2 connectors.

README

README.md

3-axis-controller

A manipulator device to operate microscope stage XYZ translations. This project was specifically designed for the OpenFlexure Delta Stage.

Assembly

Assembling the Board

  1. Order the (2 layer) board from a PCB manufacturer (e.g. JLCPCB) by uploading this file.
  2. Using the BOM, solder together the integrated board from electronics/integrated_board. The board is labeled with the locations and values of resistors, capacitors etc.
    • Make sure to solder socket headers to the board and slot in the esp32 and pcf8575 modules rather than soldering them directly to the board. Sometimes things go wrong and they will be very hard to remove...
    • All parts are intended to be soldered as sitting on the top face of the board - any differences seen in the 3D view of the PCB in KiCAD should be ignored

Software

Setting up MicroPython with Thonny IDE

  1. Follow the tutorial on this page if you haven't already done so when assembling the board.

Upload the Code

  1. Download the code here
  2. Open them all in Thonny.
    • Connect your board to your PC via micro USB.
  3. In Thonny, in the files panel (view > files) navigate to the location of the code to be installed
  4. Highlight all files and folders, including lib
  5. Right click and select Upload to /
  6. CHECK: Does the file layout in the esp32 look like that on this GitHub?

Assembling the controller

  1. Assemble the JST-XH cables mentioned in the BOM
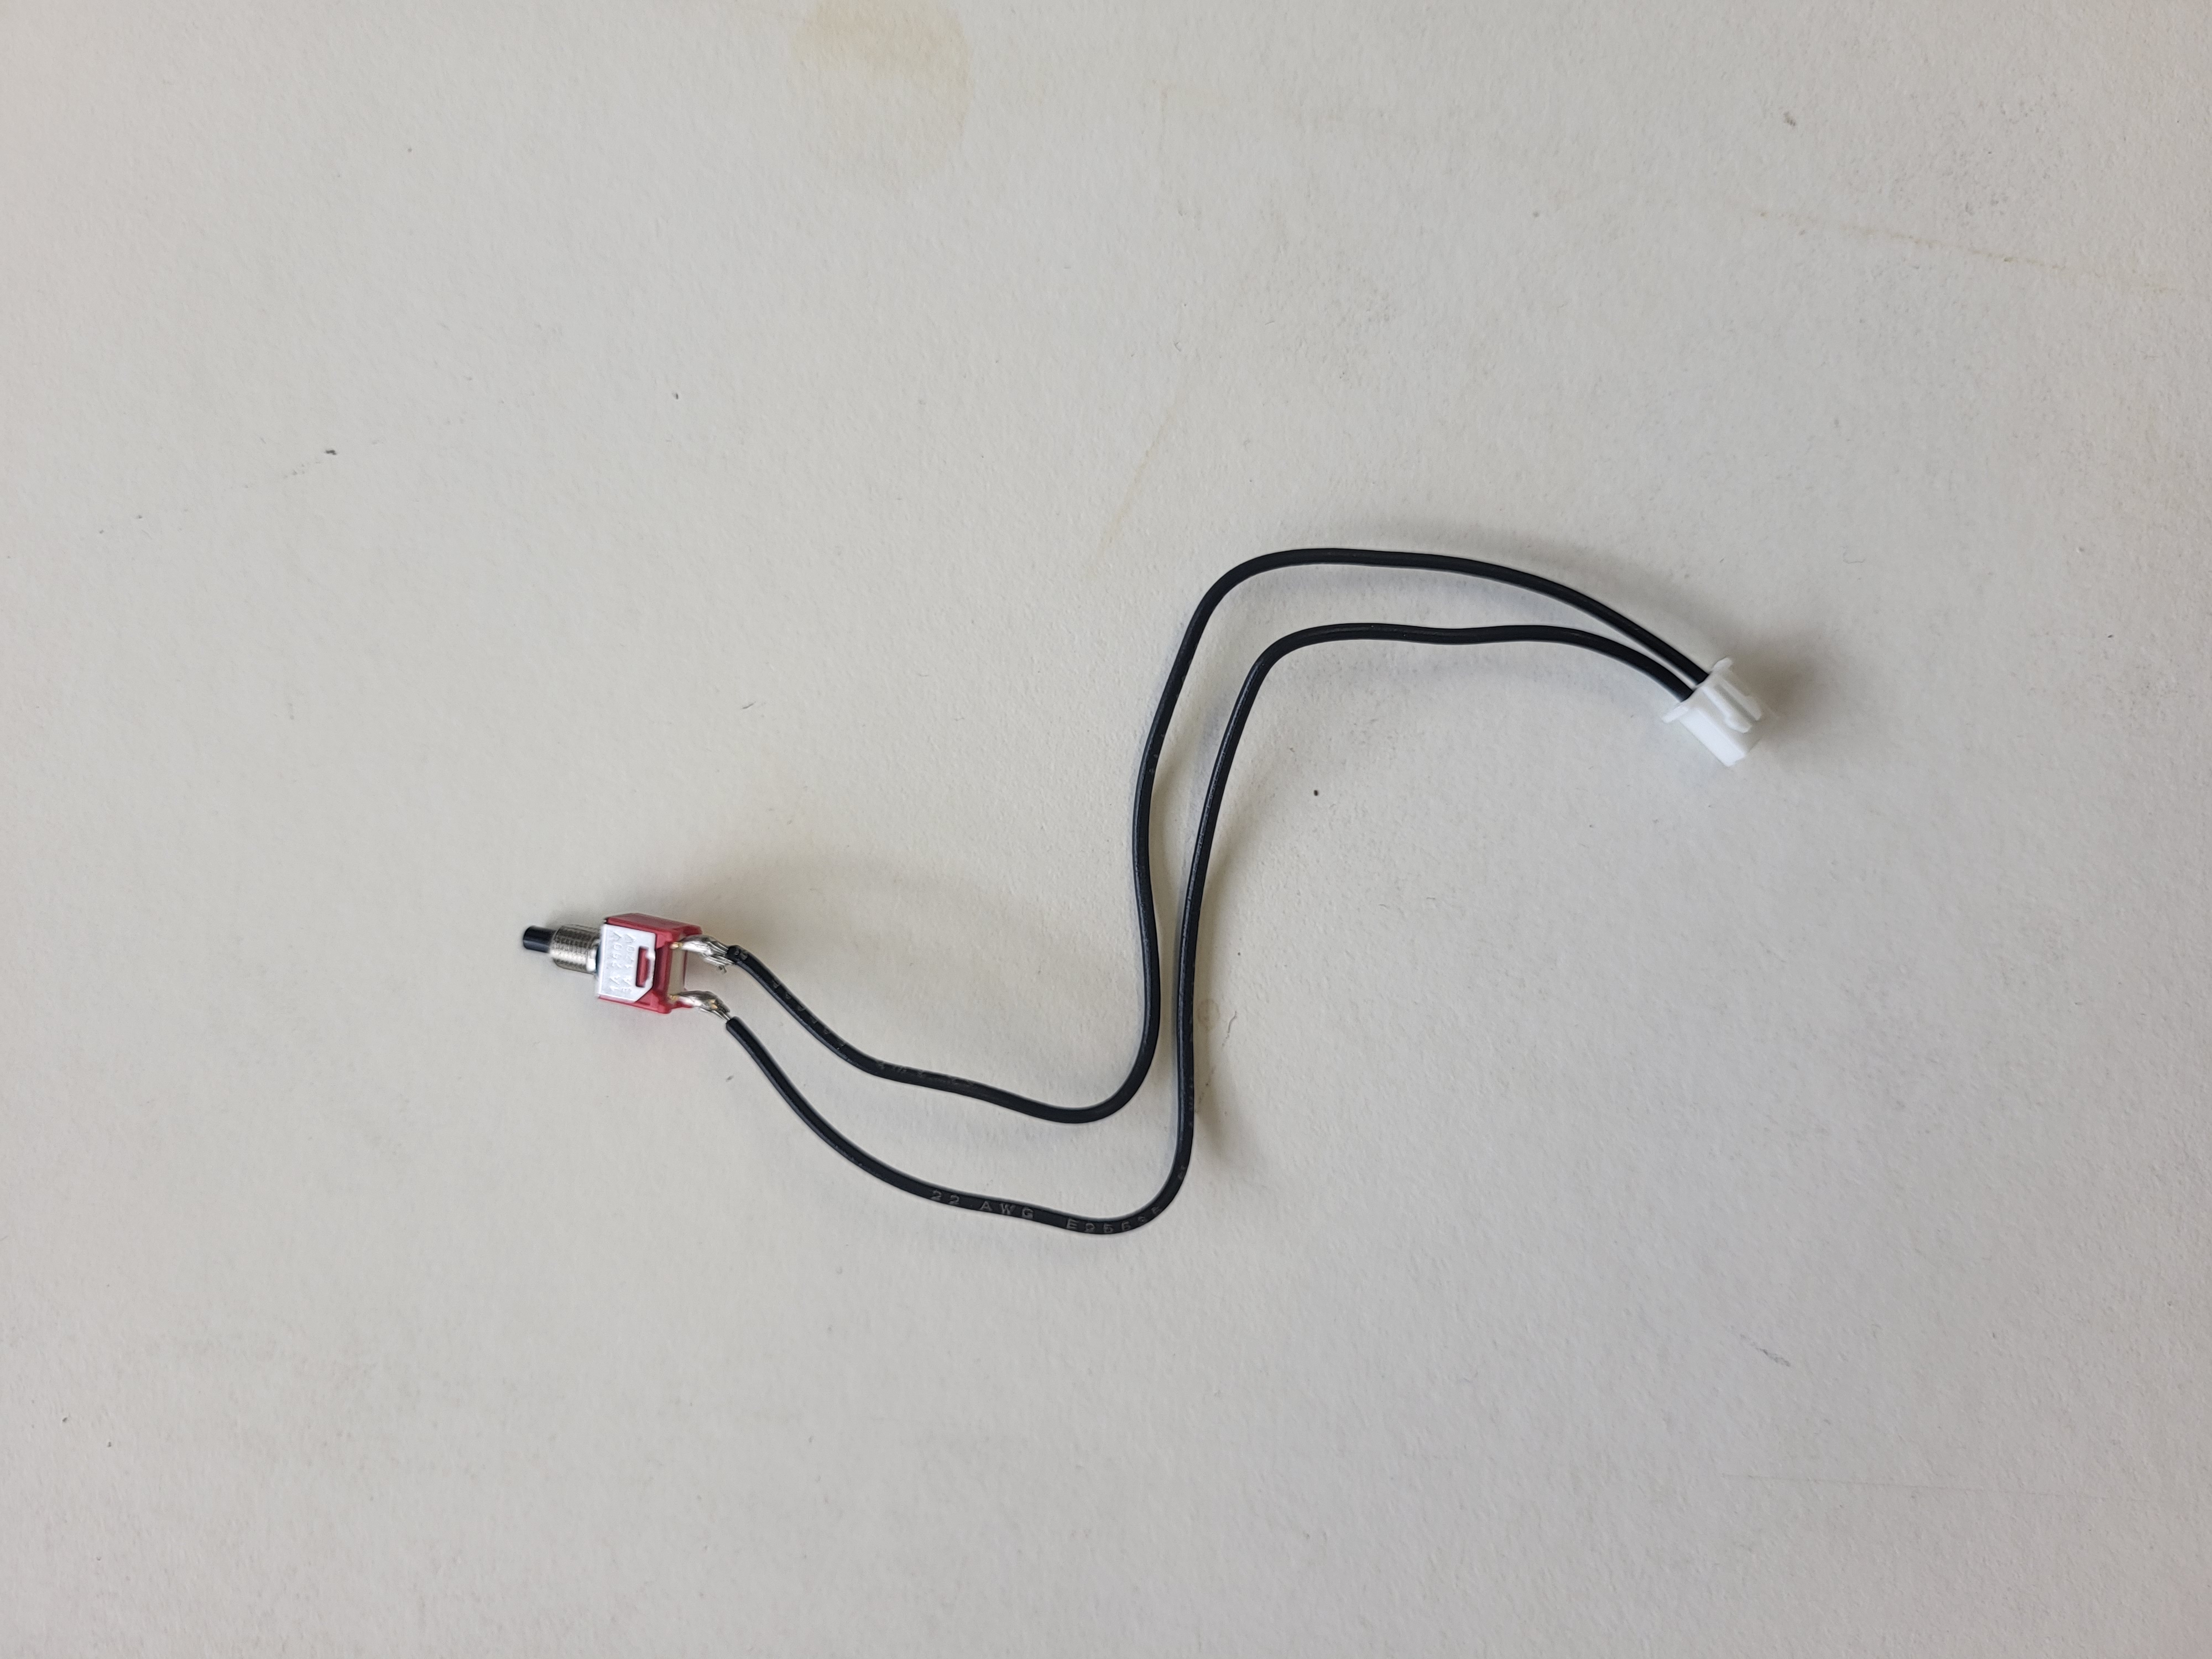
  2. For each button and flip switch, cut one crimped wire in half and solder before attaching to the JST-XH head Orientation doesn't matter.
    All switches in the panel use one crimped cable cut in half
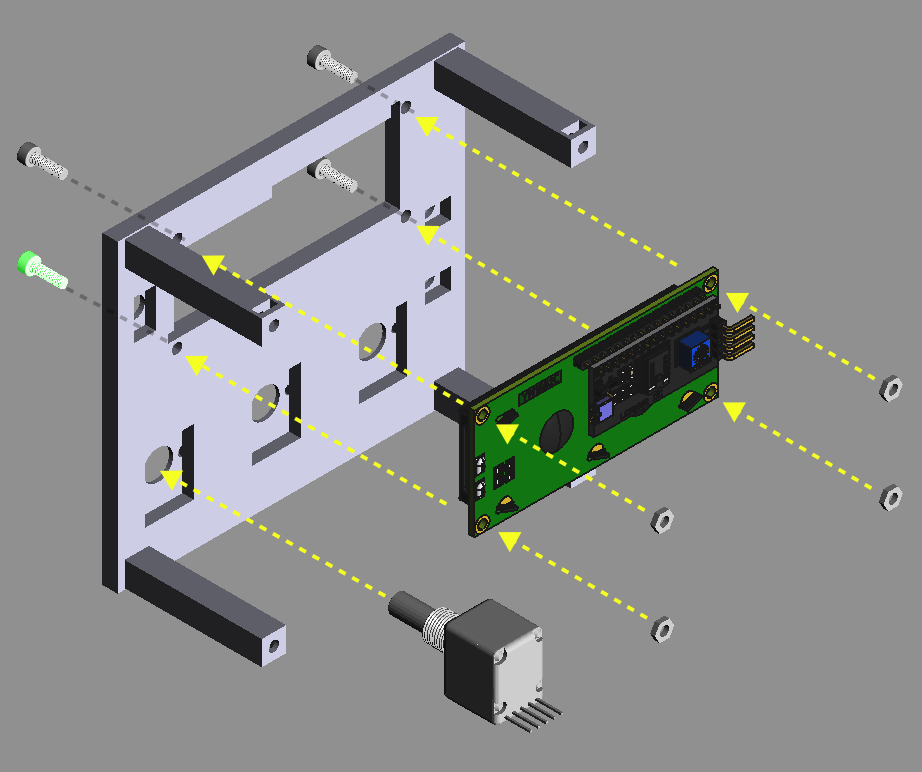
  3. Print the enclosure top and assemble as shown. Include the other rotary encoders and switches (not shown). The appropriate washers and nuts to screw onto the front face should be shipped with each component. Use M3x10 screws for the LCD. Assemble the top of the controller
  4. Use a 4-pin JST cable to connect the LCD to the marked port. Make sure the GND and VCC pins are attached to the same connection on the main and LCD board.
    • NOTE: there is a variable resistor on the back of the LCD board that adjusts the contrast, so don't screw the whole box shut until you've tested the text appears correctly
  5. Use a 5-pin JST cable for each rotary encoder. MAKE SURE the GND pin connects to the pin marked with "-" on the encoder.
  6. Plug in all the switches to the board to their closest port.
    • DO NOT PLUG SWITCHES INTO THE PORTS MARKED AS 12V/GND AS IT MAY START A FIRE AND SOME FEATURES MAY NOT WORK AS INTENDED
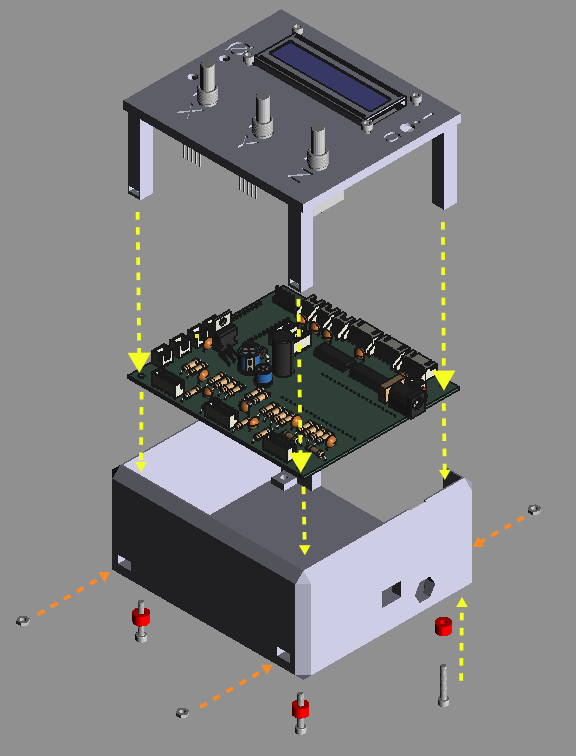
  7. Once you are confident the LCD is displaying text correctly when powered on, assemble the enclosure as shown. Make sure to print the feet in some TPU for grip. Use M3x16 (or longer).
  • Note you should have all components wired up and screwed in at this point, not all of this is shown on the diagram.

    Assemble the whole box!

Connecting to the Delta Stage

  1. Split the length (2M) of ribbon cable at the ends into 3 strips of 5 wires, and 3 strips of 2 wires. You can peel away the remaining wires and discard them.
    • Note it may be helpful for cable management not to entirely separate the 3x5 and 3x2 strips.
  2. Crimp one end of the cable, and slot into JST XH 5 or 2 cable headers respectively.
  3. Put a short length of heat-shrink tubing on each remaining end of all wires.
  4. Next, solder the remaining 3x5 wires to straight JST HX 5 pin headers (male)
    • Ensure the orientation of both ends of the cable is such that each lane could form a complete loop if it were plugged into itself without any twist. (i.e. each in and out pin is the same)
  5. Solder the sets of 2 wires to the footswitches - one to the middle-pin, the other to the pin towards the hinge of the lever.
    • Ensure this configuration is such that a circuit is made (not broken) when the switch is pressed
  6. Use hot air or a soldering iron to shrink the heat-shrink tubing and cover these solder joints.
  7. Use m2x8 screws to attach the switches to the modified feet of the Delta Stage and use these in place of the ones on the official models when assembling the actuators
    • Make sure to use the modified models found here for the open 2-photon project

Installing the I2C library

You may need to install the lib portion of the I2C code another way - the above method should work, so only follow these instructions if something is not behaving as expected.
  1. Download micropython-i2c-lcd-0.1.1.tar.gz
  2. In Thonny go to Tools > Manage Packages
    • make sure the esp32 is still plugged in to your computer
  3. Click the Install from local file link and select the .tar.gz file you downloaded
  4. CHECK: Does the file layout in the esp32 look like that on this GitHub? You should not need to but you may have to rename the folder to ensure all the code is looking in the right place...

Parts

14
QtyValueFootprintReferences
41kΩResistor_THT:R_Axial_DIN0309_L9.0mm_D3.2mm_P12.70mm_HorizontalR1, R3, R5, R6
4MountingHoleMountingHole:MountingHole_3.2mm_M3_DIN965H1, H2, H3, H4
21k8ΩResistor_THT:R_Axial_DIN0309_L9.0mm_D3.2mm_P12.70mm_HorizontalR2, R4
222nFCapacitor_THT:CP_Radial_D4.0mm_P2.00mmC1, C2
1A B VCC GNDConnector_JST:JST_XH_B4B-XH-A_1x04_P2.50mm_VerticalJ1
1GND VCC B AConnector_JST:JST_XH_B4B-XH-A_1x04_P2.50mm_VerticalJ2

Questions

How big is the Board2 PCB?

It measures 39 × 52 mm and has 2 copper layers, 1.6 mm thick.

What parts does the Board2 use?

14 parts. The full list of its parts is on this page, with links to each part's symbol and footprint where PCBKit's library has them.

Where can I download the Board2 KiCad files?

From the Open-2-Photon-Microscope/3-axis-controller repository on GitHub, at the commit this page was made from: the board is electronics/rotary_encoder_board/board2.kicad_pcb and its schematic electronics/GPIO_expander_board/GPIO_expander_board.kicad_sch. PCBKit opens the board in the browser, with nothing to install.

Can I use the Board2 design in my own project?

Its repository states no licence, so its author keeps all rights: ask Open-2-Photon-Microscope before reusing the design.

More from Open-2-Photon-Microscope/3-axis-controller

3
  • 2 layers98.5 × 111 mmIntegrated board, the printed circuit board in 3D

    Integrated board

    Open-2-Photon-Microscope/3-axis-controller

    a controller system to operate motors and microscope XYZ stage

    69 parts
  • 2 layers62 × 98 mmStepper driver, the printed circuit board in 3D

    Stepper driver

    Open-2-Photon-Microscope/3-axis-controller

    a controller system to operate motors and microscope XYZ stage

    17 parts
  • 2 layers49 × 59.5 mmGPIO expander board, the printed circuit board in 3D

    GPIO expander board

    Open-2-Photon-Microscope/3-axis-controller

    a controller system to operate motors and microscope XYZ stage

    14 parts

Similar boards

  • 2 layers116.8 × 30 mmType d, the printed circuit board in 3D

    Type d

    google/mozc-devices

    Circuit diagrams and firmware source code for Gboard DIY keyboards

    14 parts3kApache-2.0
  • 2 layers32 × 22 mmDiff driver, the printed circuit board in 3D

    Diff driver

    rene-dev/stmbl

    AC Servo Driver for STM32F4

    14 parts990GPL-3.0
  • 2 layers34 × 45 mm2032Charger, the printed circuit board in 3D

    2032Charger

    hackclub/OnBoard

    💡 Join 1,000 teenagers and make your first PCB with a $100 grant!

    14 parts915
  • 2 layers34 × 109.9 mmTdisplay s3, the printed circuit board in 3D

    Tdisplay s3

    landonr/homeThing

    Wifi Smart Home Remotes that run on ESPHome

    14 parts551GPL-3.0
  • 2 layers45.3 × 42.7 mmMainPcb, the printed circuit board in 3D

    MainPcb

    adamb314/ServoProject

    Getting the most out of your hobby servo

    14 parts545
  • 2 layers42.5 × 28.8 mmC5VRX JACK DIY, the printed circuit board in 3D

    C5VRX JACK DIY

    Twotoz/C5VRX

    Ultra-minimal, zero-CPU 5.8 GHz analog FPV video receiver using ESP32-C5 Wi-Fi 6 PHY MODEM_DIAG, BitScrambler WBFM demodulation & resistor DAC CVBS

    14 parts515GPL-3.0
  • 2 layers62 × 24 mmMai button, the printed circuit board in 3D

    Mai button

    whowechina/mai_pico

    Pico controller for Maimai

    14 parts475