
2 layers80 × 80 mm
Campv2
notazizelse/camp
CAMP v2: an all-through-hole CubeSat-style payload board I designed for my Technocamp 2026 circuitry class (200 students)
23 parts

 notazizelse/camp
CAMP v2: an all-through-hole CubeSat-style payload board I designed for my Technocamp 2026 circuitry class (200 students)
Camp is an open-source printed circuit board by notazizelse, from the notazizelse/camp repository on GitHub. It is a 2-layer board of 80 × 80 mm with 21 parts on 43 nets, routed with 111 tracks and 0 vias.
It is built around the DHT11, KH-6X6X5H-TJ and TJ-L5FCMXHTCSLCRGB-A5. Its parts include 8 resistors, 3 connectors, 3 switches and 2 diodes. It belongs with the AVR (ATmega, ATtiny) boards of this library.


A CubeSat payload computer you can build in a weekend.
An 80 × 80 mm Arduino Nano carrier board that turns a handful of loose sensor modules into one tidy instrument: it reads the temperature, the humidity and the carbon-monoxide level of the air around it, shows them on a small screen, and reports them over USB — the same job the payload computer of a real CubeSat does.
Every part is through-hole, so it can be assembled with a soldering iron and no magnifying glass. The board carries no chips of its own — the Arduino Nano does all the thinking. What the board gives you is clean wiring, the right resistors in the right places, and connectors that only fit one way.
🇺🇿 Bu hujjatning o'zbekcha versiyasi: README.uz.md 🔧 Designing a rev C, or want the netlist and fab notes? → docs/hardware-reference.md
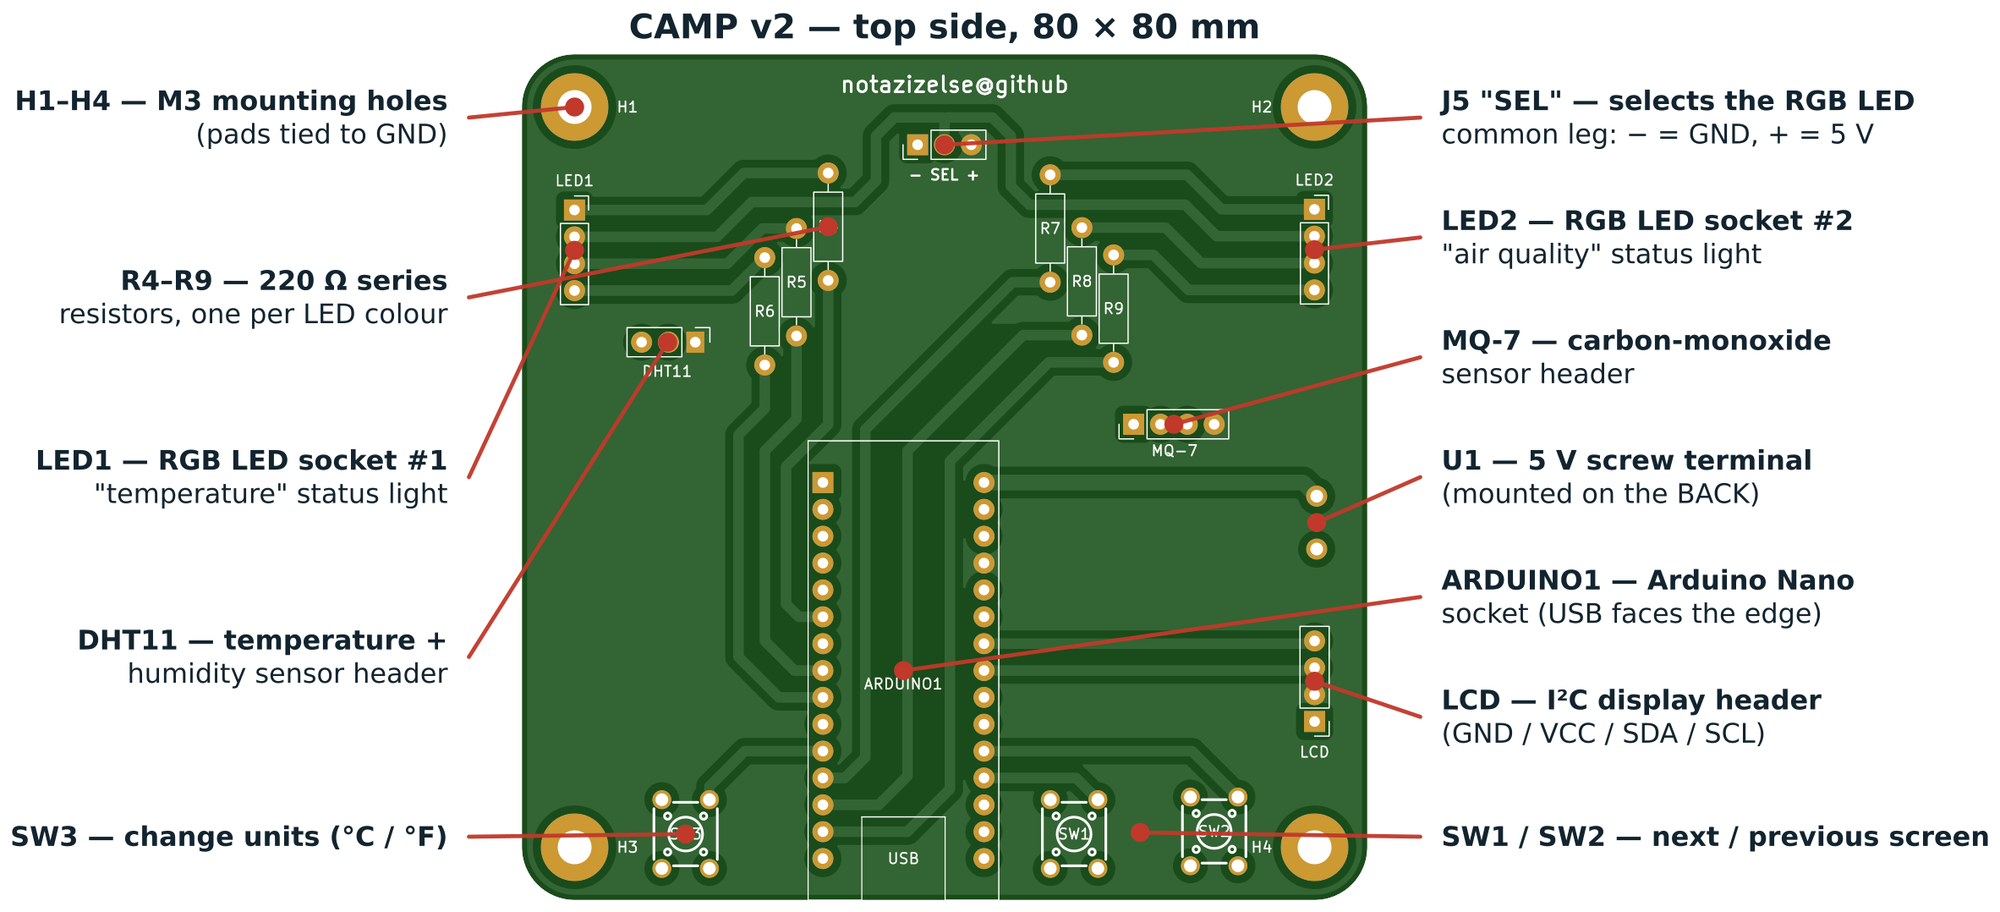
| Ref | Qty | Part | Notes |
|---|---|---|---|
| ARDUINO1 | 1 | Arduino Nano (ATmega328P) | Use two 1×15 female headers so the Nano can be unplugged |
| R4 – R9 | 6 | 220 Ω resistor, ¼ W | Colour bands: red–red–brown–gold |
| LED1, LED2 | 2 | 4-pin RGB LED, 5 mm | Fitted in 1×4 sockets, so they can be swapped |
| SW1, SW2, SW3 | 3 | 6 × 6 mm tactile push button | 4-leg, 5 mm tall |
| J5 "SEL" | 1 | 1×3 pin header + jumper cap | Chooses common-cathode or common-anode LEDs |
| DHT11 | 1 | 1×3 pin header | For the temperature / humidity module |
| MQ-7 | 1 | 1×4 pin header | For the carbon-monoxide module |
| LCD | 1 | 1×4 pin header | For the I²C display module |
| U1 | 1 | 2-way 5 mm screw terminal | Mounted on the back of the board |
| H1 – H4 | 4 | M3 screw + standoff | Optional, for mounting into a frame |
The full machine-readable list, with LCSC order codes, is in
campv2/production/bom.csv.
Soldering iron, solder, side cutters, a small screwdriver for the terminal, and a computer with the Arduino IDE.
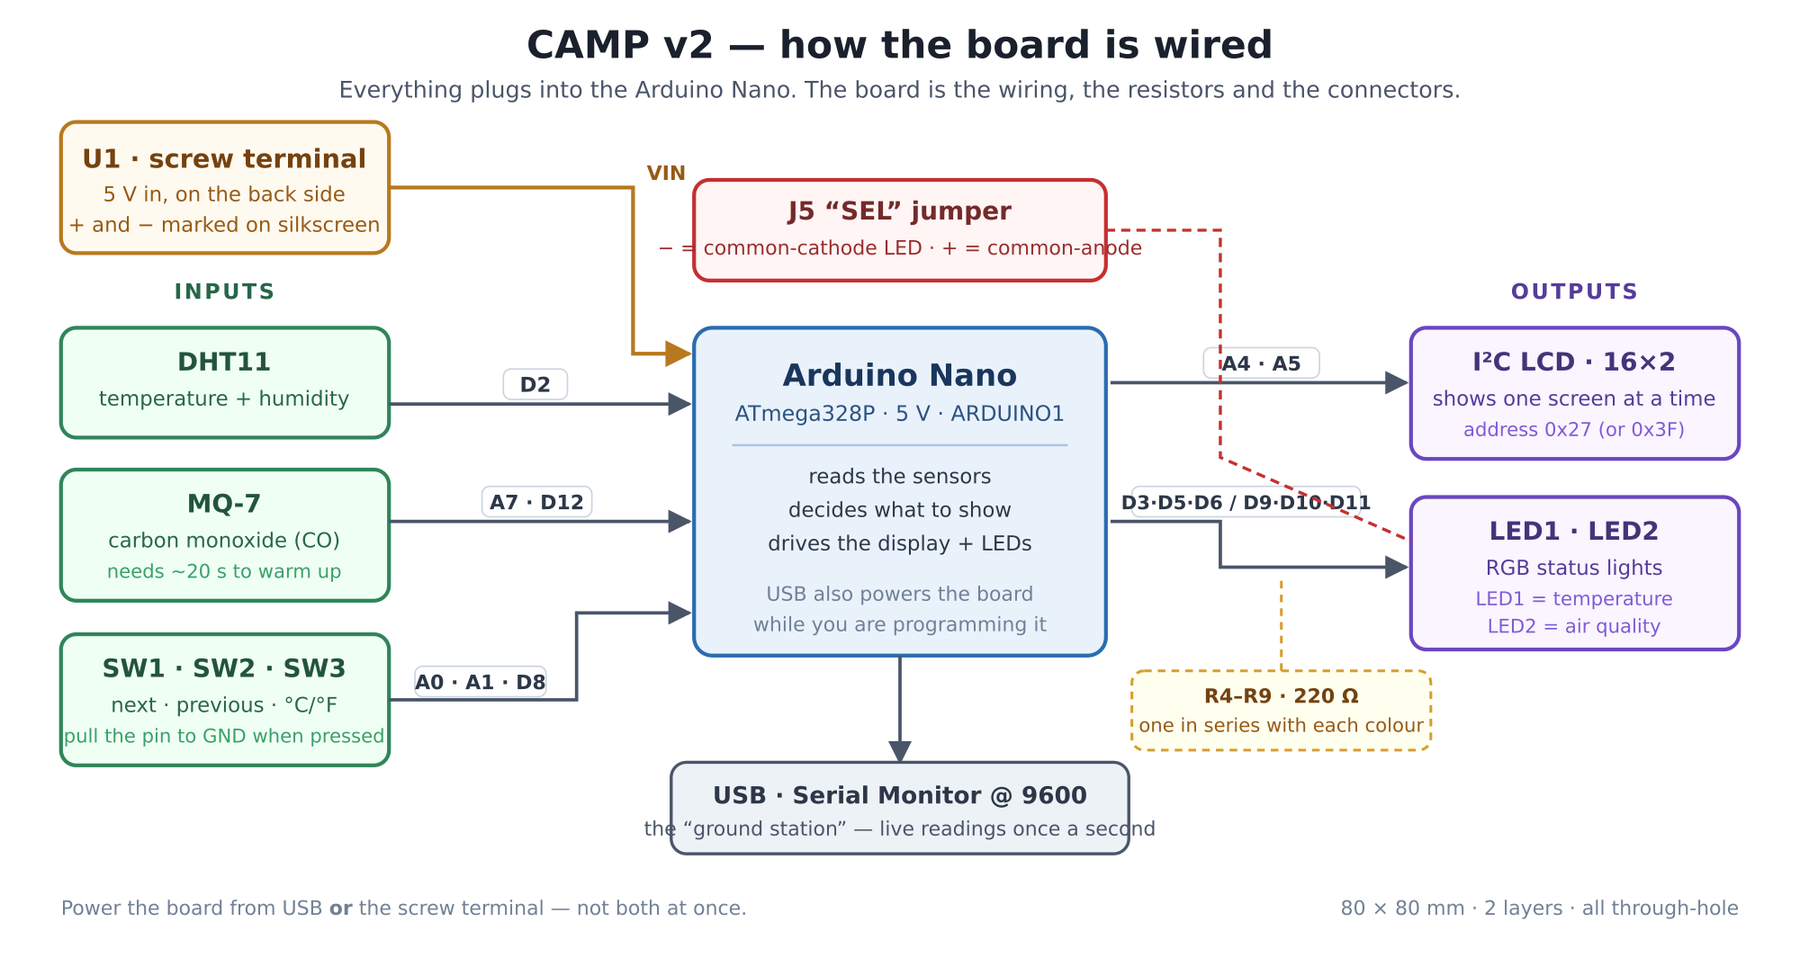
Read it left to right. The three things on the left tell the Arduino something. The two things on the right are how the Arduino tells you something. Nothing on this board talks to anything else directly — every signal goes through the Nano.
This is the single most important table in the repository. It is what the board is.
| Arduino pin | Goes to | What it does |
|---|---|---|
D2 | DHT11 pin 2 | Temperature and humidity data (one wire, both values) |
A7 | MQ-7 pin 1 | CO level, as a voltage — analogue in only, cannot be a digital pin |
D12 | MQ-7 pin 2 | The MQ-7 module's own alarm output |
A0 | SW1 | "Next screen" button |
A1 | SW2 | "Previous screen" button |
D8 | SW3 | "Change units" button (°C ↔ °F) |
A4 | LCD pin 3 | I²C SDA — data |
A5 | LCD pin 4 | I²C SCL — clock |
D3 D5 D6 | LED1 via R4, R5, R6 | Red, green, blue of the first RGB LED |
D9 D10 D11 | LED2 via R7, R8, R9 | Red, green, blue of the second RGB LED |
VIN | U1 pin 1 | 5 V from the screw terminal |
GND | U1 pin 2, every module, H1–H4 | Ground |
All six LED pins are PWM-capable, which is why the LEDs can fade smoothly between colours instead of only switching on and off.
The buttons have no resistors. Each button connects its Arduino pin to GND, and
nothing else. The pull-up resistor that holds the pin HIGH lives inside the ATmega328P
and is switched on in software with pinMode(pin, INPUT_PULLUP). So a button reads
HIGH when it is not pressed and LOW when it is — backwards from what you might
expect, and a classic thing to get stuck on.
J5 decides which way the LEDs are wired. A 4-pin RGB LED has three separate colour
legs and one leg they all share. On a common-cathode LED that shared leg must go to
GND; on a common-anode LED it must go to +5 V. Rather than pick one and lock you in,
this board brings the shared leg out to the middle pin of J5, marked SEL on the
silkscreen, with − (GND) on one side and + (5 V) on the other. Put the jumper cap on
the side your LEDs need, and set COMMON_ANODE in the sketch to match.
Each LED colour gets its own 220 Ω resistor. An LED will happily draw enough current to destroy itself, and the three colours inside an RGB package have different forward voltages, so one shared resistor would make the colours uneven. Six resistors, one per colour channel: R4/R5/R6 for LED1, R7/R8/R9 for LED2.
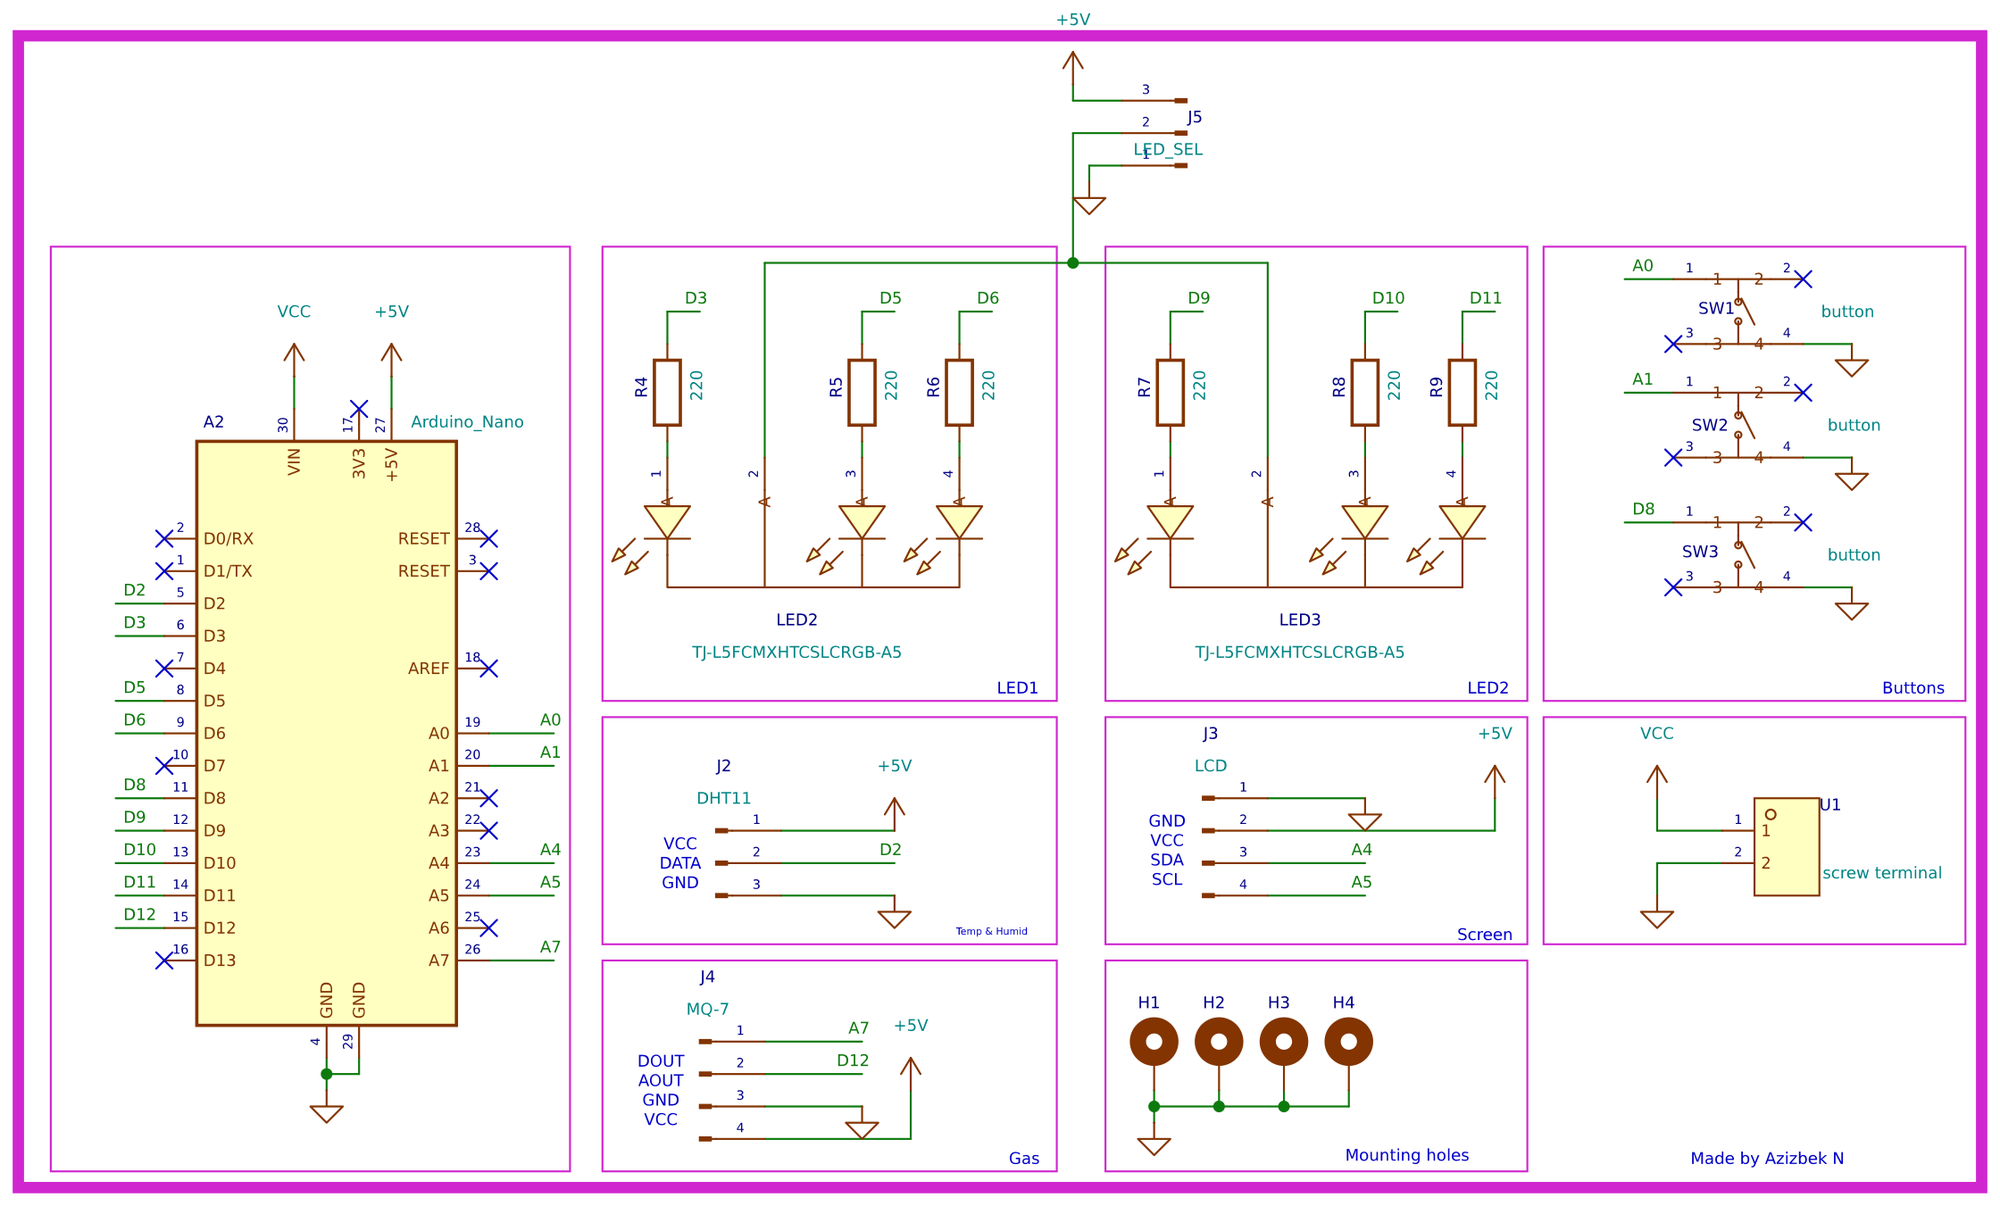
Higher-resolution vector version: docs/images/schematic.svg.
The KiCad source is campv2/campv2.kicad_sch.
The drawing is deliberately split into labelled boxes — Buttons, Temp & Humid,
Gas, Screen, Mounting holes, and the two LED blocks — so you can read one idea at a
time. Instead of drawing a wire all the way from the Nano to each block, the schematic
uses net labels: two wire ends carrying the same label, like A4, are the same
electrical node even though no line connects them on paper. This is how real schematics
stay readable.
Full step-by-step version with photos of each stage: docs/assembly.md.
The short version:
Solder from shortest part to tallest, so that each time you flip the board over, the parts you have already fitted hold themselves flat against it.
SEL header.Then plug in the modules, put a jumper cap on J5, and drop the Nano into its socket with the USB connector facing the edge of the board (the silkscreen shows you where).
⚠️ Power the board from USB or the screw terminal — never both at once. The screw terminal feeds the Nano's
VINpin. Feeding 5 V intoVINwhile USB is also connected puts the Nano's regulator and your USB port in a fight neither wins.
The sketch is campv2/firmware/CubeSat/CubeSat.ino.
LiquidCrystal I2C by Frank de BrabanderDHT sensor library by AdafruitAdafruit Unified Sensor by Adafruit
(No internet in the classroom? Known-good copies are vendored in
Arduino/libraries/ — see the README there.)avrdude: stk500_recv() error, switch the processor to
ATmega328P (Old Bootloader). Most cheap Nano clones need this.CubeSat.ino, put your own name in STUDENT_NAME, and press Upload.They are all together at the top of the sketch, in the block marked
PART 1 — SETTINGS YOU ARE MEANT TO CHANGE:
| Setting | What it is for |
|---|---|
STUDENT_NAME | Shown on the LCD at start-up |
LCD_ADDRESS | 0x27 for most I²C backpacks; try 0x3F if the screen stays blank |
COMMON_ANODE | false for common-cathode LEDs (J5 on −), true for common-anode (J5 on +) |
TEMP_COLD_C, TEMP_HOT_C | When LED1 turns blue and when it turns red |
CO_WARNING_PPM, CO_DANGER_PPM | When LED2 turns amber and when it turns red |
CALIBRATE_MODE, MQ7_R0 | MQ-7 calibration — see below |
Everything below that block is the wiring, and changing it will simply stop the board from matching the copper.
The LCD shows one screen at a time. SW1 walks forward through them, SW2 walks back, and they wrap around:
   NAME  →  TEMPERATURE  →  HUMIDITY  →  CARBON MONOXIDE
     ↑                                          │
     └──────────────────────────────────────────┘
SW3 switches the temperature between °C and °F.
The two RGB LEDs are status lights, exactly like the ones on a real satellite:
| LED1 — temperature | LED2 — air quality | |
|---|---|---|
| 🔵 blue | below 18 °C | — |
| 🟢 green | comfortable | CO below 35 ppm |
| 🟡 amber | — | CO 35 – 200 ppm |
| 🔴 red | above 28 °C | CO above 200 ppm |
Open the Serial Monitor at 9600 baud and the board reports every reading once a second. That is your ground station.
An MQ-7 does not measure CO directly — it measures its own resistance, which changes when
CO touches it. To turn that into a number in ppm the sketch needs R0, the sensor's
resistance in clean air, and every sensor's R0 is different.
CALIBRATE_MODE = true and upload.MQ7_R0.CALIBRATE_MODE = false and upload again.Until you do this, treat the ppm figure as "roughly" rather than "actually". Also give the
sensor about 20 seconds after power-on before believing anything — its heater has to come
up to temperature first, and the screen says warming up while it does.
The board was designed to be poked at. Some starting points, roughly in order of difficulty:
D12) to flash both LEDs at once.The full list is in docs/troubleshooting.md. The four that
catch nearly everybody:
| Symptom | Almost always |
|---|---|
| LCD backlight is on but shows nothing, or white squares | Wrong I²C address — change LCD_ADDRESS from 0x27 to 0x3F |
Upload fails, stk500_recv(): programmer is not responding | Wrong bootloader — Tools → Processor → ATmega328P (Old Bootloader) |
| LEDs are on when they should be off, colours inverted | J5 jumper and COMMON_ANODE disagree — flip one of them |
Temperature reads nan or the screen says the sensor failed | DHT11 in backwards, or its middle pin not seated |
camp/
├── README.md                    ← you are here (English)
├── README.uz.md                 ← same thing, in Uzbek
├── CHANGELOG.md                 ← what changed between board revisions
│
├── campv2/                      ← THE BOARD, and everything that belongs to it
│   ├── campv2.kicad_pro         ·  open this one in KiCad
│   ├── campv2.kicad_sch         ·  schematic
│   ├── campv2.kicad_pcb         ·  layout
│   ├── fp-lib-table             ·  points at ../lib (project-relative)
│   ├── sym-lib-table
│   │
│   ├── firmware/
│   │   └── CubeSat/CubeSat.ino  ← THE CODE. Open this in the Arduino IDE
│   │
│   └── production/              ← WHAT THE FACTORY GETS. Do not edit by hand
│       ├── …PCB_B.zip           ·  upload this file to JLCPCB / PCBWay as-is
│       ├── bom.csv              ·  parts list with LCSC codes
│       ├── positions.csv        ·  pick-and-place positions
│       ├── designators.csv
│       └── netlist.ipc          ·  for the fab's electrical test
│
├── lib/                         ← shared KiCad libraries
│ ├── lcsc/ · symbols + footprints pulled from LCSCThe rule: everything the current board needs is inside campv2/ — schematic,
layout, sketch and fab package, one folder. lib/ is what KiCad loads behind the
scenes. docs/ is for you. Nobody needs archive/.
⚠️ Two folders are called
production, and they are not the same thing.campv2/production/is the fab package — the gerbers, BOM and pick-and-place file you send to the factory. The top-levelproduction/holds the logo footprints and reference plots. "Send them the production files" means the zip incampv2/production/.
You need KiCad 10.0 or newer — the files use the 2026 file format and older KiCad will refuse to open them.
git clone https://github.com/notazizelse/camp.git
cd camp
Then open campv2/campv2.kicad_pro. That is all. There is no "configure paths"
step, no environment variables to set, and no libraries to install:
${KIPRJMOD}, KiCad's built-in
"wherever this project happens to be" variable, so they resolve on any machine.If KiCad still complains about a missing library, that is a bug in this repository — please open an issue rather than fixing it locally, so the next person does not hit it.
Upload campv2/production/TechnoCamp_Circuitry_Class_PCB_B.zip to any PCB house
without unzipping it, and take the defaults:
| Setting | Value |
|---|---|
| Size | 80 × 80 mm |
| Layers | 2 |
| Thickness | 1.6 mm |
| Min track / clearance | 0.5 mm / 0.5 mm |
| Min hole | 0.3 mm |
| Vias | none — every connection is a track or a pad |
| Surface finish | HASL is fine |
The design rules are deliberately loose — nothing on this board is near any fab's limits, which is what makes it cheap and reliable to produce in class quantities.
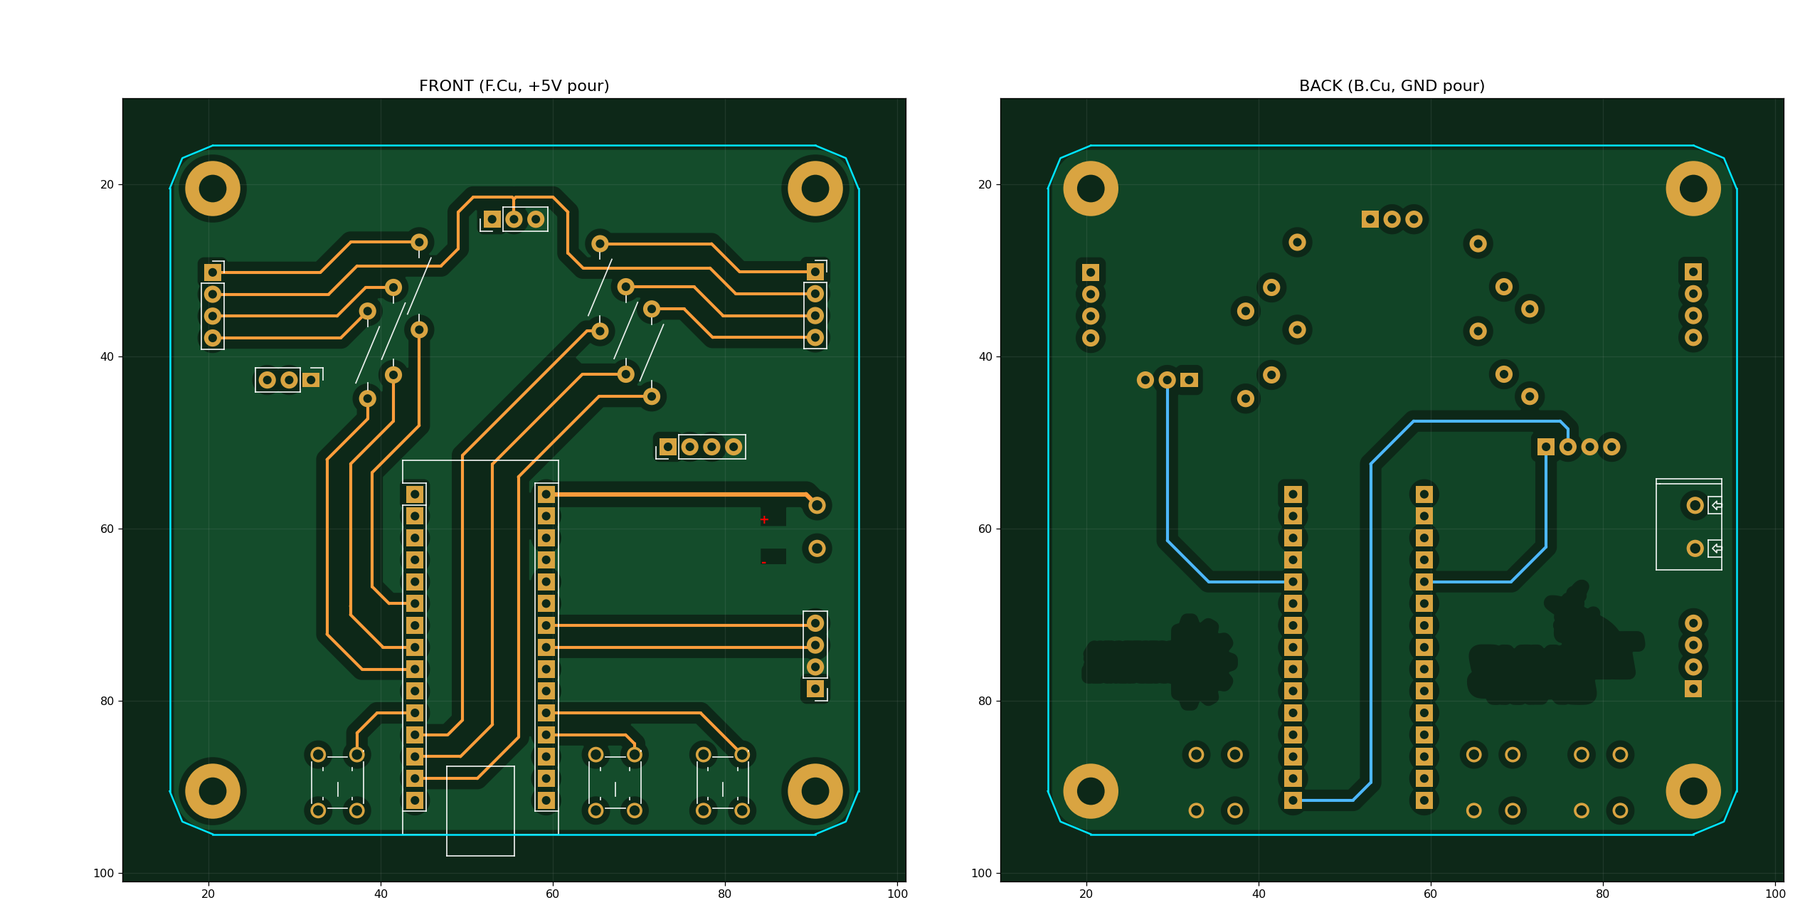
The board has a +5 V pour on the front and a GND pour on the back. That gives every part a low-impedance path to both rails without routing a single power track, and it is why the back of the board looks almost empty.
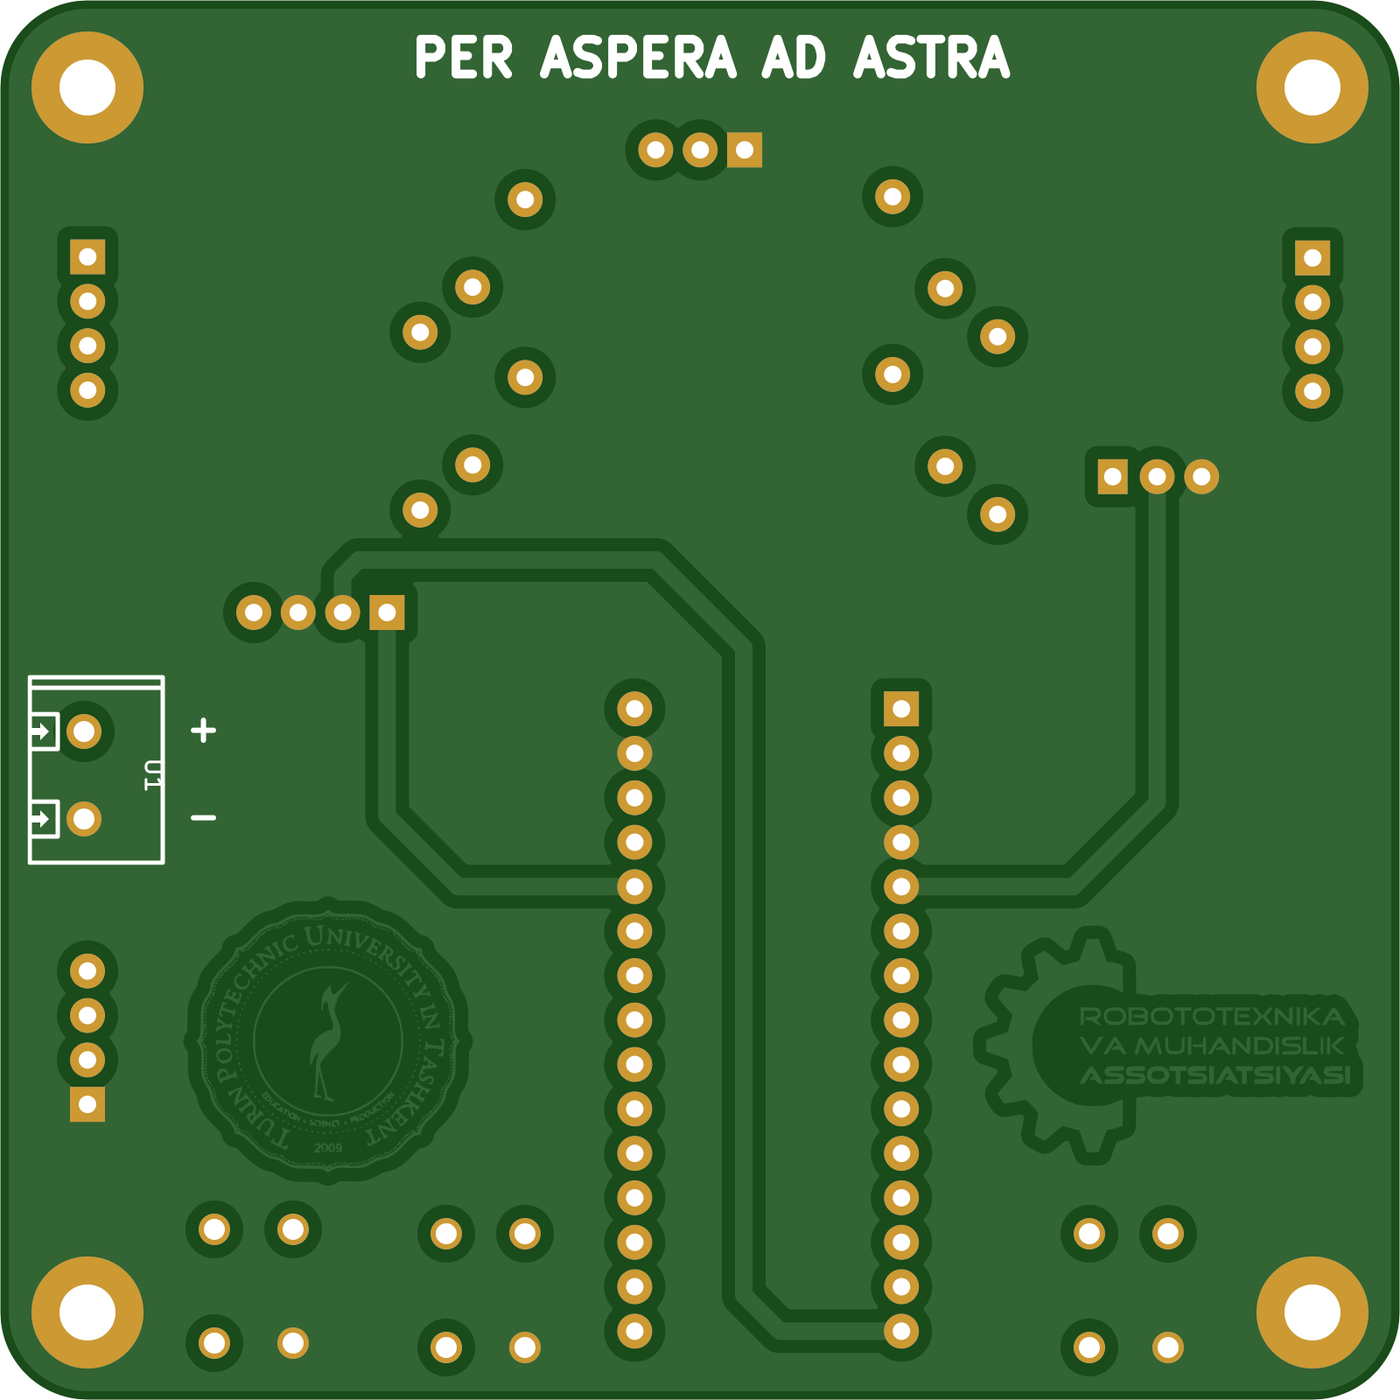
Across the top of the back, above the mounting holes, the board carries PER ASPERA AD ASTRA — through hardships, to the stars.
Designed by Azizbek N for TechnoCamp 2026, run by the Robotics and Engineering Association at Turin Polytechnic University in Tashkent. Both logos are printed on the back of the board.
The Arduino Nano pinout reference embedded in the schematic is from Last Minute Engineers and is used for reference only.
Licence: not yet chosen. Until one is added, treat this as "ask before reusing". For a teaching board like this, the usual pairing is CERN-OHL-P v2 for the hardware and MIT for the firmware.
| Qty | Value | Footprint | References |
|---|---|---|---|
| 6 | 220 | Resistor_THT:R_Axial_DIN0207_L6.3mm_D2.5mm_P10.16mm_Horizontal | R4, R5, R6, R7, R8, R9 |
| 4 | MH | MountingHole:MountingHole_3.2mm_M3 | H1, H2, H3, H4 |
| 3 | button | easyeda2kicad:SW-TH_4P-L6.0-W6.0-P4.50-LS6.5 | SW1, SW2, SW3 |
| 2 | 10k | Resistor_THT:R_Axial_DIN0207_L6.3mm_D2.5mm_P10.16mm_Horizontal | R10, R11 |
| 2 | TJ-L5FCMXHTCSLCRGB-A5 | Connector_PinSocket_2.00mm:PinSocket_1x04_P2.00mm_Vertical | LED2, LED3 |
| 1 | Arduino_Nano | Module:Arduino_Nano | A2 |
| 1 | DHT11 | Connector_PinHeader_2.54mm:PinHeader_1x04_P2.54mm_Vertical | J2 |
| 1 | LCD | Connector_PinHeader_2.54mm:PinHeader_1x04_P2.54mm_Vertical | J3 |
| 1 | MQ-7 | Connector_PinHeader_2.54mm:PinHeader_1x04_P2.54mm_Vertical | J4 |
It measures 80 × 80 mm and has 2 copper layers, 1.6 mm thick.
21 parts, built around the DHT11, KH-6X6X5H-TJ and TJ-L5FCMXHTCSLCRGB-A5. The full list of its parts is on this page, with links to each part's symbol and footprint where PCBKit's library has them.
From the notazizelse/camp repository on GitHub, at the commit this page was made from: the board is archive/camp/camp.kicad_pcb and its schematic archive/camp/camp.kicad_sch. PCBKit opens the board in the browser, with nothing to install.
Its repository states no licence, so its author keeps all rights: ask notazizelse before reusing the design.
notazizelse/camp
CAMP v2: an all-through-hole CubeSat-style payload board I designed for my Technocamp 2026 circuitry class (200 students)

notazizelse/camp
CAMP v2: an all-through-hole CubeSat-style payload board I designed for my Technocamp 2026 circuitry class (200 students)


lansidev/conveyor-belt
Miniature 3D printed conveyor belt for simulation and fun working with sensors, all controllable with Raspberry Pi


ebrithiljonas/OMG_PCB
All in One PCB for the OpenMQTTGateway Project

GeorgK/SniffingTrinket
A room climate monitor using the Adafruit Trinket Pro

bhaskar9980/Guardian
Guardian is an advanced, fully automated hydroponics system designed to optimize plant growth and maximize yield.

Twistx77/Firefly
Open WIFI-enabled RGB lamp with temperature, humidity, suspended air particles and eCO2 sensors.

unla-investigacion-desarrollo/ecosistema-iot
Antes de desarrollar el sistema final, realizamos una etapa de exploración donde investigamos y experimentamos con las siguientes tecnologías: