

2 layers68.8 × 53.6 mm
Relatively Universal ROM Programmer
AndersBNielsen/Relatively-Universal-ROM-Programmer
Hardware to program W27C512 EEPROM or any 24/28/32 pin ROM requiring from 5V to 27V programming voltage.
149 parts257GPL-3.0
 nirav1385/Arduino_Game_KiCad
An Arduino Uno-based endless runner game on a 16×2 LCD with custom pixel-art characters, dynamic difficulty scaling, and a full KiCad PCB design.
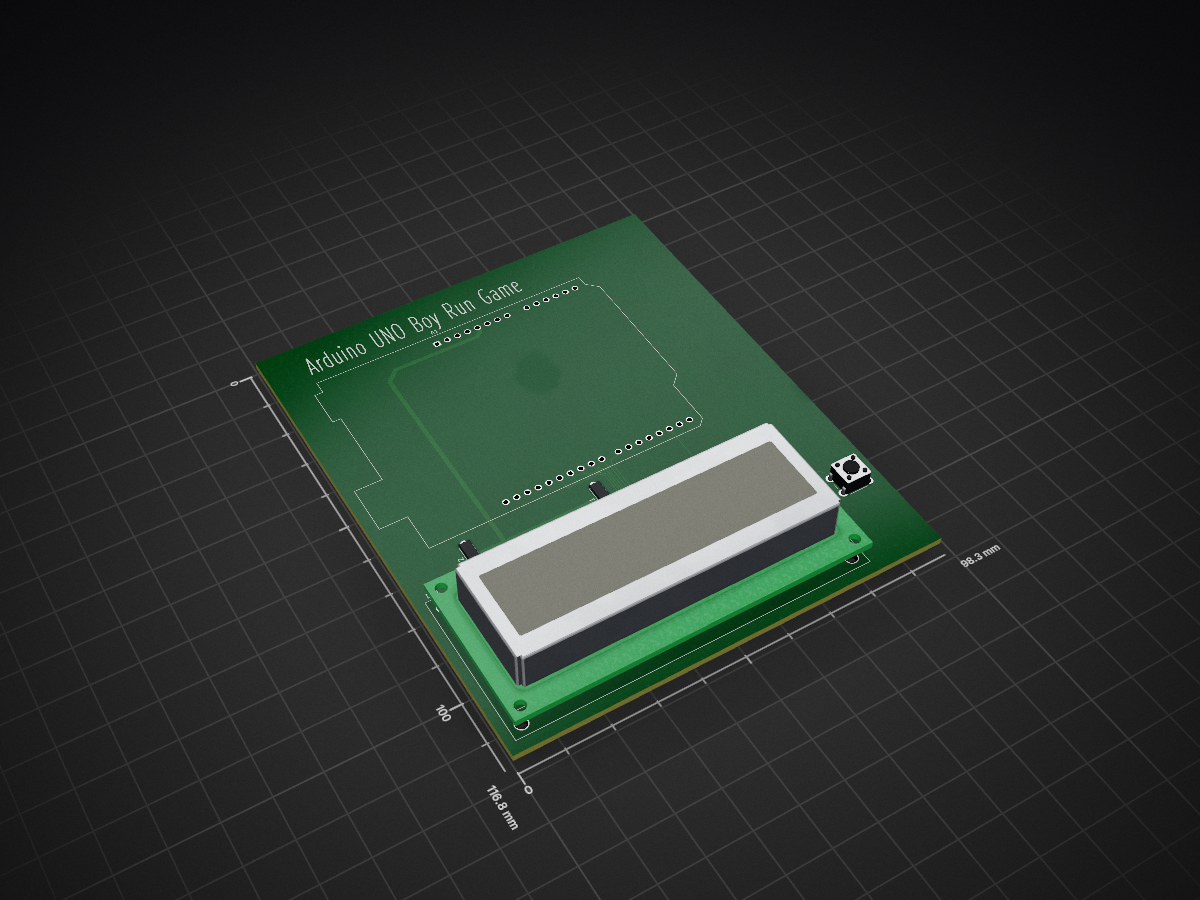
Aurdino game is an open-source printed circuit board by nirav1385, from the nirav1385/Arduino_Game_KiCad repository on GitHub. It is a 2-layer board of 98.3 × 116.8 mm with 5 parts on 36 nets, routed with 88 tracks and 0 vias.
It is built around the ARDUINO UNO R3. Its parts include 2 resistors and 1 switch. It belongs with the AVR (ATmega, ATtiny) boards of this library.
A retro-style endless runner game built with Arduino Uno and a 16×2 LCD Display. Jump over obstacles, beat your high score, and watch the speed ramp up!
Boy-Run is a fun, retro-style endless runner game that runs entirely on an Arduino Uno with a 16×2 LCD screen. A custom pixel-art boy character sprints across the bottom row of the LCD, and the player must time their jumps to dodge incoming brick obstacles.
As your score climbs, the game speeds up — making each jump more challenging than the last. One wrong move and it's Game Over!
| Feature | Description |
|---|---|
| 🏃 Custom Animation | Uses custom character bytes (boyCharacter, brickCharacter) to render a running boy and brick obstacles on the LCD |
| ⚡ Dynamic Difficulty | Game speed starts at 400ms and decreases by 20ms per point (minimum 100ms), making the game progressively harder |
| 💥 Collision Detection | Instant game-over detection when the boy and obstacle occupy the same position |
| 🏆 Live Score Tracking | Real-time score display on the top-right corner of the LCD screen |
| 🔁 Infinite Replay | Press the button again after Game Over to restart instantly |
| # | Component | Quantity | Purpose |
|---|---|---|---|
| 1 | Arduino Uno R3 | 1 | Microcontroller — the brain of the game |
| 2 | 16×2 LCD Display | 1 | Game screen for rendering characters & score |
| 3 | Push Button | 1 | Jump control input |
| 4 | 1KΩ Resistor | 1 | LCD contrast control (connected to V0 pin) |
| 5 | 220Ω Resistor | 1 | LCD backlight protection |
| 6 | Breadboard | 1 | Circuit prototyping base |
| 7 | Jumper Wires | ~15 | Connecting all components together |
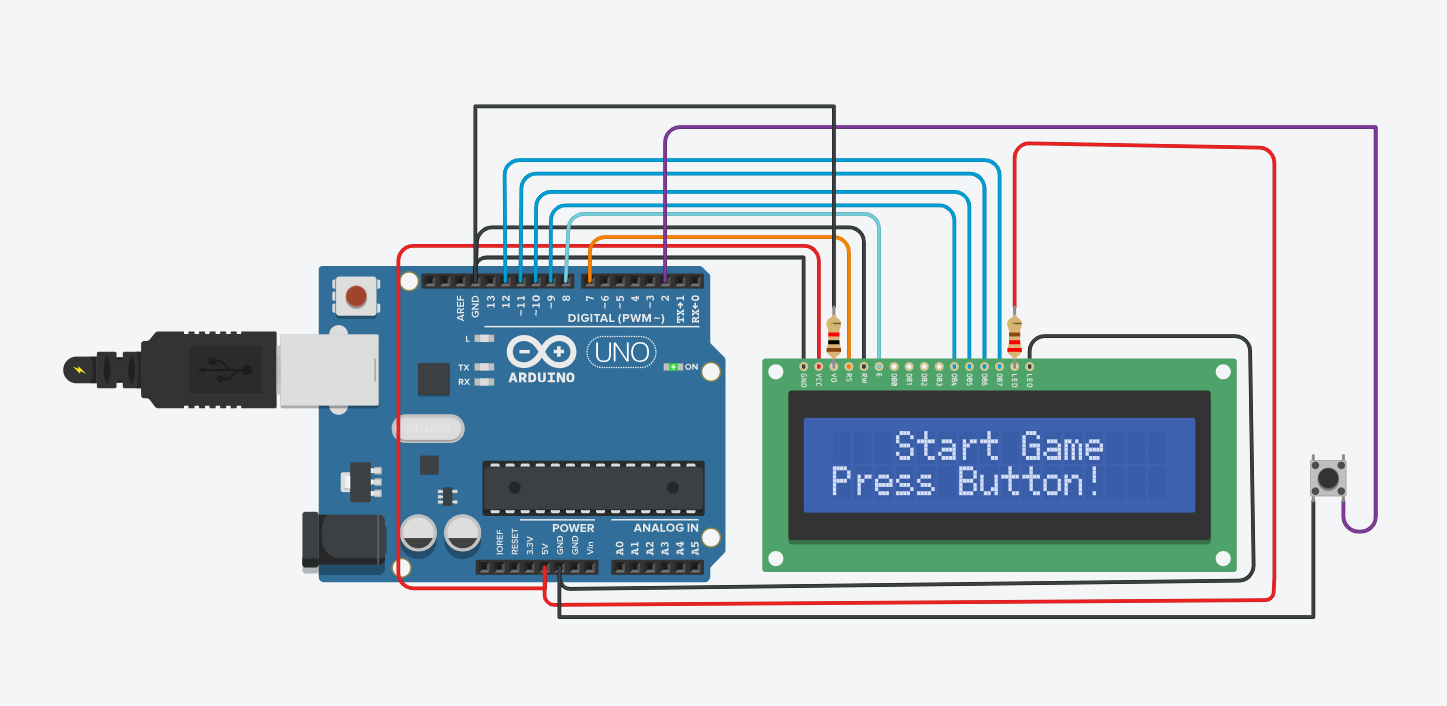
The LCD is connected in 4-bit mode to save Arduino pins:
| LCD Pin | Arduino Pin | Description |
|---|---|---|
| RS | 7 | Register Select |
| EN | 8 | Enable |
| D4 | 9 | Data Bit 4 |
| D5 | 10 | Data Bit 5 |
| D6 | 11 | Data Bit 6 |
| D7 | 12 | Data Bit 7 |
| V0 | via 1KΩ Resistor | Contrast Adjustment |
| A (Backlight) | via 220Ω Resistor | Backlight Power |
Push Button → Connected to Pin 2 (uses INPUT_PULLUP, so no external pull-up resistor needed)
1. 🔌 Power Up    →  Connect the Arduino to USB or external power
2. 🟢 Start       →  LCD shows "Start Game — Press Button!"
3. 🏃 Run         →  The boy character starts running on the bottom row
4. ⬆️ Jump        →  Press the Push Button to jump over incoming bricks
5. 💀 Game Over   →  If the boy collides with a brick, your score is shown
6. 🔁 Restart → Press the button again or hit Arduino's Reset buttonThe game's lifecycle is divided into four main phases, executed sequentially on the microcontroller:
Initialization (setup)
lcd.createChar().INPUT_PULLUP to eliminate the need for external pull-up resistors.Start Screen (Idle State)
Boy-Run / Press Button!.LOW).Active Game Loop During active play, the game updates once per frame (governed by the dynamic delay duration):
+1. Every point decreases the frame delay by 20ms (starting at 400ms down to a minimum threshold of 100ms), gradually increasing the difficulty.Game Over & Restart
Game Over! message with the final score.| Score | Delay (ms) | Difficulty |
|---|---|---|
| 0 | 400 | 🟢 Easy |
| 5 | 300 | 🟡 Medium |
| 10 | 200 | 🟠 Hard |
| 15+ | 100 | 🔴 Maximum! |
aurdino_game/
│
├── 📁 firmware/                        # Source code & component data
│   ├── game_in_c.ino                   # Main Arduino sketch (game logic)
│   └── component_list.csv              # Bill of materials (BOM)
│
├── 📁 hardware/                        # KiCad PCB design files
│   ├── aurdino_game.kicad_sch          # Schematic file
│   ├── aurdino_game.kicad_pcb          # PCB layout file
│   └── aurdino_game.kicad_pro          # KiCad project file
│
├── 📁 images_&_video/                  # Project media & documentation
│   ├── circuit_view.jpg                # Breadboard circuit photo
│   ├── game_video.mp4                  # Gameplay demo video
│   └── *.jpeg                          # Additional project images
│
└── README.md # You are here! 📍LiquidCrystal library (comes pre-installed with Arduino IDE)1. Open `firmware/game_in_c.ino` in Arduino IDE
2. Select Board → "Arduino Uno"
3. Select the correct COM Port
4. Click Upload ▶️
5. Play! 🎮

This project is open source and available for educational purposes. Feel free to modify, learn from, and share it!
Made with ❤️ and an Arduino Uno
| Qty | Value | Footprint | References |
|---|---|---|---|
| 1 | 1K | Resistor_THT:R_Axial_DIN0207_L6.3mm_D2.5mm_P7.62mm_Horizontal | R1 |
| 1 | 220 | Resistor_THT:R_Axial_DIN0207_L6.3mm_D2.5mm_P7.62mm_Horizontal | R2 |
| 1 | Arduino_UNO_R3 | Module:Arduino_UNO_R3 | A1 |
| 1 | SW_Push | Button_Switch_THT:SW_PUSH_6mm | SW1 |
| 1 | WC1602A | Display:WC1602A | DS1 |
AndersBNielsen/Relatively-Universal-ROM-Programmer
Hardware to program W27C512 EEPROM or any 24/28/32 pin ROM requiring from 5V to 27V programming voltage.

AlanFord/self-balancing-stick
Dual Axis Reaction Wheel Inverted Pendulum

Edging-Machines/Edging-Machines
This repository is intended to contain as much information as possible about building, designing, prototyping, and using automated edging machines.

PedroCNeves/AC_ChargingStation
A learning project to create an EV AC Charging station based on an Arduino Uno

jonsag/arduTester
An arduino component tester based on https://create.arduino.cc/projecthub/plouc68000/ardutester-v1-13-the-arduino-uno-transistor-tester-dbafb4


ICRS/101
The all-new open source Robotics 101 course from ICRS. It's specifically designed to be run in hackspaces, after school clubs and university societies.

It measures 98.3 × 116.8 mm and has 2 copper layers, 1.6 mm thick.
5 parts, built around the ARDUINO UNO R3. The full list of its parts is on this page, with links to each part's symbol and footprint where PCBKit's library has them.
From the nirav1385/Arduino_Game_KiCad repository on GitHub, at the commit this page was made from: the board is hardware/aurdino_game.kicad_pcb and its schematic hardware/aurdino_game.kicad_sch. PCBKit opens the board in the browser, with nothing to install.
Its repository states no licence, so its author keeps all rights: ask nirav1385 before reusing the design.