2 layers172.7 × 107.9 mm

 mzourack/QUAAD45
quad 4-step Eurorack CV sequencer
QUAAD V1 1 is an open-source printed circuit board by mzourack, from the mzourack/QUAAD repository on GitHub. It is a 2-layer board of 109.4 × 108.5 mm with 191 parts on 137 nets, routed with 2,196 tracks and 204 vias.
It is built around the ATMEGA328P-AU, TL072 and CD4052BM, with the LM1117-5.0, BAT42 and 1N4148W among its other parts. Its parts include 62 resistors, 37 diodes, 31 capacitors, 18 connectors and 12 ICs. It belongs with the AVR (ATmega, ATtiny) boards of this library.


quad 4-step Eurorack CV sequencer
current version:
PCB V1.1
Panel V1.1
Features
Demo: https://www.youtube.com/watch?v=YCnnyX1JADY
This module is basically 4 independent 4-step sequencers. Each of them features a CV output (0-5V), a clock divider (1-2-3-4-5-7-8-12-16-32 divisions) and a pattern setting. There are 6 patterns available, each one unique, as there are no repeating 4-step sequences between the looped patterns. Patterns can be changed per-sequence via a dedicated knob or via CV, aswell as globally using the MSTR PTRN knob, which basically adds a CV offset to each of the pattern CV inputs. The full range of patterns can be accesed via the pot corresponding to pattern changes of individual sequencers, the MSTR PTRN knob or via 0-5V CV. The patterns are looped, so that when, for example, you are on the last of the 6 patterns and add some positive CV offset, you will go back to the first one and then further on... The patterns are determined by this variable in the Arduino code:
int patterns[] = {1, 2, 3, 4,
                  1, 2, 4, 3,
                  2, 4, 1, 3,
                  3, 4, 2, 1,
                  4, 2, 3, 1,
                  4, 3, 2, 1};
The sequencer can be reset via a gate or manually using a button. With nothing patched into the clock input, the module is clocked internally, the tempo can be set via a potentiometer. The clock output outputs this internal clock when no external clock input is patched in, otherwise, the incoming clock signal is buffered through this output.
The module is 22HP, no 5V source required from the rack.

Hardware

Not much to say here, the build is fairly straight forward. It features SMD components, the passives are 0603.
Firmware
Complete step-by-step flashing guide available in the pdf file in this repository.
The Atmega328P is running on Arduino code - this means an Arduino bootloader needs to be flashed before the .ino code. To flash it, you can use an arduino (uno or nano for example) and a couple of jumper wires. I recommend to flash the module disconnected from the rack - the 5V needed to run the chip can be provided via the ICSP header. I used a USBASP from aliexpress, it works great but was quite hard to get working, so I cannot recommend it. If you do go down the USBASP route, note that you need to place a jumper on the programmer that slows down the data transfer frequency - a factory fresh atmega328p won't be able to accept the bootloader at USBASP default speed.
Here's the pinout of the ICSP header used for flashing the chip:
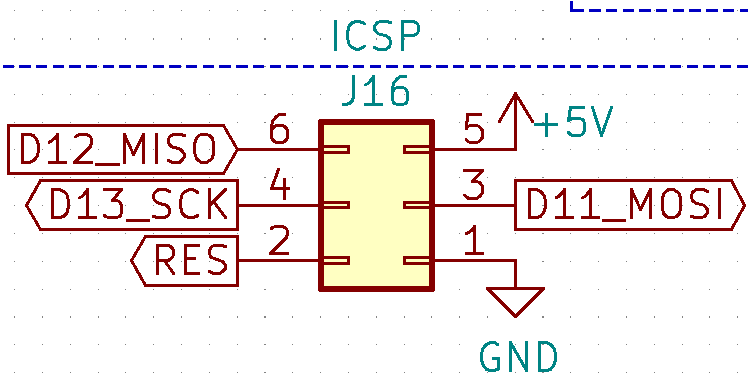
Finally, TX and RX pins are available on the back of the module. These can theoretically be used to debug the module, and could prove useful for testing new firmware. However, clock div out C and D have to be disabled in such case.
License
Shield: 
This work is licensed under a Creative Commons Attribution 4.0 International License.

| Qty | Value | Footprint | References |
|---|---|---|---|
| 26 | B100K | AlphaPots:Potentiometer_Alpha_RD901F-40-00D_Single_Vertical | RV1, RV2, RV10, RV11, RV12, RV13, RV14, RV15, RV16, RV17, RV18, RV19, RV20, RV21, RV22, RV23 +10 |
| 25 | 1K | Resistor_SMD:R_0603_1608Metric | R3, R4, R11, R12, R17, R18, R21, R22, R23, R24, R35, R36, R39, R40, R44, R45 +9 |
| 25 | LED | custom_footprints_QUAAD:CENTERED_FLAT_LED | D11, D12, D13, D14, D15, D16, D17, D18, D21, D22, D24, D25, D27, D28, D29, D30 +9 |
| 20 | 100n | Capacitor_SMD:C_0603_1608Metric | C10, C11, C12, C14, C15, C16, C17, C18, C19, C25, C26, C27, C28, C29, C30, C31 +4 |
| 15 | THONKICONN | AudioJacks:Jack_3.5mm_QingPu_WQP-PJ398SM_Vertical | J1, J2, J3, J4, J5, J6, J7, J8, J9, J10, J11, J12, J13, J14, J15 |
| 14 | 10K | Resistor_SMD:R_0603_1608Metric | R5, R6, R9, R10, R13, R14, R27, R28, R31, R32, R33, R34, R51, R59 |
| 12 | 68K | Resistor_SMD:R_0603_1608Metric | R1, R2, R7, R8, R15, R16, R25, R26, R29, R30, R37, R38 |
| 8 | BAT42 | Diode_SMD:D_SOD-123 | D1, D2, D3, D4, D9, D10, D19, D20 |
| 5 | 33K | Resistor_SMD:R_0603_1608Metric | R19, R20, R41, R42, R43 |
| 5 | 470n | Capacitor_SMD:C_0603_1608Metric | C1, C2, C3, C4, C5 |
| 5 | TL074 | Package_SO:SOIC-14_3.9x8.7mm_P1.27mm | U1, U2, U5, U6, U10 |
| 4 | CD4052B | Package_SO:SOP-16_4.55x10.3mm_P1.27mm | U3, U4, U8, U9 |
| 3 | 1M | Resistor_SMD:R_0603_1608Metric | R54, R55, R56 |
| 2 | 100K | Resistor_SMD:R_0603_1608Metric | R46, R50 |
| 2 | 18p | Capacitor_SMD:C_0603_1608Metric | C21, C22 |
| 2 | 1N4148W | Diode_SMD:D_SOD-123 | D23, D26 |
| 2 | 1u | Capacitor_SMD:C_0603_1608Metric | C23, C24 |
| 2 | 22u | Capacitor_SMD:CP_Elec_5x5.8 | C13, C20 |
| 2 | MMBT3904 | Package_TO_SOT_SMD:SOT-23 | Q1, Q2 |
| 2 | SM4001 | Diode_SMD:D_SOD-123F | D36, D37 |
| 1 | 16MHz | Crystal:Crystal_SMD_HC49-SD | Y1 |
| 1 | 220K | Resistor_SMD:R_0603_1608Metric | R47 |
| 1 | ATmega328P-AU | Package_QFP:TQFP-32_7x7mm_P0.8mm | U12 |
| 1 | Conn_01x02 | Connector_PinHeader_2.54mm:PinHeader_1x02_P2.54mm_Vertical | J17 |
| 1 | ICSP | Connector_PinHeader_2.54mm:PinHeader_2x03_P2.54mm_Vertical | J16 |
| 1 | LM1117-5.0 | Package_TO_SOT_SMD:SOT-223-3_TabPin2 | U11 |
| 1 | POWER | Connector_IDC:IDC-Header_2x05_P2.54mm_Vertical | CON1 |
| 1 | SW_DIP_x01 | Button_Switch_THT:SW_PUSH_6mm | SW1 |
| 1 | TL072 | Package_SO:SOIC-8_3.9x4.9mm_P1.27mm | U7 |
| 1 | Val** | logo:logo_18 | Ref** |
It measures 109.4 × 108.5 mm and has 2 copper layers, 1.6 mm thick.
191 parts, built around the ATMEGA328P-AU, TL072, CD4052BM and LM1117-5.0. The full list of its parts is on this page, with links to each part's symbol and footprint where PCBKit's library has them.
From the mzourack/QUAAD repository on GitHub, at the commit this page was made from: the board is PCB/QUAAD_V1_1.kicad_pcb and its schematic PCB/QUAAD_V1_1.kicad_sch. PCBKit opens the board in the browser, with nothing to install.
Its repository states no licence, so its author keeps all rights: ask mzourack before reusing the design.

punkfab/pcb-corpus
235 real KiCad boards from open-source hardware repositories, prepared as a placement and routing benchmark


ltrooney/diy-synth
A repository containing a handful of utilities for my DIY Eurorack-based modular synthesizer. Snippets include a virtual wavetable oscillator, a step sequencer, and more.

jdg511/567Terror
Software simulation of the Glitchwave 567 (LM567 glitch pedal) — JUCE Standalone + VST3

rafkhan/lowstepper
Dual phase manipulation low frequency oscillator by Okay Synthesizer.

