2 layers50 × 23.2 mm
Analog
hoglet67/RGBtoHDMI
Bare-metal Raspberry Pi project that provides pixel-perfect sampling of Retro Computer RGB/YUV video and conversion to HDMI
32 parts1kGPL-3.0

 llegoff/VGA_Zero19
VGA interface for Raspberry Pi Zéro & 2,3,4
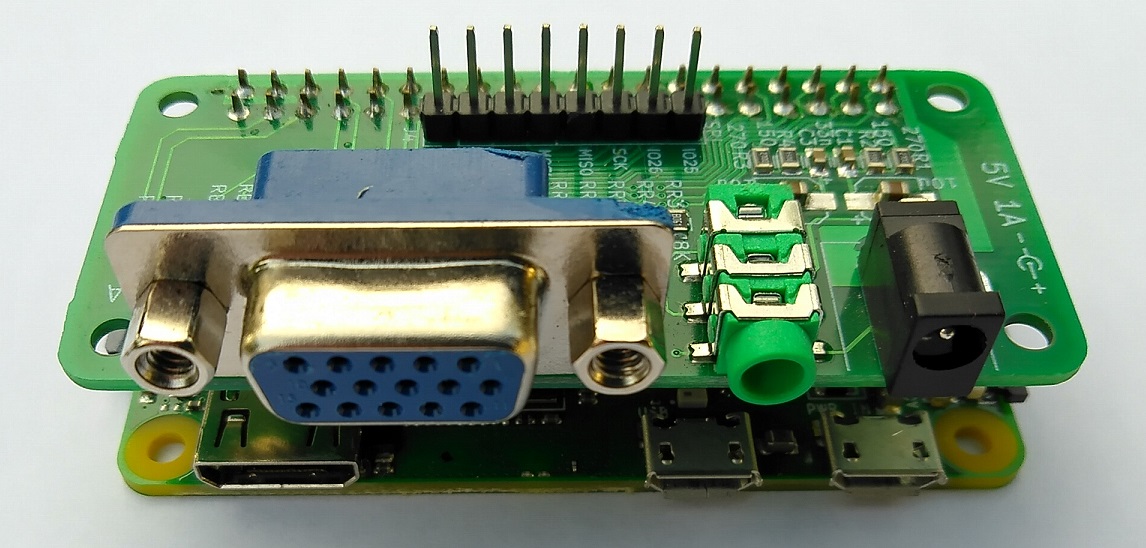
VGA Zero is an open-source printed circuit board by llegoff, from the llegoff/VGA_Zero repository on GitHub. It is a 2-layer board of 65 × 30 mm with 32 parts on 46 nets, routed with 416 tracks and 27 vias.
Its parts include 6 resistors, 6 connectors and 4 capacitors. It belongs with the interfaces and adapters boards and the Raspberry Pi (Linux) boards of this library.
VGA interface for Raspberry Pi Zéro & 2,3,B+
for pi400 see https://github.com/llegoff/Pi400VGA
buy rev3 on ebay :package:
Like VGA666, this pcb uses dpi interface (in mode 3 to free gpio 18 & 19)
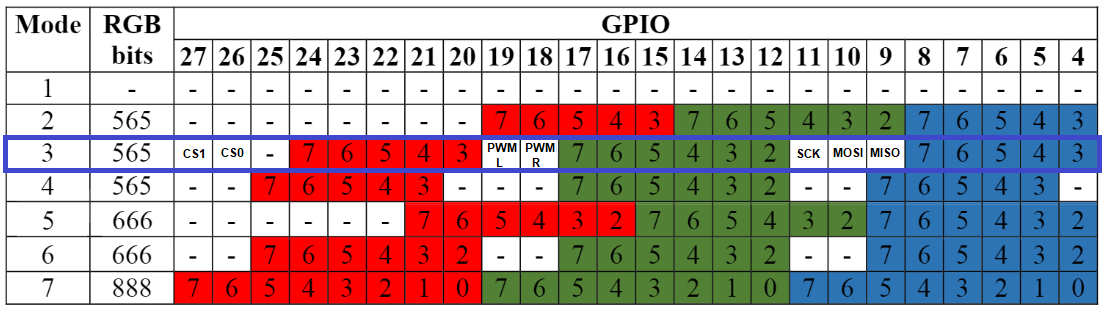
see https://www.raspberrypi.org/documentation/hardware/raspberrypi/dpi/README.md
only the necessary bits of the dpi are redirected to the 40-pin GPIO port, with the vga565.dtbo file loaded at startup
here is the code of the file:
/dts-v1/;
/plugin/;
/{
	compatible = "brcm,bcm2708";
	// There is no VGA driver module, but we need a platform device
	// node (that doesn't already use pinctrl) to hang the pinctrl
	// reference on - leds will do
	fragment@0 {
		target = <&leds>;
		__overlay__ {
			pinctrl-names = "default";
			pinctrl-0 = <&vga565_pins>;
		};
    };
	fragment@1 {
		target = <&gpio>;
		__overlay__ {
			vga565_pins: vga565_pins {
    			brcm,pins = <2 3 4 5 6 7 8 12 13 14 15 16 17 20 21 22 23 24>;
				brcm,function = <6>; /* alt2 */
			    brcm,pull = <0>; /* no pull */
		    };
	    };
    };
};
/boot/config.txt
# disable i2c, pin use by h-sync & v-sync
dtparam=i2c_arm=off
dtoverlay=vga565
dpi_output_format=0x13
enable_dpi_lcd=1
display_default_lcd=1
dpi_group=2
dpi_mode=16
#---------------- dpi_mode line ---------------------
#---> 640x480 60hz    dpi_mode=4
#---> 800x600 60hz    dpi_mode=9
#---> 1024x768 60hz   dpi_mode=16
#---> 1280x768 60hz   dpi_mode=23
#---> 1280x800 60hz   dpi_mode=28
#---> 1280x960 60hz   dpi_mode=32
#---> 1280x1024 60hz  dpi_mode=35
#---> 1360x768 60hz   dpi_mode=39
#---> 1366x768 60hz   dpi_mode=81
#---> 1400x1050 60hz  dpi_mode=42
#---> 1440x900 60hz   dpi_mode=47
#---> 1600x1200 60hz  dpi_mode=51
#---> 1680x1050 60hz  dpi_mode=58
#---> 1920x1080 60hz  dpi_mode=82
#---> 1920x1200 60hz  dpi_mode=69
#---> 1920x1440 60hz  dpi_mode=73
alternate config, no need dtbo file
# replace dtoverlay=vc4-kms-v3d with
dtoverlay=vc4-fkms-v3d
# disable i2c, pin use by h-sync & v-sync
dtparam=i2c_arm=off
gpio=2-8,12-17,20-24=a2
dpi_output_format=0x13
enable_dpi_lcd=1
display_default_lcd=1
dpi_group=2
dpi_mode=16
#---------------- dpi_mode line ---------------------
#---> 640x480 60hz    dpi_mode=4
#---> 800x600 60hz    dpi_mode=9
#---> 1024x768 60hz   dpi_mode=16
#---> 1280x768 60hz   dpi_mode=23
#---> 1280x800 60hz   dpi_mode=28
#---> 1280x960 60hz   dpi_mode=32
#---> 1280x1024 60hz  dpi_mode=35
#---> 1360x768 60hz   dpi_mode=39
#---> 1366x768 60hz   dpi_mode=81
#---> 1400x1050 60hz  dpi_mode=42
#---> 1440x900 60hz   dpi_mode=47
#---> 1600x1200 60hz  dpi_mode=51
#---> 1680x1050 60hz dpi_mode=58Configuration working with vc4-kms-v3d
dtoverlay=vc4-kms-dpi-generic,rgb565-padhi
dtparam=hactive=800,hfp=40,hsync=128,hbp=88
dtparam=vactive=600,vfp=1,vsync=4,vbp=23
dtparam=clock-frequency=40000000
#   Resolution@freq  hactive hfp hsync  hbp vactive vfp vsync vbp  clock-frequency
#VGA   640x480  @60   640     16   96    48   480    10   2    33    25175000
#SVGA  800x600  @60   800     40  128    88   600     1   4    23    40000000
#XGA  1024x768  @60  1024     24  136   160   768     3   6    29    65000000
#VESA 1368x768  @60  1368     72  144   216   768     1   3    23    85860000
#VESA 1280x800  @60  1280     64  136   200   800     1   3    24    83460000
#VESA 1280x1024 @60  1280     48  112   248  1024     1   3    38   108000000
#VESA 1400x1050 @60  1400     88  152   240  1050     1   3    33   122660000
#VESA 1600x1200 @60  1600     64  192   304  1200     1   3    46   162000000
#--- TV -----
#244p (NTSC res)@60   320      4   30    46   240     4   5    14     6400000
#288p (PAL res) @50   384     16   32    40   288     3   2    19     7363200
#480i (NTSC res)@60   640     24   64   104   480     3   6    34    13054080
#576i (PAL res) @50   768     24   72    88   576     6   5    38    14875000
#480p           @60   640     24   96    48   480    11   2    32    25452000
#720p           @60  1280    110   40   220   720     5   5    20    74250000
#1080p          @60  1920     88   44   148  1080     4   5    36   148500000
#more timming on http://tinyvga.com/vga-timing# disable i2c, pin use by h-sync & v-sync
dtparam=i2c_arm=off
gpio=2-8,12-17,20-24=a2
dpi_output_format=0x13
enable_dpi_lcd=1
display_default_lcd=1
dpi_group=2
dpi_mode=87
#hdmi_timings=506 1 8 48 56 240 1 3 10 6 0 0 0 60 0 9600000 1
#hdmi_timings=512 1 16 48 64 288 1 3 5 6 0 0 0 50 0 9600000 1
# Custom 15kHz mode
hdmi_timings=506 1 8 44 52 240 1 6 10 6 0 0 0 60 0 9600000 1
#hdmi_timings=320 1 17 33 34 224 1 14 8 18 0 0 0 60 0 6400000 1
#hdmi_timings=960 0 173 8 0 160 0 40 10 0 0 0 0 60 0 19200000 8
#hdmi_timings=320 1 25 30 30 240 1 9 3 10 0 0 0 60 0 6400000 1
#hdmi_timings=1920 1 52 208 260 240 1 6 10 6 0 0 0 60 0 38400000 1for recalbox see https://recalbox.gitbook.io/tutorials/v/francais/video/crt/configurez-votre-ecran-cathodique-sur-le-bus-dpi-vga666-piscart-rgbpi
on the pi4 and pi400, the dual screen function is supported by the vc4 fkms v3d driver
[pi4]
# Enable DRM VC4 V3D driver on top of the dispmanx display stack
dtoverlay=vc4-fkms-v3d
max_framebuffers=2
for previous versions:
:warning: need raspbian buster
edit file /boot/config.txt
at the end of the file, add line:
[all]
#dtoverlay=vc4-fkms-v3d
max_framebuffers=2
edit file /usr/share/X11/xorg.conf.d/99-fbturbo.conf
 This is a minimal sample config file, which can be copied to
# /etc/X11/xorg.conf in order to make the Xorg server pick up
# and load xf86-video-fbturbo driver installed in the system.
#
# When troubleshooting, check /var/log/Xorg.0.log for the debugging
# output and error messages.
#
# Run "man fbturbo" to get additional information about the extra
# configuration options for tuning the driver.

#Section "Device"
#        Identifier      "Allwinner A10/A13 FBDEV"
#        Driver          "fbturbo"
#        Option          "fbdev" "/dev/fb0"
#        Option          "SwapbuffersWait" "true"
#EndSection

Section "Device"
Identifier "Raspberry Pi HDMI"
Driver "fbturbo"
Option "fbdev" "/dev/fb0"
Option "ShadowFB" "off"
EndSection
install freeRDP
sudo apt-get install freerdp2-x11start freeRDP session
xfreerdp /v:<computer name or IP> /u:<user> /d:<domain> /sound:sys:alsa /multimonor
xfreerdp /v:<computer name or IP> /u:<user> /d:<domain> /g:<gateway name or IP> /gu:<gateway user> /gd:<gateway domain> /sound:sys:alsa /multimonaudio interface is connected to gpio 18 & 19 (PWM)
see https://learn.adafruit.com/adding-basic-audio-ouput-to-raspberry-pi-zero/pi-zero-pwm-audio
/boot/config.txt
# Enable audio for PiZero(loads snd_bcm2835)
dtoverlay=pwm-2chan,pin=18,func=2,pin2=19,func2=2
dtparam=audio=on
For Pi4 or Pi400 use audremap overlay
/boot/config.txt
# Enable audio for PiZero(loads snd_bcm2835)
dtoverlay=audremap,pins_18_19
dtparam=audio=onGPIO 9 , 10, 11 , 25, 26, 27 can be used as SPI , whit overlay spi0-cs, with CS redirection to gpio 26 & 27
/boot/config.txt
# uncomment to use spi0 with cs0 & cs1 retirected on pin 26 & 27
dtparam=spi=on
dtoverlay=spi0-cs,cs0_pin=26,cs1_pin=27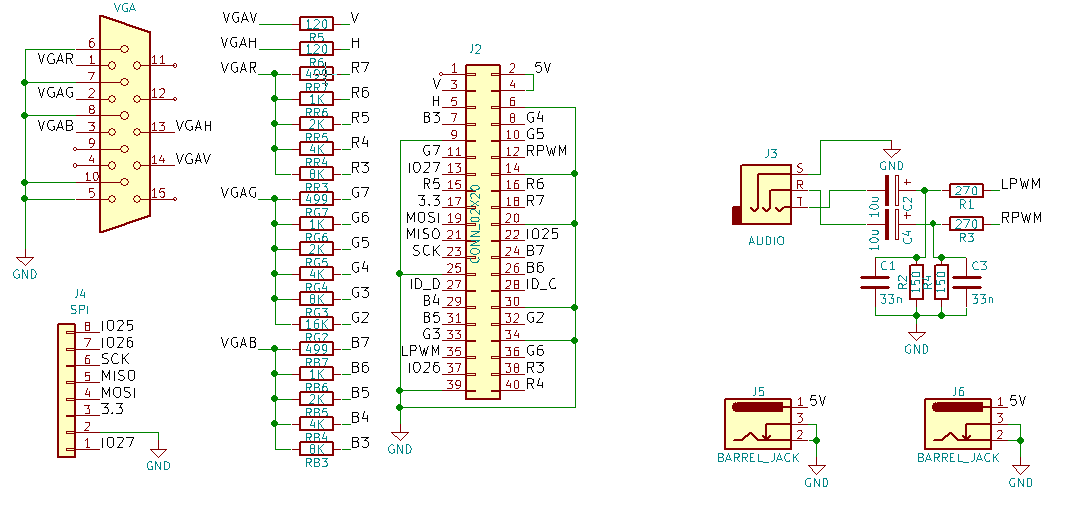
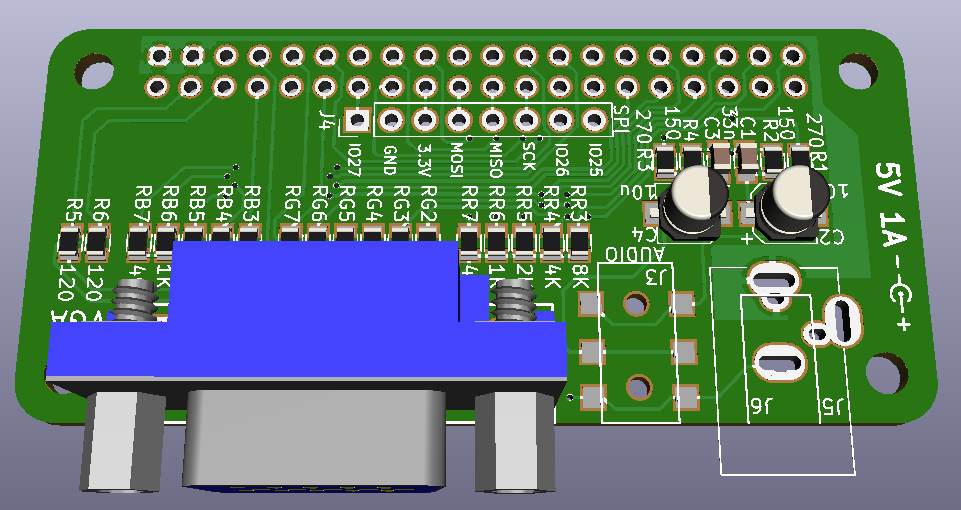
Copy vga565.dtbo to /boot/overlays/ and copy content of config-example.txt to /boot/config.txt
rev1
rev2
rev3
| Qty | Value | Footprint | References |
|---|---|---|---|
| 3 | 1K | Resistors_SMD:R_0805 | RB6, RG6, RR6 |
| 3 | 2K | Resistors_SMD:R_0805 | RB5, RG5, RR5 |
| 3 | 499 | Resistors_SMD:R_0805 | RB7, RG7, RR7 |
| 3 | 4K | Resistors_SMD:R_0805 | RB4, RG4, RR4 |
| 3 | 8K | Resistors_SMD:R_0805 | RB3, RG3, RR3 |
| 2 | 10u | Capacitors_SMD:CP_Elec_4x5.3 | C2, C4 |
| 2 | 120 | Resistors_SMD:R_0805 | R5, R6 |
| 2 | 150 | Resistors_SMD:R_0805 | R2, R4 |
| 2 | 270 | Resistors_SMD:R_0805 | R1, R3 |
| 2 | 33n | Capacitors_SMD:C_0805 | C1, C3 |
| 1 | 16K | Resistors_SMD:R_0805 | RG2 |
| 1 | AUDIO | _LaurentPerso:jack3.5smd | J3 |
| 1 | BARREL_JACK | _LaurentPerso:DC002_3.5x1.1 | J6 |
| 1 | BARREL_JACK | Connectors:BARREL_JACK | J5 |
| 1 | CONN_02X20 | _LaurentPerso:RaspberryPiZeroHAT | J2 |
| 1 | SPI | Pin_Headers:Pin_Header_Straight_1x08_Pitch2.54mm | J4 |
| 1 | VGA | _LaurentPerso:DB_15F-VGA | J1 |
It measures 65 × 30 mm and has 2 copper layers, 1.6 mm thick.
32 parts. The full list of its parts is on this page, with links to each part's symbol and footprint where PCBKit's library has them.
From the llegoff/VGA_Zero repository on GitHub, at the commit this page was made from: the board is VGA_Zero.kicad_pcb. PCBKit opens the board in the browser, with nothing to install.
Its repository states no licence, so its author keeps all rights: ask llegoff before reusing the design.
hoglet67/RGBtoHDMI
Bare-metal Raspberry Pi project that provides pixel-perfect sampling of Retro Computer RGB/YUV video and conversion to HDMI

hackclub/OnBoard
💡 Join 1,000 teenagers and make your first PCB with a $100 grant!


octosavvi/ESPKey
Wiegand data logger, replay device and micro door-controller

zmaker/arduino_cookbook
gli sketch del nuovo progetto Arduino Cookbook e dei video di YouTube

murexrobotics/electrical
Highly integrated electronics design and printed circuit boards (PCBs) for the MATE ROV Competition. Attempt the impossible.

swharden/AVR-projects
A collection of standalone AVR projects written in C

hardenedlinux/cheap-pcb
Cheap PCB: Better understanding the current status of hardware supply chain