4 layers60 × 60 mm

 LeticiaAires/Gravity-Glitch
Flappy bird inspired game with an innovative infra red controller
Projet Controler is an open-source printed circuit board by LeticiaAires, from the LeticiaAires/Gravity-Glitch repository on GitHub, published under the GPL-3.0 licence. It is a 4-layer board of 41 × 26 mm with 50 parts on 79 nets, routed with 294 tracks and 63 vias.
It is built around the HC-05, BU33SD5WG-TR and LTC4058EDD-4.2#PBF, with the SQ2310ES-T1_BE3 among its other parts. Its parts include 17 resistors, 9 capacitors, 6 ICs, 3 diodes and 3 connectors. It belongs with the STM32 boards of this library.


Welcome to Gravity Glitch, an innovative project created by 7th-semester engineering students from École Nationale Supérieure de l'Électronique et de ses Applications (ENSEA). This project serves as a platform for hands-on learning in practical electronics, software development, project management, and teamwork.
Our primary goal is to develop an exciting game inspired by the popular Flappy Bird game, with a unique twist – an innovative controller. We've integrated an infrared sensor into the game, which measures the distance between the player's hand and the sensor. This inventive controller allows players to guide "Flappy" through the game, helping it navigate obstacles and accumulate points.
To get started with the project, follow these steps:
Clone the repository to your local machine:
git clone https://github.com/LeticiaAires/Gravity-Glitch.gitEnsure you have the required dependencies installed.
How to play ?
Run the "main.py" file
Click on the "Play" button to choose your pseudo and choose your game mode !
To launch the game without installing all modules and packages on your machine, create a virtual environment.
Create the environment 'my_env' inside the project directory :
python -m venv my_environmentActivate the environment :
my_environment/bin/activateInstall the required dependencies :
pip install -r requirements.txtRun the Game.py file and play !
Deactivate the environment :
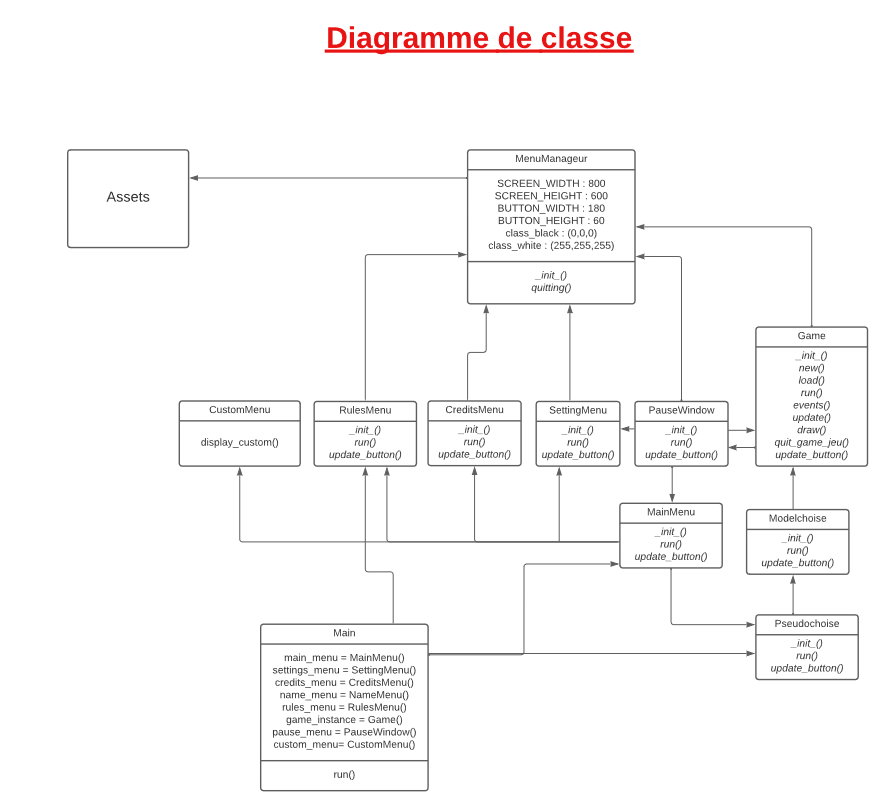
deactivateHere is an explanation of the game's structure :
The "main.py" file is the file to run to start the Game. Then, we come across a window called "MainMenu" displaying the menu of the game (with the settings, play, quit, credits and rules buttons). From there, we can :
If you choose to do the later, then you will come across a first window asking for your name (to associate your score with your pseudo). From there you can either go back to the menu or continue and go choose your game mode (History mode or alternative = a more complex version of the flappy bird). After that, by clicking on continue and pressing the space bar, you can start playing ! You have a "pause" button in the bottom left corner where you can go to the settings, see the best scores, restart, resume or quit the game.
For more detailed information about the project, you can refer to the code itself. We have included comprehensive comments and documentation within the codebase to help you understand how everything works.
This project is licensed under the MIT License.
We would like to express our gratitude to our instructors, mentors, and everyone who supported us throughout this project. Your guidance and encouragement were invaluable in making this project a reality.
|
|
 Cassandre CassandreChandelier [blocked] |
Douay Nicolas DBXYD [blocked] |
 Letícia Aires LeticiaAires [blocked] |
Mael Doublet MaelDoublet [blocked] |
 Mantou Mansko09 [blocked] |
 Mathieu Daubercies MathieuDaubercies [blocked] |
 Solène salom0701 [blocked] |
Romain Romain04G [blocked] |
Zineb Ninevv [blocked] |
| Qty | Value | Footprint | References |
|---|---|---|---|
| 6 | TestPoint | TestPoint:TestPoint_Pad_D1.0mm | GND201, NRST201, SWCLK201, SWDIO201, USART2_RX201, USART2_TX201 |
| 4 | 100n | Capacitor_SMD:C_0402_1005Metric | C201, C203, C204, C205 |
| 4 | 47k | Resistor_SMD:R_0402_1005Metric | R403, R404, R406, R407 |
| 4 | MountingHole_Pad | MountingHole:MountingHole_2.7mm_M2.5_DIN965_Pad | H101, H102, H103, H104 |
| 3 | 10k | Resistor_SMD:R_0402_1005Metric | R408, R409, R602 |
| 3 | 1k | Resistor_SMD:R_0402_1005Metric | R401, R402, R405 |
| 3 | 1u | Capacitor_SMD:C_0402_1005Metric | C301, C302, C303 |
| 2 | 5.1k | Resistor_SMD:R_0402_1005Metric | R302, R303 |
| 2 | 820 | Resistor_SMD:R_0402_1005Metric | R501, R502 |
| 2 | LED | LED_SMD:LED_0603_1608Metric | D501, D502 |
| 1 | 1.65k | Resistor_SMD:R_0402_1005Metric | R301 |
| 1 | 100k | Resistor_SMD:R_0402_1005Metric | R201 |
| 1 | 22 | Resistor_SMD:R_0402_1005Metric | R601 |
| 1 | 220n | Capacitor_SMD:C_0402_1005Metric | C304 |
| 1 | 4.7u | Capacitor_SMD:C_0402_1005Metric | C202 |
| 1 | 450404015514 | mod:450404015514 | S** |
| 1 | BATT | Connector_PinHeader_1.27mm:PinHeader_1x02_P1.27mm_Vertical | J301 |
| 1 | BU33SD5WG-TR | Package_TO_SOT_SMD:SOT-23-5 | U301 |
| 1 | HC-05 | mod:XCVR_HC-05 | U501 |
| 1 | LTC4058EDD-4.2#PBF | Package_DFN_QFN:DFN-8-1EP_3x3mm_P0.5mm_EP1.65x2.38mm_ThermalVias | IC301 |
| 1 | MOTOR | Connector_PinHeader_1.27mm:PinHeader_1x02_P1.27mm_Vertical | J601 |
| 1 | SQ2310ES-T1 | mod:SOT95P237X112-3N | Q601 |
| 1 | STM32G431KBTx | Package_QFP:LQFP-32_7x7mm_P0.8mm | U201 |
| 1 | USB_C_Receptacle_USB2.0 | Connector_USB:USB_C_Receptacle_HRO_TYPE-C-31-M-12 | J302 |
| 1 | VL53L5CX | mod:VL53L5CX | IC401 |
| 1 | VS-30BQ015HM3_9AT | mod:DIOM7959X262N | D601 |
| 1 | WE-TVS-82400102 | Package_TO_SOT_SMD:SOT-23-6 | U302 |

AresEnsea/2526_Projet2A_AresCFR
Ce repository GitHub regroupe l'ensemble des projets et documents réalisés par l'équipe Ares pour la Coupe de France de Robotique 2026.

exysta/2425_ESE_Projet_TagBot
Vous vous trouvez actuellement dans le projet TagBot (ou robot chat), qui s'intègre à un projet de classe où chaque équipe doit concevoir un robot.


MohamedBenabdelhadi/2425_ESE_Projet_V-NOM
Mohamed Benabdelhadi_Nouhaila Faris_Oliver Belliard_Valerian Priou

CaptainJaja/Projet_1A_S6
Voici le projet de première année du deuxième semestre, pour le groupe Janus-Christophe-Raphaëlle

It measures 41 × 26 mm and has 4 copper layers, 1.6 mm thick.
50 parts, built around the HC-05, BU33SD5WG-TR, LTC4058EDD-4.2#PBF and SQ2310ES-T1_BE3. The full list of its parts is on this page, with links to each part's symbol and footprint where PCBKit's library has them.
From the LeticiaAires/Gravity-Glitch repository on GitHub, at the commit this page was made from: the board is Hardware/PCB/Projet_Controler V4/Projet_Controler.kicad_pcb and its schematic Hardware/PCB/Projet_Controler V3 - Copie/Projet_Controler.kicad_sch. PCBKit opens the board in the browser, with nothing to install.
Its repository publishes it under the GPL-3.0 licence: you may reuse it on that licence's terms (keep the author's notice, and for a copyleft licence share your changes alike).