4 layers90 × 72 mm

 HOSTEER/ESE2024
Activer doxygen dans les propriétés du projet -> général C/C++, tuto doxygen https://www.youtube.com/watch?v=GC9Xy7nLxyw
Robot chat is an open-source printed circuit board by HOSTEER, from the HOSTEER/ESE2024 repository on GitHub. It is a 4-layer board of 90 × 72 mm with 112 parts on 111 nets, routed with 503 tracks and 390 vias.
It is built around the ZXBM5210-SP, MP1475DJ-LF-P and LSM6DSM. Its parts include 32 capacitors, 26 resistors, 16 diodes, 9 connectors and 8 ICs. It belongs with the robots and motor control boards and the STM32 boards of this library.


Emilie Butruille
Louis Liénart
Théo Césari
Victor Lesne
Activer doxygen dans les propriétés du projet -> général C/C++, tuto doxygen https://www.youtube.com/watch?v=GC9Xy7nLxyw
Pour importer un projet sur cubeIDE, il faut faire "File" -> "Import" -> "General" -> "Project from Folder or Archive" puis sélectionner le directory (exemple "C:\Users\louis\Desktop\ProjetCubeIDE") et ensuite faire "finish". Après ça, il faut régénérer des fichiers du code, donc cliquer sur "Device configuration tool Code generation"
Avec GitBash, pour retirer un fichier "add" par erreur faire un "git reset nom_du_fichier", un reset seul retirera tout les add fait.
Convention à avoir pour le stockage des sources : pour stocker les lib créer faire un dossier source "Prod" avec comme sous-fichier "Inc" et "Src" Ensuite les ajouter dans "Project" -> "Properties" -> "C/C++ General" -> "Paths and Symbols" -> "add" -> entrer "Prod/Inc" et faire ok.
Pour vérifier qu'une branch est ok, cloner un 2nd repo de la branch et la tester pour vérifier l'absence d'erreurs, sinon ça veut dire qu'il manque un truc au commit.
Ensuite il faut résoudre les conflits entre .cproject ( globalement garder le code du main ); .ioc (globalement fusionner les pins ajoutés et faire gaffe au pin, en double) et enfin le main.c ( où il faut fusionner )
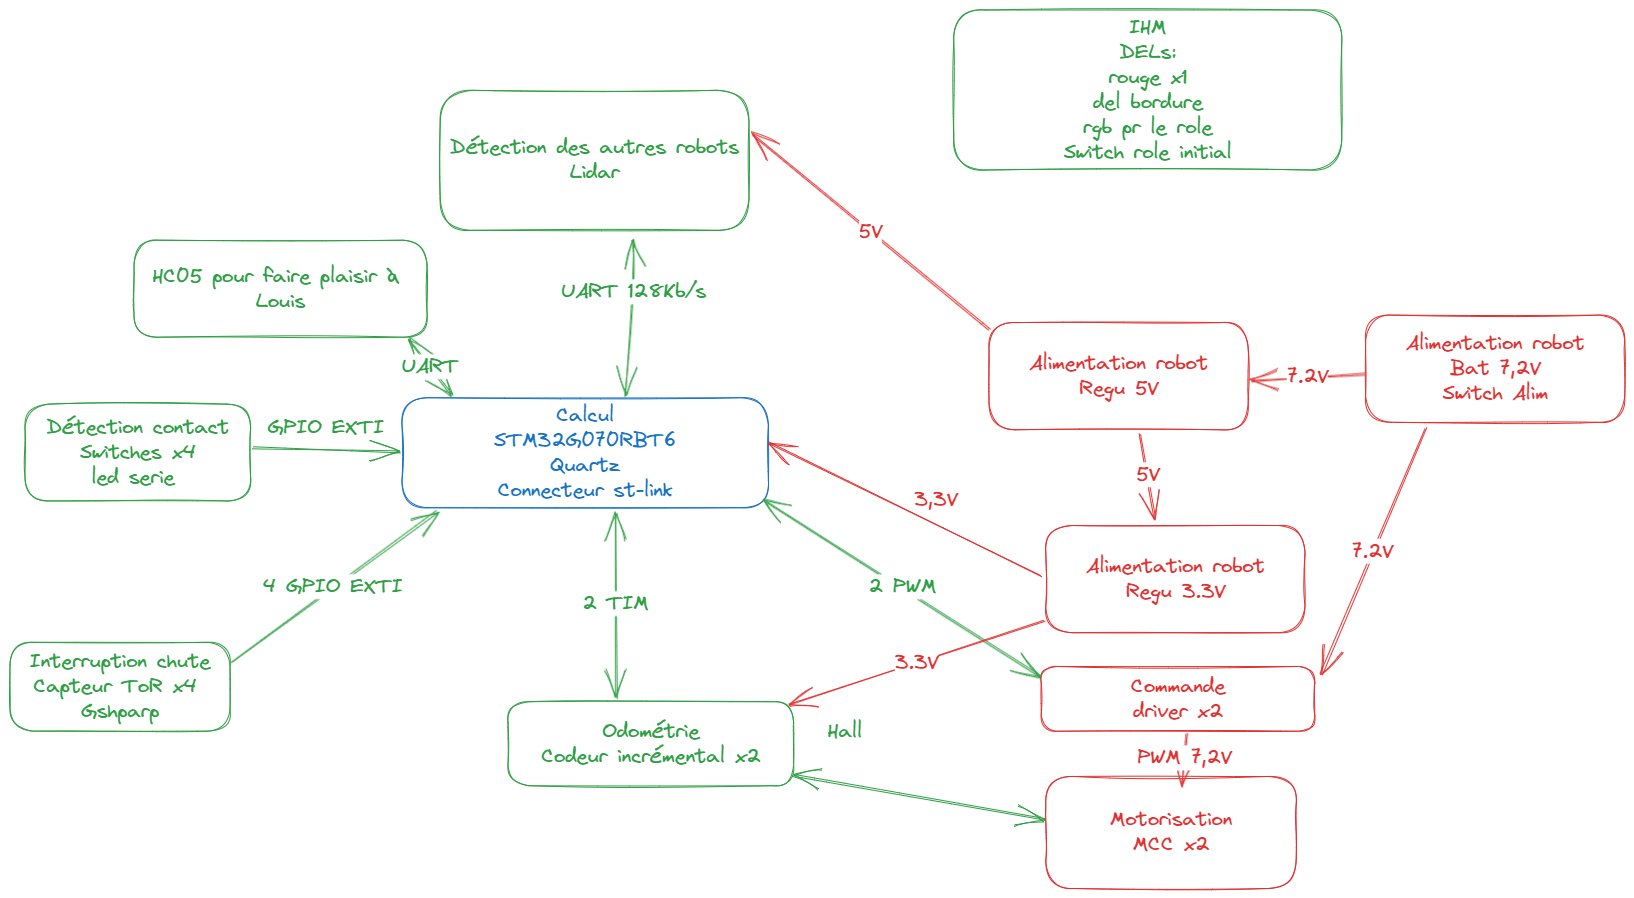
conso moyenne 300 mA
| Qty | Value | Footprint | References |
|---|---|---|---|
| 12 | 0.1uF | Capacitor_SMD:C_0402_1005Metric | C201, C203, C204, C205, C403, C404, C405, C406, C407, C408, C409, C410 |
| 10 | 1k | Resistor_SMD:R_0603_1608Metric | R304, R306, R501, R601, R602, R603, R604, R605, R606, R607 |
| 6 | ~ | Diode_SMD:D_SOD-923 | D201, D202, D203, D204, D205, D206 |
| 5 | 10R | Resistor_SMD:R_0603_1608Metric | R201, R403, R404, R407, R408 |
| 5 | 1uF | Capacitor_SMD:C_0603_1608Metric | C301, C305, C306, C601, C602 |
| 5 | 22uF | Capacitor_SMD:C_0805_2012Metric | C303, C309, C310, C401, C402 |
| 4 | MountingHole_Pad | MountingHole:MountingHole_3.2mm_M3_Pad_Via | H101, H102, H103, H104 |
| 3 | 0,1uF | Capacitor_SMD:C_0402_1005Metric | C304, C307, C308 |
| 3 | 100k | Resistor_SMD:R_0603_1608Metric | R305, R405, R406 |
| 2 | 0.015 | Resistor_SMD:R_0805_2012Metric | R401, R402 |
| 2 | 0.1u | Capacitor_SMD:C_0402_1005Metric | C501, C502 |
| 2 | 10p | Capacitor_SMD:C_0603_1608Metric | C206, C207 |
| 2 | NCS199A3RSQT2G | Package_TO_SOT_SMD:SOT-363_SC-70-6 | IC401, IC402 |
| 2 | ZXBM5210-SP | Package_SO:SOIC-8-1EP_3.9x4.9mm_P1.27mm_EP2.62x3.51mm_ThermalVias | U401, U402 |
| 1 | 10A | Fuse:Fuse_1206_3216Metric | F301 |
| 1 | 10k | Resistor_SMD:R_0603_1608Metric | R302 |
| 1 | 15pF | Capacitor_SMD:C_0603_1608Metric | C311 |
| 1 | 16MHz | Crystal:Crystal_SMD_EuroQuartz_MT-4Pin_3.2x2.5mm | Y201 |
| 1 | 16k | Resistor_SMD:R_0603_1608Metric | R307 |
| 1 | 1N4148 | Diode_SMD:D_SOD-323F | D302 |
| 1 | 2.2u | Inductor_SMD:L_0603_1608Metric | L201 |
| 1 | 20 | Resistor_SMD:R_0603_1608Metric | R303 |
| 1 | 22k | Resistor_SMD:R_0603_1608Metric | R301 |
| 1 | 3.3V | TestPoint:TestPoint_Pad_D1.0mm | +3V301 |
| 1 | 3.3V | LED_SMD:LED_0603_1608Metric | D303 |
| 1 | 4.7uF | Capacitor_SMD:C_0603_1608Metric | C202 |
| 1 | 4.7uH | Inductor_SMD:L_1008_2520Metric | L301 |
| 1 | 40.2k | Resistor_SMD:R_0603_1608Metric | R308 |
| 1 | 470uF | Capacitor_SMD:CP_Elec_10x10.5 | C302 |
| 1 | 5V | TestPoint:TestPoint_Pad_D1.0mm | +5V301 |
| 1 | 5V | LED_SMD:LED_0603_1608Metric | D304 |
| 1 | 7.68k | Resistor_SMD:R_0603_1608Metric | R309 |
| 1 | BT | Connector_PinSocket_2.54mm:PinSocket_1x06_P2.54mm_Horizontal | J601 |
| 1 | B_Detect | Connector_JST:JST_XH_S3B-XH-A_1x03_P2.50mm_Horizontal | J503 |
| 1 | Bat | Connector_JST:JST_XH_S2B-XH-A_1x02_P2.50mm_Horizontal | J301 |
| 1 | Border_Detect | LED_SMD:LED_0603_1608Metric | D601 |
| 1 | Bump | Connector_JST:JST_XH_S2B-XH-A_1x02_P2.50mm_Horizontal | J501 |
| 1 | Bump | LED_SMD:LED_0603_1608Metric | D501 |
| 1 | CS | TestPoint:TestPoint_Pad_D1.0mm | CS201 |
| 1 | Debug_1 | LED_SMD:LED_0603_1608Metric | D604 |
| 1 | Debug_2 | LED_SMD:LED_0603_1608Metric | D605 |
| 1 | Error | LED_SMD:LED_0603_1608Metric | D603 |
| 1 | F_Detect | Connector_JST:JST_XH_S3B-XH-A_1x03_P2.50mm_Horizontal | J504 |
| 1 | L-RX | TestPoint:TestPoint_Pad_D1.0mm | LIDAR_RX201 |
| 1 | L-TX | TestPoint:TestPoint_Pad_D1.0mm | LIDAR_TX201 |
| 1 | LOGO | LOGO | G*** |
| 1 | LSM6DSM | Package_LGA:LGA-14_3x2.5mm_P0.5mm_LayoutBorder3x4y | U501 |
| 1 | L_Mot | Connector_JST:JST_XH_S6B-XH-A_1x06_P2.50mm_Horizontal | J401 |
| 1 | Lidar | Connector_JST:JST_XH_S8B-XH-A_1x08_P2.50mm_Horizontal | J502 |
| 1 | MIC5317-3.3xM5 | Package_TO_SOT_SMD:SOT-23-5 | U302 |
| 1 | MISO | TestPoint:TestPoint_Pad_D1.0mm | SDO201 |
| 1 | MOSI | TestPoint:TestPoint_Pad_D1.0mm | SDI201 |
| 1 | MP1475DJ-LF-P | Package_TO_SOT_SMD:TSOT-23-8 | U301 |
| 1 | RST | Button_Switch_SMD:SW_SPST_B3U-1000P | SW201 |
| 1 | R_Mot | Connector_JST:JST_XH_S6B-XH-A_1x06_P2.50mm_Horizontal | J402 |
| 1 | SPI_CLK | TestPoint:TestPoint_Pad_D1.0mm | SPI_CLK201 |
| 1 | STLink | Connector_PinHeader_1.27mm:PinHeader_2x07_P1.27mm_Vertical_SMD | J201 |
| 1 | STM32G070RBTx | Package_QFP:LQFP-64_10x10mm_P0.5mm | U201 |
| 1 | SW_SPDT_MSM | 472121020421:Toggle_Switch | SW301 |
| 1 | Start | Button_Switch_SMD:SW_SPST_B3U-1000P | SW601 |
| 1 | Status | LED_SMD:LED_0603_1608Metric | D602 |
| 1 | Status | Button_Switch_SMD:SW_SPST_B3U-1000P | SW602 |
| 1 | ~ | Diode_SMD:D_SMB | D301 |
It measures 90 × 72 mm and has 4 copper layers, 1.6 mm thick.
112 parts, built around the ZXBM5210-SP, MP1475DJ-LF-P and LSM6DSM. The full list of its parts is on this page, with links to each part's symbol and footprint where PCBKit's library has them.
From the HOSTEER/ESE2024 repository on GitHub, at the commit this page was made from: the board is robot_chat_PCB/robot_chat.kicad_pcb and its schematic robot_chat_PCB/HMI.kicad_sch. PCBKit opens the board in the browser, with nothing to install.
Its repository states no licence, so its author keeps all rights: ask HOSTEER before reusing the design.

ezer-soltani/HellKitty-Autonomous-Robot
Professional firmware and hardware design for an autonomous mobile robot using STM32G431 and FreeRTOS. Features Lidar perception, ToF safety algorithms, and PID motor control.


flexdrt/2425_ESE_Projet_StealthKitty
Ce projet est réalisé dans le cadre de la dernière année de la filière électronique et systèmes embarqués (ESE) de l'ENSEA.

Lazorme/Ludz-le-chat
The Lidar and motor drivers are in drvLIDAR and drvMotor, respectively.

mcbridejc/GaussSpeedway
PCB design for the Gauss Speedway. Designed in Kicad 6.

exysta/2425_ESE_Projet_TagBot
Vous vous trouvez actuellement dans le projet TagBot (ou robot chat), qui s'intègre à un projet de classe où chaque équipe doit concevoir un robot.

MohamedBenabdelhadi/2425_ESE_Projet_V-NOM
Mohamed Benabdelhadi_Nouhaila Faris_Oliver Belliard_Valerian Priou