
4 layers54 × 57 mm
TagBot
exysta/2425_ESE_Projet_TagBot
Vous vous trouvez actuellement dans le projet TagBot (ou robot chat), qui s'intègre à un projet de classe où chaque équipe doit concevoir un robot.
87 parts3MIT

 mcbridejc/GaussSpeedway36
PCB design for the Gauss Speedway. Designed in Kicad 6.
GaussSpeedway is an open-source printed circuit board by mcbridejc, from the mcbridejc/GaussSpeedway repository on GitHub. It is a 4-layer board of 212.5 × 152.5 mm with 48 parts on 63 nets, routed with 1,164 tracks and 641 vias.
It is built around the ZXBM5210-SP. Its parts include 14 capacitors, 12 resistors, 5 ICs, 3 inductors and 2 connectors. It belongs with the STM32 boards of this library.
PCB design for the Gauss Speedway. Designed in Kicad 6.
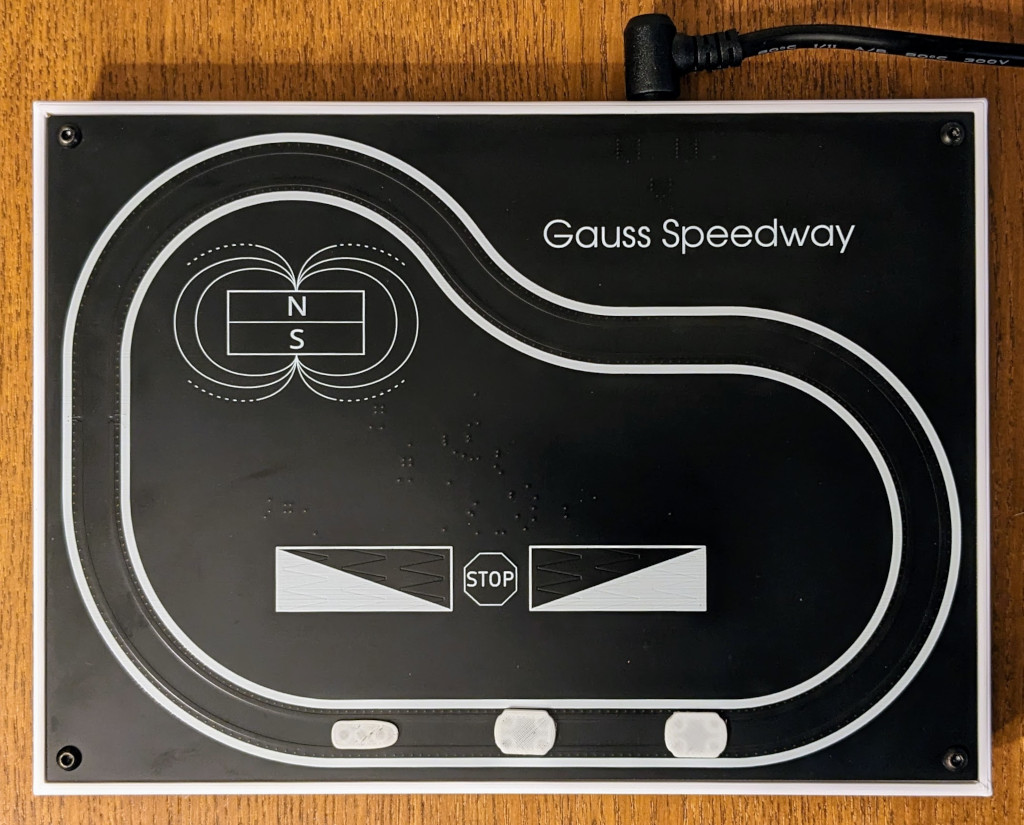
Demo video: https://vimeo.com/771275219
Firmware: https://github.com/mcbridejc/speedway-controller
The board is a 4-layer board. I typically order it in black soldermask, although this is of course not necessary. I also typically do 1oz inner copper (thinner copper is typically the default) in order to get the trace resistance down.
The holes in the corners are designed to accomodate M3 screws for mounting. The PCB mounts into a 3D printable frame, which has holes to accomodate M3 threaded heat inserts. You can also get by just putting four stand-offs on the corners.
The cars can be printed on an FDM printer. I typically use a small 0.2mm nozzle for finer features. You may need to make some adjustments for your printer, the holes for the magnet can be tricky. Ideally, you have enough of a friction fit that the magnets will stay in place while the glue sets, but enough clearance that you can get them in easily. I typically insert them by placing the magnet on the end of a small flat head screw driver, placing a drop of medium CA into the hole, and then press-fit the magnet into the hole. You have to take care to place the magnets in the correct direction.
There are STL files for two car designs in this repo. This one is the better one, with four magnets spaced properly for the guard rails. Just to show some variety, I also put up a narrow car with a single row of three magnets. It works as well, all though it is a bit more prone to flying off the track at high velocity.
You can also design your own cars. You just need to maintain the magnet spacing so that all magnets are on the same current direction. It's also pretty important to keep them light; the force created here is pretty small, and if they get too heavy they may just not move, or they may have a harder time staying on the track around a curve.
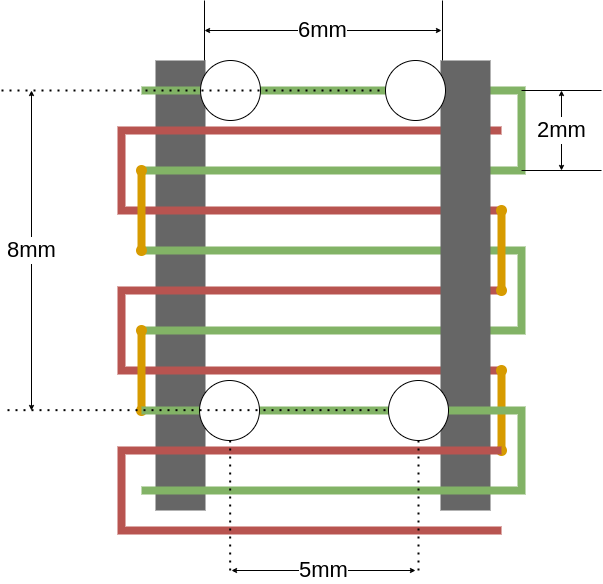
Rev 3 is tested and seems to be correct.
| Qty | Value | Footprint | References |
|---|---|---|---|
| 12 | 1k | Resistor_SMD:R_0603_1608Metric | R1, R2, R3, R4, R5, R6, R7, R8, R9, R10, R11, R12 |
| 6 | 10uF | Capacitor_SMD:C_0805_2012Metric | C2, C3, C6, C8, C9, C10 |
| 4 | 0.22uF | Capacitor_SMD:C_0603_1608Metric | C1, C4, C5, C7 |
| 4 | 47nF | Capacitor_SMD:C_0603_1608Metric | C11, C12, C13, C14 |
| 4 | MountingHole | MountingHole:MountingHole_3.7mm | H1, H2, H3, H4 |
| 3 | 68u | Inductor_SMD:L_Bourns_SRR1260 | L1, L2, L3 |
| 3 | NetTie_2 | NetTie:NetTie-2_SMD_Pad0.5mm | NT1, NT2, NT5 |
| 3 | ZXBM5210-SP | Package_SO:Diodes_SO-8EP | U3, U4, U5 |
| 2 | LinearTouch4 | touch:linear_touch_40.0mm | T1, T3 |
| 1 | Barrel_Jack_Switch | jmlib:RASM722BK_Barrel | J1 |
| 1 | Conn_01x01 | touch:button | T2 |
| 1 | Graphic | track:magnetlogo | G1 |
| 1 | JST PH | Connector_JST:JST_PH_S8B-PH-SM4-TB_1x08-1MP_P2.00mm_Horizontal | J2 |
| 1 | LOGO | touch:Label | G*** |
| 1 | MCP1754S-3302xCB | Package_TO_SOT_SMD:SOT-23 | U2 |
| 1 | STM32F051C6Tx | Package_QFP:LQFP-48_7x7mm_P0.5mm | U1 |
It measures 212.5 × 152.5 mm and has 4 copper layers, 4.69 mm thick.
48 parts, built around the ZXBM5210-SP. The full list of its parts is on this page, with links to each part's symbol and footprint where PCBKit's library has them.
From the mcbridejc/GaussSpeedway repository on GitHub, at the commit this page was made from: the board is GaussSpeedway.kicad_pcb and its schematic GaussSpeedway.kicad_sch. PCBKit opens the board in the browser, with nothing to install.
Its repository states no licence, so its author keeps all rights: ask mcbridejc before reusing the design.
exysta/2425_ESE_Projet_TagBot
Vous vous trouvez actuellement dans le projet TagBot (ou robot chat), qui s'intègre à un projet de classe où chaque équipe doit concevoir un robot.

MohamedBenabdelhadi/2425_ESE_Projet_V-NOM
Mohamed Benabdelhadi_Nouhaila Faris_Oliver Belliard_Valerian Priou


DBXYD/2025-CGS-ESP32-IoT
Il s'agit d'un PCB permettant de centraliser l'alimentation des appareils et de les connecter au réseau local.

ezer-soltani/HellKitty-Autonomous-Robot
Professional firmware and hardware design for an autonomous mobile robot using STM32G431 and FreeRTOS. Features Lidar perception, ToF safety algorithms, and PID motor control.


flexdrt/2425_ESE_Projet_StealthKitty
Ce projet est réalisé dans le cadre de la dernière année de la filière électronique et systèmes embarqués (ESE) de l'ENSEA.