Skip to the content
2 layers100.3 × 50 mmControl unit4, the printed circuit board in 3D

Semanur and I are university students at METU EE, and we are lab partners at an analog laboratory course abbreviated as EE313. In this course, we do predetermined experiments on analog circuits (mainly amplifiers). At the end of the term, we are supposed to design a prototype that fulfills a specified task. This repo will include files of that prototype.

Size
100.3 × 50 mm
Copper layers
2
Thickness
1.6 mm
Parts
38
Nets
28
Pads
89
Tracks, vias
266, 4
Pours
1
Routed
Yes
KiCad
KiCad 5 (file 20171130)
Created
2 Jan 2022
Updated
16 Feb 2022

Overview

Control unit4 is an open-source printed circuit board by erdemcanaz, from the erdemcanaz/EE313-Term-project repository on GitHub. It is a 2-layer board of 100.3 × 50 mm with 38 parts on 28 nets, routed with 266 tracks and 4 vias.

It is built around the LM358. Its parts include 28 resistors, 5 diodes, 3 connectors and 2 ICs.

Main components

1

README

README.md

Implementing An Analog Approach For Closed Environment Autonomous Temperature Control Circuitry

EE-313 TERM PROJECT

General requirements

The project consists of five units; namely, sensing, set, control, operation and display units. The sensing unit perceives the ambient temperature and sends this information to the control and display units. Similarly, set unit receives an input from the user indicating the desired temperature level and send this information to control and display units. Control unit compares the two temperatures and decides the action to be taken by the operation unit. Operation unit is where the heating and cooling systems are present. It perates one of these systems according to the signal sent from the control unit. Display unit shows the ambient and set temperatures by mapping them into a color spectrum
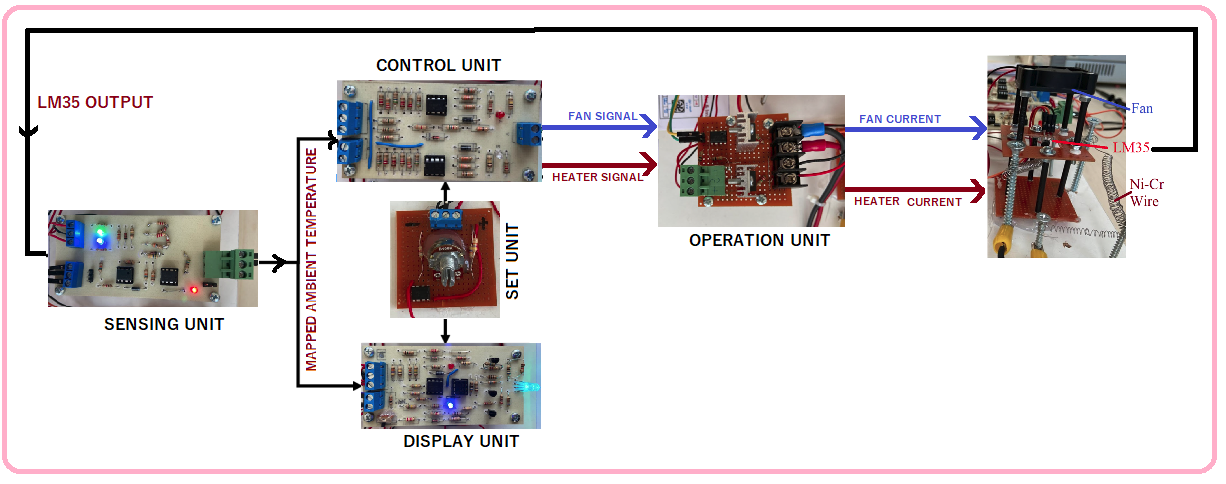
Sensing Unit
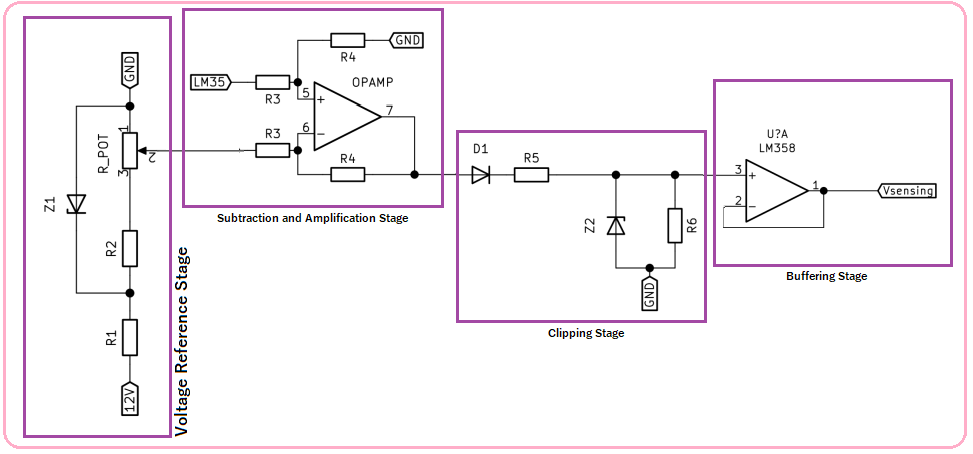
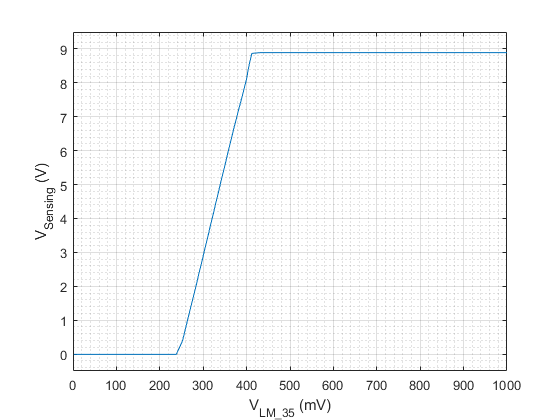
Sensing unit output voltage (Vsensing) is 0V and 9V voltage for the 24◦C and 40◦C temperatures, respectively. Between these temperature levels, it has a linear increase in the output voltage. Outside of this temperature range, it performs clipping in the voltage levels. The temperature sensor used (LM35) has lienar characteristics and outputs 240mV and 400mv for 24◦C and 40◦C temperatures respectively. By subtracting 240mV and multiplying the result with 56 (160 mV x 56=8.96V), we can get desired output characteristics. Yet another problem to solve is to constrain this voltage in between 0-9Volts. Which can be done by a diode an a 9.1V zenner diode.

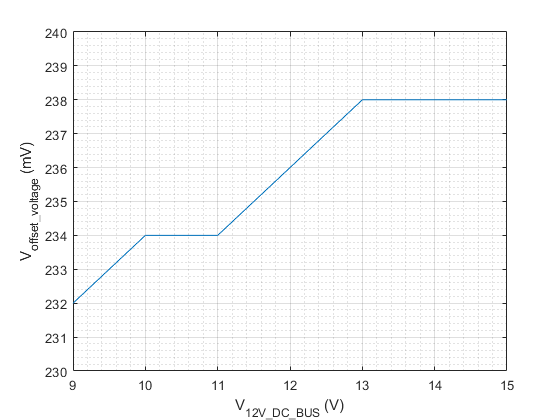
  1. Voltage Reference Stage: At this stage, about 240mV+(0.7)/56 is generated. 240mV is due to LM35 and (0.7)/56 is due to forward voltage drop of diode D1. Even though R3 & R4 is >> R1,R2 % R_POT; this voltage reference is not isolated. Also forward votlage drop of the diode may not be exactly 0.7Volts. Thus, a potentiometer is used to find exact point where output is 0 volt at 24C and starts to increase just after that. Then, potentiometer is replaced by resistors.
  2. Subtraction and Amplification Stage: At this stage, reference voltage is subtracted froum LM35 voltage output. The result is multiplied by the ratio of R4/R3. We chosed R4/R3 as 56.
  3. Clipping Stage: This stage rectifies the output of the subtraction stage due to D1. And if voltage of the previous stage is greater than V_Z2, Z2 is activated and voltage upper limit is set.
  4. Buffering Stage: This stage buffers the output.
Experimentally measured input output characteristics and stability of the reference stage due to unstable buss voltage are given below.
Set Unit

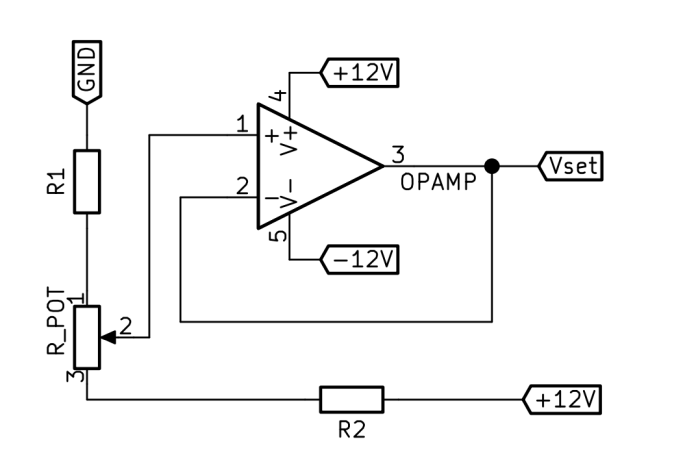
Desired temperature is set by adjusting the the potentiometer's knob. The schematic is self explanatory. R1, R2 and R_POT ensures voltage of the second leg of the potentiometer is greater than 0.25V and less than 8.75V.
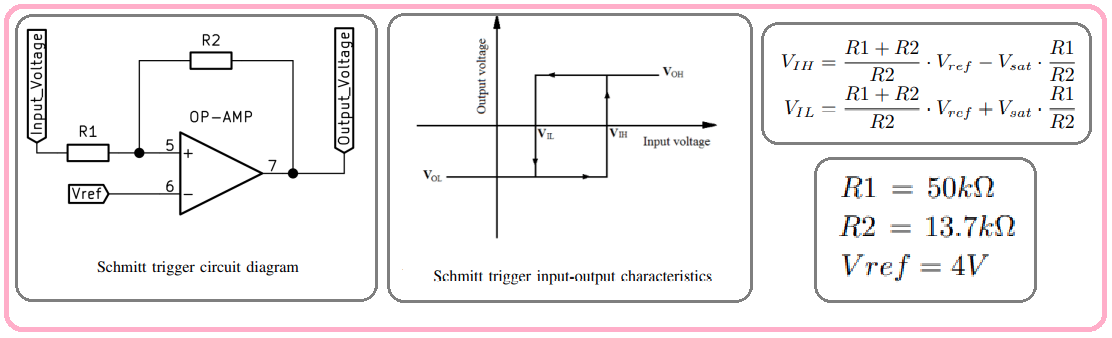
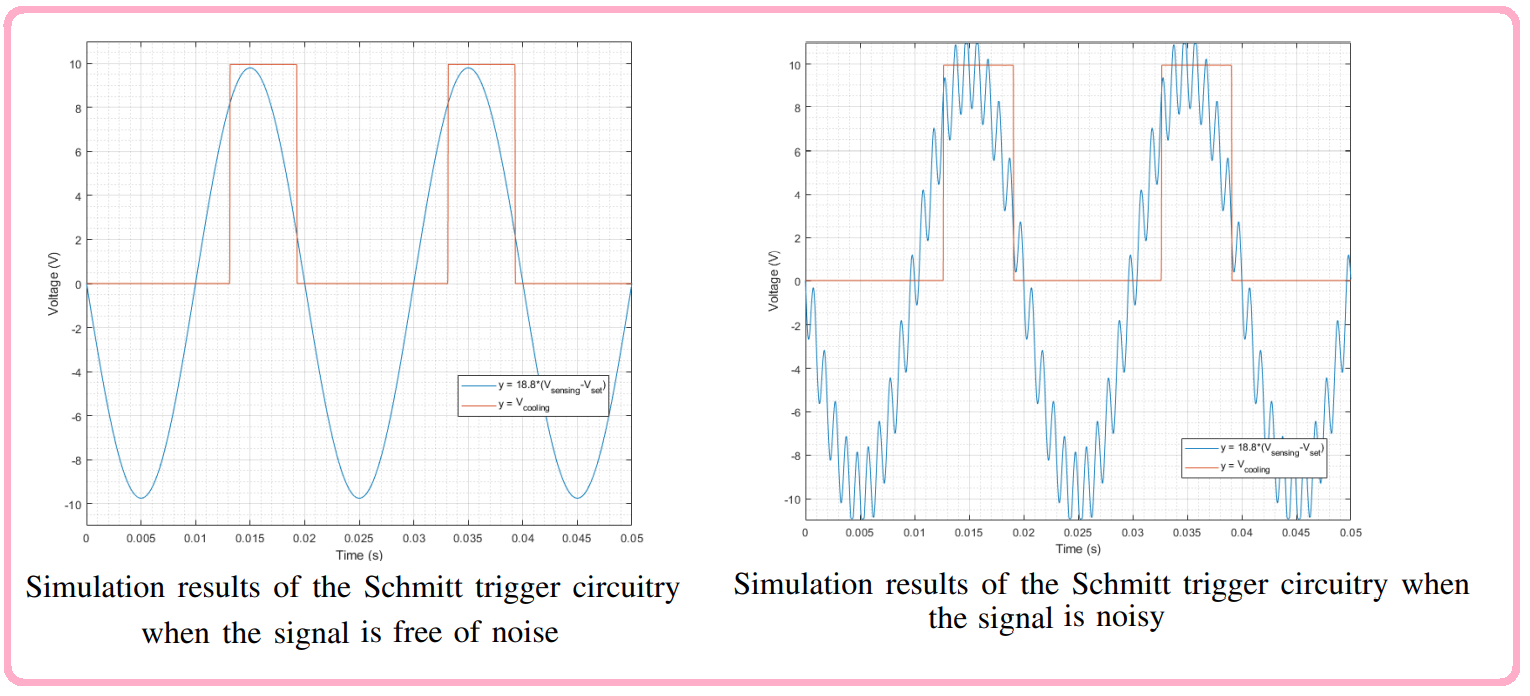
Control Unit
Operation Unit: Heating and Cooling

Display Unit

THANKS!
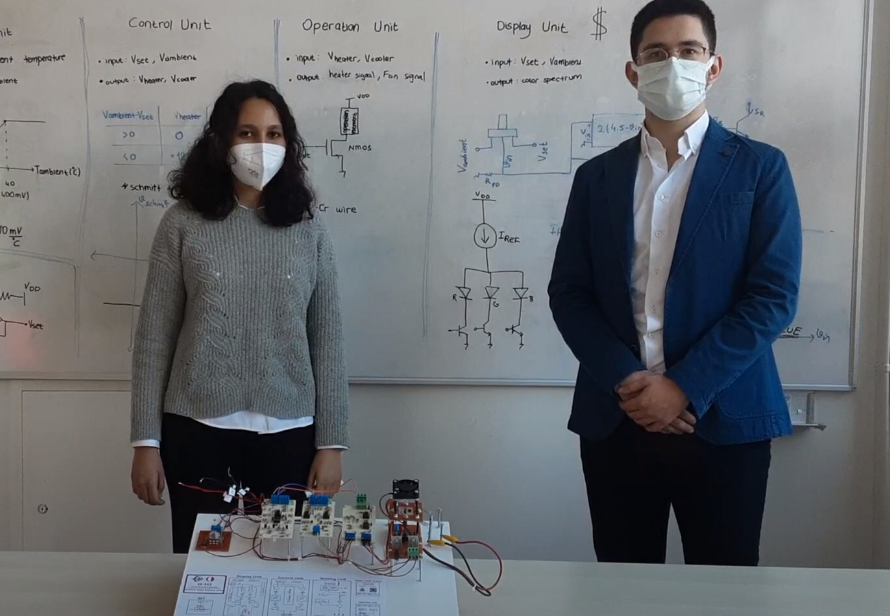
Semanur Avşar (Left) & Erdem Canaz (right)
https://youtu.be/WysXOD-1qQ8

Parts

38
QtyValueFootprintReferences
70Resistor_THT:R_Axial_DIN0309_L9.0mm_D3.2mm_P12.70mm_HorizontalR7, R9, R13, R14, R15, R19, R20
61kResistor_THT:R_Axial_DIN0309_L9.0mm_D3.2mm_P12.70mm_HorizontalR2, R3, R4, R5, R23, R24
418.8kResistor_THT:R_Axial_DIN0309_L9.0mm_D3.2mm_P12.70mm_HorizontalR8, R10, R11, R12
21000kResistor_THT:R_Axial_DIN0309_L9.0mm_D3.2mm_P12.70mm_HorizontalR27, R28
2100kResistor_THT:R_Axial_DIN0309_L9.0mm_D3.2mm_P12.70mm_HorizontalR25, R26
213.7kResistor_THT:R_Axial_DIN0309_L9.0mm_D3.2mm_P12.70mm_HorizontalR17, R18
250kResistor_THT:R_Axial_DIN0309_L9.0mm_D3.2mm_P12.70mm_HorizontalR21, R22
2Conn_01x02_FemaleTerminalBlock:TerminalBlock_Altech_AK300-2_P5.00mmJ1, J5
2DDiode_THT:D_5W_P12.70mm_HorizontalD2, D3
2LM358Package_DIP:DIP-8_W7.62mmU1, U2
13.6kResistor_THT:R_Axial_DIN0309_L9.0mm_D3.2mm_P12.70mm_HorizontalR6
15.2kResistor_THT:R_Axial_DIN0309_L9.0mm_D3.2mm_P12.70mm_HorizontalR1
16.2VDiode_THT:D_5W_P12.70mm_HorizontalD1
17kResistor_THT:R_Axial_DIN0309_L9.0mm_D3.2mm_P12.70mm_HorizontalR16
1BLUE_LEDLED_THT:LED_D3.0mm_FlatTopD5
1Conn_01x03_FemaleTerminalBlock:TerminalBlock_Altech_AK300-3_P5.00mmJ2
1RED_LEDLED_THT:LED_D3.0mm_FlatTopD4

More from erdemcanaz/EE313-Term-project

2
  • 2 layers100.6 × 50 mmDisplay unit2, the printed circuit board in 3D

    Display unit2

    erdemcanaz/EE313-Term-project

    Semanur and I are university students at METU EE, and we are lab partners at an analog laboratory course abbreviated as EE313. In this course, we do predetermined experiments on analog circuits (mainly amplifiers).

    45 parts1
  • 2 layers100.3 × 50.3 mmSensing unit1, the printed circuit board in 3D

    Sensing unit1

    erdemcanaz/EE313-Term-project

    Semanur and I are university students at METU EE, and we are lab partners at an analog laboratory course abbreviated as EE313. In this course, we do predetermined experiments on analog circuits (mainly amplifiers).

    25 parts1

Similar boards

  • 2 layers132.1 × 45.7 mmIPoS, the printed circuit board in 3D

    IPoS

    peterheinrich/InternetOverSpaghetti

    Transmitting IP packages over a pair of spaghetti thus demonstrating how media independent IP really is.

    42 parts342
  • 2 layers68.8 × 53.6 mmZArduino, the printed circuit board in 3D

    ZArduino

    zmaker/arduino_cookbook

    gli sketch del nuovo progetto Arduino Cookbook e dei video di YouTube

    46 parts269
  • 2 layers152 × 88 mmRFBitBangSMT, the printed circuit board in 3D

    RFBitBangSMT

    profdc9/RFBitBanger

    A QRP digital transceiver created from readily available parts for off-the-grid maintenance

    271 parts222
  • 2 layers118 × 103.5 mmEV Charger2, the printed circuit board in 3D

    EV Charger2

    fotherja/EV_Charger

    Arduino Uno Code for EV Charger

    62 parts167MIT
  • 2 layers113 × 62.2 mmFullScope, the printed circuit board in 3D

    FullScope

    tvlad1234/pillScopePlus

    Oscilloscope based around the STM32F401 Black Pill and a color LCD screen

    15 parts165Apache-2.0
  • 2 layers75.2 × 61.1 mmHelios, the printed circuit board in 3D

    Helios

    Grix/helios_dac

    Helios Laser DAC

    102 parts132
  • 2 layers144.1 × 182.2 mmSHVC CPU-01, the printed circuit board in 3D

    SHVC CPU-01

    starlightk7/OpenSFC

    OSHW Reproduction Parts related to the Super Famicom / Super Nintendo game console

    498 parts114CERN-OHL-S-2.0
  • 2 layers100 × 85 mmVNA, the printed circuit board in 3D

    VNA

    profdc9/VNA

    Vector Network Analyzer based on the STM32F103C8T6 bluepill

    178 parts93

Questions

How big is the Control unit4 PCB?

It measures 100.3 × 50 mm and has 2 copper layers, 1.6 mm thick.

What parts does the Control unit4 use?

38 parts, built around the LM358. The full list of its parts is on this page, with links to each part's symbol and footprint where PCBKit's library has them.

Where can I download the Control unit4 KiCad files?

From the erdemcanaz/EE313-Term-project repository on GitHub, at the commit this page was made from: the board is KiCad/control unit4/control unit4.kicad_pcb. PCBKit opens the board in the browser, with nothing to install.

Can I use the Control unit4 design in my own project?

Its repository states no licence, so its author keeps all rights: ask erdemcanaz before reusing the design.