
2 layers84 × 86 mm

 darthcloud/cube64-dx75
GameCube controllers adaptor for N64
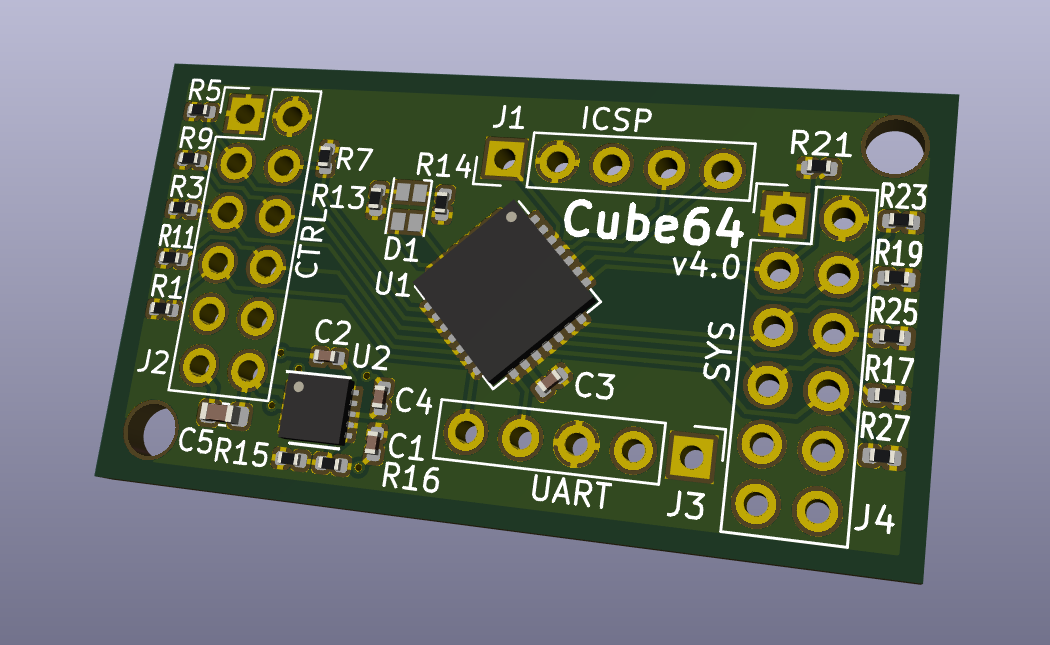
Cube64 is an open-source printed circuit board by darthcloud, from the darthcloud/cube64-dx repository on GitHub, published under the GPL-2.0 licence. It is a 2-layer board of 38 × 21 mm with 42 parts on 36 nets, routed with 179 tracks and 5 vias.
It is built around the PIC18F24Q10-I/SS. Its parts include 28 resistors, 5 capacitors, 4 connectors, 2 ICs and 1 diode. It belongs with the retro computing and games and interfaces and adapters boards and the PIC boards of this library.
See my new project:
BlueRetro - Multiplayer Bluetooth controllers adapter for retro video game consoles
https://hackaday.io/project/170365-blueretro
https://github.com/darthcloud/BlueRetro
This is a project to build an adaptor for using GameCube controllers with N64 consoles. The motivation behind this is that the N64 has some really great games, but the controller hardware is rather bad- the joysticks wear out quickly, and the layout is odd. The GameCube controllers, however, have a superset of the features and a much better joystick.
A secondary goal of this project is to more thoroughly reverse engineer the protocols involved and create reusable libraries for interfacing PIC microcontrollers to N64 and GameCube devices. The very basics of reverse engineering the two protocols were done before Micah (@scanlime) started this project, but she quickly discovered that there's much more to the protocol. We believe this project may be the first one to completely reverse engineer the protocol used by standard N64 controllers, including peripherals like the Controller and Rumble Paks.
All code here is released under the GPL. This means that if you have basic electronics skills and a way to program the microcontroller, you can build your own cube64 adaptor easily. The hardware is extremely simple, and all the complexity of reverse engineering and writing code is done for you ;)
https://github.com/darthcloud/cube64-dx/discussions
The completed adaptor plugs into an N64 console, and a regular GameCube controller or WaveBird receiver plugs into the adaptor. The default button mapping is as follows:
| GameCube | N64 |
|---|---|
 |  |
 |  |
 |  |
 |  |
 |  |
 |  |
 |  |
 |  |
 |  |
 |  |
 |  |
By default the adaptor layout banks are loaded with the first four preset. See wiki for more information on the preset.
All the configurable feature of the adaptor can be accessed thought this menu. To access the menu:
The adaptor LED will be ON as long you are inside the menu.
Once in the menu the N64 will receive blank status packet regardless of buttons pressed on the GameCube controller. An invalid selection in the menu will exit the menu.
The button mapping is stored in non-volatile memory, and may be modified during gameplay. To change the mapping for one button or axis direction:
While in the main menu, press Start again.
If you have the rumble power connected, you should feel a brief rumble.
Press the button you wish to remap. This includes any button or axis direction.
Press the button you want to map it to. This button is always interpreted according to the table below.
If the mapping was successful and you have rumble power connected, you should feel a brief rumble.
| GameCube | N64 |
|---|---|
| |
| |
| |
| |
| |
| |
| |
|  |
| |
|  |
| |
It's possible to map a special function to a button instead of a N64 button.
While in the main menu, press Y.
If you have the rumble power connected, you should feel a brief rumble.
Press the button you wish to set the function to.
If you have the rumble power connected, you should feel a brief rumble.
Press the button corresponding to the special function you want. This button is always interpreted according to the defaults below.
If the mapping was successful and you have rumble power connected, you should feel a brief rumble.
| GameCube | Function |
|---|---|
| Temporary overwrite current mapping layout with layout corresponding to the D-pad direction until button is released. |
| A+C-Down two buttons mapping. |
| B+C-Right two buttons mapping. |
 | Turbo disable (Default). |
| Faster turbo. |
| Medium turbo. |
| Slower turbo. |
By default button remapping and special function will only map to the digital trigger buttons. Pressing X before either menu options will allow mapping to the analog trigger axes.
While in the main menu, press X.
If you have the rumble power connected, you should feel a brief rumble.
Press either Start or Y. See Axis & Button remapping or Special function sections for next steps.
To reset the current active mapping layout to the above defaults:
While in the main menu, press Z.
If you have the rumble power connected and the reset was successful, you should feel a brief rumble.
The adaptor can either emulate a Rumble Pak, let all controller slot command bypass to a real N64 controller or display the slot as empty. To switch between the modes:
While in the main menu, press D-pad UP.
If you have the rumble power connected, you should feel a brief rumble.
Press D-pad UP for bypass mode, D-pad LEFT for Rumble Pak mode or D-pad RIGHT for emptied slot controller.
If you have the rumble power connected and the mode change was successful, you should feel a brief rumble.
This setting is volatile. Adaptor always starts with Rumble Pak mode.
Empty mode is useful for some game that report error with a Rumble Pak. For those games, without even invoking the main menu you may simply hold D-pad RIGHT on power on to disable the Rumble Pak mode and avoid the error.
Holding D-pad UP at boot will set bypass mode as well.
Setting bypass mode while no N64 controller is present in the secondary adaptor port will make the adaptor reset.
It is possible to save up to 4 sets of mapping layouts so you can easily use different keys mapping in different games. To change between the layout does the following:
While in the main menu, press D-pad LEFT.
If you have the rumble power connected, you should feel a brief rumble.
Press one of the 4 D-pad directions which correspond to the 4 layout available.
If you have the rumble power connected and the layout change was successful, you should feel a brief rumble.
All layout by default hold the default button configuration. Just select one of 4 layouts and then change the button configuration using the button mapping key combo described above.
When you select a layout, it is saved into the EEPROM so the next time you power up the adaptor the last used will be reloaded automatically.
By default the joysticks value from the GameCube controller are scale to match the N64 joystick value range. This can be disabled to use the GameCube range instead (< v3.1 behavior). A response curve can also be applied to a GC axis. By default none is applied (Linear). Scale and curve setting are save independently for each axis and each layout.
While in the main menu, press D-pad RIGHT.
If you have the rumble power connected, you should feel a brief rumble.
Press either direction on one of the four GC joystick axes.
If you have the rumble power connected, you should feel a brief rumble.
Press X to enable or Y to disable the scaling function. Or press one of the D-pad directions for enabling a response curve. (UP: Aggressive, LEFT: Relaxed, RIGHT: Wide, DOWN: S-Curve) Or press A for no response curve (Linear).
If you have the rumble power connected and the layout change was successful, you should feel a brief rumble.
This option is saved into the EEPROM so the next time you power up the adaptor the last used setting will be reloaded automatically.
Eight pre-defined button mapping layout can be loaded in the currently active layout. See wiki for preset detail.
While in the main menu, press D-pad DOWN.
If you have the rumble power connected, you should feel a brief rumble.
Press any direction on GC D-pad or main joystick to choose one preset.
If you have the rumble power connected, you should feel a brief rumble.
The adaptor handles calibration in almost the exact same way a GameCube does. If your joystick is drifting or unresponsive during gameplay, you should be able to recalibrate it by performing any of the following actions without touching the joystick, C-stick, L button, or R button:
Hold down X, Y, and Start for a couple seconds during gameplay.
Unplug the controller from the adaptor and plug it back in.
Unplug the adaptor from the N64 and plug it back in.
Turn off the N64 then turn it back on. (The reset button won't recalibrate, since the adaptor doesn't lose power or get reinitialized)
If connected to two ports of the system, the adaptor will answer automatically a limited button status and identity commands on the 2nd port. This allows to play GoldenEye 007 and Perfect Dark using their respective 1 player 2 controller control style.
Analog input map for the 1st controller C Buttons will map to the 2nd controller joystick. Digital input map for the 1st controller R button will map to the 2nd controller Z button.
There are currently two versions of the Cube64 hardware:
The "Cube64 DIY" uses a PIC18F14K22 microcontroller. Just about any electronics hobbyist should be able to build it easily. 5V can be provided either externally or by using a charge pump in 8-pin SOIC package.
The "Cube64 SMD" uses a PIC18F24Q10 microcontroller, and a charge pump in 10-pin DFN package. PCB gerber and KiCad sources are provided.
Both versions of the hardware have the same button remapping features and responsiveness, as the only difference in their firmware is a few lines worth of compile-time configuration. The DIP version of the Q10 could also be used for the DIY version, but the package is bigger.
The protocol used between the N64 and controller, and between the controller and Controller Pak is well understood now. An RS-232 to N64 bridge and several Python programs demonstrate just about all of the protocol.
The necessary subset of the protocol has been implemented in the Cube64 firmware to emulate an official N64 controller with Rumble Pak. If 5V power for the motor can be supplied to the GameCube controller, its rumble motor will be used to emulate the N64 Rumble Pak.
It should be possible to emulate the N64 Controller Pak using the results of the reverse engineering.
Source code for the firmware, in PIC assembly. It was developed using the open source "gputils" package (use latest snapshot). The firmware for the adaptor itself is "cube64.asm", but there are a few additional test programs and libraries.
This includes schematics and PCB for the adaptor, in KiCad source format.
Utilities and documentation produced while reverse engineering.
| Qty | Value | Footprint | References |
|---|---|---|---|
| 22 | DNP | cube64:R_0402_1005Metric | R1, R2, R10, R11, R12, R17, R18, R19, R20, R21, R22, R23, R24, R25, R26, R27 +6 |
| 3 | 2.2u | cube64:C_0402_1005Metric | C1, C2, C4 |
| 2 | 1K | cube64:R_0402_1005Metric | R3, R9 |
| 2 | 64.9 | cube64:R_0402_1005Metric | R13, R14 |
| 1 | 0.1u | cube64:C_0402_1005Metric | C3 |
| 1 | 100K | cube64:R_0402_1005Metric | R16 |
| 1 | 4.7u | cube64:C_0603_1608Metric | C5 |
| 1 | 402K | cube64:R_0402_1005Metric | R15 |
| 1 | CTRL | cube64:PinHeader_2x06_P2.54mm_Vertical | J2 |
| 1 | ICSP | cube64:PinHeader_1x05_P2.54mm_Vertical | J1 |
| 1 | LED_Dual_AACC | cube64:D_0606_1616Metric | D1 |
| 1 | LTC3203B-1 | cube64:DFN-10-1EP_3x3mm_P0.5mm_EP1.55x2.48mm | U2 |
| 1 | PIC18F24Q10 | cube64:QFN-28-1EP_6x6mm_P0.65mm_EP4.25x4.25mm_ThermalVias | U1 |
| 1 | SYS | cube64:PinHeader_2x06_P2.54mm_Vertical | J4 |
| 1 | UART | cube64:PinHeader_1x05_P2.54mm_Vertical | J3 |
The 40 most common of 42 parts.
It measures 38 × 21 mm and has 2 copper layers, 1.6 mm thick.
42 parts, built around the PIC18F24Q10-I/SS. The full list of its parts is on this page, with links to each part's symbol and footprint where PCBKit's library has them.
From the darthcloud/cube64-dx repository on GitHub, at the commit this page was made from: the board is hardware/cube64.kicad_pcb. PCBKit opens the board in the browser, with nothing to install.
Its repository publishes it under the GPL-2.0 licence: you may reuse it on that licence's terms (keep the author's notice, and for a copyleft licence share your changes alike).

rusefi/rusefi
rusefi - GPL internal combustion engine control unit


hackclub/sprig
🍃 Learn to code by making games in a JavaScript web-based game editor.

jamro/tiny-engineer
A small desktop robot that brings an AI coding assistant to life, physically acting out when it reads files, thinks, writes code, and finishes work.

hoglet67/RGBtoHDMI
Bare-metal Raspberry Pi project that provides pixel-perfect sampling of Retro Computer RGB/YUV video and conversion to HDMI

hackclub/OnBoard
💡 Join 1,000 teenagers and make your first PCB with a $100 grant!

