2 layers37.8 × 21.5 mm

 cnlohr/wiflier92
ESP8266-based Quadcopter Brain
Wiflier EXP is an open-source printed circuit board by cnlohr, from the cnlohr/wiflier repository on GitHub. It is a 2-layer board of 37.8 × 21.5 mm with 61 parts on 41 nets, routed with 756 tracks and 77 vias.
It is built around the ESP8266EX, BMP280 and LSM9DS1, with the W25Q80DVSIG among its other parts. Its parts include 23 connectors, 12 capacitors, 7 ICs, 5 diodes and 4 transistors. It belongs with the ESP8266 and AVR (ATmega, ATtiny) boards of this library.


WARNING: This project is still in its early stages! It doesn't fly yet!
WARNING: Everything surrounding a control loop in control.c for flight IS SUPER JANKEY AND TOTALLY NOT HOW IT SHOULD BE!
WARNING: When I operated the PWM at 3kHz, I had to modify my current board to add pullups on the I2C and short out the AVR's reset to VBat, otherwise it seemed to reboot randomly during flight.
Do you think quadcopters are neat? Eh, not really for me... BUT I THINK ESP8266's ARE AWESOME! So, I slapped an LSM9DS1 IMU, a BMP085 barometer and an AVR co-processor with 4 PWM output drivers to a PCB small enough to fit in a hubsan X4 quadcopter.
Picture of the wiflier brain
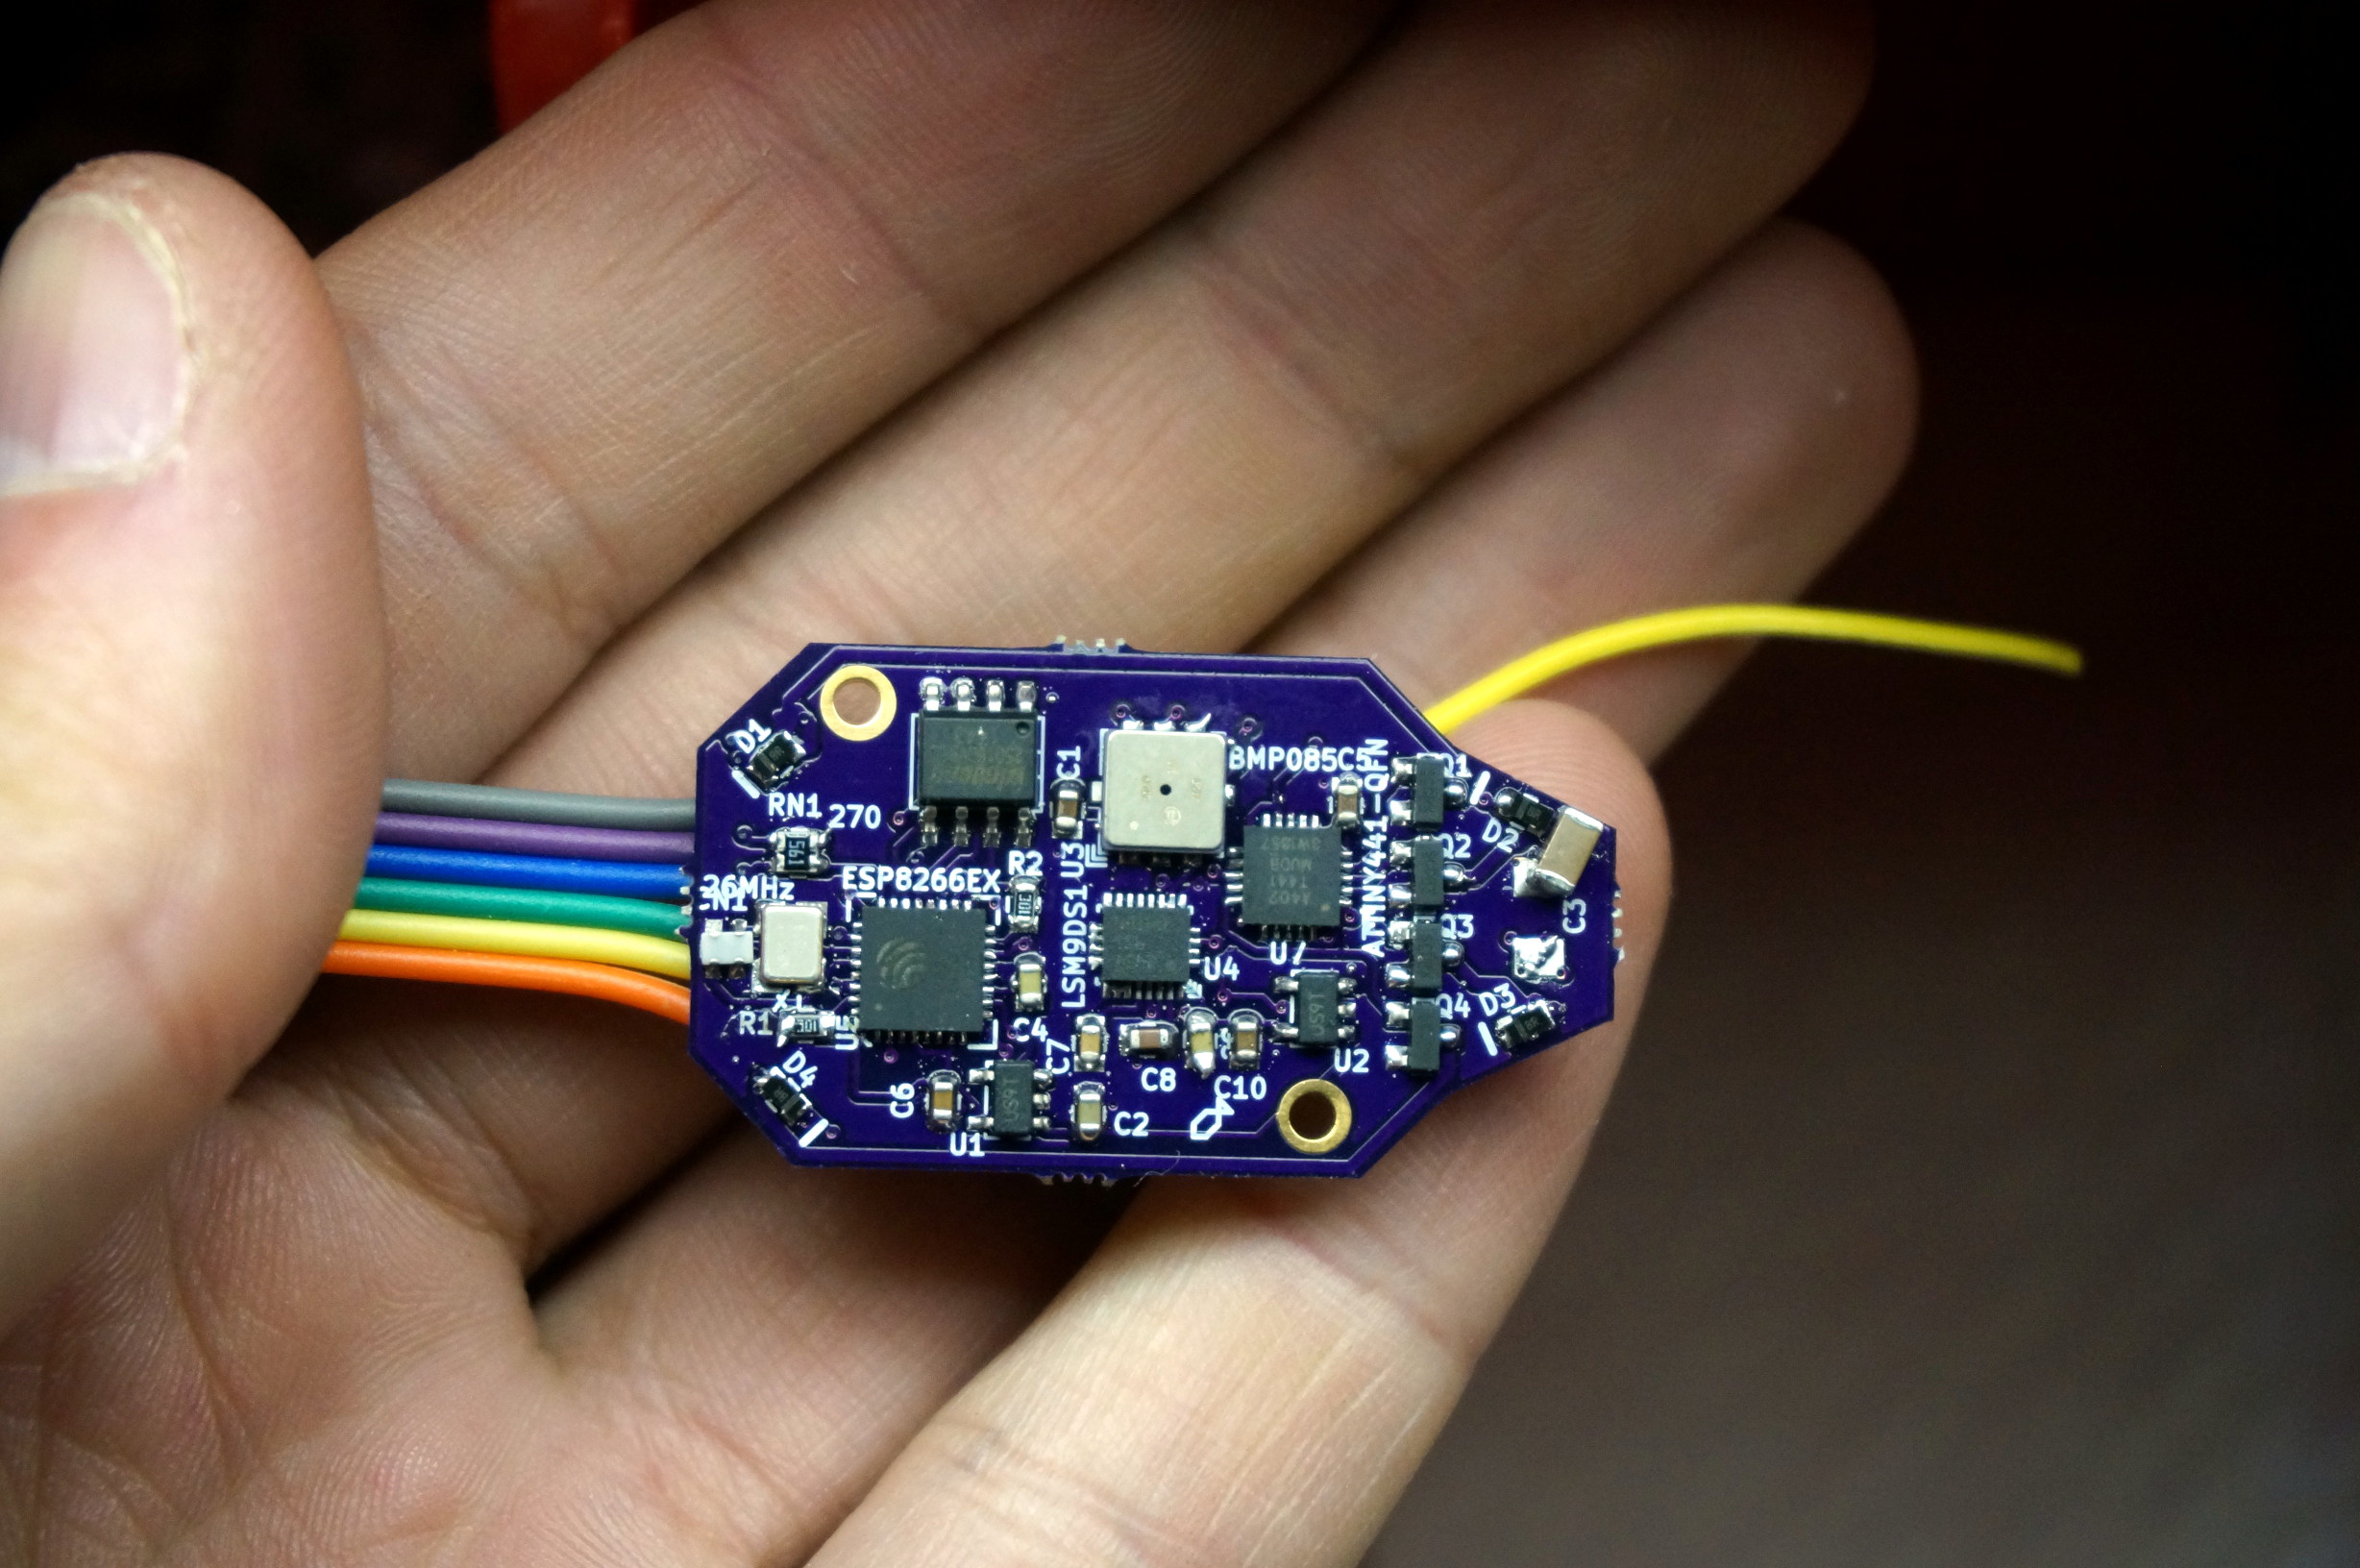
Youtube video of the first crack at this:
!(http://img.youtube.com/vi/3n76iMTHXuE/0.jpg)
There is an ESP8266, a 32-bit 80(or 160)MHz processor with 802.11bgn networking at the heart of the system. This run all the user interface code, and handles all control algorithms. It is attached to a 2 MByte flash for code and data storage. It is connected via a software i2c bus to:
The wiflier uses an ESP8266, which can act as either a station (mode 1) or a softap (mode 2). Softap means it broadcasts a SSID that other compuers can connect to.
Station mode can be initialized by the W1:[ssid]:password command. This will cause the wiflier to connect to the specified network. It supports WEP, WPA-PSK, and WPA2-PSK. It will remember this setting when it boots up. If it fails to connect, it will revert to mode 2. Currently (maybe?) if it reverts to mode 2, it will stay in mode 2 every subsequent bootup.
If it succeeds in negotiating, it will pull a DHCP lease and print to the serial terminal what that DHCP release is. All communicat
Soft AP mode allows the ESP8266 to create its own wifi network that you can connect to with a wifi-enabled device. In this mode, one can connect to the new network, and visit the ESP at 192.168.4.1.
This is the default mode.
There are currently two command interfaces to the wiflier. One is UDP, on port 7777, the other is via HTTP at http://[ip]/d/issue?.
For the UDP interface, you can use netcat or 'nc' to communicate with the ESP. This is partciularly convenient as a command-line tool. You can type
nc [ip] 7777 -uTo open a terminal to the wiflier. You can type T1 and enter. This should provide a constant stream of telemetry.
When using the UDP interface, you must only have one command per packet. Packets are the delineation of commands.
If you make an HTTP request to http://[ip]/d/issue?[command] where [ip] is the address of the wiflier, and [command] is the command you are issuing, the command will be executed and its return value is sent. You can check this interface's functionality by going to http://192.168.4.1/d/issue?T0 and verify it returns a T0 confirmation. Anything after the question mark will be urldecoded. Things like amphersands should be URL encoded.
This interface does not yet exist, but I hope to make it a reality.
This code is separated into two pieces, the ESP firmware and the AVR firmware.
The ESP firmware requires the esp_iot_sdk_v1.1.0, and a copy of the ESP8266 GCC toolchain. To build the ESP firmware, cd to the espfirmware folder and type 'make'.
The AVR firmware requires avr-libc-1.8.0 and avr-gcc-4.8.1 at a minimum. To build the AVR firmware, cd to the avr folder, and type 'make'.
We use a bit of a modified take on the old memory layout since, while we support OTA upgrades, we do so in a different way than the normal way.
| Address | Size | Name / Description |
|---|---|---|
| 00000h | 64k | 0x00000.bin, IRAM Code |
| 10000h | 180k | Normally unused, HTTP may be here if signature found. |
| 3C000h | 4k | May be used by web interface |
| 3D000h | 4k | our device configuration |
| 3E000h | 8k | May be used by ESP SDK. |
| 40000h | 240k | 0x40000.bin, Cached code. |
| 7C000h | 8k | May be used by ESP SDK. |
| 7E000h | 8k | May be WiFi configuration |
| 80000h | 512k | Scratchpad (Temp only!) |
| 100000h | 1M+ | HTTP data, 1M on W25Q16. HTTP Used here if signature found. |
The wiflier schematics and PCB layout is done in KiCad (2013-07-03). It should be compatible with newer versions, but is unlikely to be compatible with older versions. In the hardware/ folder, you'll also find wiflier.lst. This contains the part identifier, name, digikey part number (if applicable) and cost assuming an order of ~10 boards.
The UART on the wiflier is used to send debugging information. The Wiflier does not currently accept commands via the UART. I intend to make the UART available to GPS or video input.
To UART flash the ESP8266 you will need esptool.py and a serial TTL uart. USB to serial converters are good. Do not use RS-232-level UARTs. To flash this, you will need to:
De-power the device.
Connect GPIO0 to GND.
Connect TX, RX and GND (And possibly power) to your UART, reversing TX/RX lines.
Apply power to the device.
Then go to the espfirmware folder, and type:
~/esp8266/esptool/esptool.py --port /dev/ttyUSB0 write_flash 0x00000 0x00000.bin 0x40000 0x40000.binor
make burnThe esptool should reboot into the running code.
Net Flashing the ESP8266 is particularly easy. Connect to the wiflier, verify you can communicate to it (via HTTP or ping). Use the 'execute_reflash' tool with the following commands:
web/execute_reflash 192.168.4.1 0x00000.bin 0x40000.binor, from the espfirmware folder...
make netburnThis will connect to 192.168.4.1, and it will perform the following steps:
The AVR is particularly easy to flash. You'll need:
To flash, follow the following steps:
The heart of the wiflier is the command engine. This command engine is human-readable, and with the exception of some use cases of the flashing commands is human-readable.
Commands are very simple, they are basically single letters, then parameters, separated by colons. Responses are usually similar to the command that was sent. A failure can be indicated by either a lack of response, or an exclaimation point (!) prefixing the response.
As a warning, in some places \r\n is used and in others \n is used. You should discard \r in all non-binary uses.
Turning the main control loop off will stop all I2C bus communication and resolving what to do in the control loop. That also means telemetry will stop.
Reboot the system. This includes the bootloader. If GPIO0 is held low, the serial bootloader will be initiated.
This will either continously stream, or turn off streaming of the calibrated telemetry data from the sensors. Calibration is done using the Rn and Z commands. Data is tab deliniated.
The streaming format is: TD: [frame #] [GyroX] [GyroY] [GyroZ] [AccX] [AccY] [AccZ] [MagX] [MagY] [MagZ] [Pressure in Bar] [Temperature in tenths of degrees C] [battery voltage in 1/100ths of a volt]\n
This will enable/disable streaming of uncalibrated telemetry data, straight from the sensors. Data is tab deliniated.
The streaming format is: UD: [frame #] [GyroX] [GyroY] [GyroZ] [AccX] [AccY] [AccZ] [MagX] [MagY] [MagZ] [Pressure in Bar] [Temperature in tenths of degrees C] [battery voltage in 1/100ths of a volt]\n
For example:
UD   9224      600      199      137     2839     1790     2080       61     2214    -4673    101233    368    499 \r\n
UD   9225     -616     -244      304     3208     1797     1934       40     2229    -4673    101233    368    507 \r\n
UD   9226     -687     -234      318     3374     1815     1893       74     2259    -4683    101233    368    507 \r\n
UD   9227      242      240       43     2960     1795     2051       31     2223    -4691    101233    368    507 \r\n
UD 9228 455 146 46 3122 1708 1964 37 2226 -4664 101237 368 507 \r\nSending a Z will set the zero all gyros, and accelerometer X and accelerometer Y. This will only have an effect on the calibrated, filtered telemetry data.
When you want to begin range calibration (for accelerometer Z, and all mag inputs) send R1. This will begin to look for peak positive and negative values. When you execute R0, it will take whatever the maximums are and scale all data to that range.
When you send a 'P' command, the wiflier will send back all calibration and possibly other system data. As of the time of writing this the following values are returned:
    P6
    #GC\t x \t y \t z (Gyro Zero)
    #AC\t x \t y \t z (Accelerometer Zero)
    #AL\t x \t y \t z (Accelerometer Minimum)
    #AM\t x \t y \t z (Accelerometer Maximum)
    #ML\t x \t y \t z (Magnetometer Minimum)
#MH\t x \t y \t z (Magnetometer Maximum)This writes the current information in the global settings value to the flash at address 3D000h.
Returns if motors are in automatic mode (1/0) and all motor speeds, 0..255 speed.
M? will return `M?[automatic]:[M0 speed]:[M1 speed]:[M2 speed]:[M3 speed]\r\n"
Selecting this function will move the move the motors into automatic mode, allowing a control algorithm to take them over.
(Not currently implemented)
Disable automatic control of motors, they will now respond to the M(number) commands. Optionally, can take up to 4 arguments for the new motor set values.
If you want to control an individual motor speed, you call Mn:speed for example M0:127 would turn motor 0 on to half duty cycle. This only works if the motors are in manual mode.
Erase a specific flash sector, it will erase the flash starting at address n4096 to n4096+4095. This function works with flash memory below and above the 1MB barrier, however it takes a moment to execute and no interrupts may run while it is executing.
Erase a specific block of flash. This operates on a whole 64kB block, and takes about as long as it takes FE to erase just one sector. This function does not work past the 1MB barrier.
This function writes flash. It requires two parameters, the first is the starting addres, the second is the size (in bytes). Writes must be aligned to 4-byte boundaries, sizes must line to 4-byte boundaries.
FW40:8:hello\r\nWill write hello\r\n\0 to memory address 40 (which will break booting, so don't do this), and it will respond with:
FW40This will read back from the flash, starting at the first parameter and with length of the second.
FR40:8\r\nWill read from address 40 8 bytes and if we've executed the terrible terrible example above, respond with:
FR00000040:0008:hello\r\n\0This function takes several parameters, in the style: FMa:b:c:d:e:f:g:h where
This will verify both MD5's before copying. Interrupts will continue to execute until the actual flash-over begins. Once flash-over is complete, the device will automatically reboot.
An example would be:
FM524288:0:33792:d6f04e459bc9aefabd9ed80981e6837f:786432:262144:171008:8435d1904110eacb66771320f63736bcIt should respond with FM In the event of a failure, it will also send a !FM[code].
If you want to connect to an existing wifi network, you can use the W1 command. This will find the specified AP, and join. An example W1 command would be W1:ssid:password. This will connect to network with name 'ssid', and password 'password'. If it fails to connect, it will switch back to softap mode.
This will cause the ESP8266 to make its own network. You can connect to it. Its IP will be 192.168.4.1
This will cause the ESP8266 to give you the mode (1 or 2) SSID, and password of the current network status.
For example WI will return WI1:mynetwork:mypassword.
WARNING: If operating in mode 2, this will cause the ESP to go offline momentarily while it scans!
If you issue the WS command, the ESP8266 will begin a scan. It is unlikely to return any response at all. You can read the returned networks with the WR command.
It may take several seconds for the WS command to complete.
After you scan for networks, you can probe for responses to those networks with the WR command. It returns WRn where n is the number of networks found. It will then provide the networks in a tab delinated data format as follows:
#SSID MAC RSSI Channel EncryptionFor example a response to the WR command could be:
WR3
#quiddles       00:23:15:11:22:41       -44     1       open
#reads          08:18:a0:02:4d:cc       -55     1       wpa2
#rguest 0a:14:c1:f3:02:a0 -68 11 openSECTION NOT WRITTEN
| Qty | Value | Footprint | References |
|---|---|---|---|
| 4 | 10uF | SM0603 | C1, C2, C3, C5 |
| 4 | 20V_500mA | SM0805 | D1, D2, D3, D4 |
| 4 | 7A_20V | SOT23GDS | Q1, Q2, Q3, Q4 |
| 3 | .1u | SM0603 | C6, C8, C12 |
| 3 | 12k | SM0603 | R1, R2, R4 |
| 3 | LED | .1SMTPIN | P13, P14, P15 |
| 3 | NP | SM0603 | L1, L2, R5 |
| 2 | 1k | NETWORK0606 | RN1, RN2 |
| 2 | ANT | .1SMTPIN | P6, P19 |
| 2 | ~ | HOLE-1.9MM | P7, P8 |
| 1 | - | SM0603 | FB1 |
| 1 | .1uF | SM0603 | C7 |
| 1 | 100uF | SM1206 | C10 |
| 1 | 10nF | SM0603 | C9 |
| 1 | 10p | NETWORK0606 | CN1 |
| 1 | 1uF | SM0603 | C4 |
| 1 | 26MHz | XTAL4P | X1 |
| 1 | 3V | .1SMTPIN | P11 |
| 1 | 5.6pF | SM0603 | C11 |
| 1 | ATTINY841-QFN | QFN20 | U7 |
| 1 | B+ | .1SMTPIN | P21 |
| 1 | B- | .1SMTPIN | P24 |
| 1 | BMP280 | BMP280 | U3 |
| 1 | ESP8266EX | QFN32 | U5 |
| 1 | ESP_UART | SMT_1x6 | P32 |
| 1 | GND | .1SMTPIN | P12 |
| 1 | GPIO2 | .1SMTPIN | P1 |
| 1 | LED- | SM0805 | D5 |
| 1 | LSM9DS1 | LGA-24B | U4 |
| 1 | M0 | SMT_1x2 | P2 |
| 1 | M1 | SMT_1x2 | P3 |
| 1 | M2 | SMT_1x2 | P4 |
| 1 | M3 | SMT_1x2 | P5 |
| 1 | MCP1824/3.0 | SOT23-5 | U2 |
| 1 | MCP1824/3.3 | SOT23-5 | U1 |
| 1 | PA0 | .1SMTPIN | P18 |
| 1 | SCL | .1SMTPIN | P10 |
| 1 | SDA | .1SMTPIN | P9 |
| 1 | TOUT | .1SMTPIN | P17 |
| 1 | VAA | .1SMTPIN | P16 |
| 1 | W25Q80DV | SO8E | U6 |


jayis1/hardware-design-lab
Full-cycle hardware device designs — each device in its own subfolder with architecture, schematics, PCB layout, and software stack


ybabs/H745FCS
Quadcopter Flight Controller based on the dual core STM32H745 Microcontroller

stanford-ssi/phoenixAV
This is the avionics repository for Project Phoenix, a staged rocket for the FAR 1030 competition.

NoSleepKid/miniRACER
A highly advanced Raspberry Pi-driven RC Car with highly advanced sensors and custom PCBs.

zeodotdev/zeo-boards
ESP32-S3 development board with onboard BME280 (temperature, humidity, pressure) and LSM6DS3 (6-axis IMU) sensors. This repo contains the designs, ESP-IDF firmware, and a Python plotter for visualization.

It measures 37.8 × 21.5 mm and has 2 copper layers, 1.6 mm thick.
61 parts, built around the ESP8266EX, BMP280, LSM9DS1 and W25Q80DVSIG. The full list of its parts is on this page, with links to each part's symbol and footprint where PCBKit's library has them.
From the cnlohr/wiflier repository on GitHub, at the commit this page was made from: the board is hardware/wiflier_EXP.kicad_pcb. PCBKit opens the board in the browser, with nothing to install.
Its repository states no licence, so its author keeps all rights: ask cnlohr before reusing the design.