4 layers50 × 15.2 mm

 chrkir/hcv9
Local Viessmann E3 CAN-bus to MQTT bridge for Vitocal heat pumps. Features Home Assistant Auto-Discovery, ESP32 firmware, and Open Hardware.
Hcv is an open-source printed circuit board by chrkir, from the chrkir/hcv repository on GitHub. It is a 2-layer board of 49.5 × 40.5 mm with 32 parts on 52 nets, routed with 204 tracks and 28 vias.
It is built around the ESP32-WROOM-32U, TEA 1-0505 and ADUM1201AR, with the TPS562242DRL and PESD1CAN-UX among its other parts. Its parts include 14 capacitors, 6 resistors, 5 ICs, 3 connectors and 2 diodes. It belongs with the home automation and IoT and interfaces and adapters boards and the ESP32 boards of this library.


An isolated, passive CAN-bus adapter to fetch local data from Viessmann E3-generation heat pumps (e.g., Vitocal 250-A, 252-A) and stream it via Wi-Fi to MQTT with native Home Assistant Auto-Discovery.
This project supports both the E3 Generation (e.g., Vitocal 250-A, 252-A) and the V200/WO1C CAN Protocol (e.g., Vitocal 200-S, 200-A, HCV) via dedicated software builds.
| Feature / Setting | Vitocal 250 (E3 Series) | Vitocal 200 (HCV / WO1C Series) |
|---|---|---|
| Firmware Target | Vitocal-250 Build | Vitocal-200 Build |
| DID Profile File | vcalobj.did | vcalobj200.did |
| DID Format | Decimal (e.g., 881, 548) | Hexadecimal (e.g., 0x0371, 0x0100) |
| Log File | canLog250.txt | canLog200.txt |
| Bus Protocol | E3 CAN Specification | WO1C CAN Variant |
vcalobj200.did) for Vitocal 200When using the Vitocal 200 Firmware, the DID profile file must be uploaded as vcalobj200.did. Addresses correspond strictly to the WO1C / HCV hexadecimal address map:
# ==============================================================================
# embdes Viessmann Vitocal 200 / WO1C Custom DID Profile
# Line comments starting with '#' are fully supported.
# ==============================================================================

# Core Temperatures & Controls (WO1C Hex Format)
{0x0100, OutdoorTemp, Aussentemperatur, 0, 1, FLOAT_TEMP_10},
{0x0371, OperatingMode, Betriebsart, 0, 1, INTEGER},
{0x0401, MixerPumpState, StatusMischerPumpe, 0, 1, ON_OFF},This project follows a hybrid Open Hardware / Commercial Software model to support the community while funding the extensive reverse-engineering work behind the Viessmann CAN protocols.
All hardware files are open-source. You can find the schematics, PCB layout files (KiCAD/EasyEDA), Bill of Materials (BOM), and a 3D-printable enclosure STL file in the /hardware folder. Feel free to DIY and order your own boards.
If you do not want to solder SMD components or lack the equipment, you can buy a fully assembled and tested hardware unit inside its enclosure directly from me for **approx. €35 + MwSt ** (plus shipping from Germany).
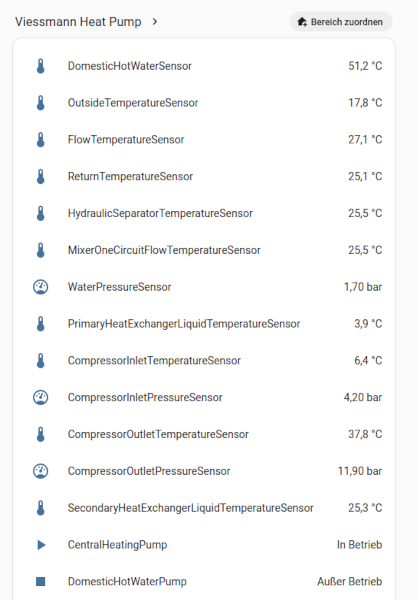
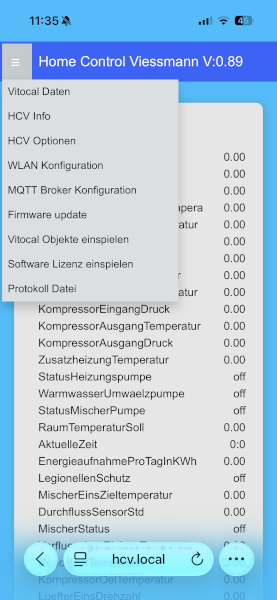
Connect the adapter to the INTERNAL CAN-bus of your Viessmann heat pump (typically labeled as "Plug 72" / Stecker 72 on the main terminal block).
http://192.168.1.1 in your browser, enter your local Wi-Fi and MQTT broker credentials.To unlock all sensors and Home Assistant Auto-Discovery:
info@embdes.com with your Chip ID.license.txt file.L/h).kWh with total_increasing state class).running and problem device classes).By default, the adapter processes all available data points. To keep your MQTT broker clean and reduce network traffic, you can now upload a custom selection profile via a vcalobj.did file through the web interface.
Only the DIDs specified in this file will be active on the CAN bus, transmitted via MQTT, and displayed in the local web app.
vcalobj.did).vcalobj.did)The file must be uploaded as a plain text or CSV-like format using the following structure:
{ID, Description_Original, Description_Custom, Byte_Position, Display_Flag, DID_TYPE}
Here is a verified example for a minimal setup (Core temperatures, flowrate, and energy counters).
Note: New releases may expand the configuration; the file itself is always the source of truth.
# ==============================================================================
# embdes Viessmann E3 Custom DID Profile
# Remove or add rows to customize your MQTT payload and local dashboard.
# Line comments starting with '#' are fully supported.
# ==============================================================================

# Core Temperatures
{268, FlowTemperatureSensor, Vorlauftemperatur, 0, 1, FLOAT_TEMP_10},
{269, "ReturnTemperatureSensor", "AußeneinheitRücklauftemperatur", ...},
{271, DomesticHotWaterSensor, WarmwasserTemperatur, 0, 1, FLOAT_TEMP_10},
{274, OutdoorTemperatureSensor, Aussentemperatur, 0, 1, FLOAT_TEMP_10},

# Flowrate & Hydraulics
{1043, VolumetricFlowrateSensor, DurchflussSensorStd, 0, 1, FLOAT_LH},

# Energy Dashboard
{548, EnergyConsumptionPerDay, EnergieaufnahmeProTagInKWh, 0, 1, P_KWH},

# Binary States (On/Off)
{401, MixerPumpStatus, StatusMischerPumpe, 0, 1, ON_OFF},To avoid parsing errors on the microcontroller, ensure your vcalobj.did strictly adheres to these rules:
1, instead of 1 ,).% within the custom description strings. Use clean alphanumeric names (e.g., LuefterEinsDrehzahl instead of LuefterEinsDrehzahl%).DID_TYPE tokens are:
FLOAT_TEMP_10, FLOAT_PRES_10, FLOAT_PRES_100ON_OFF, INT_TIME, INT_PERC, P_KWH, P_WATTFLOAT_LH, INTEGERvcalobj.did file using a standard text editor (like VS Code or Notepad++).vcalobj.did file, and hit upload.The embdes adapter can be integrated into evcc as a passive heat pump power meter. Since the adapter operates strictly in read-only mode, it is 100% safe and will not interfere with your Viessmann warranty.
To display your heat pump's consumption in evcc, add the following configuration to your evcc.yaml:
meters:
  - name: viessmann_heatpump
    type: custom
    power:
      source: mqtt
      topic: viessmann/wp/state
      jq: .EnergieaufnahmeProTagInKWh oder EnergyConsumptionCentralHeating # Fetches the daily energy counter from the JSON payload
Note: The adapter acts as a pure data provider (Push-to-MQTT). No active HTTP polling or writing to the CAN-bus is required or supported.
Starting with v1.14.0, the HCV Web Interface allows you to adjust parameters directly on the Vitocal 250 heating unit without needing external automation scripts or manual MQTT commands.
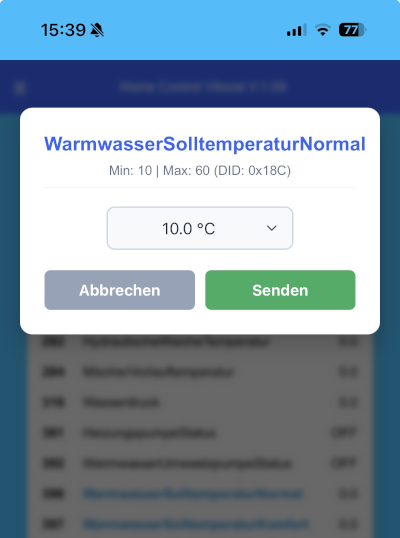
Min: 10 | Max: 60 for WarmwasserSolltemperaturNormal) defined by vcalobj.did to prevent invalid inputs.DID: 0x18C).This release introduces a streamlined, connector-driven DID management architecture, transparent Vitocharge VX3 integration, and solidifies the Early-Boot Ethernet Rescue Mode for reliable recovery. What’s New in v1.41
Smart Connector-Driven DID Assignment Connector Selection: Added a dedicated CAN Connector dropdown (Stecker 72 vs. Stecker 91) in the Web UI (/options).
Stecker 72 (Internal Refrigerant Circuit CAN): Tailored for local heat pump sensors & circuit modules.
Stecker 91 (System CAN Bus): Used for system-wide metrics and external device integration.
Dynamic UI Form Adaptation: Selecting Stecker 91 automatically hides module-specific checkboxes (Heizkreis 1–3, DHW, Buffer) in the frontend to prevent invalid or conflicting configuration options.
Transparent Vitocharge VX3 / PV Integration
Early-Boot Ethernet Rescue Mode (Hot-Plug Recovery)
Deterministic Network Modes: Strict separation between Ethernet (netMode = 0) and Wi-Fi (netMode = 1). No unexpected fallback switching.
Bootloop & Freeze Prevention: If a corrupted or oversized custom .did file prevents the device from starting, trigger the rescue mode via hot-plug:
Unplug the Ethernet cable.

Power-cycle the HCV module.

Re-plug the Ethernet cable within 10 seconds of cold boot.
Safe Recovery Environment: The device enters Rescue Mode (http://hcv.local and Telnet on Port 23). Custom user DID files (/uobjects.dat) are completely bypassed, allowing web/FTP/Telnet access to delete or repair damaged files.
Comprehensive stability update focusing on Wi-Fi connection resilience, LwIP stack crash prevention, and UI setup flexibility.
Active Wi-Fi Watchdog & Auto-Recovery:
ESP.restart()) after 5+ minutes of continuous disconnection (e.g., during night-time router/repeater reboots) to guarantee clean re-association with the AP.Deterministic Network Mode:
LwIP Stack & Crash Prevention (mbox Fix):
startNetwork().WiFi.mode(WIFI_STA) is invoked at the very start to ensure LwIP mailboxes and tasks are fully operational before launching CAN bus tasks, WebServer, or MQTT sockets.Flexible Wi-Fi Pre-Configuration (Web UI):
<input> linked to an HTML5 <datalist>.ESP_RST_PANIC) during W5500 Ethernet initialization with plugged cable.In addition to the Wi-Fi-only version, the HCV Ethernet Edition is now available.
0x693 (Display Unit).vx3obj.did Table File: Fully decoupled VX3 data points from the standard Vitocal table (vcalobj.did).httpMain, corrected write-filter logic (writeFlg) for read-only sensor points, and added new VX3 configuration options in the Web UI.vx3obj.did file, and fixed vcalobj.did mappings (corrected DID 534/535 to 526/528).-- right after HCV boot until valid data is received.can deinit).If you are upgrading from v1.18, updating to v1.19.0 is strongly recommended to resolve the CAN data display issue.
If you want to buy a pre-assembled board or a software license, please contact me:
Disclaimer: This is a third-party community project. This project is not affiliated with, authorized, or endorsed by Viessmann.
Dieses Update passt die DID-Verarbeitung im HCV-Adapter direkt an die individuelle Ausstattung der jeweiligen Vitocal-Anlage an.
Die zentrale DID-Tabelle (vcalobj.did) deckt verschiedene Anlagentypen und Erweiterungen ab. Über das Web-Interface unter Optionen lässt sich die Konfiguration exakt auf die tatsächlich verbauten Komponenten einstellen:
Ablauf: Im Web-Interface werden nur die Haken bei den Modulen gesetzt, die in der eigenen Heizung vorhanden sind. Der Adapter liest daraufhin ausschließlich diese Datenpunkte in den Speicher ein.
user.did)Um eigene Anpassungen bei Updates der Standard-Tabelle nicht zu verlieren, ist die Konfiguration getrennt:
vcalobj.did): Enthält die vom Adapter mitgelieferten Viessmann-DIDs.user.did): Enthält benutzerdefinierte DIDs in der Sektion [USER].Beim Aktualisieren der vcalobj.did bleibt die user.did auf dem Gerät erhalten. Der Adapter lädt beim Start die ausgewählten Standard-Sektionen und hängt die Einträge aus der user.did an.
.did-Datei wird der Inhalt einmalig in eine Binärdatei auf dem Gerät umgewandelt (/vobjects.dat bzw. /uobjects.dat).vcalobj.did im Web-Interface hochladen.user.did unter [USER] ablegen und hochladen:[USER]
{ 9999, "CustomSensor", "Mein_Eigener_Wert", 0, FLOAT_TEMP_10, 0, 0, 0x680, 1, 0, 2 }| Qty | Value | Footprint | References |
|---|---|---|---|
| 6 | 100n | Capacitor_SMD:C_0603_1608Metric | C2, C3, C9, C11, C13, C15 |
| 3 | 10uF | Capacitor_SMD:C_0805_2012Metric | C1, C4, C10 |
| 2 | 22uF | Capacitor_SMD:C_1206_3216Metric_Pad1.33x1.80mm_HandSolder | C7, C8 |
| 1 | 10k | Resistor_SMD:R_0603_1608Metric | R3 |
| 1 | 1uF | Capacitor_SMD:C_0603_1608Metric | C5 |
| 1 | 2.2uH | Inductor_SMD:L_Bourns-SRN4018 | L1 |
| 1 | 30k | Resistor_SMD:R_0603_1608Metric | R6 |
| 1 | 33/16 | Capacitor_Tantalum_SMD:CP_EIA-3528-12_Kemet-T | C12 |
| 1 | 33p | Capacitor_SMD:C_0603_1608Metric | C6 |
| 1 | 470R | Resistor_SMD:R_0603_1608Metric | R8 |
| 1 | 4k7 | Resistor_SMD:R_0603_1608Metric | R1 |
| 1 | 51R | Resistor_SMD:R_0603_1608Metric | R4 |
| 1 | 94.2k | Resistor_SMD:R_0603_1608Metric | R5 |
| 1 | ADuM1201AR | Package_SO:SOIC-8_3.9x4.9mm_P1.27mm | U4 |
| 1 | ATA6560 | Package_SO:SOIC-8_3.9x4.9mm_P1.27mm | U3 |
| 1 | Conn_01x02 | Connector_Phoenix_MC:PhoenixContact_MC_1,5_2-G-3.5_1x02_P3.50mm_Horizontal | J4 |
| 1 | Conn_ARM_SWD_TagConnect_TC2030 | Connector:Tag-Connect_TC2030-IDC-FP_2x03_P1.27mm_Vertical | J2 |
| 1 | ESP32-WROOM-32U | RF_Module:ESP32-WROOM-32 | U1 |
| 1 | LED | LED_THT:LED_D3.0mm | D1 |
| 1 | PESD1CAN-UX | Package_TO_SOT_SMD:SOT-23-3 | D3 |
| 1 | SW_Push | Button_Switch_SMD:SW_SPST_EVPBF | SW1 |
| 1 | TEA1-0505 | Converter_DCDC:Converter_DCDC_TRACO_TEA1-xxxx_THT | U5 |
| 1 | TPS562242 | Package_TO_SOT_SMD:SOT-563 | U2 |
| 1 | USB_C_Receptacle_PowerOnly_6P | Connector_USB:USB_C_Receptacle_GCT_USB4125-xx-x-0190_6P_TopMnt_Horizontal | J3 |
It measures 49.5 × 40.5 mm and has 2 copper layers, 1.6 mm thick.
32 parts, built around the ESP32-WROOM-32U, TEA 1-0505, ADUM1201AR and TPS562242DRL. The full list of its parts is on this page, with links to each part's symbol and footprint where PCBKit's library has them.
From the chrkir/hcv repository on GitHub, at the commit this page was made from: the board is hardware/HCV.kicad_pcb and its schematic hardware/HCV.kicad_sch. PCBKit opens the board in the browser, with nothing to install.
Its repository states no licence, so its author keeps all rights: ask chrkir before reusing the design.


SIGPLAN-AV/apple-peeler
HDMI MITM device aimed at supplying crafted EDID to make Apple sources behave


nichtrami/led_tube
A LED Tube that works wireless and runs on a ESP32 with Arduino Framework

RainbowLabsDE/PowerMeasure_1Ph
this repo is still undergoing major changes and should not yet be rebuilt
