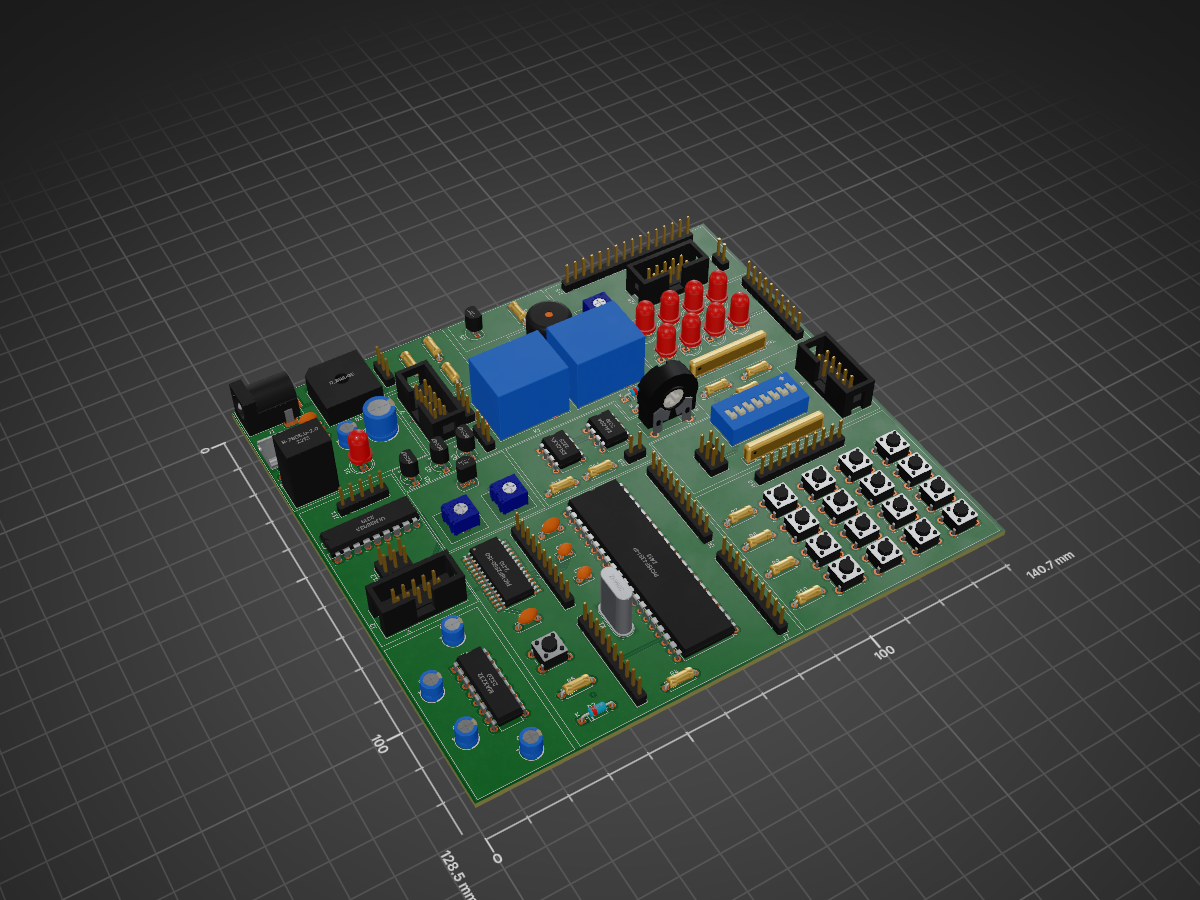
A compact, self-contained development board for the 8051 microcontroller family (AT89x51xxP), designed in KiCad — built to run 8051 firmware on the bench with nothing more than a barrel-jack power supply and a…
PIC DEV BOARD is an open-source printed circuit board by anshukumar146, from the anshukumar146/GitHub repository on GitHub. It is a 4-layer board of 140.7 × 128.5 mm with 102 parts on 193 nets, routed with 893 tracks and 25 vias.
It is built around the PIC18F4331-I/PT, MAX232N and R-78B5.0-2.0, with the DS18B20, 24LC04B/P and ULN2803A among its other parts. Its parts include 21 connectors, 20 switches, 15 resistors, 13 capacitors and 13 diodes. It belongs with the microcontroller boards boards and the PIC boards of this library.
A compact, self-contained development board for the 8051 microcontroller family (AT89x51xxP), designed in KiCad — built to run 8051 firmware on the bench with nothing more than a barrel-jack power supply and a USB-to-serial adapter.
📖 Project Overview
Purpose
This repository contains the full KiCad design (schematic, PCB layout, and fabrication outputs) for a standalone 8051 development board. It's built around the classic AT89x51xxP DIP-40 microcontroller and includes on-board power regulation, a crystal oscillator, reset circuitry, and breakout headers — everything needed to power up and program an 8051 without any external dev kit.
Real-World Applications
A low-cost bring-up board for learning 8051 assembly/C and embedded fundamentals
A reference design for retro/classic MCU projects and hobbyist electronics
A base platform for simple I/O, UART, and I2C peripheral experiments
A teaching aid for university digital-electronics / microprocessor lab courses
Target Users
Students and hobbyists learning embedded systems on the 8051 architecture
Electronics enthusiasts who want a from-scratch, fully open PCB design to fabricate
Instructors needing a simple, reproducible 8051 lab board
📸 Preview
Schematic
(image)
PCB — Top
(image)
PCB — Bottom
(image)
3D View
(image)
✨ Features
✅ AT89x51xxP (8051-family) MCU in a socketed DIP-40 footprint
✅ On-board AMS1117-1.5 linear regulator for a clean 3.3V rail
✅ 11.0592 MHz crystal oscillator — the standard frequency for accurate UART baud rates
✅ Barrel-jack power input with a physical power switch
✅ Reset push-button with pull-up resistor network
✅ Status LED with current-limiting resistor
✅ Breakout headers for 5V, 3V3, GND, UART, and I2C
✅ 2-layer PCB, fully routed with complete Gerber/drill fabrication output
🛠️ Technologies Used
Category
Details
EDA Tool
KiCad 10.0.0
MCU
AT89x51xxP (8051 core, DIP-40)
Regulator
AMS1117-1.5 (SOT-223)
Board
2-layer, 1.6 mm thickness, ~54.6 mm × 52.3 mm
Manufacturing Output
Gerber (RS-274X) + Excellon drill files, ready for fab
Images/ — Schematic, PCB, and 3D renders used in this README
⚙️ How It Works
Power In — DC power enters through the barrel jack (J6), gated by an on-board switch.
Regulation — The AMS1117-1.5 (U2) steps input voltage down to a clean, regulated 3.3V rail for the MCU and peripherals, with bulk/decoupling capacitors (C3, C7, C8) smoothing the supply.
Clocking — An 11.0592 MHz crystal (X1) with its load capacitors (C1, C2) drives the AT89x51xxP's internal oscillator, giving accurate standard UART baud rates (e.g. 9600, 19200, 115200 bps derivatives).
Reset — A push-button (SW1) with pull-up resistors (R2–R5) provides a manual reset path into the MCU's RST pin.
I/O Breakout — Header pins expose 5V, 3V3, and GND rails (J1–J3), plus dedicated UART (J4) and I2C (J5) headers for connecting external modules, a USB-to-serial adapter, or a logic analyzer.
Status Indication — An on-board LED (D1) with current-limiting resistor (R1) gives simple visual feedback (e.g. power or a GPIO-driven heartbeat).
🔍 Bill of Materials (Key Components)
Ref
Part
Value
Footprint
U1
AT89x51xxP
8051-family MCU
DIP-40 (socketed)
U2
AMS1117-1.5
3.3V LDO regulator
SOT-223
X1
Crystal
11.0592 MHz
HC-49/U vertical
C1, C2
Ceramic capacitor
0.022 µF
Load caps for X1
C3, C7
Electrolytic capacitor
10 µF
Regulator input/output
C4, C5, C6
Ceramic capacitor
100 nF
Decoupling
C8
Electrolytic capacitor
100 µF
Bulk supply filtering
R1
Resistor
180 Ω
LED current limit
R2–R5
Resistor
8.2 kΩ
Reset pull-ups
D1
LED
5 mm
Status indicator
SW1
Push-button
6 mm THT
Reset
J1 / J2 / J3
1×3 pin header
5V / 3V3 / GND
Power breakout
J4
1×4 pin header
UART
Serial breakout
J5
1×4 pin header
I2C
I2C breakout
J6
Barrel jack + switch
DC power in
Power input
(Full net-level detail lives in the schematic file under Schematic/.)
💻 Getting the Project Open
1. Clone the repository
bash
git clone https://github.com/anshukumar146/GitHub.git
cd GitHub/PCB_projects/KICAD/8051_Standalone_Dev_Board
2. Install KiCad (version 10 or later recommended)
Option A — Use the pre-generated Gerbers
The files in Gerber/ are ready to upload directly to any PCB fabricator (JLCPCB, PCBWay, OSH Park, etc.):
Zip all .gbr and .drl files together.
Upload the zip to your fab house's Gerber viewer/order page.
Confirm the board outline, layer count (2), and dimensions (~54.6 mm × 52.3 mm, 1.6 mm thickness) match the preview.
Place the order.
Option B — Regenerate Gerbers from source
Open the .kicad_pcb file from PCB/ in KiCad's PCB Editor.
Run File → Fabrication Outputs → Gerbers (and Drill Files) to regenerate output.
Review the plot in File → Fabrication Outputs → Gerber Viewer before ordering.
🧑💻 Usage (After Assembly)
Solder/populate components per the BOM above (MCU can be socketed for easy replacement).
Connect a regulated DC supply to the barrel jack (J6) and flip the power switch.
Program the AT89x51xxP with your 8051 firmware using your preferred external programmer connected via the socket.
Use the UART header (J4) with a USB-to-serial adapter to communicate with the board at 9600/19200/115200 baud (enabled by the 11.0592 MHz crystal).
Use the I2C header (J5) to attach sensors, EEPROMs, or other I2C peripherals.
Press SW1 at any time to reset the MCU.
📊 Design Summary
Layers: 2 (F.Cu / B.Cu)
Board size: ≈ 54.6 mm × 52.3 mm
Thickness: 1.6 mm
Finish: None (as generated — set per fab house preference at order time)
Min track/clearance: 0.2 mm (per design rules in the Gerber job file)
🧭 Design Motivation
Most 8051 "getting started" boards are either bundled with proprietary programmers or buried inside larger, more expensive kits. This board strips things down to a minimal, breadboard-friendly reference design: drop in the MCU, apply power, and start experimenting with the 8051 instruction set, timers, UART, and I2C — with a fully open schematic and PCB layout anyone can inspect, modify, or fabricate themselves.
🚀 Future Improvements
Add an on-board USB-to-serial chip so no external adapter is needed
Add an ICSP/ISP-style header for in-circuit programming
Add silkscreen pin labels for all breakout headers
Consider a 4-layer variant for tighter routing and better ground return paths
Add mounting holes for enclosure compatibility
Add a schematic-level ERC/DRC report to the repo for reviewers
🎓 Learning Outcomes
By studying and building this project, you will learn:
How to design a minimal, standalone microcontroller board from schematic to fabrication
Power regulation basics: selecting and decoupling an LDO regulator
Crystal oscillator circuit design, including load capacitor selection
Reset circuit design with pull-up resistor networks
Breaking out UART and I2C for external peripheral communication
Reading and generating Gerber/Excellon fabrication files from KiCad
PCB layout fundamentals on a 2-layer board (routing, layer stack, board outline)
🧩 Skills Demonstrated
Schematic Capture & Electrical Design (KiCad)
PCB Layout & Routing
Power Supply / LDO Regulator Design
Crystal Oscillator Circuit Design
Fabrication Output Generation (Gerber/Excellon)
Embedded Hardware Documentation
👤 Author
Name: Anshu Kumar
GitHub:@anshukumar146LinkedIn:(add your LinkedIn URL here)Email:(add your email here)
📜 License
This project is licensed under the MIT License.
text
MIT License

Copyright (c) 2026 Anshu Kumar

Permission is hereby granted, free of charge, to any person obtaining a copy
of this software and associated documentation files (the "Software"), to deal
in the Software without restriction, including without limitation the rights
to use, copy, modify, merge, publish, distribute, sublicense, and/or sell
copies of the Software, and to permit persons to whom the Software is
furnished to do so, subject to the following conditions:

The above copyright notice and this permission notice shall be included in all
copies or substantial portions of the Software.

THE SOFTWARE IS PROVIDED "AS IS", WITHOUT WARRANTY OF ANY KIND, EXPRESS OR
IMPLIED, INCLUDING BUT NOT LIMITED TO THE WARRANTIES OF MERCHANTABILITY,
FITNESS FOR A PARTICULAR PURPOSE AND NONINFRINGEMENT. IN NO EVENT SHALL THE
AUTHORS OR COPYRIGHT HOLDERS BE LIABLE FOR ANY CLAIM, DAMAGES OR OTHER
LIABILITY, WHETHER IN AN ACTION OF CONTRACT, TORT OR OTHERWISE, ARISING FROM,
OUT OF OR IN CONNECTION WITH THE SOFTWARE OR THE USE OR OTHER DEALINGS IN THE
SOFTWARE.
🙏 Acknowledgements
Microchip's AT89x51xxP datasheet for MCU electrical and pinout reference
The KiCad project and community libraries for schematic symbols and footprints
The open-source hardware community for encouraging fully documented, reproducible PCB designs
⭐ If you found this repository helpful, consider giving it a star!
It measures 140.7 × 128.5 mm and has 4 copper layers, 1.6 mm thick.
What parts does the PIC DEV BOARD use?
102 parts, built around the PIC18F4331-I/PT, MAX232N, R-78B5.0-2.0 and DS18B20. The full list of its parts is on this page, with links to each part's symbol and footprint where PCBKit's library has them.
Where can I download the PIC DEV BOARD KiCad files?
From the anshukumar146/GitHub repository on GitHub, at the commit this page was made from: the board is PCB_projects/KICAD/PIC_DEV_BOARD/KiCad/PIC_DEV_BOARD.kicad_pcb and its schematic PCB_projects/KICAD/8051-Standalone-Dev-Board/8051_Standalone_Dev_Board.kicad_sch. PCBKit opens the board in the browser, with nothing to install.
Can I use the PIC DEV BOARD design in my own project?
Its repository states no licence, so its author keeps all rights: ask anshukumar146 before reusing the design.
A compact, self-contained development board for the 8051 microcontroller family (AT89x51xxP), designed in KiCad — built to run 8051 firmware on the bench with nothing more than a barrel-jack power supply and a…
A compact, self-contained development board for the 8051 microcontroller family (AT89x51xxP), designed in KiCad — built to run 8051 firmware on the bench with nothing more than a barrel-jack power supply and a…
A compact, self-contained development board for the 8051 microcontroller family (AT89x51xxP), designed in KiCad — built to run 8051 firmware on the bench with nothing more than a barrel-jack power supply and a…