
2 layers83.3 × 65.3 mm
SimonShield
github-linguist/linguist
Language Savant. If your repository's language is being reported incorrectly, send us a pull request!
46 parts14kMIT
 SukkoPera/OpenC64MegaDrivePadAdapter64
Safely connect your Sega Mega Drive/Genesis controllers to your Commodore 64 or Amiga
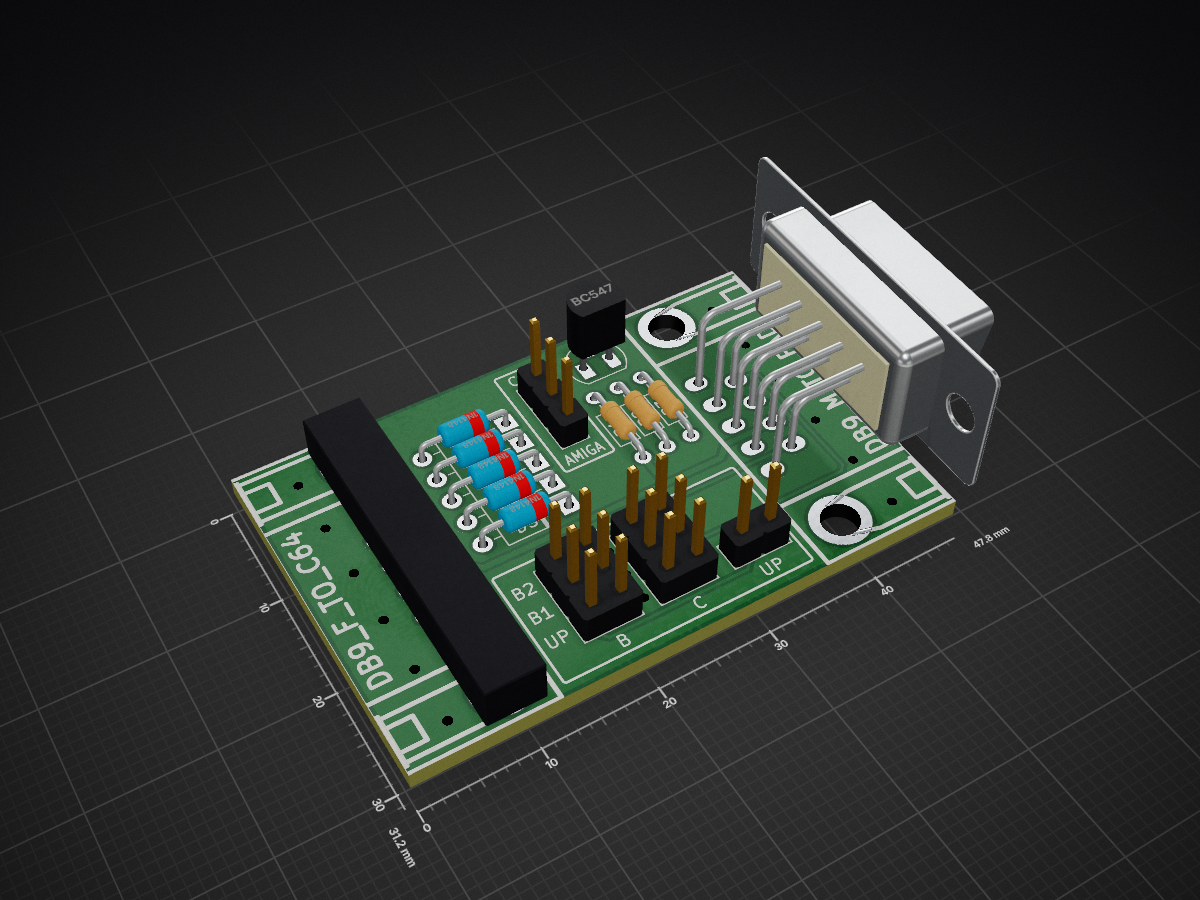
OpenC64MegaDrivePadAdapter is an open-source printed circuit board by SukkoPera, from the SukkoPera/OpenC64MegaDrivePadAdapter repository on GitHub. It is a 2-layer board of 47.8 × 31.2 mm with 16 parts on 19 nets, routed with 172 tracks and 15 vias.
It is built around the BC547. Its parts include 7 connectors, 5 diodes, 3 resistors and 1 transistor. It belongs with the retro computing and games and keyboards and input boards of this library.
OpenC64MegaDrivePadAdapter is an Open Hardware adapter that allows the safe connection of a Sega Mega Drive (known as Genesis in the US) controller to a Commodore 64 or Amiga computer.

Despite being compatible at the physical level (i.e.: they use the same DB-9 connectors), Sega Mega Drive controllers are slightly different from the Atari-style joysticks (which the C64 uses) at the electrical level. These differences usually manifest themselves in the fact that certain keyboard keys are not responsive when a Sega Mega Drive pad is connected to a C64 computer, but the CIA chip may also get harmed as a result.
Since I think that the Sega Mega Drive controller is one of the best joypads which ever saw the light, I developed this simple adapter board, which is supposed to sit inbetween the computer and the controller. You should be able to keep it plugged into the computer and then connect the controller to it, but you can also use a joystick extension cord (widely available), if that makes it easier.
Button B will work as the normal fire button, but this adapter also allows using Button C as the second fire button, for those games that support two buttons.
While this all works out of the box on Amiga computers, this adapter also allows to customize the button mapping to a certain degree: for instance, replacing UP with C might make some games more comfortable to play. This might be useful on the Amiga as well, so the adapter also supports an Amiga mode.
The board is based on the circuit that was originally published in issue #5 of Commodore world back in 1994, with a few improvements that will allow an easier gameplay with certain titles.
First of all, be sure to move the C64/Amiga jumper to the proper position, before connecting the adapter.
Then you have three more configuration jumpers that you can use to customize how the computer interprets button presses on the controller.
In fact, since most joysticks back in the day only had a single fire button, it was usually used for firing, whatever that meant. Jumping was usually done with the UP direction of the joystick, which is quite annoying on a joypad.
This is why OpenC64MegaDrivePadAdapter allows you to repurpose the B or C key to jumping, leaving the other button for firing, all at your choice.
It also allows to use C as the second fire button, which is only supported by a few titles. You can even swap B and C, if you prefer.
Configuration is done through the jumpers on the board, and should be pretty self-explanatory. There are only two rules which you will have to remember:
If you don't follow the rules, you will probably cause permanent damage to your computer and/or controller, so please be careful, you have been warned.
The default configuration maps B to button 1, C to button 2 and UP to UP. If you play Giana Sisters, you will probably want to use the C button for jumping, so just do the following:
OpenC64MegaDrivePadAdapter should work with all Commodore 64 and Amiga computers. On the Amiga 600 it might be necessary to use an extension cable, since the adapter will not physically fit into Port 2. An extension cable might also help on some Commodore 64's which have loose ports that will not hold the adapter in place.
The OpenC64MegaDrivePadAdapter documentation, including the design itself, is copyright © SukkoPera 2017-2019.
OpenC64MegaDrivePadAdapter is Open Hardware licensed under the CERN OHL v. 1.2.
You may redistribute and modify this documentation under the terms of the CERN OHL v.1.2. This documentation is distributed as is and WITHOUT ANY EXPRESS OR IMPLIED WARRANTIES whatsoever with respect to its functionality, operability or use, including, without limitation, any implied warranties OF MERCHANTABILITY, SATISFACTORY QUALITY, FITNESS FOR A PARTICULAR PURPOSE or infringement. We expressly disclaim any liability whatsoever for any direct, indirect, consequential, incidental or special damages, including, without limitation, lost revenues, lost profits, losses resulting from business interruption or loss of data, regardless of the form of action or legal theory under which the liability may be asserted, even if advised of the possibility or likelihood of such damages.
A copy of the full license is included in file LICENSE.pdf, please refer to it for applicable conditions. In order to properly deal with its terms, please see file LICENSE_HOWTO.pdf.
The contact points for information about manufactured Products (see section 4.2) are listed in file PRODUCT.md.
Any modifications made by Licensees (see section 3.4.b) shall be recorded in file CHANGES.md.
The Documentation Location of the original project is https://github.com/SukkoPera/OpenC64MegaDrivePadAdapter/.
Since the project is open you are free to get the PCBs made by your preferred manufacturer, however in case you want to support the development, you can order them from PCBWay through this link:

You get cheap, professionally-made and good quality PCBs, I get some credit that will help with this and other projects. You won't even have to worry about the various PCB options, it's all pre-configured for you!
Also, if you still have to register to that site, you can use this link to get some bonus initial credit (and yield me some more).
Again, if you want to use another manufacturer, feel free to, don't feel obligated :).
If you need help or have questions, you can join the official Telegram group.
| Qty | Value | Footprint | References |
|---|---|---|---|
| 5 | 1N4148 | Diode_THT:D_DO-35_SOD27_P7.62mm_Horizontal | D1, D2, D3, D4, D5 |
| 2 | 2.2k | Resistor_THT:R_Axial_DIN0204_L3.6mm_D1.6mm_P7.62mm_Horizontal | R1, R3 |
| 2 | CONN_02X03 | OpenC64MegaDrivePadAdapter:PinHeader_2x03_P2.54mm_Vertical | J2, J3 |
| 1 | 100k | Resistor_THT:R_Axial_DIN0204_L3.6mm_D1.6mm_P7.62mm_Horizontal | R2 |
| 1 | BC547 | Package_TO_SOT_THT:TO-92_HandSolder | Q1 |
| 1 | CONN_01X02 | OpenC64MegaDrivePadAdapter:PinHeader_1x02_P2.54mm_Vertical | J1 |
| 1 | CONN_C64_AMI | OpenC64MegaDrivePadAdapter:PinHeader_1x03_P2.54mm_Vertical | J4 |
| 1 | DB9_F_TO_C64 | w_conn_d-sub:DB_9F | J10 |
| 1 | DB9_M_TO_PAD | w_conn_d-sub:DB_9M | J20 |
| 1 | OSHW_LOGO | Symbol:OSHW-Symbol_6.7x6mm_Copper | J99 |
github-linguist/linguist
Language Savant. If your repository's language is being reported incorrectly, send us a pull request!

dotnet/iot
This repo includes .NET Core implementations for various IoT boards, chips, displays and PCBs.

peterheinrich/InternetOverSpaghetti
Transmitting IP packages over a pair of spaghetti thus demonstrating how media independent IP really is.

tebl/RC6502-Apple-1-Replica
An expandable SBC-version of the Apple 1 computer, easy to get started with and lot of cool stuff that can be added to it!


ZeroPhone/ZeroPhone-PCBs
PCB files for ZeroPhone - for gerbers and schematics, go to "Releases" tab!

It measures 47.8 × 31.2 mm and has 2 copper layers, 1.6 mm thick.
16 parts, built around the BC547. The full list of its parts is on this page, with links to each part's symbol and footprint where PCBKit's library has them.
From the SukkoPera/OpenC64MegaDrivePadAdapter repository on GitHub, at the commit this page was made from: the board is OpenC64MegaDrivePadAdapter.kicad_pcb. PCBKit opens the board in the browser, with nothing to install.
Its repository states no licence, so its author keeps all rights: ask SukkoPera before reusing the design.