2 layers30.8 × 48.5 mm
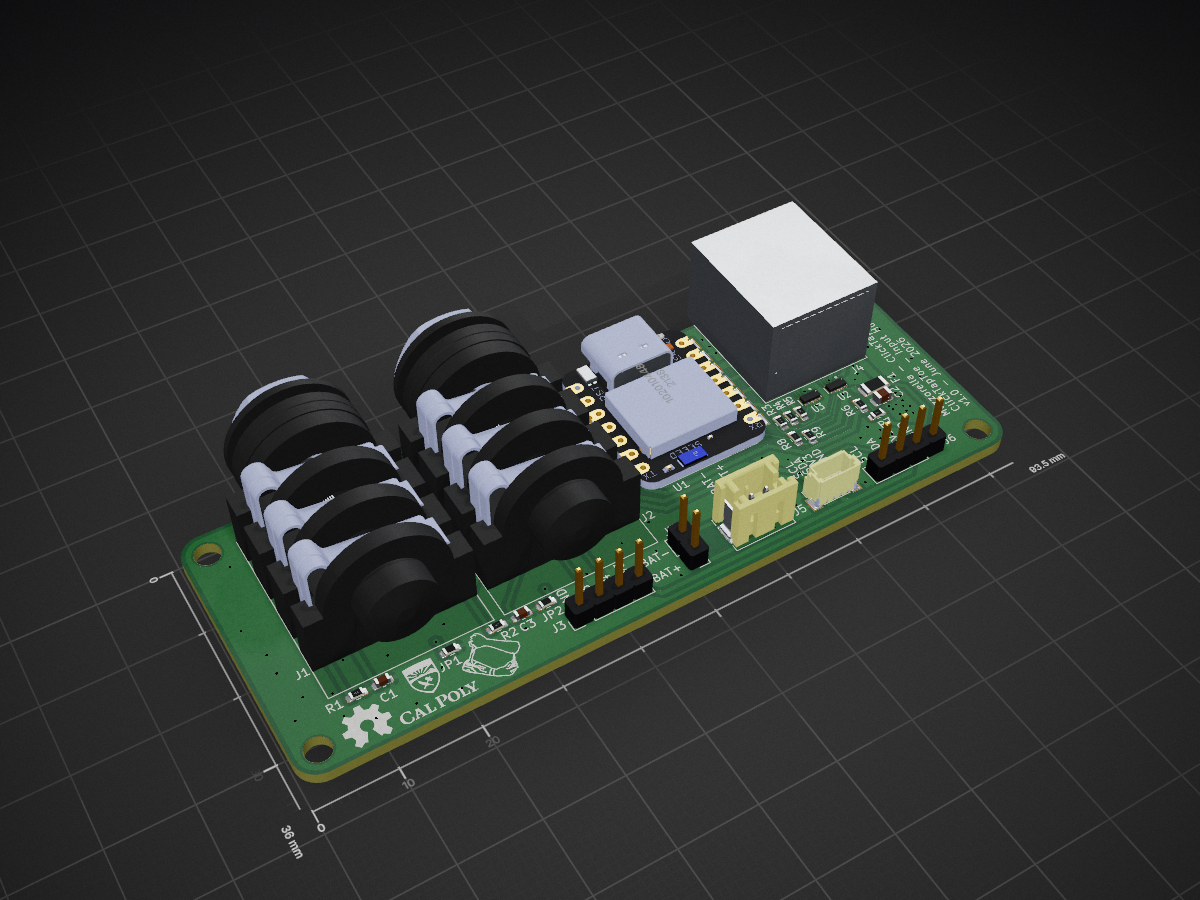
 Mazzorella/ClickTapToe
Accessible mouse implemented with ZMK.
Input hub is an open-source printed circuit board by Mazzorella, from the Mazzorella/ClickTapToe repository on GitHub. It is a 2-layer board of 93.5 × 36 mm with 35 parts on 41 nets, routed with 256 tracks and 129 vias.
It is built around the TPD4E05U06DQAR, PJ-307 and 1206L012WR, with the 54602-908LF, B2B-PH-SM4-TB and BM04B-SRSS-TB(LF)(SN)(P) among its other parts. Its parts include 11 connectors, 9 resistors, 3 capacitors, 3 ICs and 1 fuse.


ClickTapToe is a custom foot-operated mouse for people who need to reduce repetitive hand and arm movement. The goal is to move common mouse actions away from the hands by using foot pedals for clicking, a large foot-driven scroll wheel, and a separate mouse pointer module.
This repository contains the firmware, hardware notes, and project documentation for ClickTapToe. The current firmware target is a Seeed Studio XIAO nRF52840 / XIAO BLE running as a USB HID mouse with ZMK. Bluetooth is disabled for the ClickTapToe firmware build.
The current firmware supports USB mouse clicks from external pedals, USB vertical scrolling from the input hub scroll wheel, and pointer movement from the mouse pointer module:
D2 and D3 remain spare/test inputs and are not exposed as production pedal jacks on the current input hub PCBPMW3610 pointing support is active for the current firmware target.
ClickTapToe is built from two custom electronics modules plus external pedals:
See HARDWARE.md for the current pin map and hardware notes. For a public-facing hardware overview with embedded board previews, open the ClickTapToe Hardware Viewer.
| Board | Source | KiCanvas preview |
|---|---|---|
| Input hub | hardware/input-hub/ | Open preview |
| Mouse pointer | hardware/mouse-pointer/ | Open preview |
.github/workflows/build.yml runs the upstream ZMK user-config build workflow.build.yaml defines the firmware build matrix.config/west.yml tracks upstream ZMK and imports ZMK's west manifest.zephyr/module.yml declares this repository as the zmk-keyboard-clicktaptoe module and exposes its board, devicetree binding, Kconfig, and driver files.boards/shields/clicktaptoe/ contains the ClickTapToe shield definition, overlay, metadata, and default keymap.Makefile wraps the local west build command for Docker/devcontainer use.hardware/ contains the input hub and mouse pointer KiCad source files.docs/ is reserved for assembly, usage, and release documentation.The active firmware target is:
board: xiao_ble//zmk
shield: clicktaptoe
artifact-name: clicktaptoe_xiao_usb_zmkclicktaptoe_xiao_usb_zmk.uf2 file onto the mounted drive.Use a safe desktop target for click testing, such as an empty Finder window or browser page.
D0 to GND; the host should receive a left click.D1 to GND; the host should receive a right click.D2 and D3 only as spare/test GPIOs if they are wired for bring-up.If macOS does not immediately recognize the updated HID device, unplug and reconnect the XIAO BLE.
If an old Bluetooth name appears after flashing, remove the cached Bluetooth entry from the host. This firmware build disables ZMK BLE.
If the PMW3610 does not move the pointer after flashing, power-cycle the XIAO once. The input hub physically routes PMW3610 nRESET on XIAO D6 / RJ45 pin 8, but the current firmware still relies on SPI/software reset and does not drive that reset line yet.
This repository is both a ZMK config repository and a ZMK module. Local builds should make the repository visible to ZMK as the config path and as an extra module so the custom clicktaptoe shield can be discovered.
The preferred local workflow is to build from a ZMK Docker/devcontainer environment and use this repository's Makefile.
One common local layout is to keep this repository next to a ZMK firmware checkout:
projects/
  zmk/
  zmk-pmw3610-driver/
  ClickTapToe/
Open the ZMK firmware checkout in VS Code:
code /path/to/projects/zmkThen use Dev Containers: Reopen in Container. If using a devcontainer, bind mount this repository into the container and run the build commands from the ClickTapToe repository directory.
On the first devcontainer launch, initialize the Zephyr workspace from the ZMK checkout:
west init -l app/
west update
Restart the devcontainer after west update completes.
Clone the PMW3610 driver module where the Makefile can find it. In the default devcontainer layout:
git clone https://github.com/badjeff/zmk-pmw3610-driver /workspaces/zmk-pmw3610-driverAfter that, run the build commands from this repository:
make buildTo build and copy the generated UF2 into this repository's firmware/ directory:
make uf2The copied firmware path is:
firmware/clicktaptoe_xiao_usb_zmk.uf2Build outputs are written under this repository's ignored build/ directory,
not under ZMK's app/ tree.
By default, the Makefile expects ZMK's app directory to be available at ../zmk/app, which matches the sibling directory layout shown above. Override ZMK_APP if your checkout path differs:
make uf2 ZMK_APP=/path/to/zmk/appThe wrapped west command has this shape:
west build -d "/path/to/this-repo/build/clicktaptoe" -b "xiao_ble//zmk" -- \
  -DSHIELD=clicktaptoe \
  -DZMK_CONFIG="/path/to/this-repo/config" \
  -DZMK_EXTRA_MODULES="/path/to/this-repo;/path/to/zmk-pmw3610-driver"
By default, the Makefile expects the PMW3610 driver module at ../zmk-pmw3610-driver. Override PMW3610_MODULE if your checkout path differs:
make uf2 PMW3610_MODULE=/path/to/zmk-pmw3610-driver| Qty | Value | Footprint | References |
|---|---|---|---|
| 4 | MountingHole | MountingHole:MountingHole_3.2mm_M3_ISO14580 | H1, H2, H3, H4 |
| 3 | 10k | Resistor_SMD:R_0603_1608Metric | R7, R8, R9 |
| 3 | 47R | Resistor_SMD:R_0603_1608Metric | R3, R4, R5 |
| 2 | 0R | Resistor_SMD:R_0603_1608Metric | JP1, JP2 |
| 2 | 1u | Capacitor_SMD:C_0603_1608Metric | C1, C3 |
| 2 | 330 | Resistor_SMD:R_0603_1608Metric | R1, R2 |
| 2 | ACJMIH | input_hub:AMPHENOL_ACJMIH | J1, J2 |
| 2 | Conn_01x04 | Connector_PinHeader_2.54mm:PinHeader_1x04_P2.54mm_Vertical | J3, J6 |
| 2 | PJ-307 | input_hub:AUDIO-TH_PJ-307 | J9, J10 |
| 2 | TPD4E05U06DQAR | input_hub:IC_TPD4E05U06DQAR | U2, U3 |
| 1 | 100 | Resistor_SMD:R_0603_1608Metric | R6 |
| 1 | 102010448 | input_hub:MODULE_102010448 | U1 |
| 1 | 10uF | Capacitor_SMD:C_0805_2012Metric | C2 |
| 1 | 1206L012WR | Fuse:Fuse_1206_3216Metric | F1 |
| 1 | 54602-908LF | input_hub:RJ45_Amphenol_54602-x08_Horizontal | J4 |
| 1 | B2B-PH-SM4-TB | input_hub:JST_PH_B2B-PH-SM4-TB_1x02-1MP_P2.00mm_Vertical | J11 |
| 1 | BM04B-SRSS-TB_LF__SN_ | input_hub:JST_BM04B-SRSS-TB_LF__SN_ | J5 |
| 1 | Conn_01x02 | Connector_PinHeader_2.54mm:PinHeader_1x02_P2.54mm_Vertical | J7 |
| 1 | EMPOWER_Hand_Line_Silkscreen_7mm_MildSmooth | input_hub:EMPOWER_Hand_Line_Silkscreen_7mm_MildSmooth | G*** |
| 1 | EMPOWER_Hand_Line_Silkscreen_7mm_MildSmooth_Mirrored | input_hub:EMPOWER_Hand_Line_Silkscreen_7mm_MildSmooth_Mirrored | G*** |
| 1 | XIAO_BAT_SOLDER_ACCESS | input_hub:XIAO_BAT_SOLDER_ACCESS | J8 |

loozhengyuan/MitsubishiSC
Smart controller for Mitsubishi Electric HVAC systems.


svirant/DonutDongle
Arduino Nano based hub that connects your digital and analog console switching setup with the RetroTink 4K and/or RetroTink 5x/OSSC for Auto Profile switching

cristianoag/wozblaster
Repository to host source files for the Wozblaster Reloaded

cellularmitosis/abx-tayda
A relay board for performing blind A/B testing of two audio sources.


tebl/BulkyMIDI-32
A HW build of the MT32-PI project, allowing you to emulate a Roland MT-32 using a Raspberry Pi. Includes enough additional modules to build a MIDI-mountain as well as adapters for connecting to most things retro.
It measures 93.5 × 36 mm and has 2 copper layers, 1.6 mm thick.
35 parts, built around the TPD4E05U06DQAR, PJ-307, 1206L012WR and 54602-908LF. The full list of its parts is on this page, with links to each part's symbol and footprint where PCBKit's library has them.
From the Mazzorella/ClickTapToe repository on GitHub, at the commit this page was made from: the board is hardware/input-hub/kicad/input_hub.kicad_pcb and its schematic hardware/input-hub/kicad/input_hub.kicad_sch. PCBKit opens the board in the browser, with nothing to install.
Its repository states no licence, so its author keeps all rights: ask Mazzorella before reusing the design.