4 layers29 × 50.3 mm
Lg hvac esp32
JanM321/esphome-lg-controller
Wired controller for LG HVAC units using ESPHome and ESP32
15 parts2920BSD

 JanM321/esphome-lg-controller292
Wired controller for LG HVAC units using ESPHome and ESP32
Lg hvac esp32 is an open-source printed circuit board by JanM321, from the JanM321/esphome-lg-controller repository on GitHub, published under the 0BSD licence. It is a 4-layer board of 22.9 × 50.8 mm with 20 parts on 11 nets, routed with 84 tracks and 17 vias.
It is built around the TJA1027T/20, TPS82130SIL and 1N4148WS. Its parts include 5 resistors, 4 capacitors, 3 connectors, 2 ICs and 2 diodes. It belongs with the home automation and IoT boards and the ESP32 boards of this library.


Wired controller for LG Air Conditioners using an ESP32 microcontroller and ESPHome. It can be used to control an indoor unit from Home Assistant.
This has some advantages compared to the LG ThinQ integration:
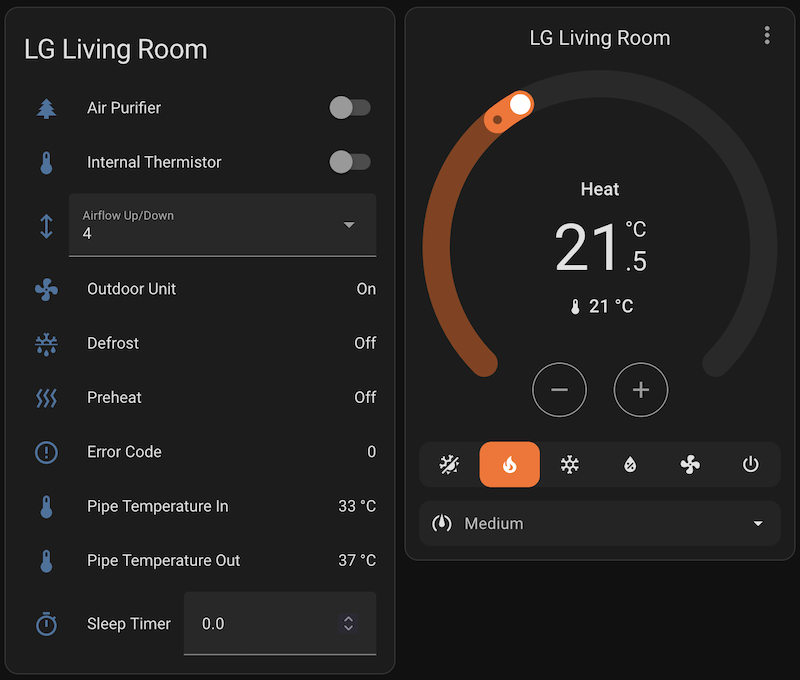
If your indoor unit supports the LG PREMTB100 and/or LG PREMTA200 controller, it will very likely be compatible.
The wiki has a list of LG AC units that have been tested with this controller.
It's possible to connect multiple controllers to a single indoor unit, but one of them must be set as 'master' and the others as 'slave'. Since February 2024, this ESPHome controller has experimental support for this. I'm not using this myself, so there might be some issues with this (please report them).
The room temperature sensor is ignored for 'slave' controllers, so if you want to use this controller with an LG controller and use a Home Assistant temperature sensor, the LG controller must be set as 'slave'.
There seem to be two different protocols that LG AC units and wall controllers use to communicate:
The controller hardware is identical because both use a very slow serial connection (104 bps) over a three-wire cable (Red = 12V, Yellow = Signal, Black = GND). In fact, some LG controllers support both protocols: my LG PREMTB001 controller first tries the 13-byte protocol and if it doesn't receive a response it will switch to the 6-byte protocol. My LG PREMTB100 (newer controller) only supports the 13-byte protocol as far as I can tell.
Wired controllers must be connected to the CN-REMO socket on the indoor unit's PCB (green 3 pin JST-XH connector). Fortunately my wall units came with a short extension cable already plugged into that port so I only had to open up the bottom part of the unit to connect my controller.
Wired controllers using the new protocol only send and receive settings and current temperature. The HVAC unit itself decides when to start/stop active cooling/heating etc based on this. It's possible to use a Home Assistant template sensor as temperature sensor to influence this behavior (see below).
See protocol.md for information about the protocol based on reverse engineering the PREMTB001 and PREMTB100 controllers.
There are three different PCB designs. The "hardware-tiny" variant is most popular at this point. The "hardware-FeatherS3" PCB is a more recent addition.
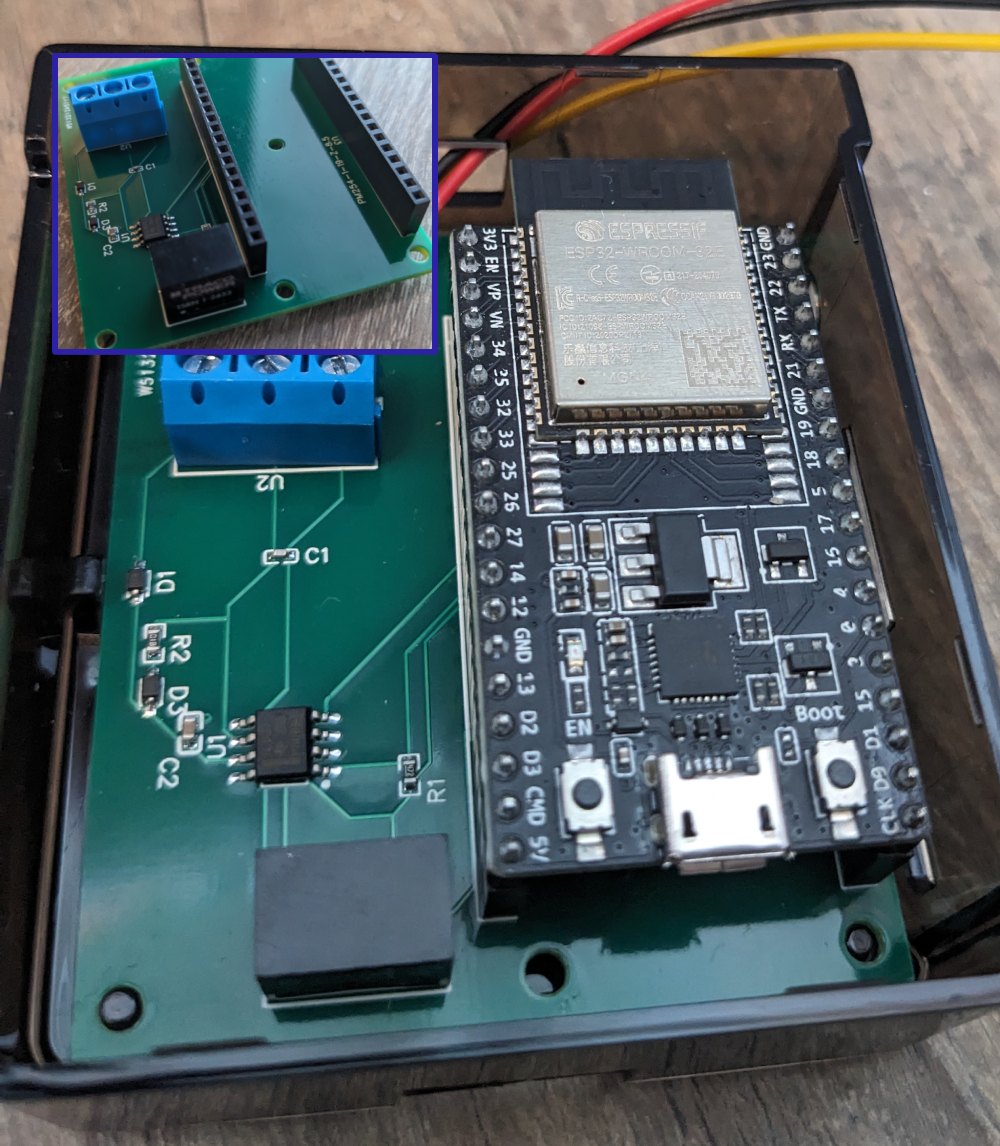
You need at least the following parts for each indoor unit:
The hardware/ PCB I ordered from PCBWay.
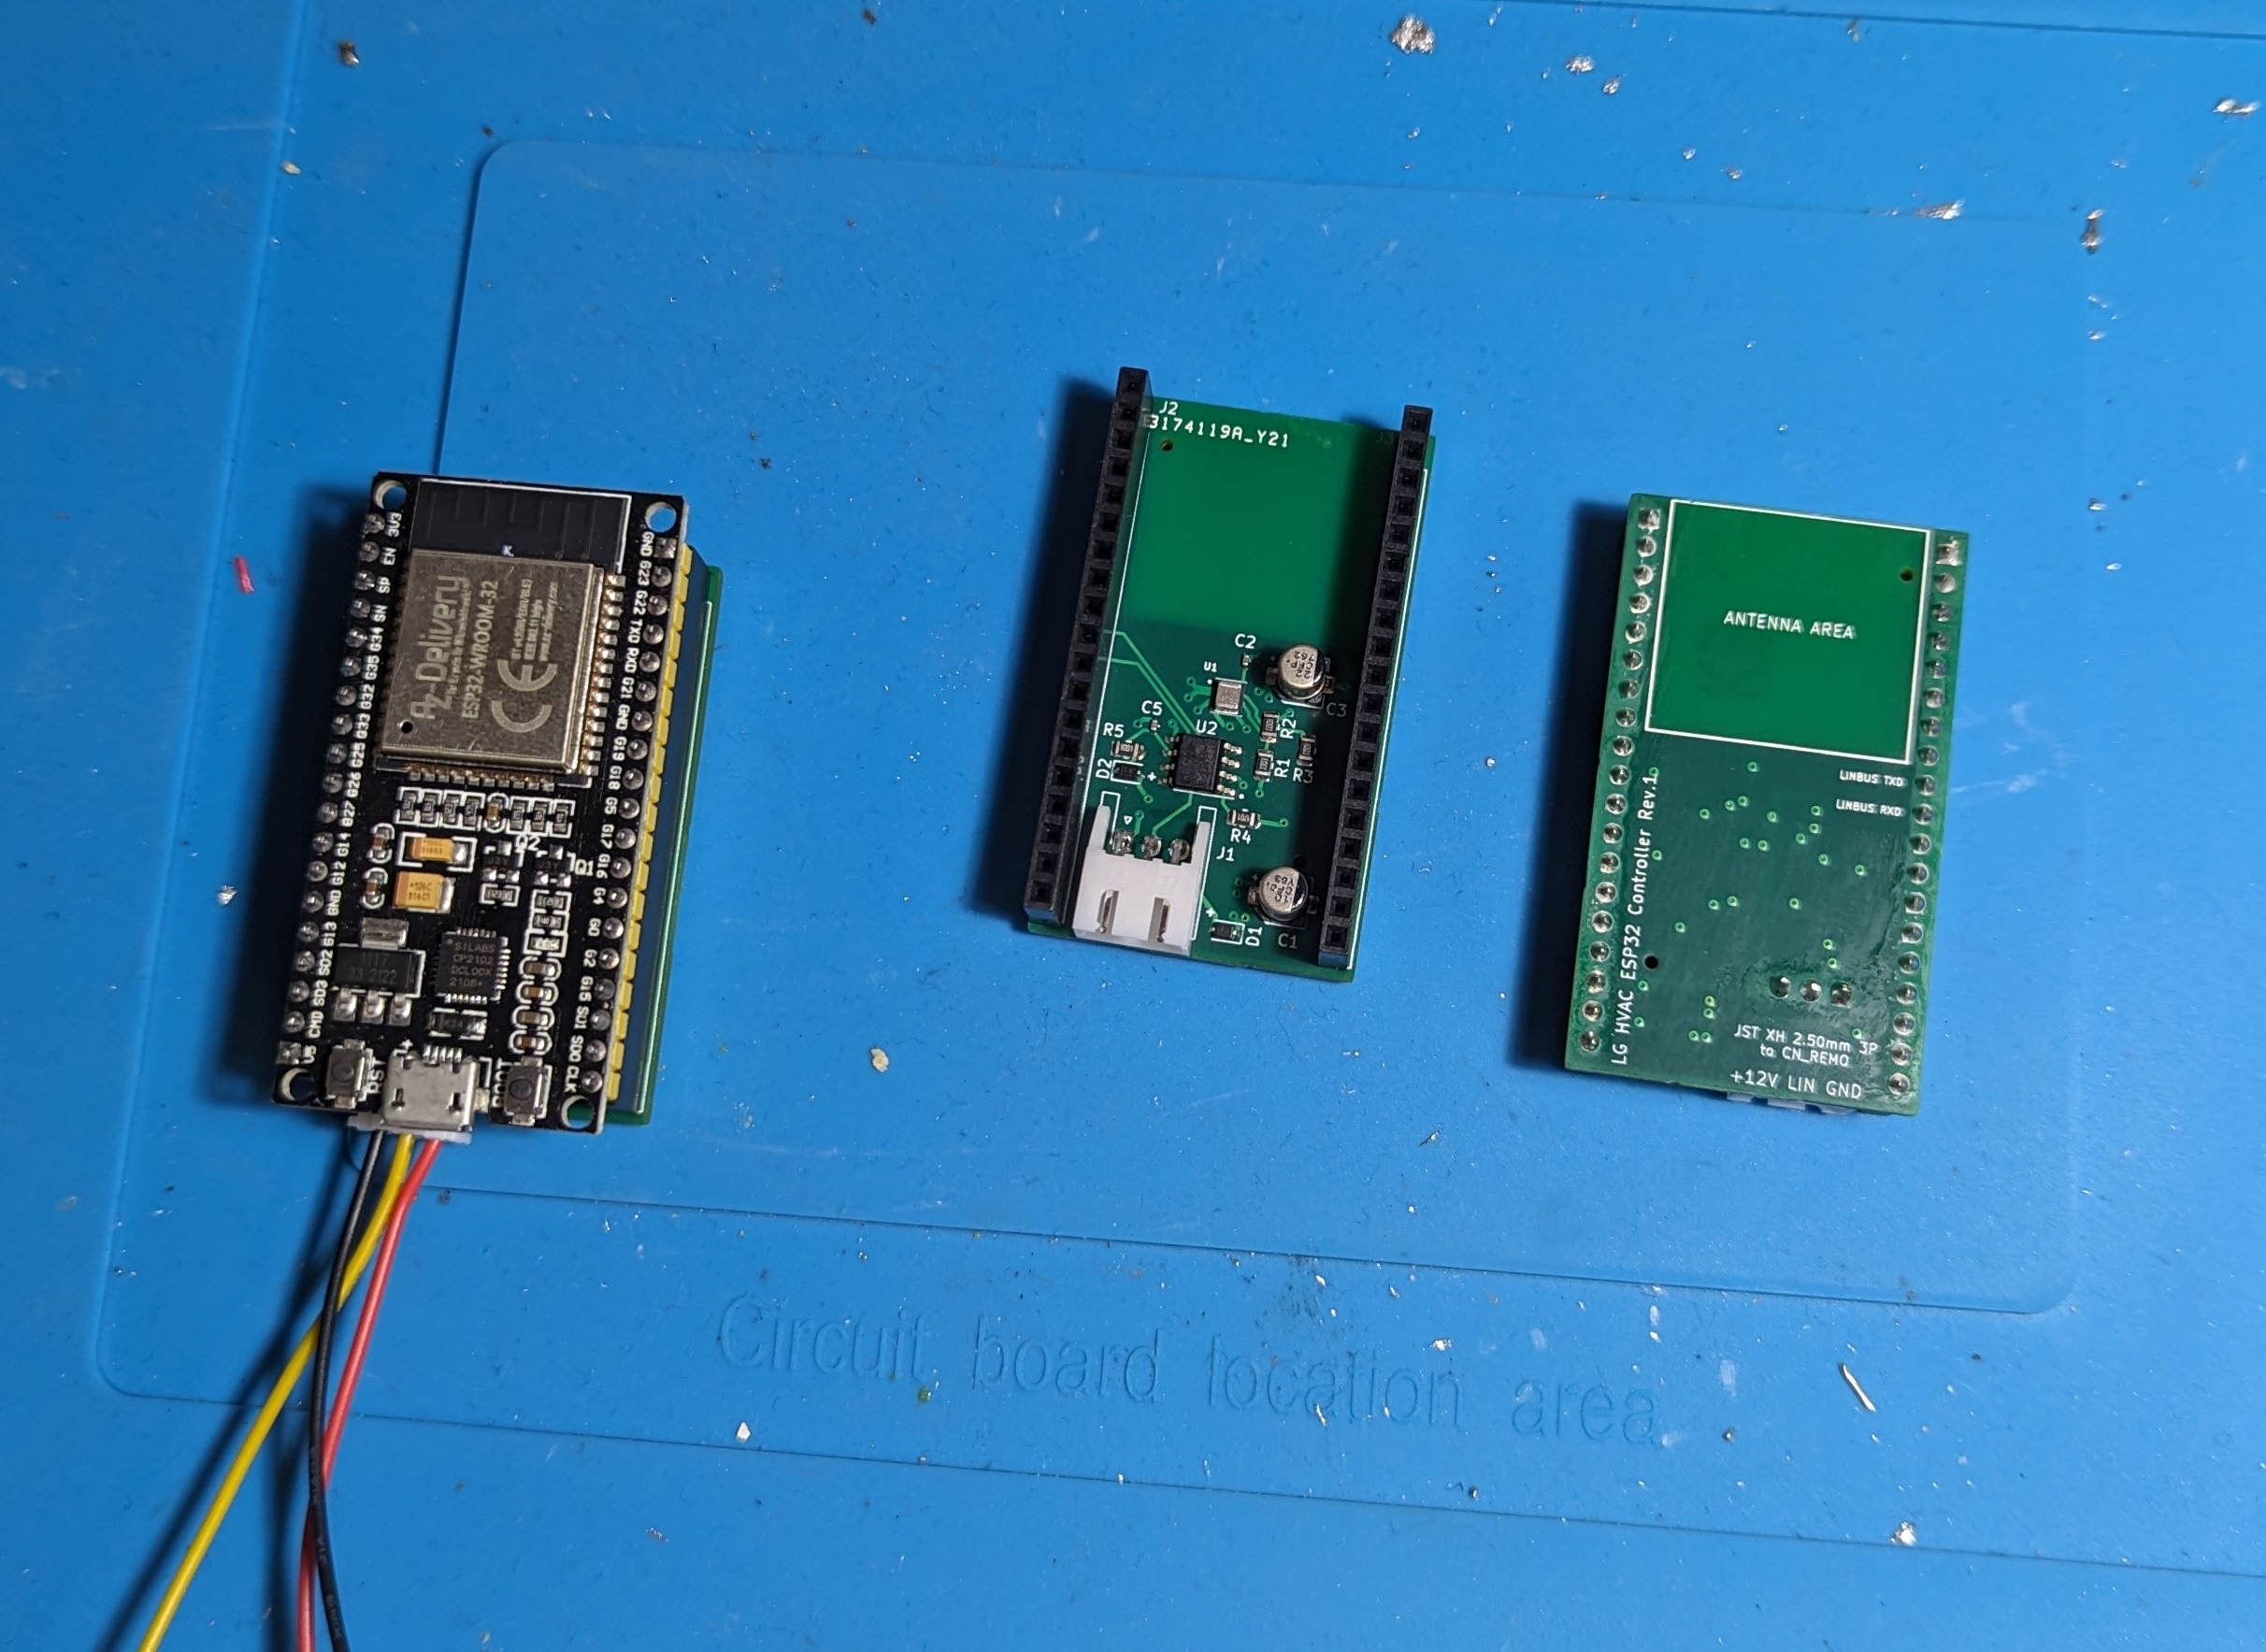
You need at least the following parts for each indoor unit:
The hardware-tiny/ PCB can be ordered from JLCPCB (see instructions here).
This revision has a known issue: a 22 uF capacitor is missing at the regulator output (see this comment for details). It is fairly straightforward to rework the PCB to add a capacitor, see this comment for an example.
This is the current revision. Note that the pictures below are for the older revision.
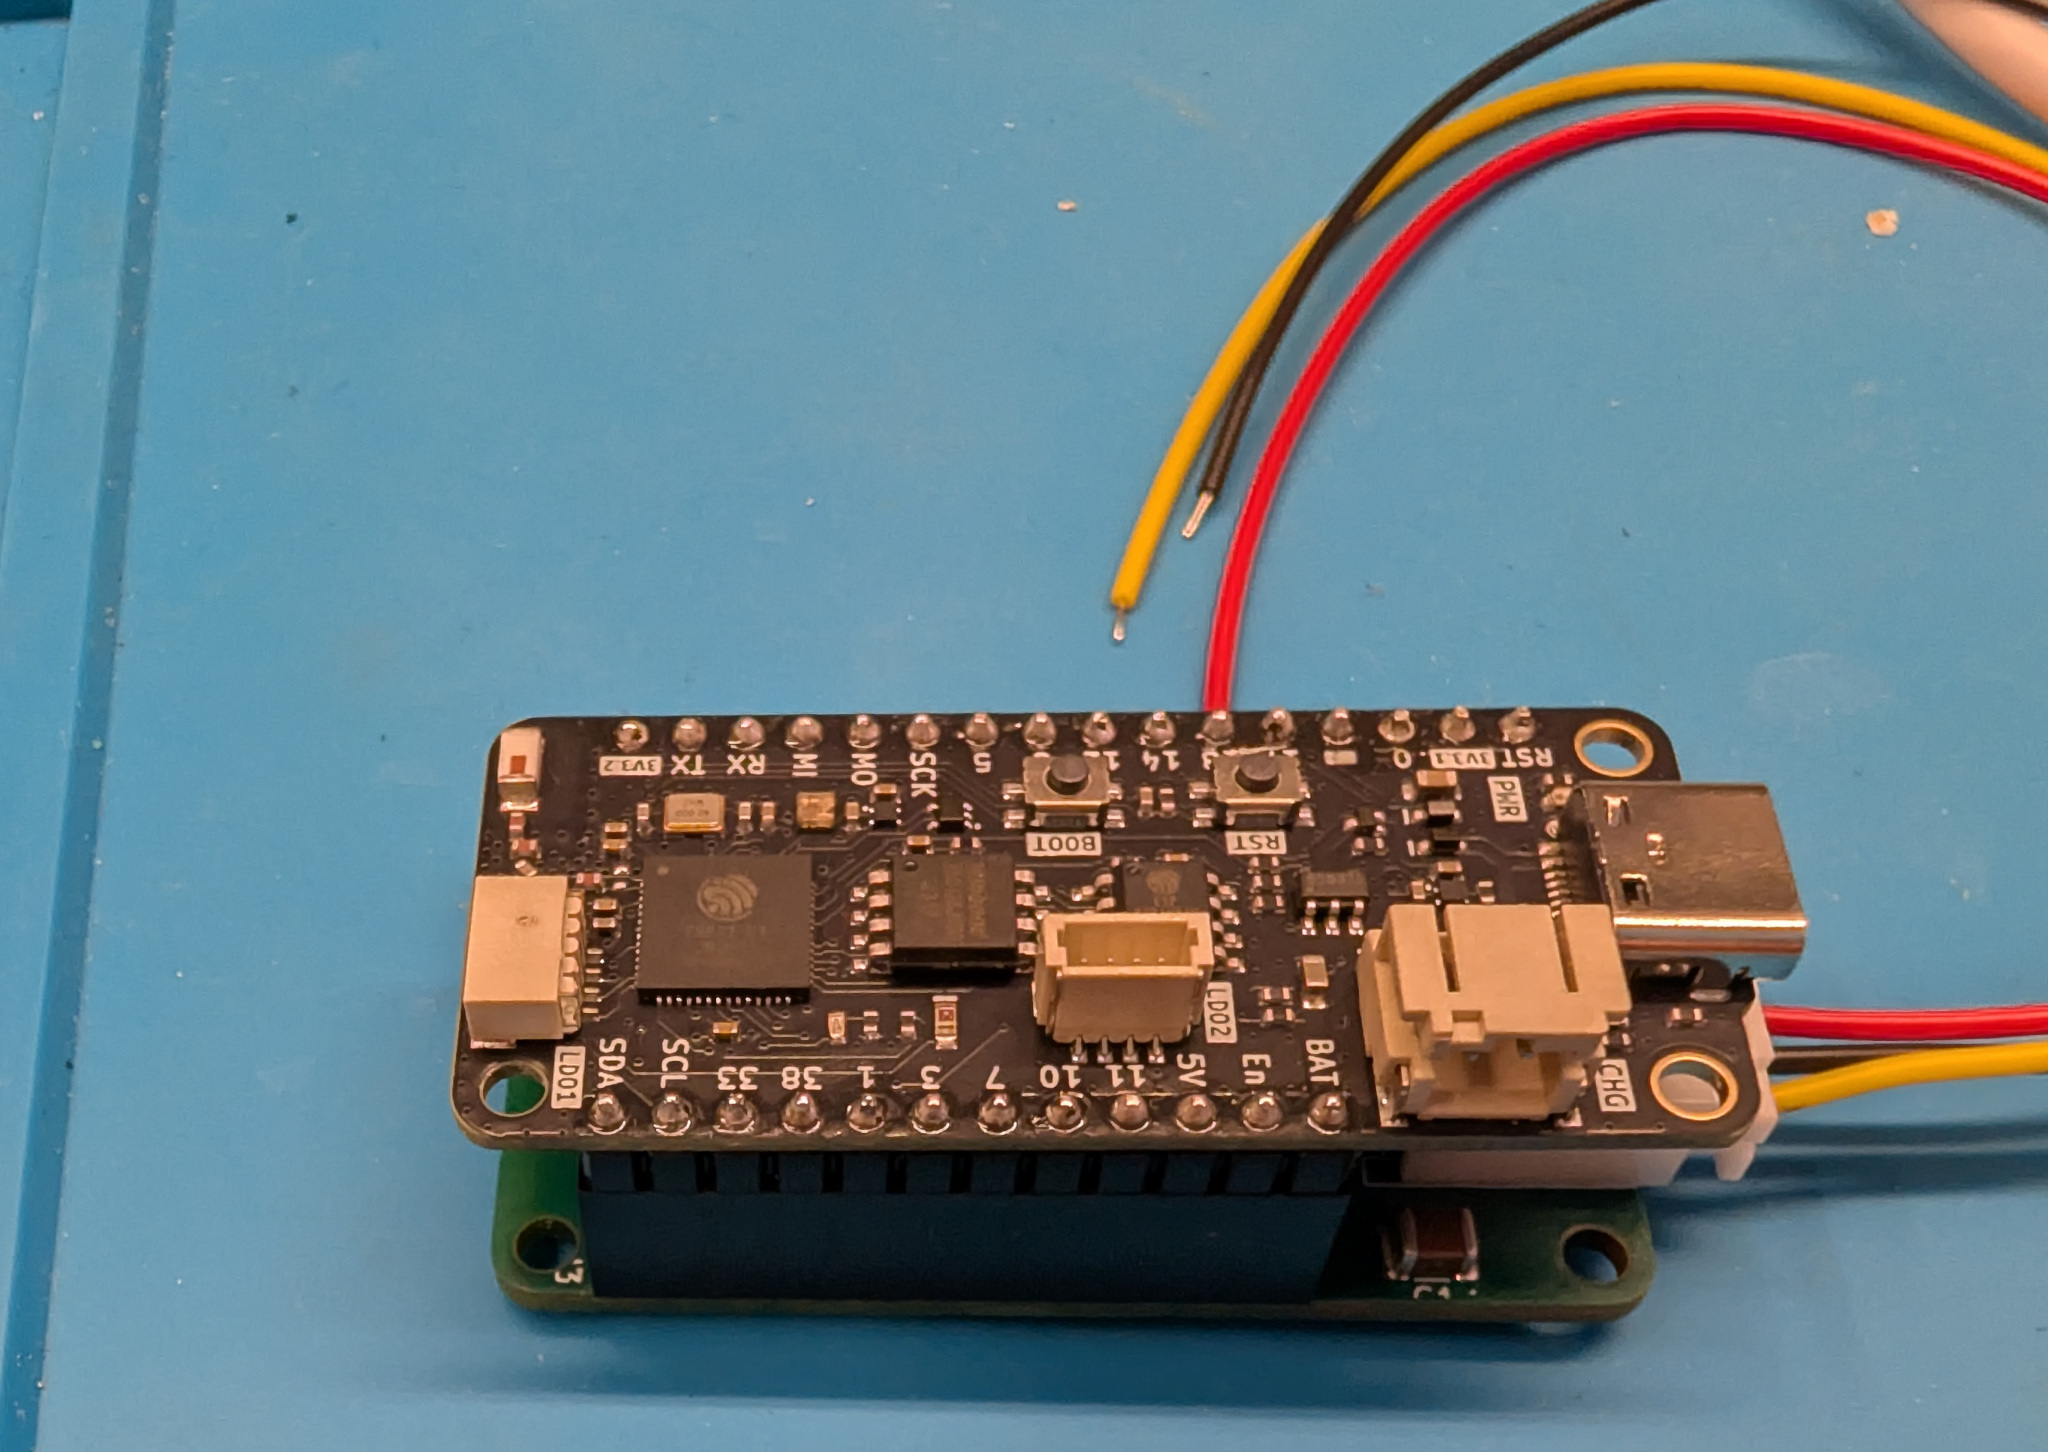
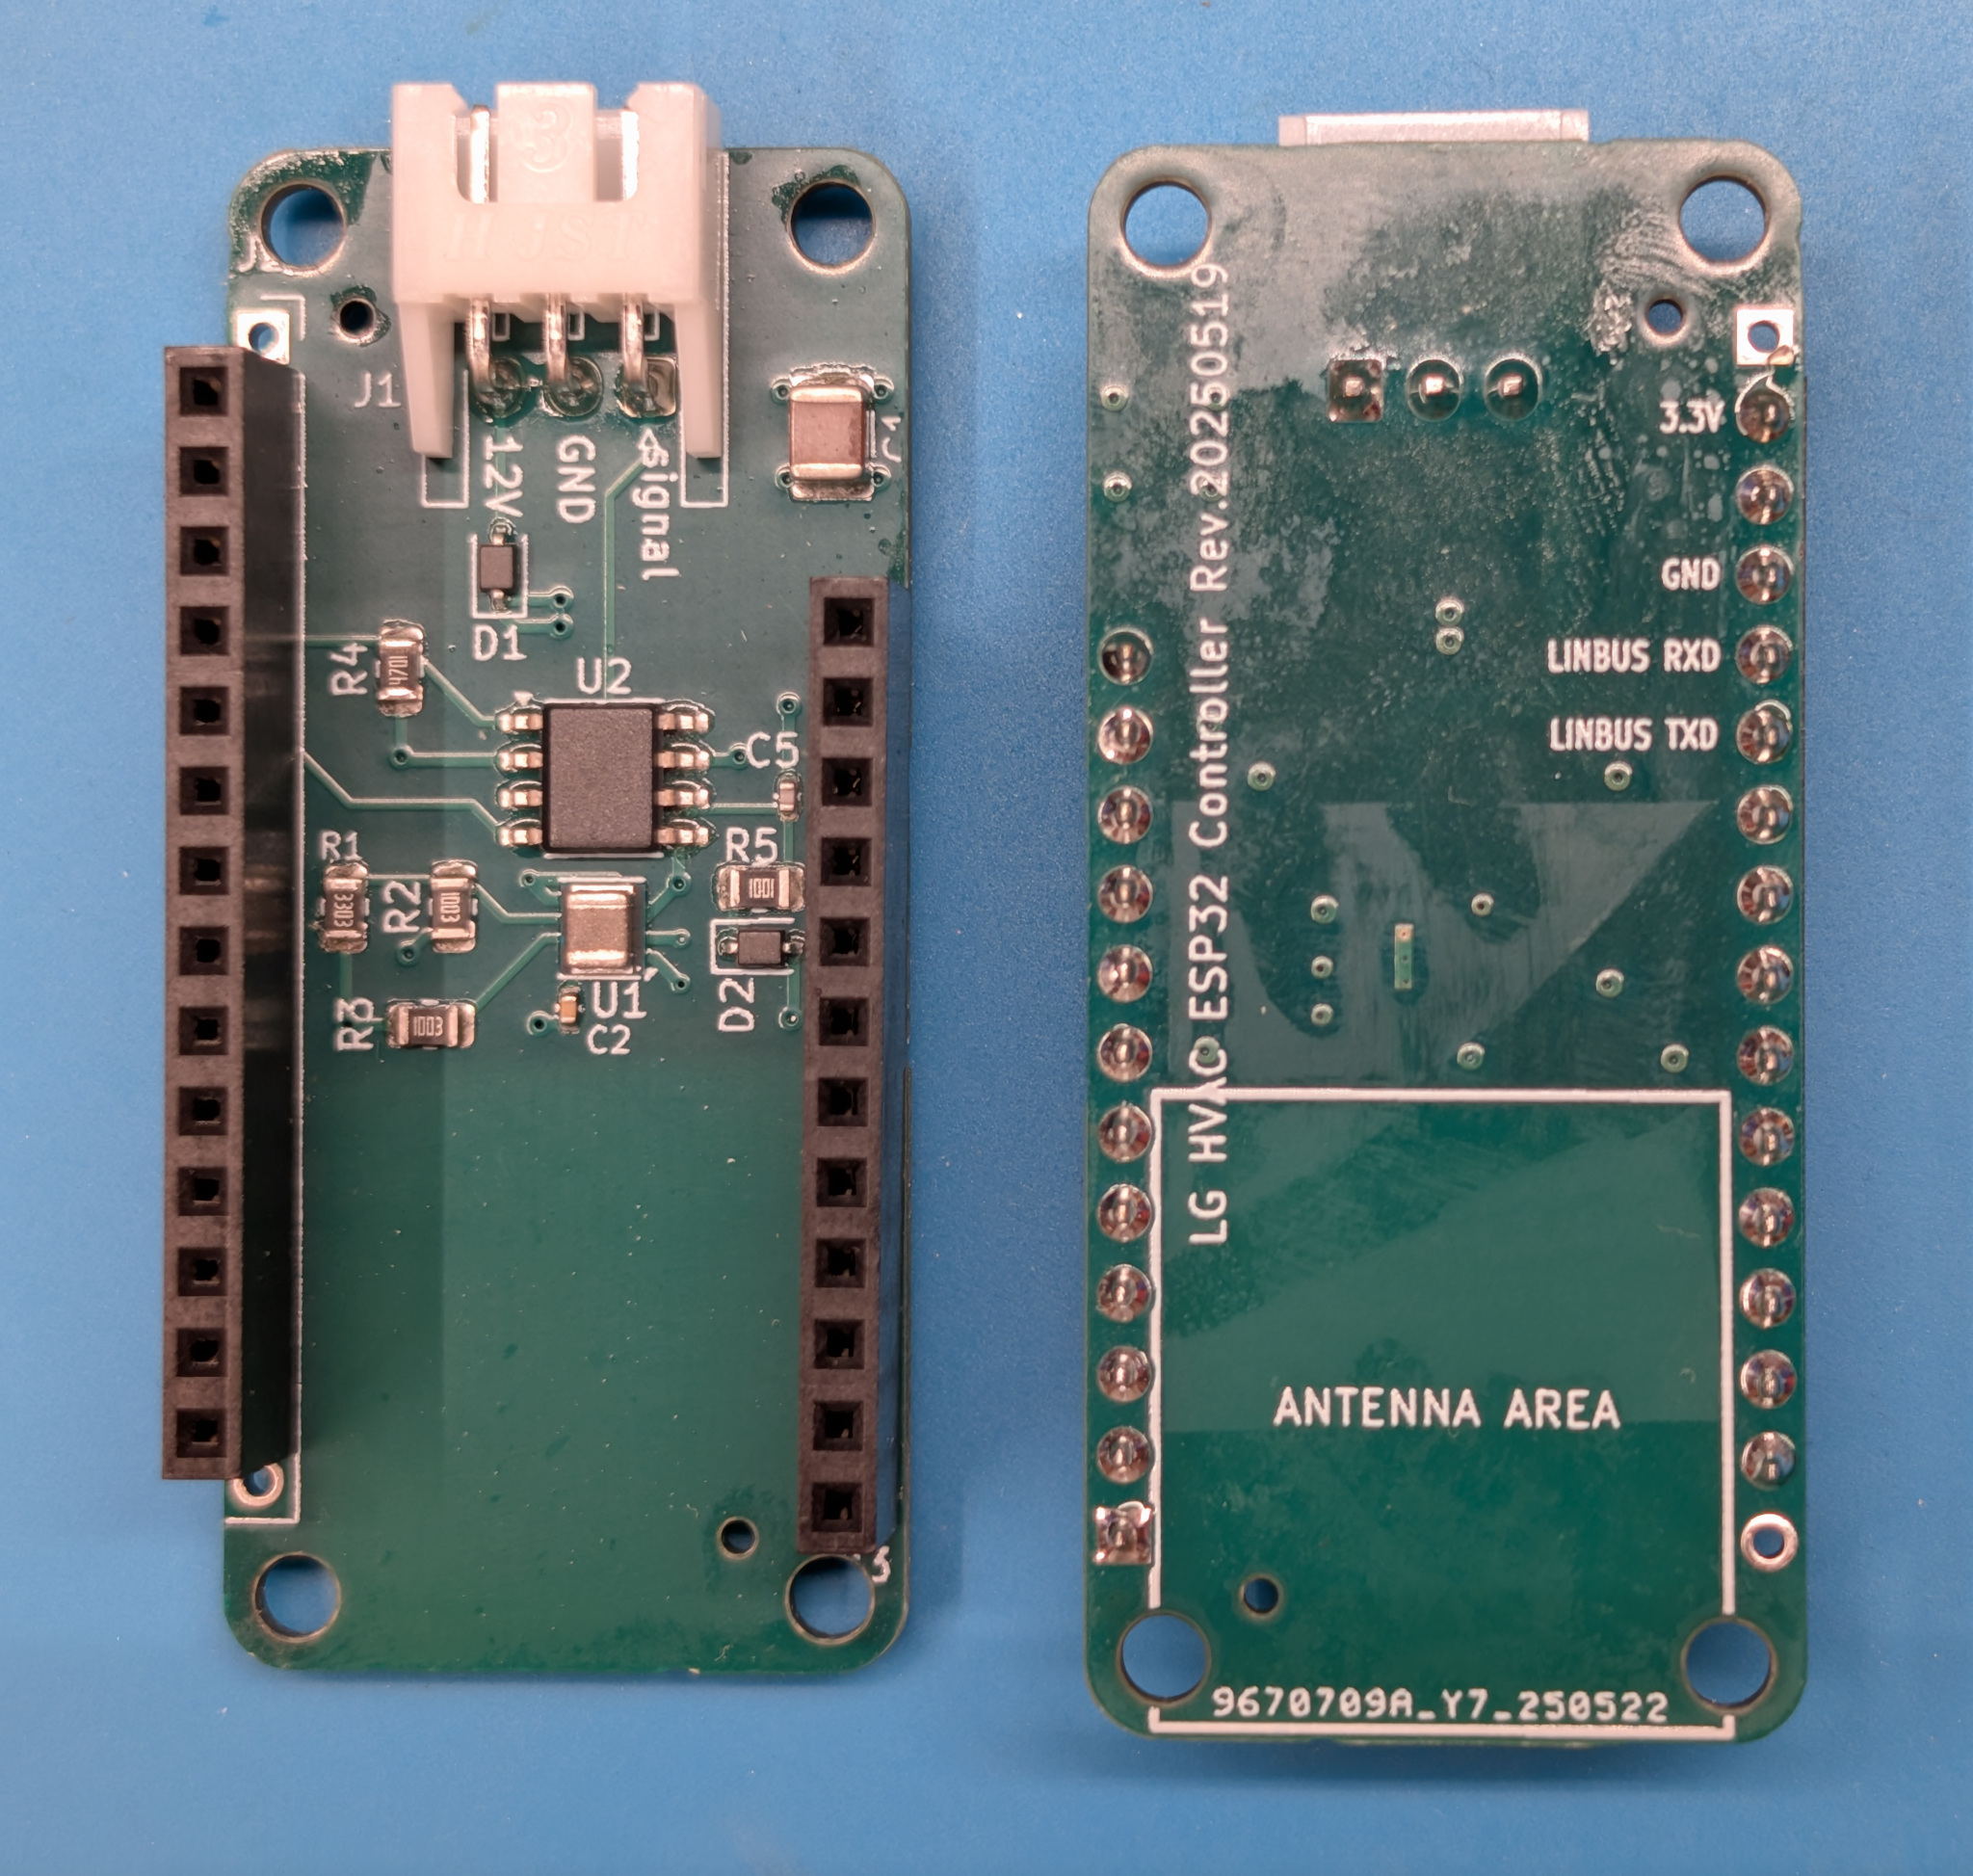
You need at least the following parts for each indoor unit:
This PCB supports the more modern FeatherS3 by Unexpected Maker, which has a USB-C connector. The FeatherS3 can be powered from the 3.3V pin, which is what is assumed here. The USB-C connector should not be connected at the same time; if you want to power the FeatherS3 via USB, you should not connect the 3.3V pin.
The hardware-FeatherS3/ PCB can be ordered from JLCPCB.
JLCPCB ordering instructions:
GERBER-lg_hvac_esp32.zip as the gerber file, leave all settings default.Assembly option at the bottom of the quote page and proceed.BOM-lg_hvac_esp32.csv for the bom file and CPL-lg_hvac_esp32.csv for placement / cplI paid about $50 for five boards, fully assembled, before any shipping and import duties.
Note: if you use the FeatherS3 PCB, you'll also need to make some changes to esphome/base.yaml for ESPHome as part of the next step. See the FeatherS3 comments in that file.
I used the following steps to build the ESPHome firmware, flash it on the device, and add the controller in Home Assistant:
esphome directory.source venv/bin/activate).template.yaml to (for example) lg-livingroom.yaml and edit the lines marked with XXX.esphome run lg-livingroom.yaml to build the firmware and upload it to the device.If you just want to connect to the device to view the debug logs, use esphome logs lg-livingroom.yaml.
Features currently available in Home Assistant:
The LG ThinQ app and wireless remote can still be used to change these settings and other settings. They'll be synchronized with this controller.
Unfortunately not all settings are exposed to the wired controller, but if you're interested in a feature and it's supported by the PREMTB100 or PREMTA200 controller, please open an issue and we can consider adding it.
❗ Update November 2023: This section is for my original PCB in the hardware/ directory. Florian Brede has designed a smaller and cheaper PCB that can be ordered from JLCPCB. It's in the hardware-tiny/ directory.
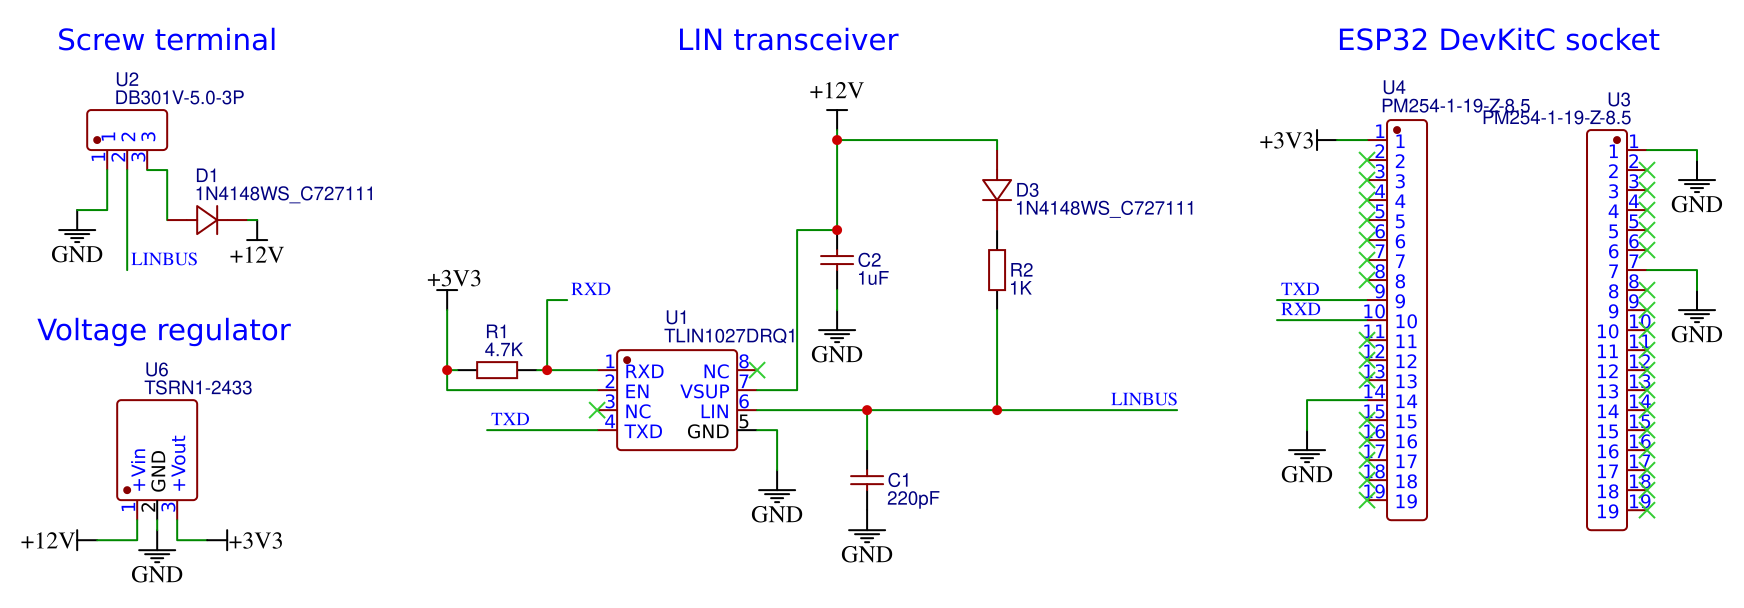
See hardware/ for schematic and list of materials. This part was based on the excellent work and research by @Flameeyes:
The hardware needs four main components:
My PCB also has some capacitors, resistors and diodes that are based on the TLIN1027DRQ1 data sheet. I'm not sure if these are really necessary but I included them to be safe and it works well. I used SMT components if available because I had the PCBs assembled by PCBWay. Update november 2023: the hardware-tiny/ PCB can be ordered from JLCPCB.
Note: an alternative for the LIN transceiver is the opto-isolator design used here:
This project is licensed under the 0BSD License. See the LICENSE file for details. This basically means you can use it however you want. Attribution is not required but would be greatly appreciated.
| Qty | Value | Footprint | References |
|---|---|---|---|
| 4 | MountingHole | MountingHole:MountingHole_2.7mm_M2.5 | H1, H2, H3, H4 |
| 2 | 100k | Resistor_SMD:R_0805_2012Metric | R2, R3 |
| 2 | 1N4148WS | Diode_SMD:D_SOD-323 | D1, D2 |
| 1 | 10uF | Capacitor_SMD:C_1210_3225Metric | C1 |
| 1 | 1k | Resistor_SMD:R_0805_2012Metric | R5 |
| 1 | 220pF | Capacitor_SMD:C_0402_1005Metric | C5 |
| 1 | 3.3nF | Capacitor_SMD:C_0402_1005Metric | C2 |
| 1 | 330k | Resistor_SMD:R_0805_2012Metric | R1 |
| 1 | 4.7k | Resistor_SMD:R_0805_2012Metric | R4 |
| 1 | C_0805_2012Metric | Capacitor_SMD:C_0805_2012Metric | C3 |
| 1 | Conn_01x12 | Connector_PinSocket_2.54mm:PinSocket_1x12_P2.54mm_Vertical | J3 |
| 1 | Conn_01x16 | Connector_PinSocket_2.54mm:PinSocket_1x16_P2.54mm_Vertical | J2 |
| 1 | JST_XH_S3B-XH-A-1_01x03 | Connector_JST:JST_XH_S3B-XH-A-1_1x03_P2.50mm_Horizontal | J1 |
| 1 | TJA1027 | Package_SO:SOIC-8_3.9x4.9mm_P1.27mm | U2 |
| 1 | TPS82130 | Package_LGA:Texas_SIL0008D_MicroSiP-8-1EP_2.8x3mm_P0.65mm_EP1.1x1.9mm_ThermalVias | U1 |
JanM321/esphome-lg-controller
Wired controller for LG HVAC units using ESPHome and ESP32

Bartek0x00/USRTLIN-PCB
PCB files and documentation for USRTLIN converter project


maximus64/opendiag-hardware
OpenDIAG - Open Source OBD2 Interface (Hardware)

atwardzik/reflow_station_pcb
This project is currently in a prototype stage. It features PCB project of basic reflow station utilizing 4 phase-controlled triacs steering with attached heaters.


variegated-coffee/open-lcc-board
Schematics and PCB files for the Open LCC hardware

variegated-coffee/all-purpose-espresso-controller
Espresso electronics are usually proprietary affairs with little to no expandability. The purpose of this project is to give everyone an open source alternative with lots of features and flexibility.

lnsru/melexis_VGA_ToF_camera
PCB design with the new MLX75027 VGA time of flight sensor
It measures 22.9 × 50.8 mm and has 4 copper layers, 4.69 mm thick.
20 parts, built around the TJA1027T/20, TPS82130SIL and 1N4148WS. The full list of its parts is on this page, with links to each part's symbol and footprint where PCBKit's library has them.
From the JanM321/esphome-lg-controller repository on GitHub, at the commit this page was made from: the board is hardware-FeatherS3/lg_hvac_esp32.kicad_pcb and its schematic hardware-FeatherS3/lg_hvac_esp32.kicad_sch. PCBKit opens the board in the browser, with nothing to install.
Its repository publishes it under the 0BSD licence: you may reuse it on that licence's terms (keep the author's notice, and for a copyleft licence share your changes alike).