2 layers142 × 23 mm
Massue bento v4
benkuper/BenTo-Legacy
Legacy repository for the former BenTo-Club project
101 parts1GPL-3.0

 wngxp/smart-scale
Work-in-progress ESP32-S3 smart food scale with custom PCB, enclosure CAD, firmware, mobile app, and backend.
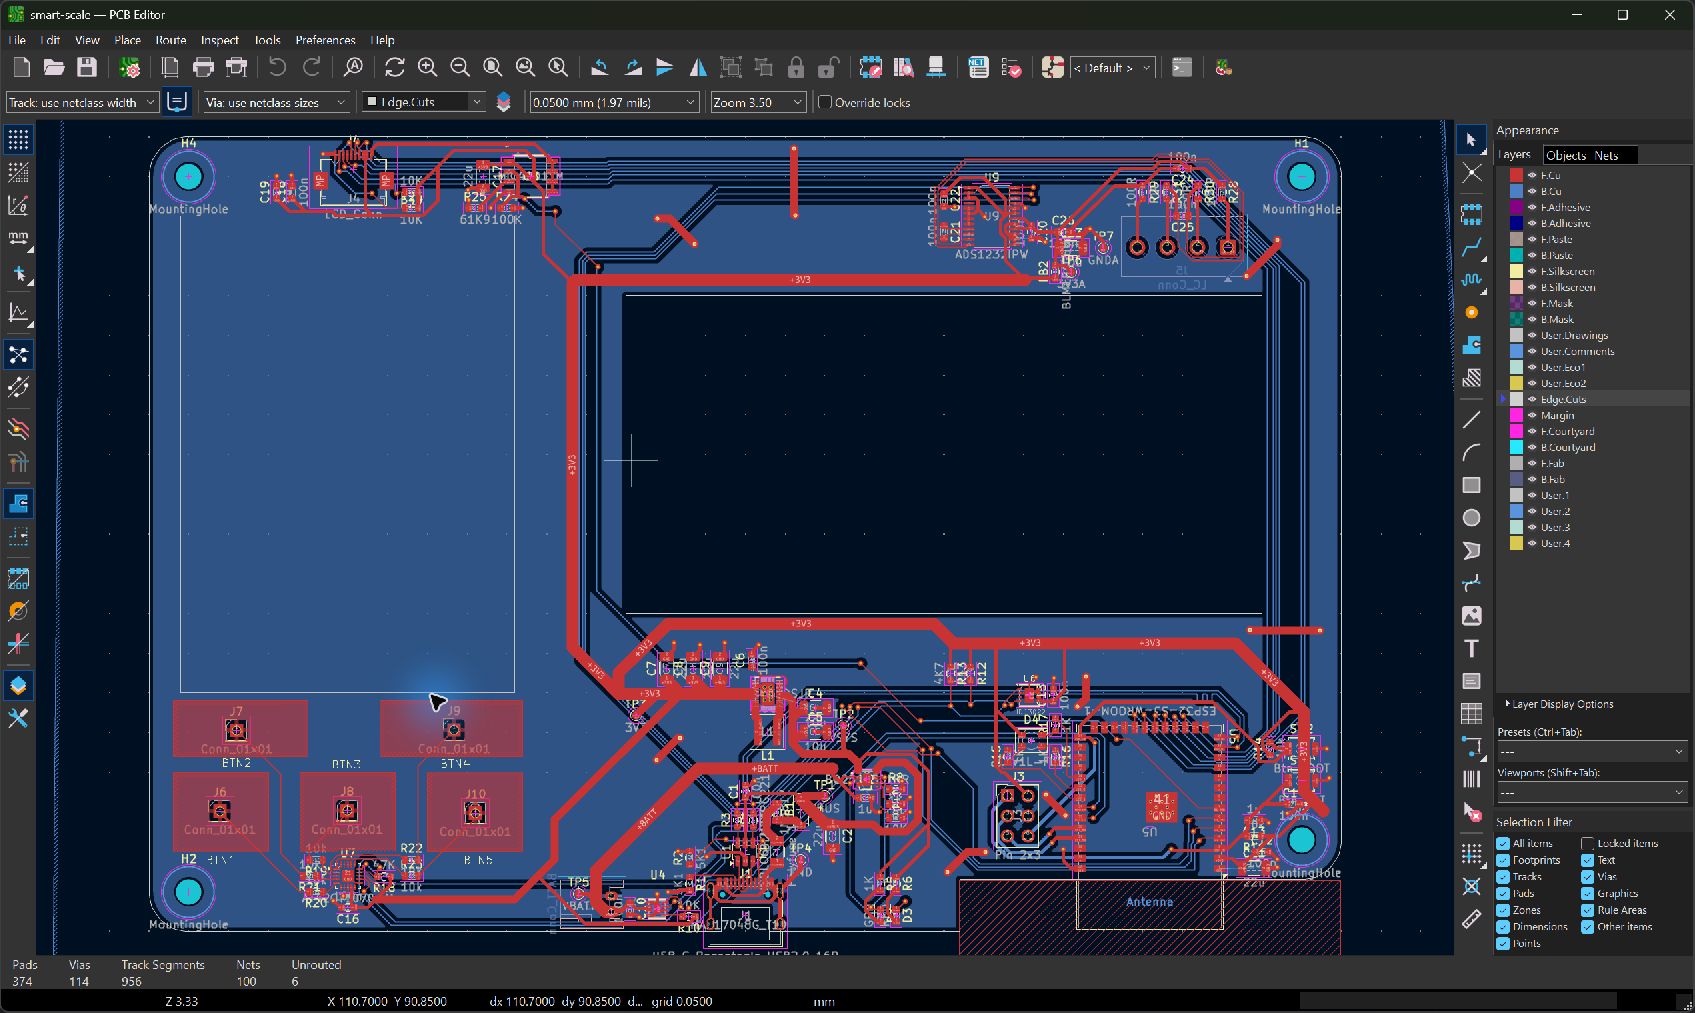
Smart scale is an open-source printed circuit board by wngxp, from the wngxp/smart-scale repository on GitHub. It is a 2-layer board of 150 × 101 mm with 97 parts on 100 nets, routed with 948 tracks and 114 vias.
It is built around the ESP32-S3-WROOM-1-N8, ADS1232IPW and AT42QT1070-MMH, with the MIC4801YM, TPS63021DSJR and BQ25185DLHR among its other parts. Its parts include 31 resistors, 26 capacitors, 10 connectors, 9 ICs and 4 diodes. It belongs with the ESP32 boards of this library.


A connected 5 kg kitchen scale that displays weight and nutrition locally and syncs stable measurements to a phone.
[!WARNING] Work in progress. The custom PCB, enclosure, and camera-free v1 design are under active development. Review
hardware/schematic-review.mdbefore fabricating or powering a board; the repository is not a production-ready hardware release.
| Area | Status |
|---|---|
| Product direction | Camera-free scale with local weight/macros and phone sync |
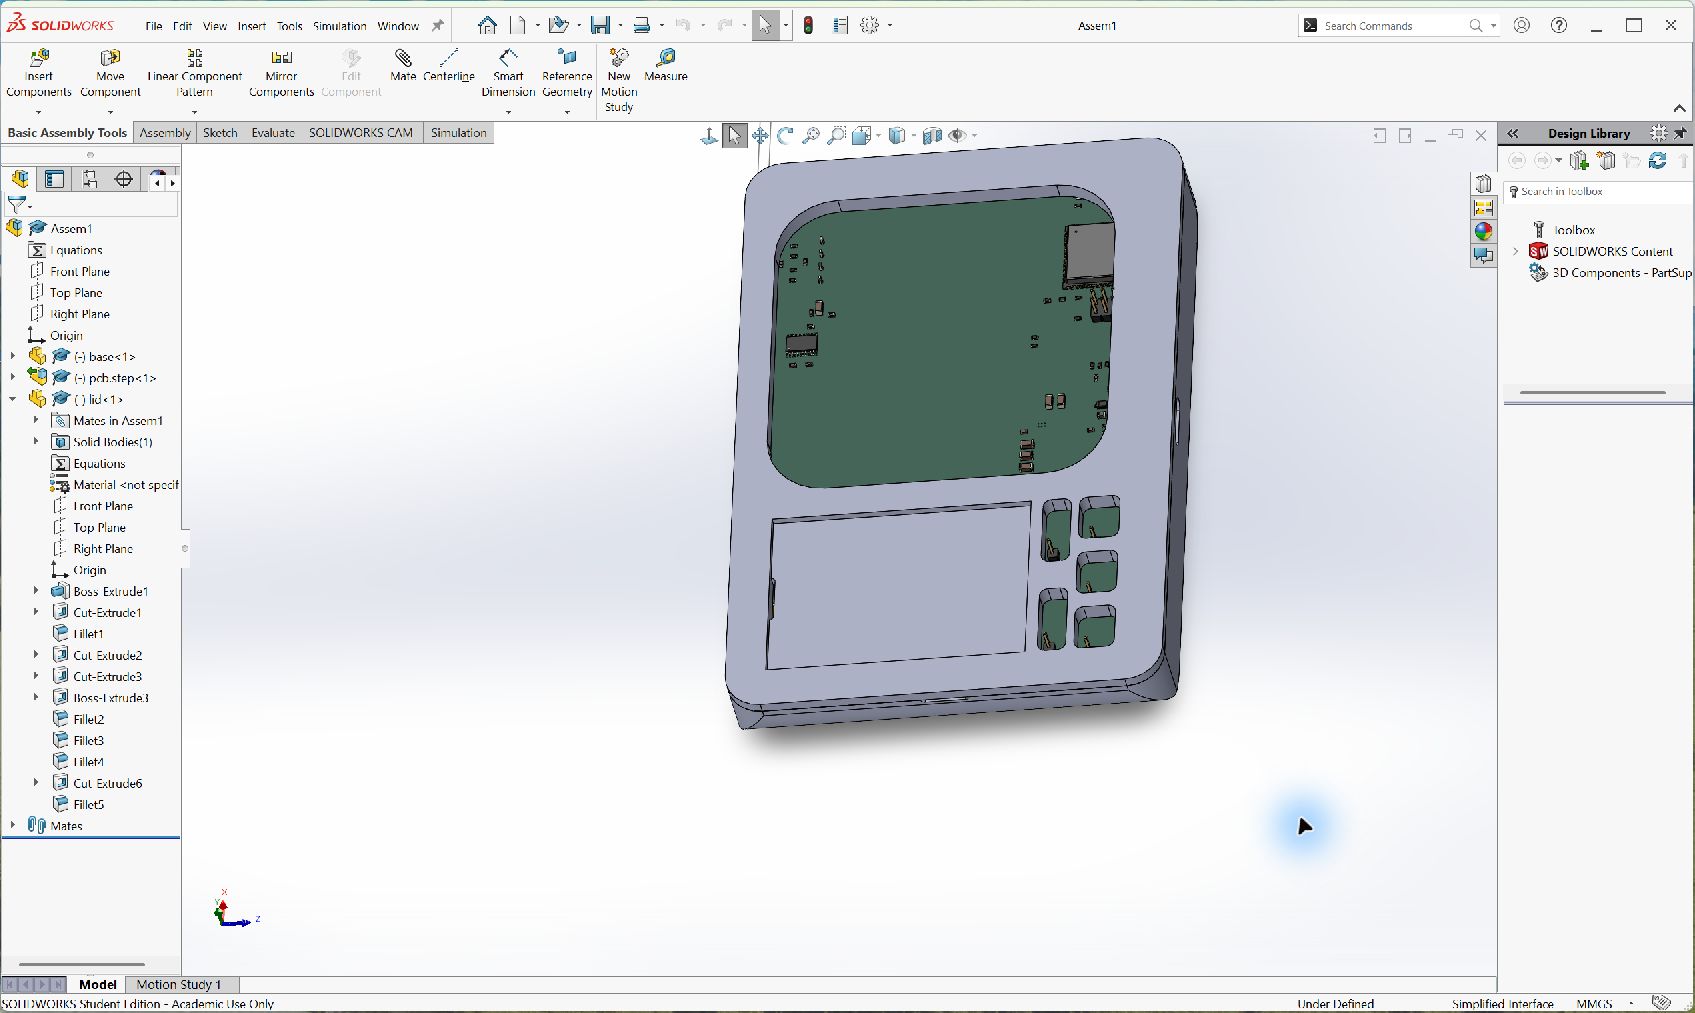
| Mechanical | 3D-printed enclosure and weighing-plate CAD in progress |
| Electronics | Custom ESP32-S3 PCB assembled for bring-up; design review ongoing |
| Firmware | Earlier camera/OLED prototype retained as migration input |
| Mobile/backend | Earlier Expo + FastAPI prototype retained as migration input |
The camera-free product baseline is documented in
docs/v1-baseline.md. The current custom schematic has
diverged from some early component choices in that document, so use the KiCad
files and hardware/schematic-review.md when
assessing the board as it exists today.
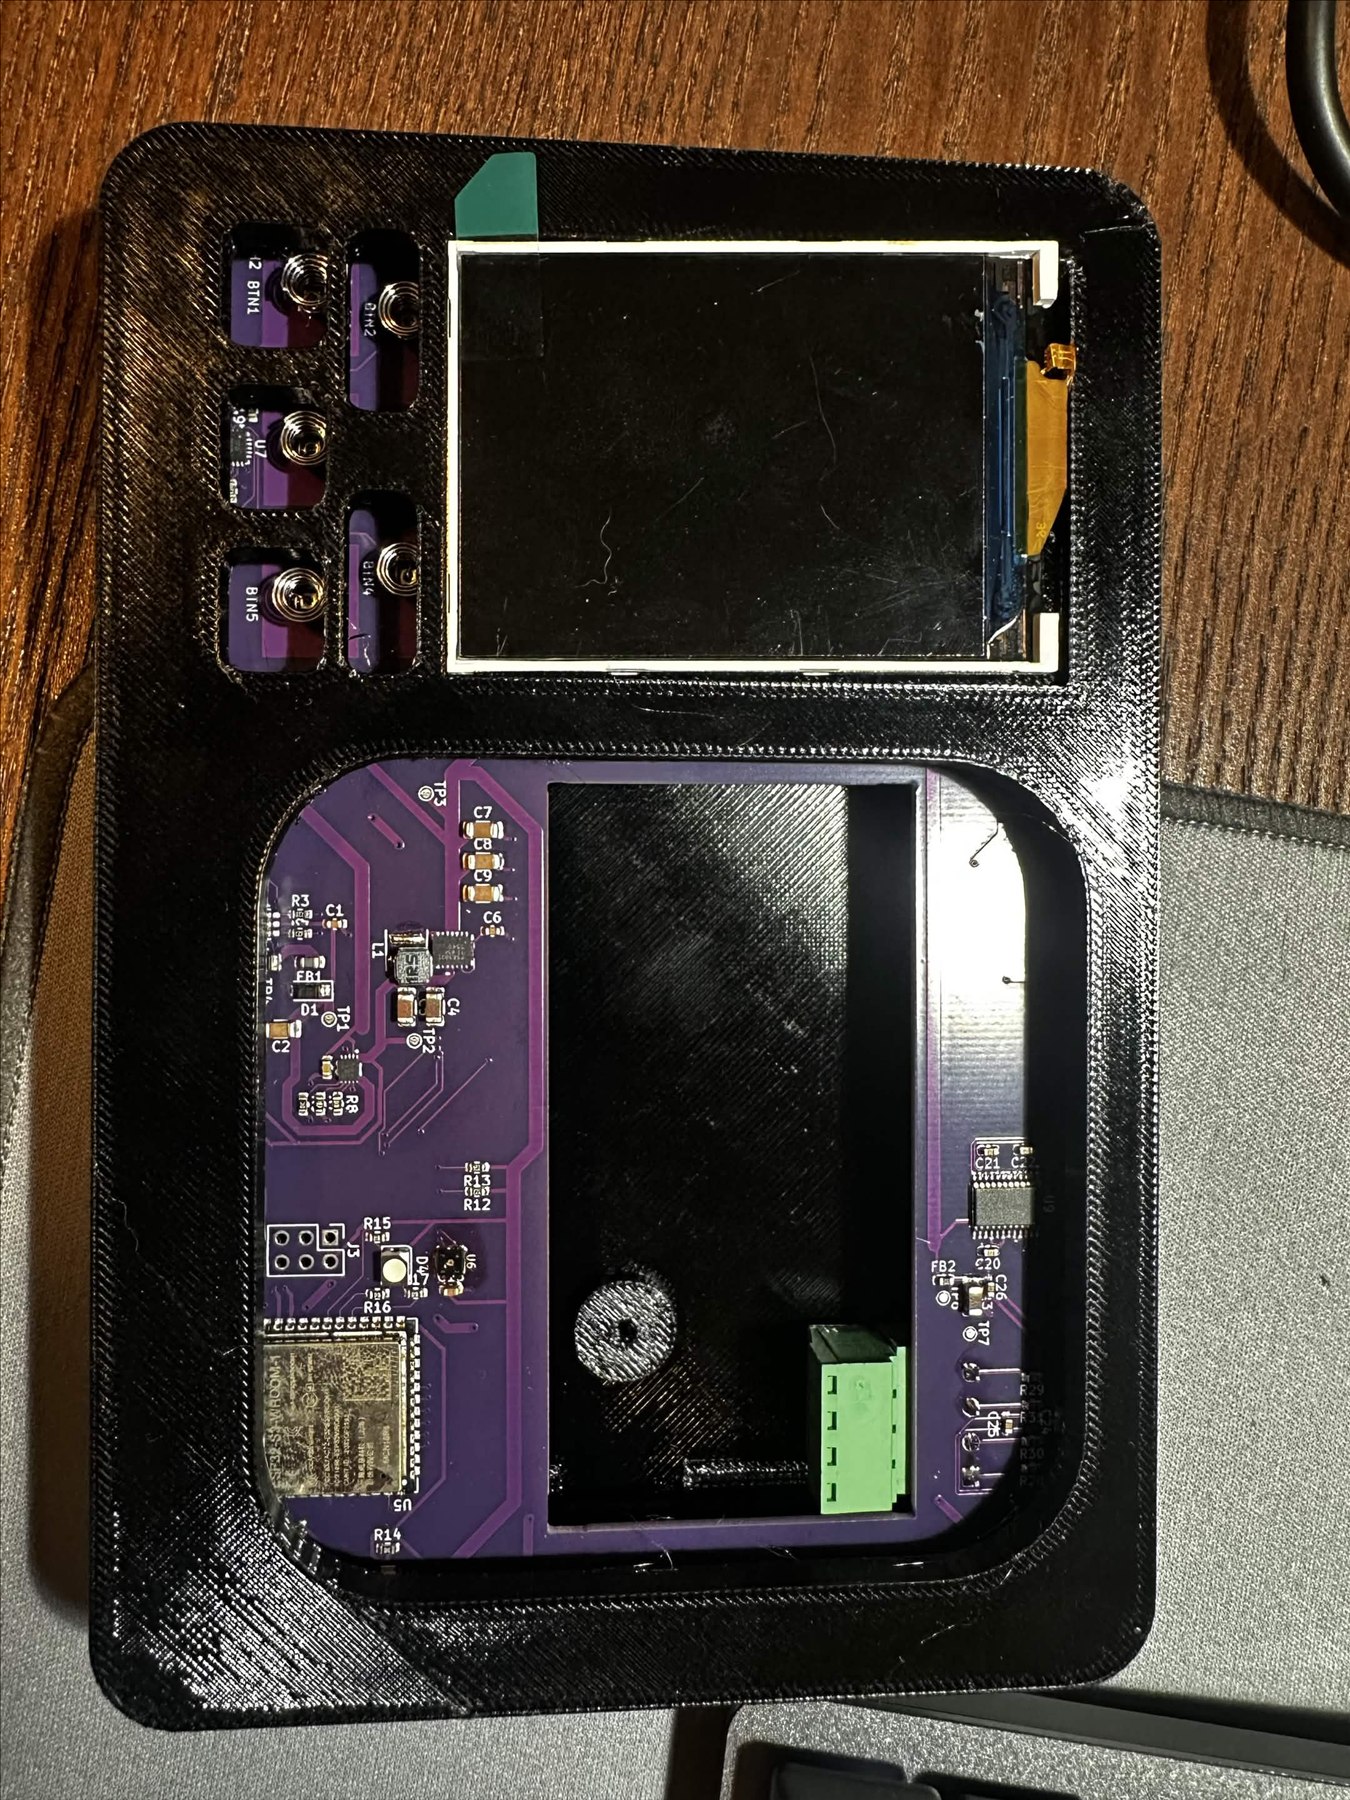
| Custom PCB in the enclosure | Early breadboard proof of concept |
|---|---|
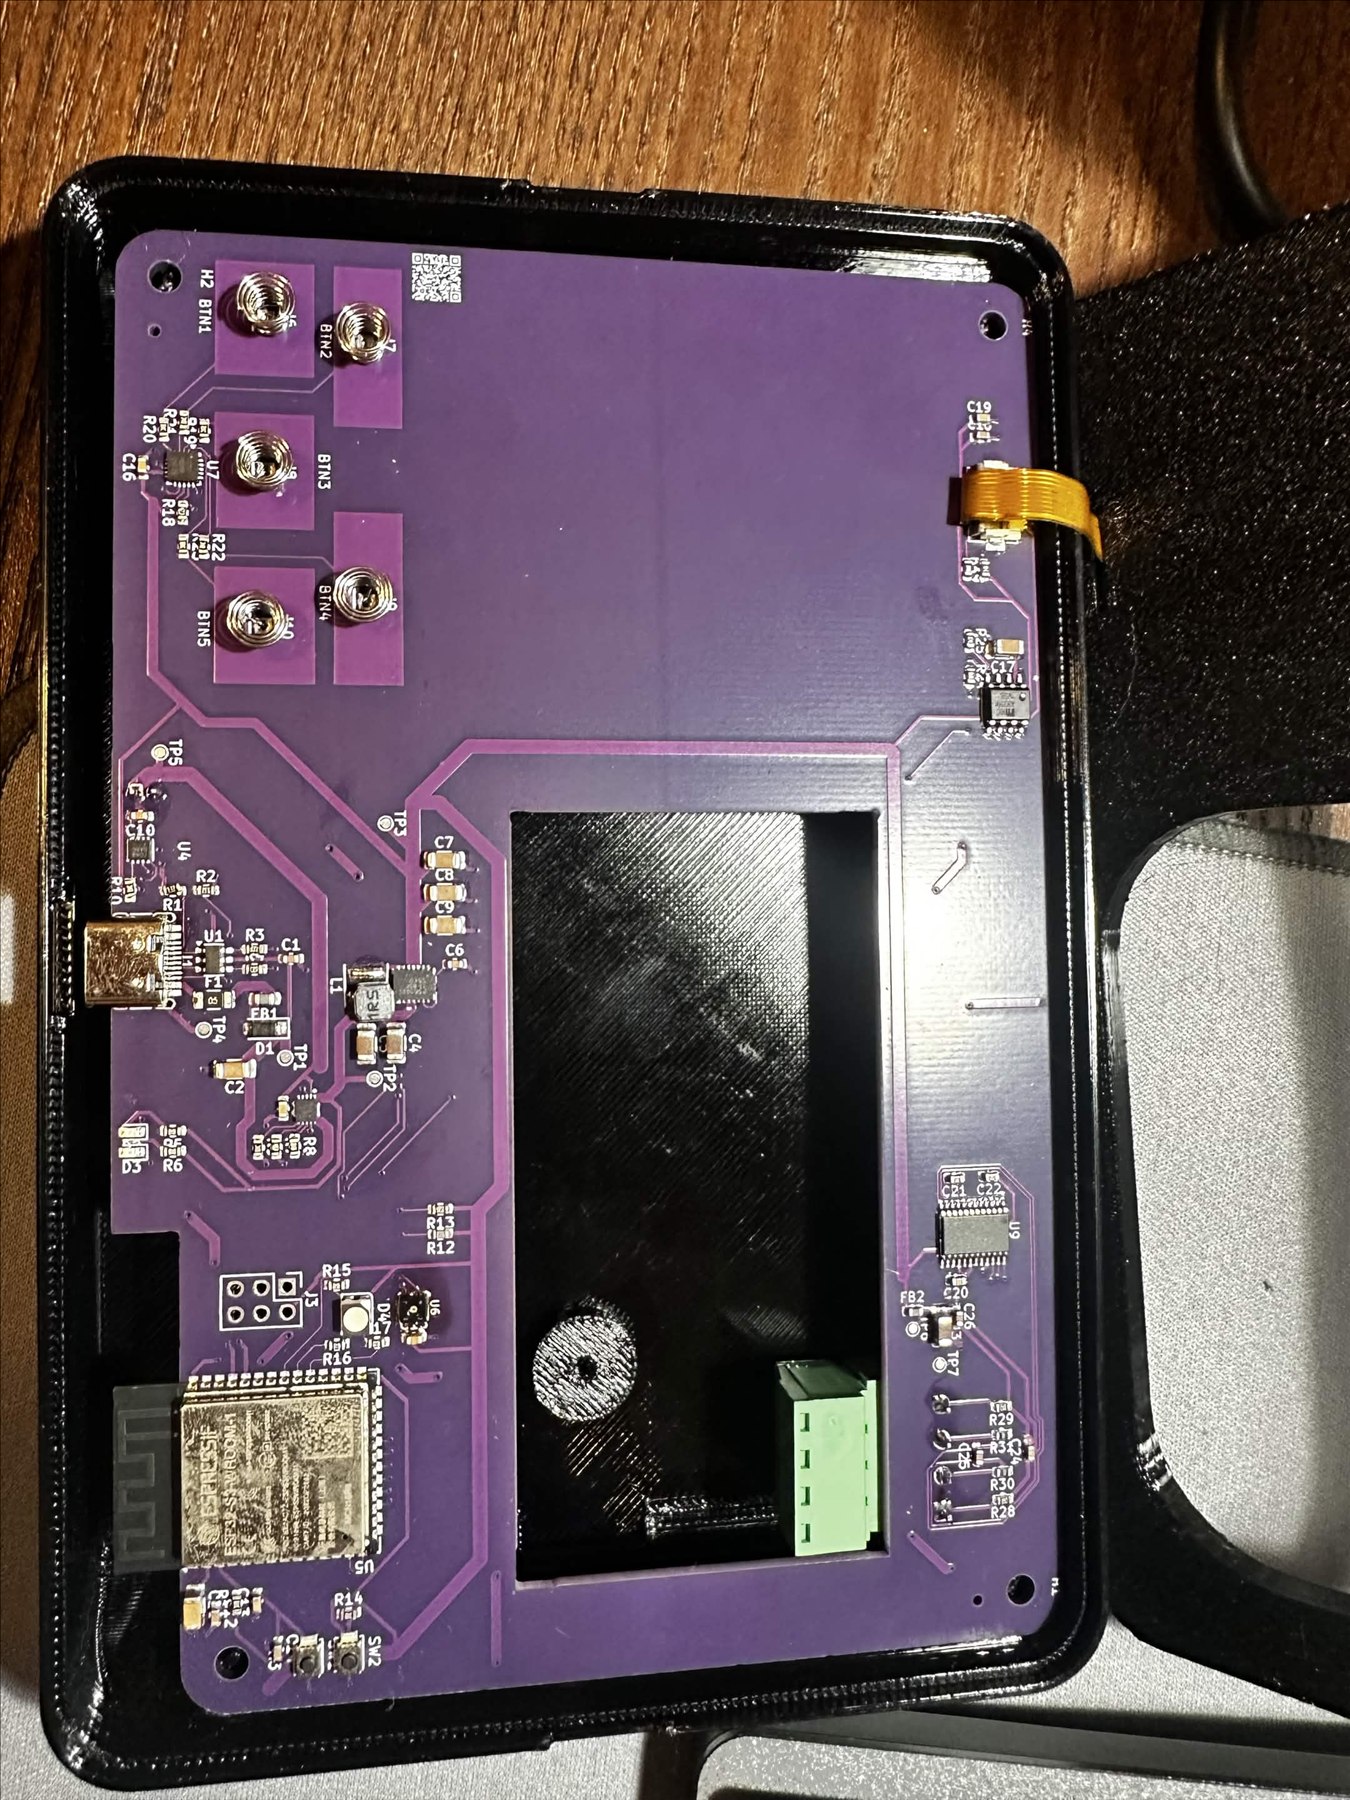 | 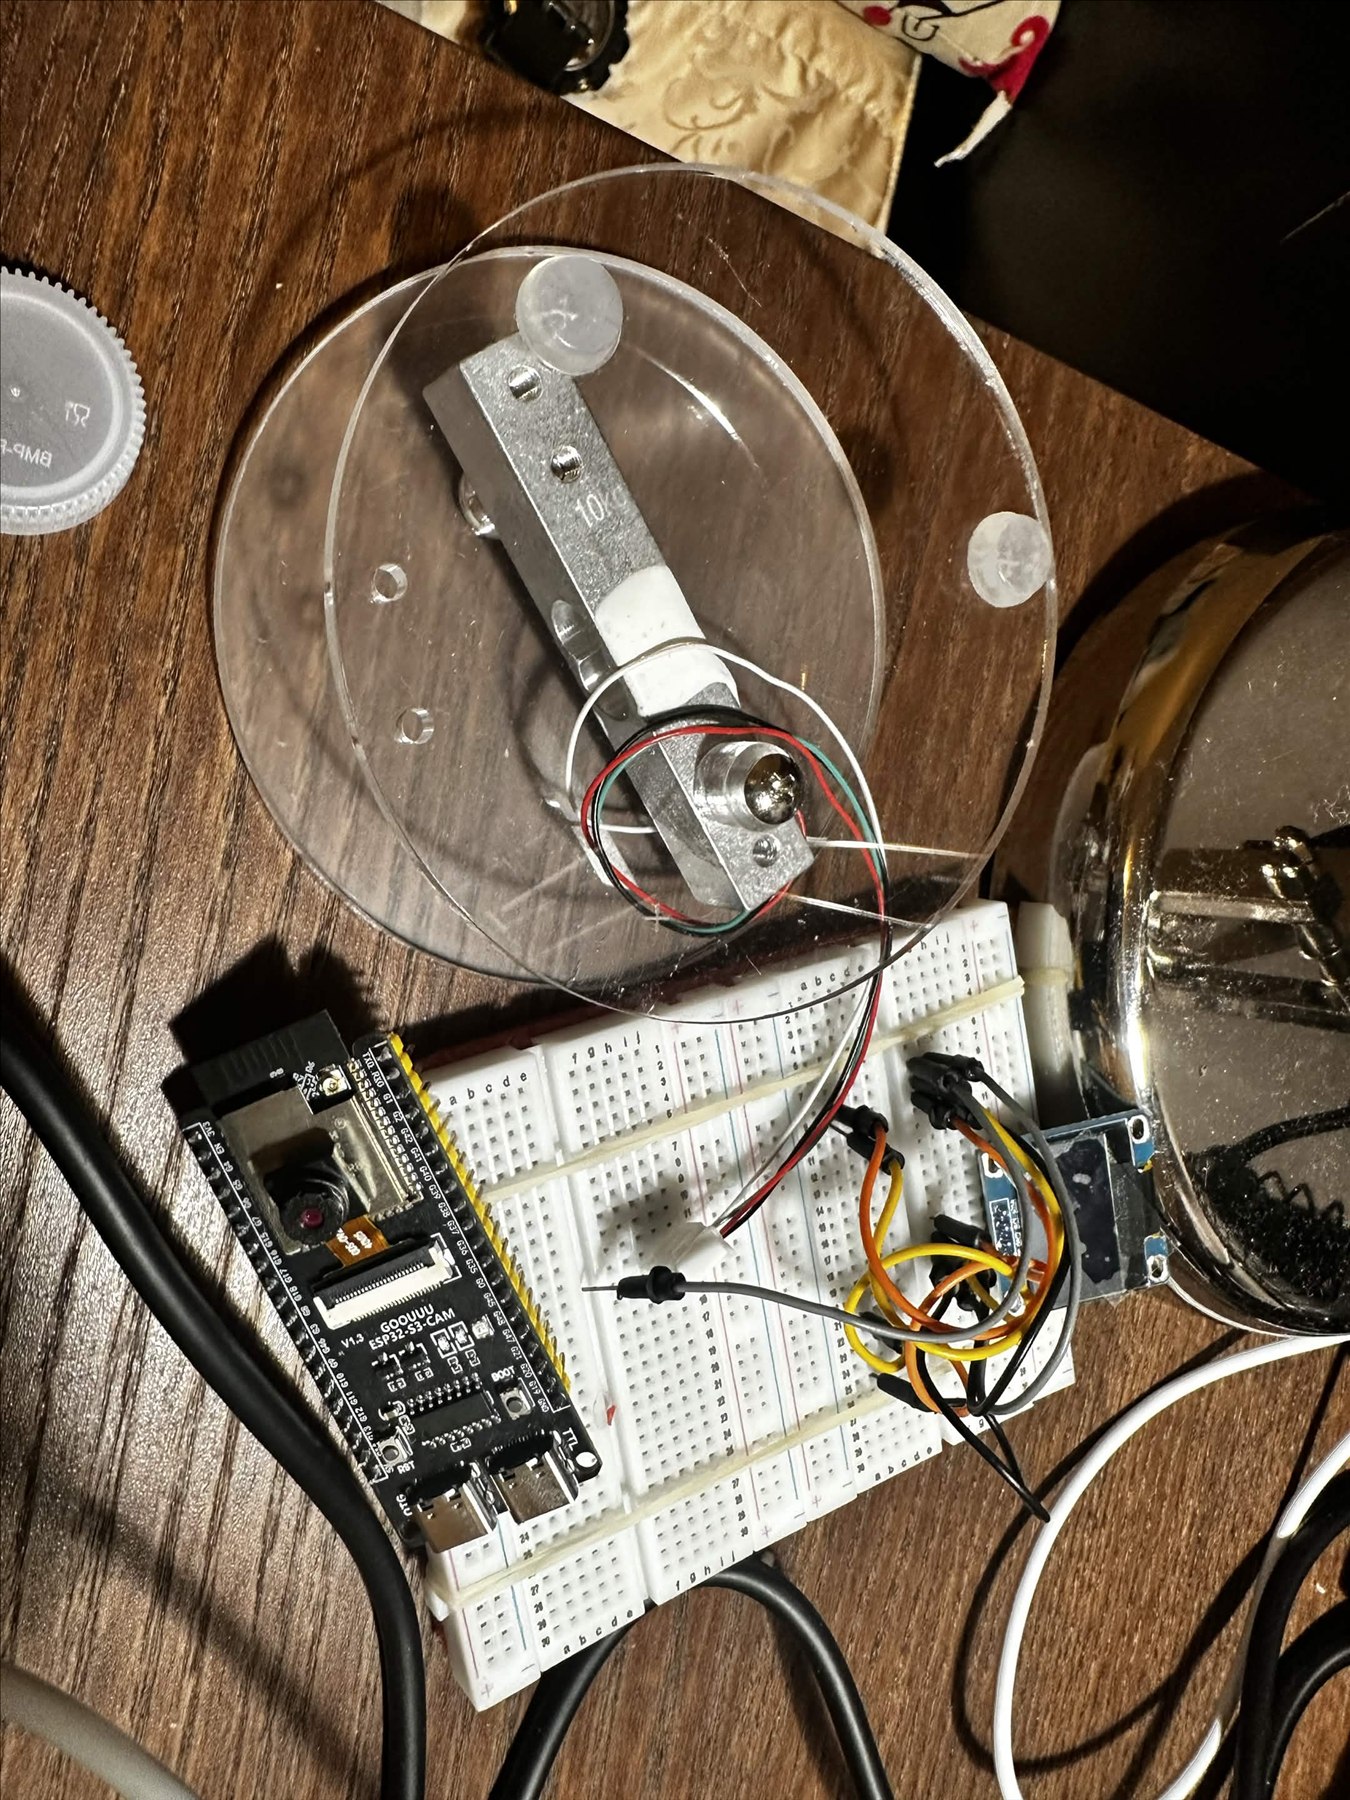 |
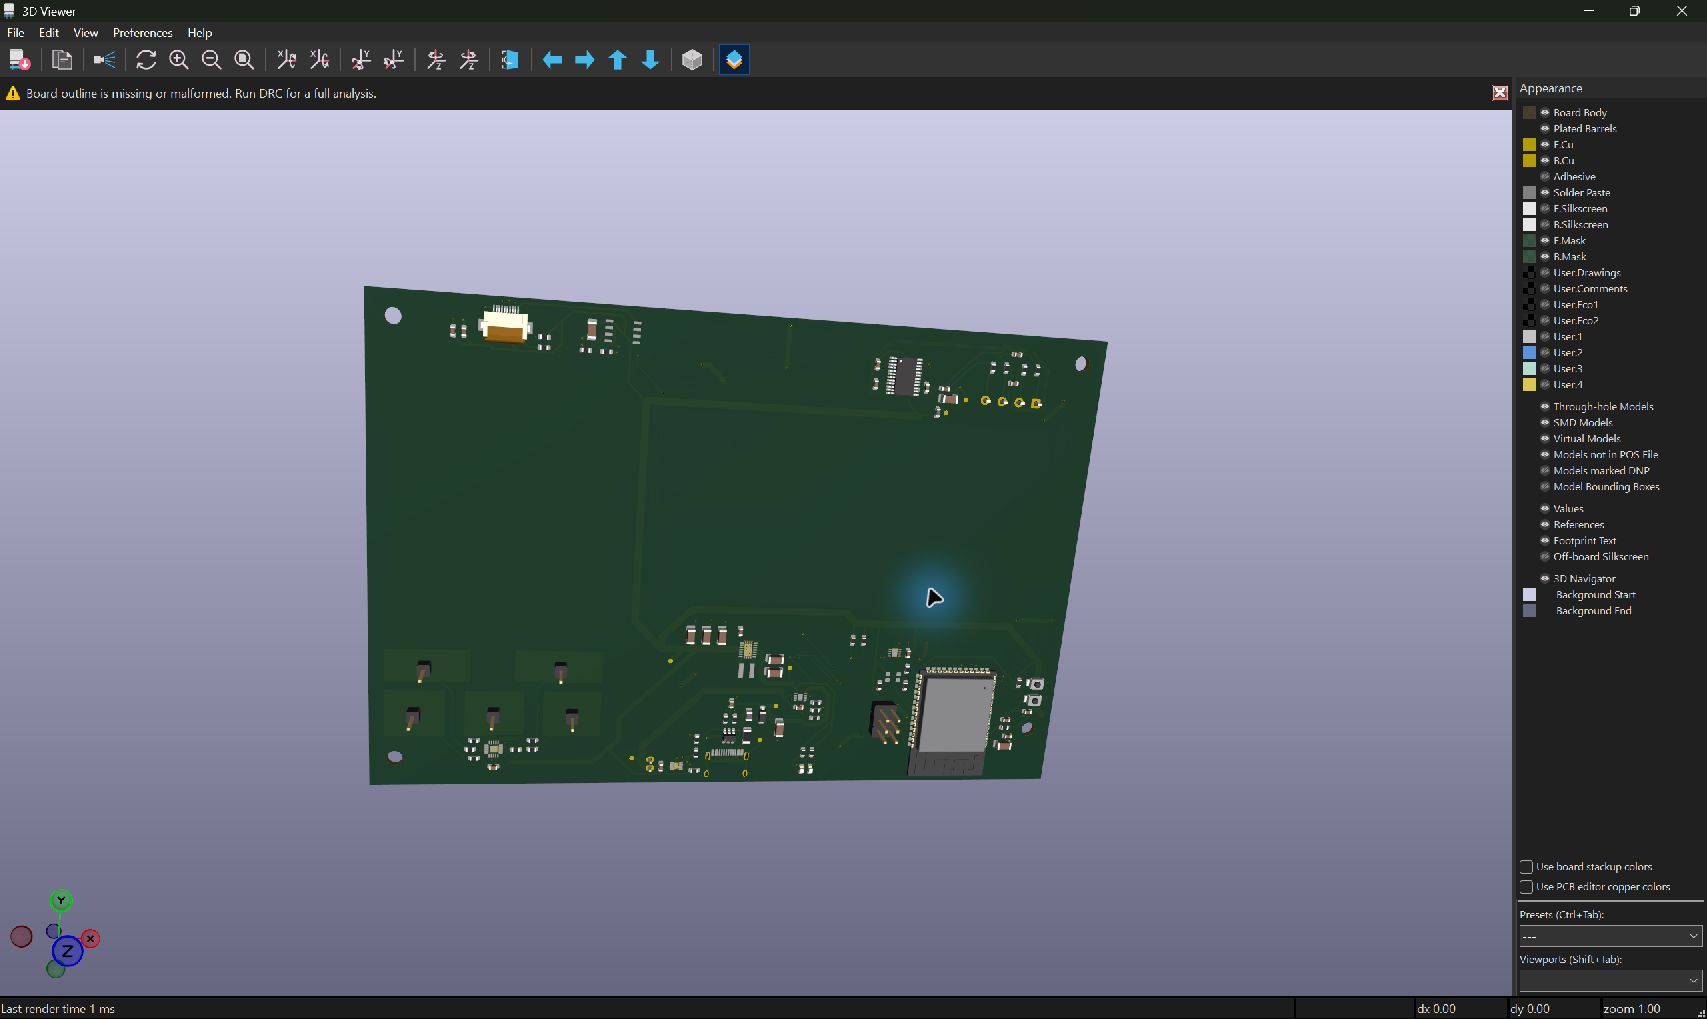
These images show the current work-in-progress electrical and mechanical design.
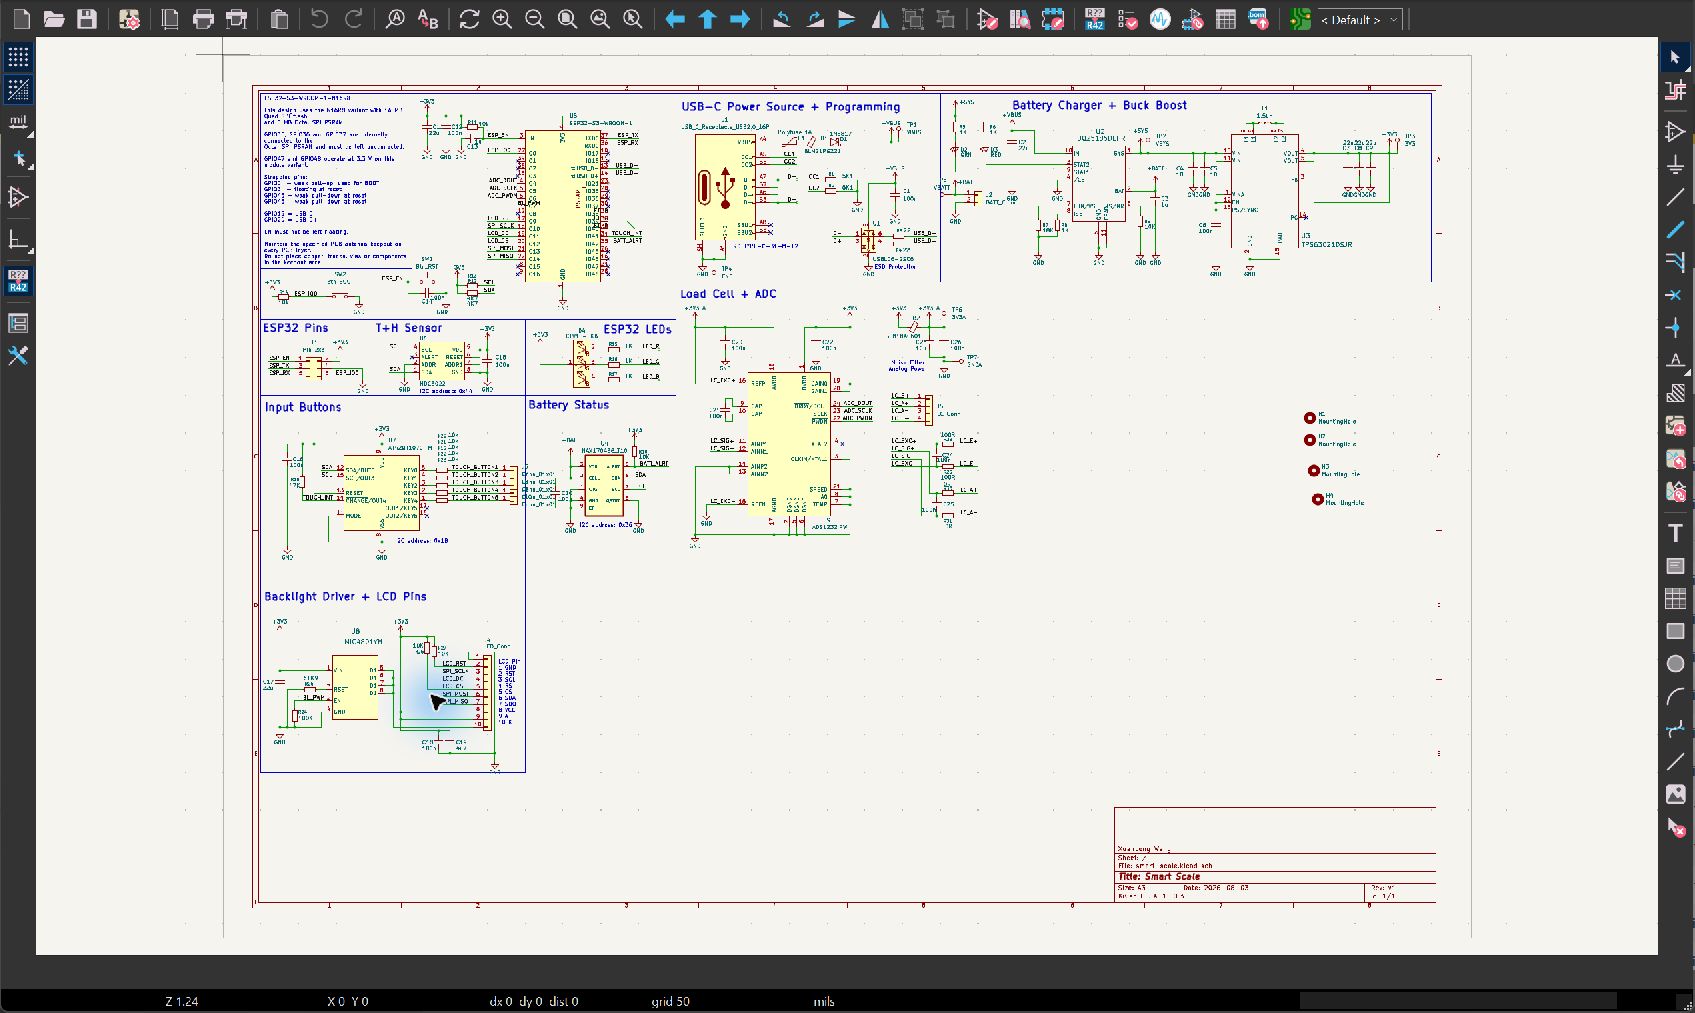
| PCB layout | PCB model |
|---|---|
 |  |
┌──────────────┐  weight + JPEG   ┌─────────────┐  food name   ┌──────────────────┐
│  ESP32-S3    │ ───────────────▶ │   Backend   │ ───────────▶ │  Claude Vision    │
│  + camera    │   POST /identify │  (FastAPI)  │ ◀─────────── │  (claude-sonnet)  │
│  + load cell │                  │             │   macros     ┌──────────────────┐
│  + OLED      │ ◀── live weight  │             │ ───────────▶ │  Open Food Facts  │
└──────────────┘   POST /weight   └─────┬───────┘ ◀─────────── └──────────────────┘
                                        │  GET /weight, /identify, /log, /logs
                                        ▼
                                 ┌─────────────┐
                                 │  Expo app   │  live weight, scan, confirm, log
                                 │  (iOS)      │
                                 └─────────────┘
Pipeline: put food on the scale → press the button (or tap Scan in the app) → the backend identifies the food with Claude Vision → looks up macros on Open Food Facts → the app shows the top matches → you confirm one → the meal is logged.
/app         Expo / React Native app for the legacy prototype
/backend     FastAPI + SQLite API for the legacy prototype
/docs        Camera-free v1 requirements and implementation baseline
/enclosure   SolidWorks sources and printable STL files
/firmware    ESP-IDF firmware for the legacy ESP32-S3-CAM prototype
/hardware    KiCad schematic, PCB, libraries, review notes, and fabrication files
README.md Project overview and statusnpx (app)The backend, the ESP32, and the phone must all be on the same local network.
/backend)FastAPI + SQLite (aiosqlite), httpx, and the Anthropic SDK.
cd backend

# Create and activate a virtual environment
python -m venv .venv
source .venv/bin/activate          # Windows: .venv\Scripts\activate

pip install -r requirements.txt

# Configure API keys
cp .env.example .env               # Windows: copy .env.example .env
#   then edit .env: set ANTHROPIC_API_KEY=sk-ant-... (required), and for the
#   best per-ingredient macros set USDA_FDC_API_KEY (free, instant signup).

# Run (0.0.0.0 so the ESP32 and phone can reach it)
uvicorn app.main:app --host 0.0.0.0 --port 8000 --reload
Find your computer's LAN IP (ipconfig on Windows, ipconfig getifaddr en0 on
macOS) — you'll need it for the firmware and the app.
| Method | Path | Purpose |
|---|---|---|
| POST | /identify | multipart image (JPEG) + weight (g) → dish split into components + macros |
| POST | /log | store a meal (food_name, weight_g, per-100g macros) |
| GET | /logs | all meals, newest first |
| POST | /weight | firmware posts the live weight here ({"weight_g": ...}) |
| GET | /weight | latest weight reading (polled by the app) |
| GET | /identify/latest | the most recent /identify result (e.g. a scale-led scan) |
/identify sends the image to Claude Vision (claude-sonnet-4-6), which breaks
the dish into edible components (a simple food yields one). The measured weight
is split across components by the model's estimates, and each is priced with
macros from USDA FoodData Central (primary — accurate for generic foods),
falling back to Open Food Facts for items USDA lacks. The response lists every
component (name, weight, per-100g macros, matched source) plus summed totals
for the dish. Components with no database match return null macros.
/firmware)ESP-IDF project for the GOOUUU ESP32-S3-CAM (OV2640 camera). Uses the
esp32-camera component, esp_http_client, a raw SSD1306 I2C driver, and a
bit-banged HX711 driver (both included under components/).
| Peripheral | Signal | GPIO |
|---|---|---|
| HX711 load cell | DT | 1 |
| HX711 load cell | SCK | 2 |
| SSD1306 OLED | SDA | 21 |
| SSD1306 OLED | SCL | 47 |
| Button | — | 0 (boot button, active-low) |
| OV2640 camera | — | CAMERA_MODEL_ESP32S3_EYE mapping (GPIO 4–18, reserved) |
Load cell: 1 kg, calibration factor -330. PSRAM pins 35/36/37 are reserved.
firmware/main/config.local.example.h to
firmware/main/config.local.h, then edit the local file:
WIFI_SSID, WIFI_PASSWORDBACKEND_URL → http://<your-computer-ip>:8000cd firmware
idf.py set-target esp32s3
idf.py build
idf.py -p <PORT> flash monitor # e.g. -p COM5 or -p /dev/ttyUSB0PSRAM note:
sdkconfig.defaultsis set for octal PSRAM (the N16R8 module). If your board has quad PSRAM, changeCONFIG_SPIRAM_MODE_OCTtoCONFIG_SPIRAM_MODE_QUAD.
/weight so the app can poll it./identify, shows "SCANNING" during the request, then returns to the weight
display. (The device screen only ever shows the weight — no food names or
macros — per the design.)/app)Expo / React Native (iOS primary), React Navigation bottom tabs.
cd app
npm install
# If Expo reports version mismatches: npx expo install --fix

npx expo start
Then press i for the iOS simulator, or scan the QR code with Expo Go on your iPhone.
Set the backend URL in app/src/config.ts:
export const API_BASE_URL = 'http://192.168.1.50:8000'; // your computer's LAN IP(Use http://localhost:8000 only for the iOS simulator on the same Mac as the
backend.)
GET /weight every 500 ms and shows the live weight.
Scan takes a photo, POSTs it with the current weight to /identify, and
opens the results.POST /log → back to the Scale tab.Design note — where the photo comes from. The hardware pipeline has the scale capture the image (button →
/identify). For a self-contained app that works without the hardware, the in-app Scan button captures with the phone camera and calls the same/identifyendpoint. To instead surface a scale-initiated scan in the app, pollGET /identify/latest(the backend caches the most recent result).
uvicorn ...).API_BASE_URL to your computer's IP, open it on your phone.To simulate the scale's weight feed without hardware:
curl -X POST http://localhost:8000/weight \
  -H "Content-Type: application/json" -d '{"weight_g": 152.0}'
The Scale tab will show 152 g.
| Qty | Value | Footprint | References |
|---|---|---|---|
| 14 | 100n | Capacitor_SMD:C_0603_1608Metric | C1, C6, C10, C12, C14, C15, C16, C18, C20, C21, C22, C24, C25, C26 |
| 7 | 10k | Resistor_SMD:R_0603_1608Metric | R11, R14, R19, R20, R21, R22, R23 |
| 6 | 1K | Resistor_SMD:R_0603_1608Metric | R5, R6, R8, R15, R16, R17 |
| 6 | 22u | Capacitor_SMD:C_1206_3216Metric | C2, C7, C8, C9, C11, C17 |
| 5 | Conn_01x01 | Connector_PinHeader_2.54mm:PinHeader_1x01_P2.54mm_Vertical | J6, J7, J8, J9, J10 |
| 4 | 10K | Resistor_SMD:R_0603_1608Metric | R9, R10, R26, R27 |
| 4 | MountingHole | MountingHole:MountingHole_3.2mm_M3 | H1, H2, H3, H4 |
| 3 | 10u | Capacitor_SMD:C_1206_3216Metric | C4, C5, C23 |
| 2 | 0R | Resistor_SMD:R_0603_1608Metric | R30, R31 |
| 2 | 100R | Resistor_SMD:R_0603_1608Metric | R28, R29 |
| 2 | 1u | Capacitor_SMD:C_0603_1608Metric | C3, C13 |
| 2 | 22 | Resistor_SMD:R_0603_1608Metric | R3, R4 |
| 2 | 4K7 | Resistor_SMD:R_0603_1608Metric | R12, R13 |
| 2 | 5K1 | Resistor_SMD:R_0603_1608Metric | R1, R2 |
| 1 | 1.5uH | Inductor_SMD:L_Coilcraft_XxL4020 | L1 |
| 1 | 100K | Resistor_SMD:R_0603_1608Metric | R24 |
| 1 | 18K | Resistor_SMD:R_0603_1608Metric | R7 |
| 1 | 1N5817 | Diode_SMD:D_SOD-123 | D1 |
| 1 | 3V3 | TestPoint:TestPoint_Pad_D1.0mm | TP3 |
| 1 | 3V3A | TestPoint:TestPoint_Pad_D1.0mm | TP6 |
| 1 | 47K | Resistor_SMD:R_0603_1608Metric | R18 |
| 1 | 4u7 | Capacitor_SMD:C_0603_1608Metric | C19 |
| 1 | 61K9 | Resistor_SMD:R_0603_1608Metric | R25 |
| 1 | ADS1232IPW | Package_SO:TSSOP-24_4.4x7.8mm_P0.65mm | U9 |
| 1 | AT42QT1070-M | Package_DFN_QFN:VQFN-20-1EP_3x3mm_P0.45mm_EP1.55x1.55mm | U7 |
| 1 | BATT_Conn | Connector_JST:JST_PH_S2B-PH-K_1x02_P2.00mm_Horizontal | J2 |
| 1 | BLM18AG601 | Inductor_SMD:L_0603_1608Metric | FB2 |
| 1 | BLM21PG221 | Inductor_SMD:L_0805_2012Metric | FB1 |
| 1 | BQ25185DLHR | smartscale:WSON10_DLH_TEX | U2 |
| 1 | Btn_BOOT | Button_Switch_SMD:SW_SPST_B3U-1000P | SW2 |
| 1 | Btn_RST | Button_Switch_SMD:SW_SPST_B3U-1000P | SW1 |
| 1 | CLV1L-FKB | LED_SMD:LED_Cree-PLCC4_3.2x2.8mm_CCW | D4 |
| 1 | ESP32-S3-WROOM-1 | RF_Module:ESP32-S3-WROOM-1 | U5 |
| 1 | FND | TestPoint:TestPoint_Pad_D1.0mm | TP4 |
| 1 | GNDA | TestPoint:TestPoint_Pad_D1.0mm | TP7 |
| 1 | GRN | LED_SMD:LED_0603_1608Metric | D2 |
| 1 | HDC3022 | smartscale:Texas_DEJ0008A_WSON-8-1EP_2.5x2.5mm_P0.5mm_EP1.2x1.9mm | U6 |
| 1 | LCD_Conn | Connector_FFC-FPC:Hirose_FH12-10S-0.5SH_1x10-1MP_P0.50mm_Horizontal | J4 |
| 1 | LC_Conn | TerminalBlock_Phoenix:TerminalBlock_Phoenix_MKDS-1-4-3.81_1x04_P3.81mm_Horizontal | J5 |
| 1 | MAX17048G_T10 | smartscale:MAX17048G_T10 | U4 |
| 1 | MIC4801YM | smartscale:SOIC-8_M_MCL | U8 |
| 1 | Pin 2x3 | Connector_PinHeader_2.54mm:PinHeader_2x03_P2.54mm_Vertical | J3 |
| 1 | Polyfuse 1A | Fuse:Fuse_1206_3216Metric | F1 |
| 1 | RED | LED_SMD:LED_0603_1608Metric | D3 |
| 1 | TPS63021DSJR | smartscale:DSJ14_2P85X1P58 | U3 |
| 1 | USBLC6-2SC6 | Package_TO_SOT_SMD:SOT-23-6 | U1 |
| 1 | USB_C_Receptacle_USB2.0_16P | Connector_USB:USB_C_Receptacle_HRO_TYPE-C-31-M-12 | J1 |
| 1 | VBATT | TestPoint:TestPoint_Pad_D1.0mm | TP5 |
| 1 | VBUS | TestPoint:TestPoint_Pad_D1.0mm | TP1 |
| 1 | VSYS | TestPoint:TestPoint_Pad_D1.0mm | TP2 |
It measures 150 × 101 mm and has 2 copper layers, 1.6 mm thick.
97 parts, built around the ESP32-S3-WROOM-1-N8, ADS1232IPW, AT42QT1070-MMH and MIC4801YM. The full list of its parts is on this page, with links to each part's symbol and footprint where PCBKit's library has them.
From the wngxp/smart-scale repository on GitHub, at the commit this page was made from: the board is hardware/smart-scale.kicad_pcb and its schematic hardware/smart-scale.kicad_sch. PCBKit opens the board in the browser, with nothing to install.
Its repository states no licence, so its author keeps all rights: ask wngxp before reusing the design.
benkuper/BenTo-Legacy
Legacy repository for the former BenTo-Club project


houseofthe051010/ESP32-Walkie-Talkie-V2
This ESP32 Walkie Talkie is redesigned with a SX1262 radio, a PCB, and a full case redesign.

Patkra77111/ESP32_Falcon
This is custom ESP32 board with the IMU BMI270.


sihyun-noh/zephyr_485toSDI12
Zephyr RTOS 기반 Dajilog MCU 장비의 firmware, custom board 정의, 공통 component, KiCad hardware source를 함께 관리하는 repository입니다.

patchez98/TartarSauce
Replacement for Razer Nostromo / Tartarus / Orbweaver with mechanical switches and analog thumbstick

MG-5/vfd-clock-hardware
Hardware for controlling six VFD IV-17 tubes as clock (HH:MM:SS)