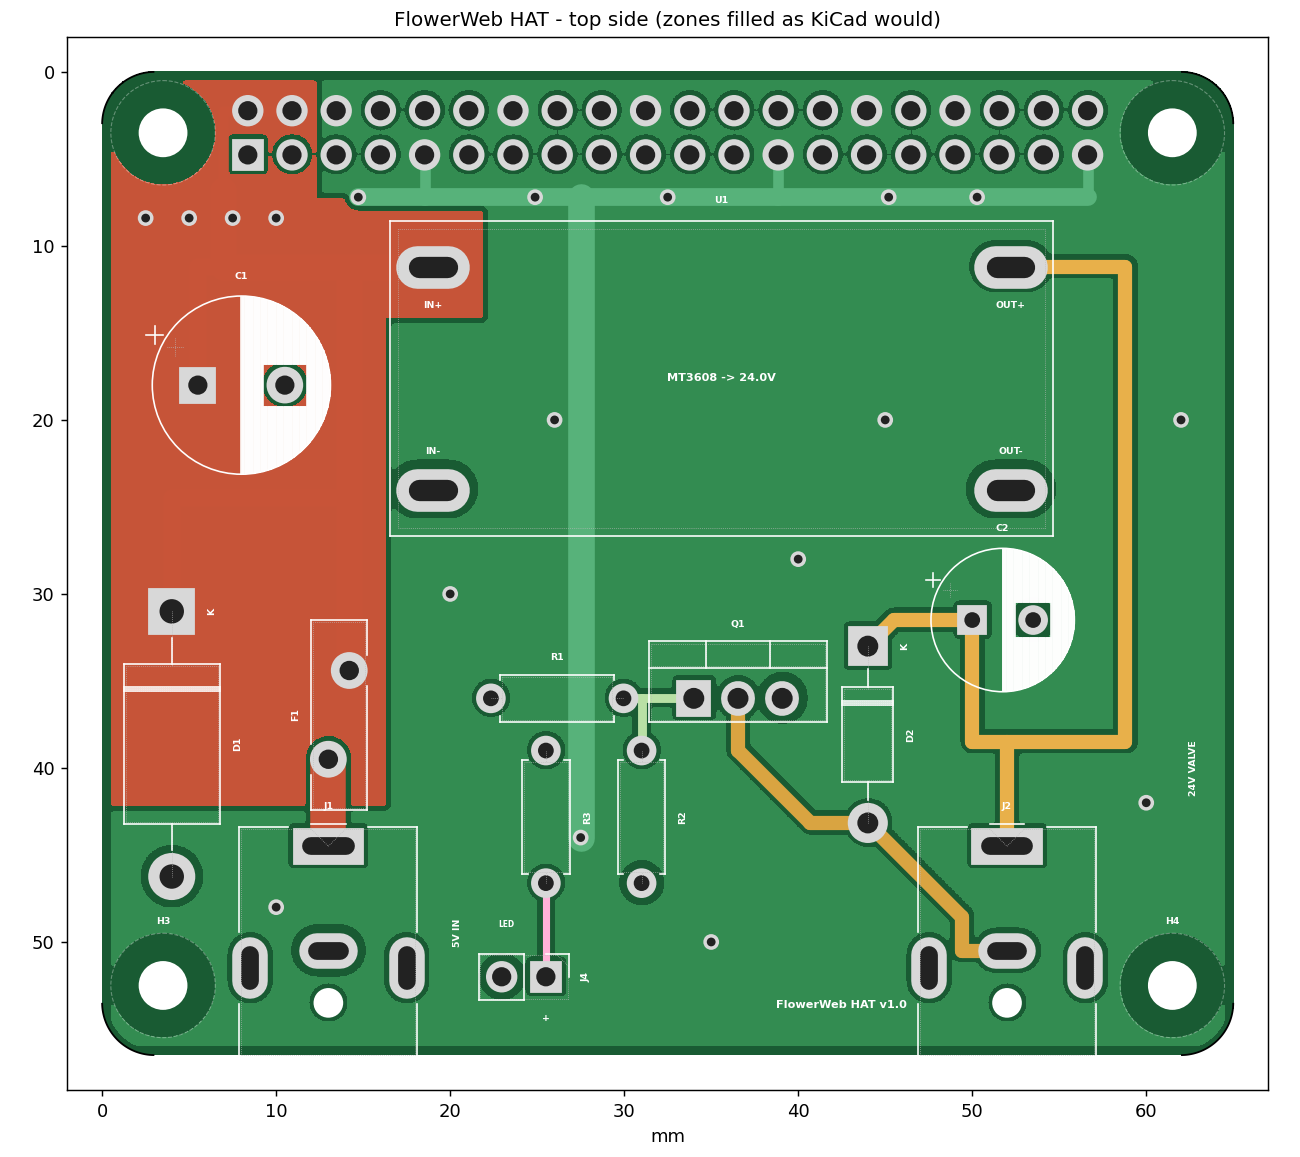
Flowerweb hat
Remote flower watering system with raspberry pi over tailscale net
- Size
- 65 × 56.5 mm
- Copper layers
- 2
- Thickness
- 1.6 mm
- Parts
- 18
- Nets
- 9
- Pads
- 79
- Tracks, vias
- 83, 18
- Pours
- 8
- Routed
- Yes
- KiCad
- KiCad 7 (file 20221018)
- Created
- 23 Sep 2026
- Updated
- 23 Sep 2026
Overview
Flowerweb hat is an open-source printed circuit board by versarite, from the versarite/Flowerweb repository on GitHub. It is a 2-layer board of 65 × 56.5 mm with 18 parts on 9 nets, routed with 83 tracks and 18 vias.
It is built around the M2.5, PJ-063AH and 1.5KE6V8A, with the TIP121 among its other parts. Its parts include 4 connectors, 3 resistors, 2 capacitors, 2 diodes and 1 IC. It belongs with the home automation and IoT boards of this library.
Main components
4M2.5
-0.45mm 2.5mm 2mm 5mm DIN934 Hex M2.5X0.45 Nickel plated Silver white - Hexagonal nutsShuntianHex NutPJ-063AH
插件-25℃~+85℃ 24V 2mm 6.5mm 8A DC Power Jack Right Angle 插件 DC Power Connectors ROHSCUIDC Power Connectors1.5KE6V8A
DO-2011.5kW 13.4V 1mA 5.8V 6.8V 746A@8/20us TVS Unidirectional DO-201 ESD and Surge Protection (TVS/ESD) ROHSSTMicroelectronicsESD And Surge Protection (TVS/ESD)TIP121
TO-220-31000 2.5V 200uA 2W 4V 5A 5V 80V NPN TO-220-3 Darlington Transistors ROHSSTMicroelectronicsDarlington Transistors
README
hardware/kicad/README.mdFlowerWeb HAT (KiCad)
A Raspberry Pi HAT (65 × 56.5 mm, 2 layers) that powers the Pi from a 5 V barrel jack and switches a 24 V valve from GPIO18.

Files
| File | What it is |
|---|---|
flowerweb_hat.kicad_pro | KiCad project. Open this one |
flowerweb_hat.kicad_sch | Schematic (also as schematic.pdf) |
flowerweb_hat.kicad_pcb | Board layout |
flowerweb.kicad_sym, flowerweb.pretty/ | Project symbol and footprint library (MT3608 module footprint) |
BOM.csv | Parts list |
preview_*.png | Rendered previews |
Written in KiCad 7 format, so it opens in KiCad 7, 8 and 9. All other footprints come from the standard KiCad libraries.
Circuit
- 5 V input (J1): PJ-063AH jack (5.5 × 2.1 mm, rated 8 A) → F1 6 A resettable fuse → +5V. D1 (1.5KE6V8A TVS) clamps overvoltage and conducts if the plug is reversed, which trips F1. C1 470 µF is bulk capacitance.
- Raspberry Pi (J3): 2 × 20 socket on the bottom side. +5V goes to pins 2 and 4 (the Pi is back-powered through the header), GND to all eight ground pins.
- 24 V (U1): MT3608 step-up module, 5 V → 24 V, with C2 100 µF / 35 V on the output.
- Valve driver: GPIO18 (pin 12) → R1 1 kΩ → TIP121 base. R2 10 kΩ pulls the base low so the valve stays shut while the Pi boots. The TIP121 switches the low side of the valve, and D2 (1N4007) absorbs the coil's turn-off spike.
- Valve jack (J2): PJ-063AH. Centre pin = +24 V, sleeve = switched side. The sleeve is not ground, so don't connect it to anything else.
- Status LED (J4): 3.3 V (pin 17) → R3 220 Ω → header pin 1 (LED +). Pin 2 = LED −. That's about 6 mA for a red or green LED. Use a lower value (e.g. 68 Ω) for blue or white.
Before ordering
- Open
flowerweb_hat.kicad_proin KiCad. - In the PCB editor press B (Fill all zones). The copper pours are saved unfilled. Every connection, GND and 5V included, is also made by traces, so there are no ratsnest lines even before filling. The pours add copper area for the 5 A current, so always fill them before ordering.
- Run Inspect → Design Rules Checker and, in the schematic, Inspect → Electrical Rules Checker. The board was checked with independent clearance, pour and connectivity checks while it was being made, but it has not yet been opened in KiCad itself. Run both checks once before ordering.
- Optional: Tools → Update Footprints from Library adds the 3D models for the 3D viewer. Afterwards, check that J3's pin 1 is still next to mounting hole H1.
- Plot Gerbers and drill files (File → Fabrication Outputs). The board uses standard rules (0.2 mm clearance, 0.3 mm tracks, 0.4 mm vias) that every PCB fab supports. The MT3608 pads have slotted holes, which most fabs (JLCPCB, PCBWay, Aisler) make at no extra cost.
Assembly notes
- Set the MT3608 to 24.0 V before soldering it in. Feed it 5 V, turn the trimmer and measure. The TIP121 drops about 1 V, so the valve sees roughly 23 V. Set 25 V if your valve needs the full 24.
- MT3608 modules differ slightly between sellers. Line up the IN+ / IN− / OUT+ / OUT− marks on the PCB with the ones on the module. The slotted pads allow about ±1 mm. Solder the module on with short wire legs (cut resistor leads work).
- Solder the 2 × 20 socket on the bottom side. Mount the HAT with M2.5 standoffs. The usual height is 11–12 mm, but measure yours with the socket plugged in.
- Raspberry Pi 5: add
usb_max_current_enable=1to/boot/firmware/config.txt. Otherwise the Pi 5 limits USB current when it's powered through the GPIO header. - The TIP121 needs no heatsink at 150 mA (about 0.15 W).
- No ID EEPROM and no camera/display cable slot are included.
License
PolyForm Noncommercial 1.0.0. See LICENSE.md in the project root.
Copyright DL1BWA 2026
Parts
18| Qty | Value | Footprint | References |
|---|---|---|---|
| 4 | M2.5 | MountingHole:MountingHole_2.7mm_M2.5 | H1, H2, H3, H4 |
| 2 | PJ-063AH | Connector_BarrelJack:BarrelJack_CUI_PJ-063AH_Horizontal | J1, J2 |
| 1 | 1.5KE6V8A | Diode_THT:D_DO-201AE_P15.24mm_Horizontal | D1 |
| 1 | 100uF 35V | Capacitor_THT:CP_Radial_D8.0mm_P3.50mm | C2 |
| 1 | 10k | Resistor_THT:R_Axial_DIN0207_L6.3mm_D2.5mm_P7.62mm_Horizontal | R2 |
| 1 | 1N4007 | Diode_THT:D_DO-41_SOD81_P10.16mm_Horizontal | D2 |
| 1 | 1k | Resistor_THT:R_Axial_DIN0207_L6.3mm_D2.5mm_P7.62mm_Horizontal | R1 |
| 1 | 220 | Resistor_THT:R_Axial_DIN0207_L6.3mm_D2.5mm_P7.62mm_Horizontal | R3 |
| 1 | 470uF 10V | Capacitor_THT:CP_Radial_D10.0mm_P5.00mm | C1 |
| 1 | MF-RG600 (6A) | Fuse:Fuse_Bourns_MF-RG600 | F1 |
| 1 | MT3608 module | flowerweb:MT3608_Module | U1 |
| 1 | Raspberry Pi 40-pin | Connector_PinSocket_2.54mm:PinSocket_2x20_P2.54mm_Vertical | J3 |
| 1 | STATUS LED | Connector_PinHeader_2.54mm:PinHeader_1x02_P2.54mm_Vertical | J4 |
| 1 | TIP121 | Package_TO_SOT_THT:TO-220-3_Vertical | Q1 |
Questions
How big is the Flowerweb hat PCB?
It measures 65 × 56.5 mm and has 2 copper layers, 1.6 mm thick.
What parts does the Flowerweb hat use?
18 parts, built around the M2.5, PJ-063AH, 1.5KE6V8A and TIP121. The full list of its parts is on this page, with links to each part's symbol and footprint where PCBKit's library has them.
Where can I download the Flowerweb hat KiCad files?
From the versarite/Flowerweb repository on GitHub, at the commit this page was made from: the board is hardware/kicad/flowerweb_hat.kicad_pcb and its schematic hardware/kicad/flowerweb_hat.kicad_sch. PCBKit opens the board in the browser, with nothing to install.
Can I use the Flowerweb hat design in my own project?
Its repository states no licence, so its author keeps all rights: ask versarite before reusing the design.
Similar boards
- 2 layers95.9 × 112.6 mm

- 2 layers75 × 50 mm

Aire apollo
makespacemadrid/ApolloVentilator
Nos gustaría ser el Marlin de los ventiladores :)
37 parts6GPL-3.0 - 2 layers96.6 × 100 mm

- 2 layers81.2 × 82.6 mm

- 4 layers243.8 × 171.5 mm

- 4 layers151.7 × 39.8 mm

- 6 layers55 × 120 mm

BitForge Nano
WantClueTechnologies/BitForge-Nano
This project presents a fully open-source Bitcoin mining hardware platform, designed for transparency, modularity, and extensibility.
220 parts15CERN-OHL-S-2.0 - 2 layers90 × 90 mm

PlasmaTransformer
inceptionev/PlasmaTransformer
This project mainly focuses on creating a driver and 3D-printed support structure that allows for safe continuous operation of a plasma toroid.
86 parts14