Skip to the content
2 layers33.9 × 19.2 mmDiabolic drive programmer, the printed circuit board in 3D

Diabolic drive programmer

unit72784/Diabolic-Drive143

Stealthy, modern, wireless keystroke injection tool in a universal 4 layer double-sided flash drive PCB form factor with 64 GB storage

Size
33.9 × 19.2 mm
Copper layers
2
Thickness
1.6 mm
Parts
21
Nets
43
Pads
138
Tracks, vias
280, 19
Pours
1
Routed
Yes
KiCad
KiCad 7 (file 20221018)
Created
19 Apr 2023
Updated
1 Jun 2025

Overview

Diabolic drive programmer is an open-source printed circuit board by unit72784, from the unit72784/Diabolic-Drive repository on GitHub. It is a 2-layer board of 33.9 × 19.2 mm with 21 parts on 43 nets, routed with 280 tracks and 19 vias.

It is built around the ATMEGA32U4-MU. Its parts include 9 capacitors, 6 resistors, 3 connectors, 1 IC and 1 diode. It belongs with the interfaces and adapters boards and the AVR (ATmega, ATtiny) boards of this library.

Main components

1

README

README.md

Diabolic Drive

💀 The final Diabolic Drive firmware is live — locked, loaded, and lethal.This isn’t just an update — it’s a full-scale upgrade built for offensive ops in the real world. Designed by UNIT 72784. One mind. Full control. For every hacker. You’ve waited long enough. Flash it. Wreck everything. Break what must be broken. 💀

New firmware installation instructions are here.

Diabolic Drive Teaser | A True Red Teaming Device That will Keep Evolving
Watch Diabolic Drive Teaser


:bangbang: Diabolic Drive default access point credentials are:
Wi-Fi SSID: DDv1
Password: diabolic_drive :bangbang:

Firmware ChangeLog

1. Dynamic Hardware ID Spoofing :

Spoof the VID and PID of your Diabolic Drive over the Web UI using the USBID command.

2. Side-Channel Exfiltration with Keystroke Reflection

Capture and reflect keystrokes in real-time for stealthy data extraction.

3. LangIgnore Mode

No layout? No problem. Payloads are delivered consistently using ALT + numpad ASCII codes, bypassing language settings across all keyboard layouts.

4. OS Detection

Automatically detects the target operating system so you can adapt payloads accordingly.

5. Configurable Random Typing Cadence

Human-like keystroke timing to avoid behavioral detection systems.

6. Revamped Web UI

Completely refreshed interface — cleaner, faster, and more intuitive than ever.

7. DNS Redirection with Captive Portal

ensures all requests go to the onboard web server, displaying a captive portal instead of a “no internet” message. On mobile devices, it eliminates the need to disable mobile data to access the web interface.

8. Stability & Performance

Tons of under-the-hood bug fixes, stability improvements, and overall performance boosts.

Usage

  1. Plug in your Diabolic Drive
  2. Connect to the WiFi network DDv1 with the default password diabolic_drive
  3. Open the browser on the device you used to connect to your Diabolic Drive and visit 192.168.4.1 or diabolic.drive
  4. Your Diabolic Drive comes preloaded with a test Ducky script, which I used in the testing phase to check if the Diabolic Drive key stroke injection works properly. No worries about it; it's just a powershell command that retrieves the credentials of the Diabolic Drive access point from your Windows machine if it's already saved and you have connected to it from your computer before.
  5. To access Settings along with other menus, click on the 3 horizontal bars icon (top right corner).

‼️The software that comes preloaded with the already-shipped Diabolic Drive is in a very early beta phase (built on WiFiDuck) with some modifications to suit the Diabolic Drive and to integrate the Spectre POC feature just to get things up and running. After ensuring all Diabolic Drives are delivered to the backers, I will start working on the software side and adding features to it.‼️

✅ This is now complete. Final firmware is released.


Feel free to subscribe to the UNIT 72784 YouTube channel; many great videos, feature updates and use-case scenarios will be posted there very soon!

About

Diabolic Drive isn’t just another HID injector — it’s a full-blown offensive implant wrapped in the body of a perfectly normal 64GB flash drive.

Plug it in and it plays the part: real storage, clean profile, zero suspicion. But behind the scenes, it’s wirelessly waiting to strike — injecting keystrokes, executing payloads, and slipping past defenses in plain sight.

Built for red teamers, crafted for covert ops, and born for social engineering. This isn’t a bad USB — it’s the next generation.

Diabolic-Drive-PCB


Why Diabolic Drive ?

What’s the one USB device people still trust enough to plug in without thinking? A flash drive. No cables. No adapters. Just something simple, familiar, and everywhere.

Think about it — when was the last time you plugged in a USB cable just for data? Now think about how often flash drives get used. Exactly.

But just looking like a flash drive isn’t enough anymore — people are catching on. So Diabolic Drive doesn’t just look legit — it is legit. A full 64GB of real, usable storage. No gimmicks. No dead shells. Plug it in, and it behaves exactly like a standard thumb drive.

That’s what makes it dangerous.

It blends in, earns trust, and delivers payloads with surgical precision. Whether you’re baiting targets in the wild or slipping it into a physical pentest, Diabolic Drive is built for the job — engineered for social engineering.

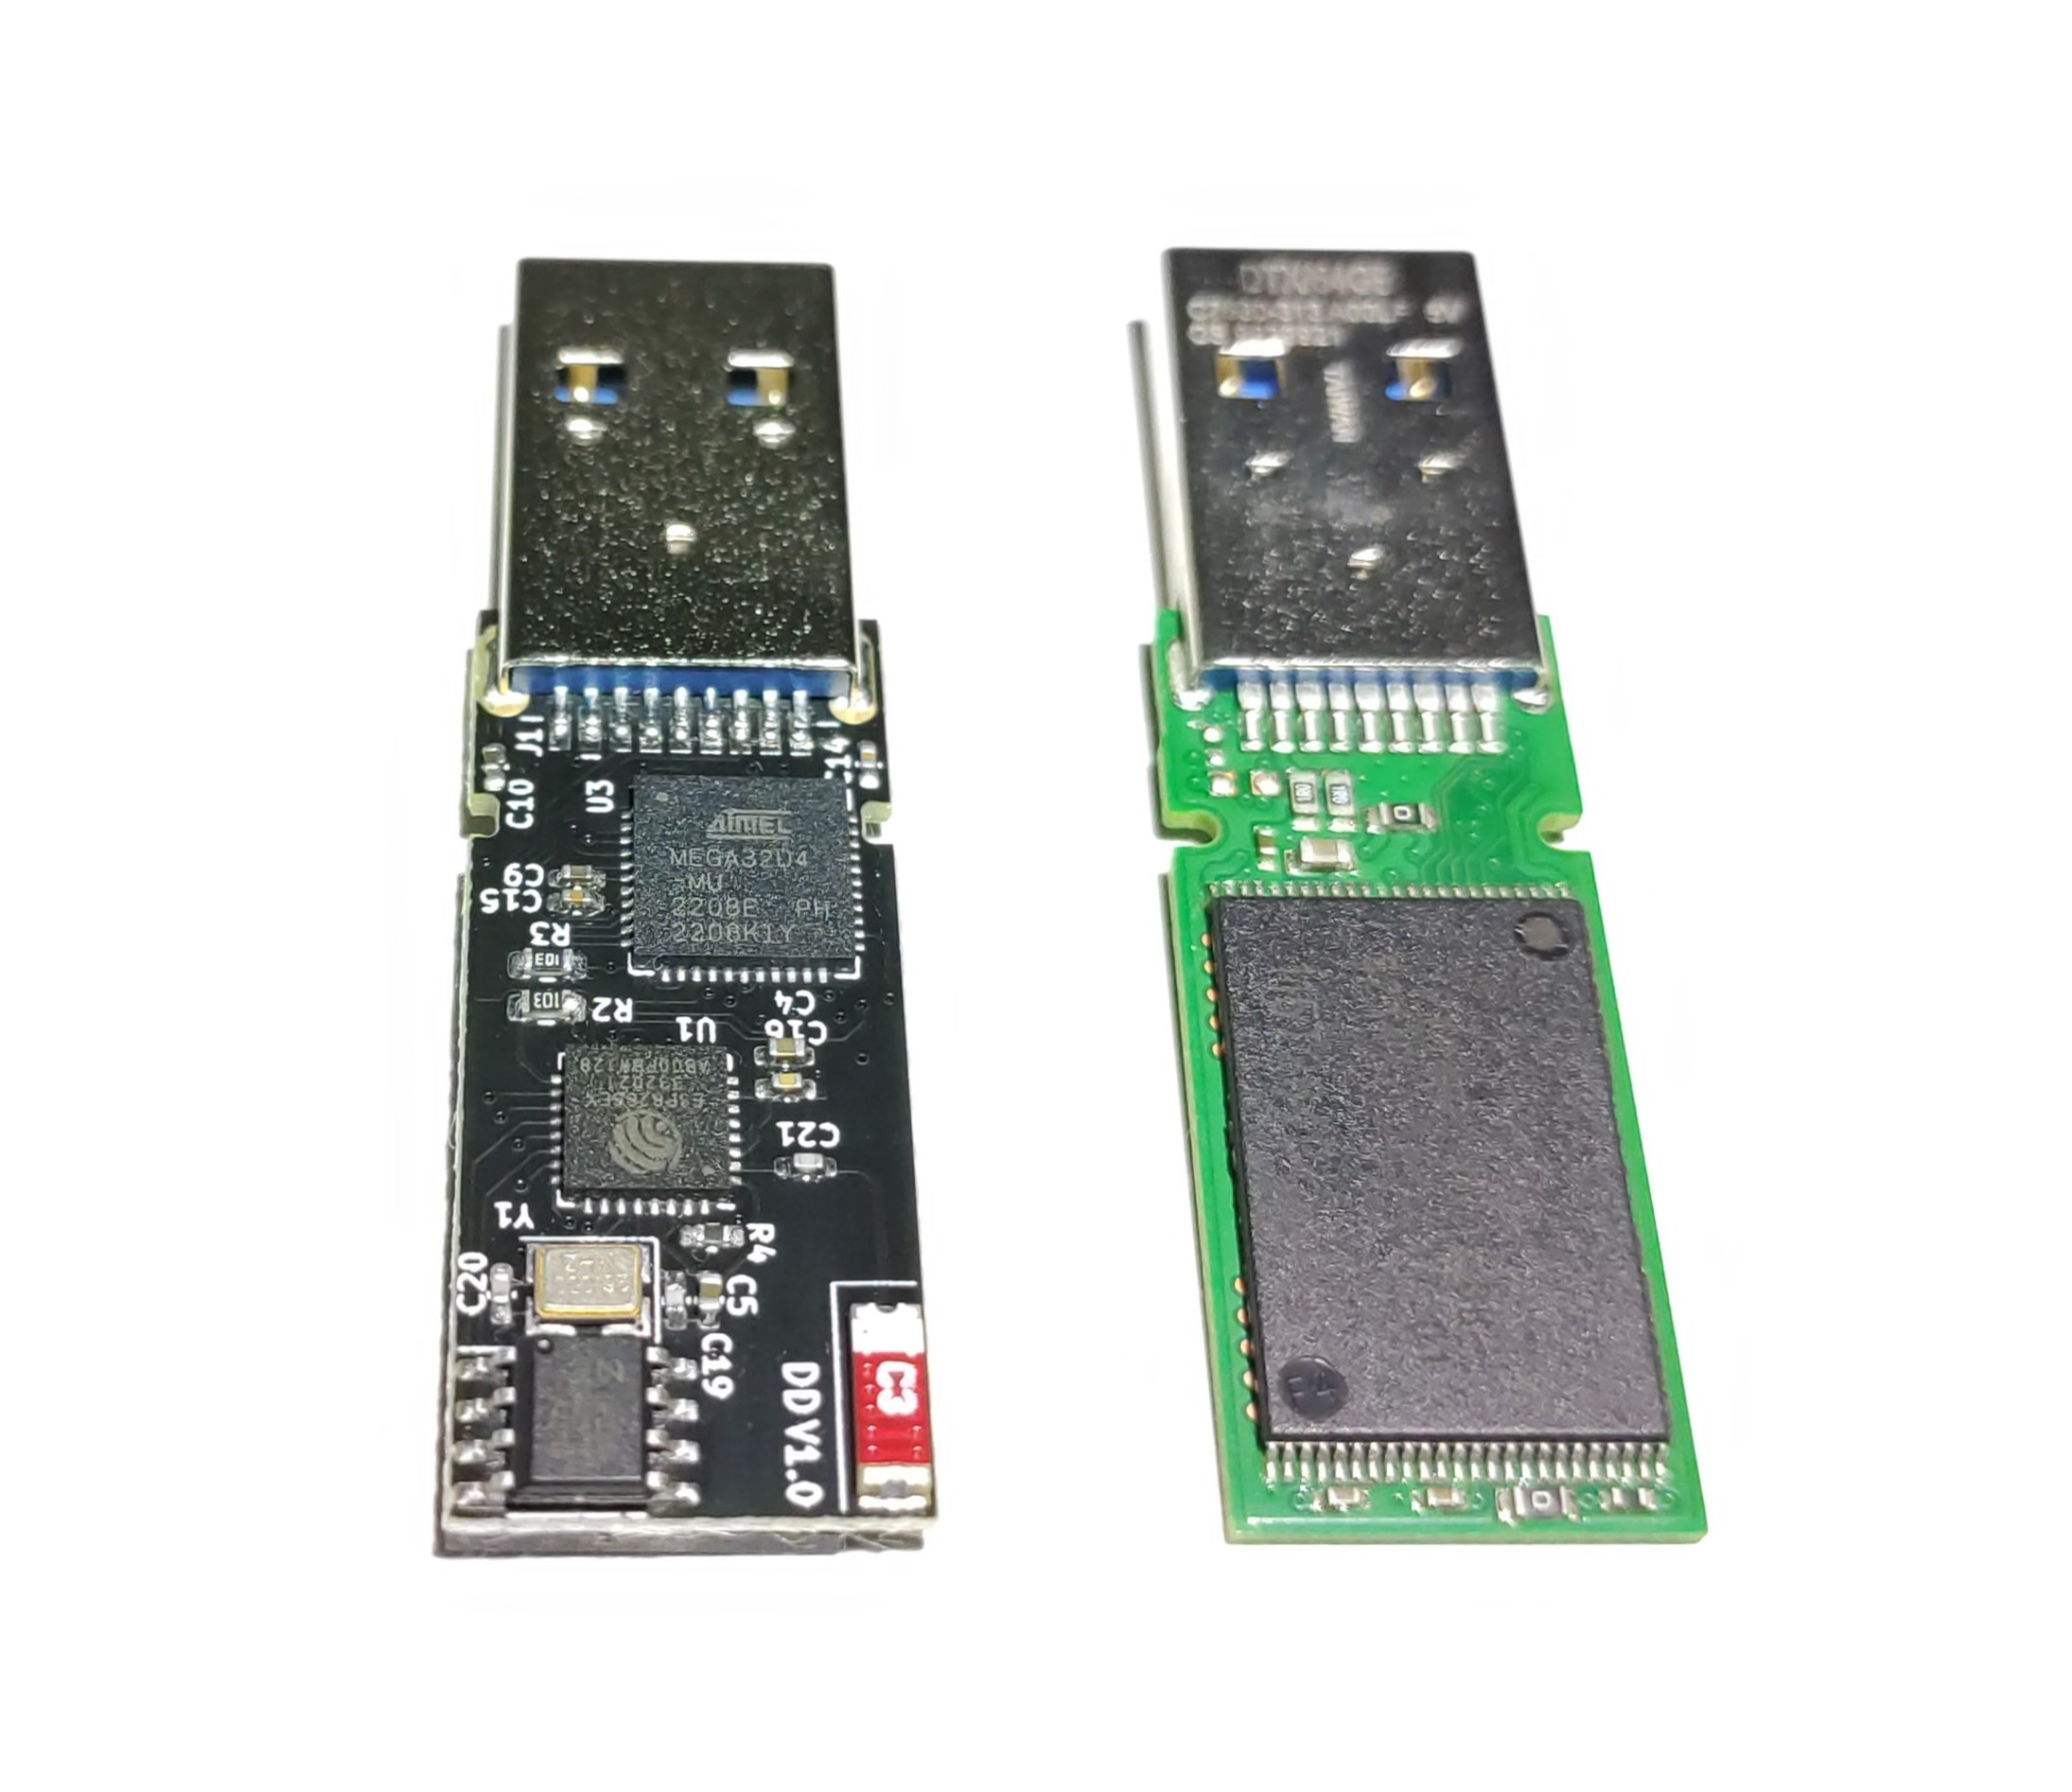
Diabolic Drive vs genuine flash drive

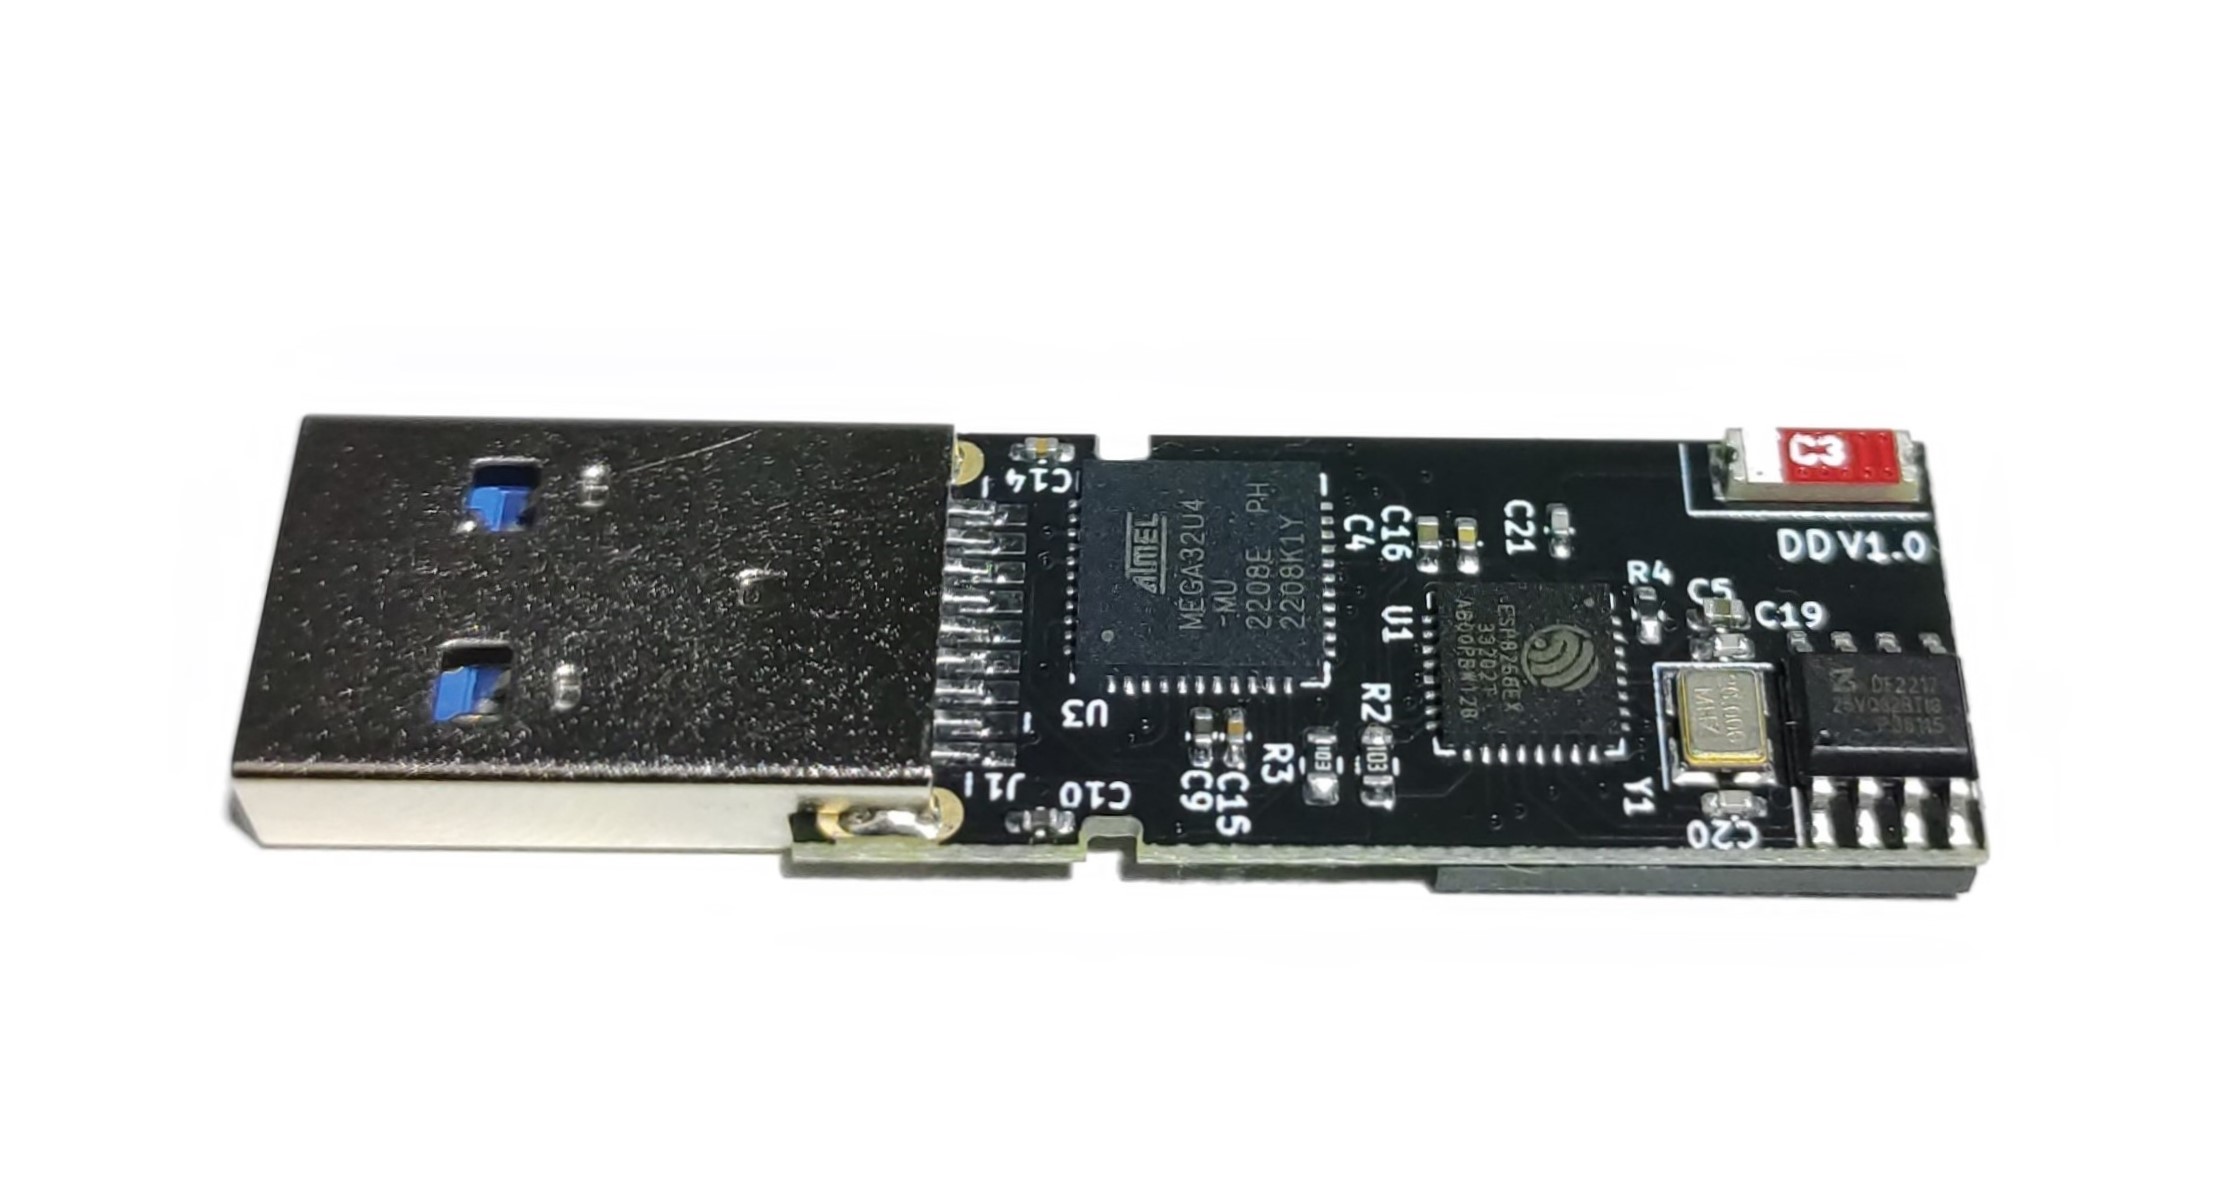
*Diabolic Drive on the left, standard flash drive on the right

How Stealth can Diabolic Drive go ?

there are 4 main features that make Diabolic Drive very Stealth

  • PCB design is in Universal Flash Drive PCB shape. For any person with good security awareness, plugging in a generic-looking or very old-fashioned USB 2.0 flash drive might not be the best option to go for., This is why I decided to go with the trendy shapes of modern-looking USB 3.0 flash drives and the most common available models. I did lots of recon, got many models disassembled, identified the PCB dimensions, and finally managed to get a universal PCB shape that I needed to design my PCB identical to to help the Diabolic Drive be much more stealthy, hiding itself in many common USB 3.0 flash drive enclosures out there! Disclaimer : Enclosure in image below is for demonstration purposes only !

Diabolic Drive hidden in enclosure

  • plug in your Diabolic Drive to a USB port will raise only one USB plug in sound When Diabolic Drive is plugged into a host computer, it acts just like a regular USB flash drive, including any audio notifications you would normally hear when plugging in a new USB device. Your computer will identify Diabolic Drive as a flash drive, HID device, and virtual COM port simultaneously (Now with SPECTRE, your computer will only identify it as a flash drive, and the HID interface remains dormant until you fire your payload.), but will only trigger an audio notification once, which is how a standard drive would behave.

Diabolic Drive Stealthy Feature 'audio notification ping once !'
Watch Diabolic Drive Stealthy Feature Demo

  • Hardware IDs are spoofable. Diabolic Drive Flash storage hardware IDs can be spoofed for maximum stealthiness. These IDs include VID, PID, Vendor info, Product info, Rev info, Vendor string, Product String, and SN. This makes distinguishing Diabolic Drive very difficult!

 Diabolic Drive in 'Stealth mode,' with spoofed hardware IDs
Watch Diabolic Drive in "Stealth mode," with spoofed hardware IDs

Have a look at the image below. Can you spot which one is Diabolic Drive?

Diabolic Drive's Hardware IDs

  • a stealth mode that can be preprogrammed and makes your computer read the ATMEGA32U4 as a HID device only, hiding its identity of running an Arduino Bootloader and its COM port from the Windows device manager, which enhances Diabolic Drive's covert usability.
  • the Spectre status, which you can learn more about here.

spectre thumbnail - Copy

Features

Diabolic Drive runs on humble, battle-tested hardware — but don’t let that fool you. It’s been pushed to its absolute limits with stealth, control, and adaptability in mind. Designed to give you full flexibility, total control, and future-proof expansion, all without sacrificing speed or stealth.

✅ Features Ready (Out of the Box)

  • Dual Communication (Serial + I²C)
    ATMEGA32U4 and ESP8266 are wired over both Serial and I²C, making it compatible with nearly every open-source firmware built for these two chips.

    Supports: WiFi Duck, WiFi Ducky, ESPloitV2, WHID, supremeDuck, and more.

  • Payloads + Storage — Simultaneously
    Fire off keystrokes and read/write real data at the same time.
    Full 64GB flash storage is usable even while executing wireless payloads.

  • Web-Based Control Interface
    No apps, no drivers. Just connect over Wi-Fi and command everything from a clean, mobile-friendly Web UI.

  • Hardware ID Cloning
    Clone the ATMEGA32U4 and Flash storage hardware IDs (VID, PID, etc.) for stealth.

    Note: not supported live/on-the-fly — but fully programmable. Now Dynamic Hardware ID Spoofing works over the Web UI using the USBID command.

Flash Software

I know I'm very bad at explaining things, but I will ensure I make a series of Youtube videos for a better explanation of how this process works very soon. :) Also, feel free to do yours, and I will put your links here.:)

See Here : New firmware installation instructions

Flash ATmega32U4

If your Diabolic Drive is still running the beta firmware it shipped with, you'll need to:

  1. Connect to the device over Wi-Fi.
  2. Press the Start button in the Web UI to expose the ATmega32U4 to your computer.

⚠️ By default, the ATmega32U4 is dormant due to SPECTRE mode.

Do not enable Diabolic Drive Stealth Mode unless you have either:

  • a Diabolic Drive Programmer, or
  • an Arduino Pro Micro configured as an ISP.

Otherwise, you'll lose the ability to upload sketches to the ATmega32U4.


Flash ESP8266

To flash the ESP8266:

  1. Ensure the ATmega32U4 is exposed and shows up as a COM port in Windows Device Manager.
  2. Upload the provided sketch to the ATmega32U4.
  3. Once the upload completes successfully, the Diabolic Drive Wi-Fi will disappear — indicating that the ESP has entered flashing mode.

Programming Options

ESP8266

  • OTA ( Over The Air ) through its web interface
  • through ATMEGA32U4 acting as a Serial Bridge giving you full control over it in case something went wrong (also supports NodeMCU Firmware Programmer App )

ATMEGA32U4

  • Uploading Arduino Sketches : by directly plug your Diabolic Drive into the computer as ATMEGA32U4 has native USB support through USB transceiver built into it that handles the USB connection .

Access ATMEGA32U4 Bootloader

  • This is a unique way by UNIT 72784 that gives you full control over the ATMEGA32U4 of a Diabolic Drive by accessing its boatloader through USB 3.0 defined pins. .. Diabolic Drive uses a modified version of the Arduino Leonardo bootloader by default and is also compatible with the original Arduino Leonardo bootloader.

Diabolic Drive Access ATMEGA32U4 Bootloader through USB3.0 defined pins POC
Watch the POC Demo

Technical Specifications

  • ATMEGA32U4 running at 16MHz and 5V .
  • ESP8266ex running at 160MHZ at 3.3v with onboard LDO Regulator .
  • ESP8266ex has 4MB of memory able to store millions of characters to save your payloads .
  • High gain 4.1dBi ceramic chip 2.4G Wireless antenna.
  • 64GB Flash Storage with average reading and writing speed of 20MB/s , 10MB/s respectively. Demo available here

Credits

on the Software Side

  • WiFiDuck A huge thanks!
  • supremeDuck the most feature-rich one! Actually, I like how creative Michal Borowski is!

on the Hardware Side

  • HAK5 If Rubber Ducky didn't exist, then Diabolic Drive would never exist! Actually, Darren is a godfather for all of these tools!
  • Mike Grover miniaturization inspiration!

on the media, funding distribution side

CrowdSupply They are the best crowdfunding site and the best team! :heart:

This is my first repo, so I'm not familiar with this staff, feel free to start a pull request for adding credits for anyone you believe was a part of this project. :)

Parts

21
QtyValueFootprintReferences
40.1uFCapacitor_SMD:C_0603_1608MetricC2, C7, C8, C9
3330RResistor_SMD:R_0603_1608MetricR4, R5, R6
222pFCapacitor_SMD:C_0603_1608MetricC3, C4
25.1kResistor_SMD:R_0603_1608MetricR1, R2
11.0uFCapacitor_SMD:C_0603_1608MetricC1
110kResistor_SMD:R_0603_1608MetricR3
110uFCapacitor_SMD:C_0603_1608MetricC5
116MHzCrystal:Crystal_SMD_5032-4Pin_5.0x3.2mmY1
11uFCapacitor_SMD:C_0603_1608MetricC6
1ATmega32U4-MPackage_DFN_QFN:QFN-44-1EP_7x7mm_P0.5mm_EP5.2x5.2mmU1
1Conn_01x06Connector_PinHeader_2.54mm:PinHeader_1x06_P2.54mm_VerticalJ4
1LED_BARGLED_SMD:LED_Kingbright_APFA3010_3x1.5mm_HorizontalD1
1USB 3.0 FEMALE SOCKET 9PConnector_USB:GCT_USB1075-XX-X-X_REVEJ2
1USB_C_16PConnector_USB:USB_C_Receptacle_GCT_USB4105-xx-A_16P_TopMnt_HorizontalJ1

Similar boards

  • 2 layers87.8 × 59.8 mmFreeDeck SMD 2020-02, the printed circuit board in 3D

    FreeDeck SMD 2020-02

    FreeYourStream/freedeck-hardware

    all the stuff you need to build your own FreeDeck

    37 parts772
  • 2 layers54 × 15 mmXyp gpib, the printed circuit board in 3D

    Xyp gpib

    xyphro/UsbGpib

    Versatile, cheap and portable USB to GPIB converter (USBTMC class based)

    25 parts690MIT
  • 4 layers40.6 × 17.8 mmPD Micro, the printed circuit board in 3D

    PD Micro

    ryan-ma/PD_Micro

    USB-C PD3.0 PPS on ATMega32U4 Arduino board

    61 parts439MIT
  • 2 layers37.3 × 14.7 mmFairberryMainboard, the printed circuit board in 3D

    FairberryMainboard

    Dakkaron/Fairberry

    The goal of this project is to add a BlackBerry Q10 keyboard to non-BlackBerry phones. While this can easily be adapted to suit any other phone with an USB port at the bottom, I will focus on releasing files for the…

    15 parts365
  • 2 layers50 × 90 mmMouse, the printed circuit board in 3D

    Mouse

    biomurph/Mouse

    Repository for Open Source Mouse Firmware and Hardware

    49 parts362MIT
  • 4 layers66 × 115.3 mmMemoryBrakout, the printed circuit board in 3D

    MemoryBrakout

    ccadic/sharpikeebo

    Miniature RPI Zero 2W shield with Sharp memory Display and USB Beyboard

    194 parts143
  • 2 layers68 × 69.4 mmKowgary16 cfx, the printed circuit board in 3D

    Kowgary16 cfx

    ChrisChrisLoLo/bancouver40

    A 4x10 CFX spaced low-profile mechanical keyboard.

    55 parts113GPL-3.0
  • 2 layers344 × 124.5 mmUniversalTKL, the printed circuit board in 3D

    UniversalTKL

    ojthetiny/OpenTKL

    Fully Open source TKL keyboard

    175 parts103GPL-3.0

Questions

How big is the Diabolic drive programmer PCB?

It measures 33.9 × 19.2 mm and has 2 copper layers, 1.6 mm thick.

What parts does the Diabolic drive programmer use?

21 parts, built around the ATMEGA32U4-MU. The full list of its parts is on this page, with links to each part's symbol and footprint where PCBKit's library has them.

Where can I download the Diabolic drive programmer KiCad files?

From the unit72784/Diabolic-Drive repository on GitHub, at the commit this page was made from: the board is Design Files/Diabolic Drive Programmer/diabolic drive programmer.kicad_pcb and its schematic Design Files/Diabolic Drive Programmer/diabolic drive programmer.kicad_sch. PCBKit opens the board in the browser, with nothing to install.

Can I use the Diabolic drive programmer design in my own project?

Its repository states no licence, so its author keeps all rights: ask unit72784 before reusing the design.