
2 layers40 × 30 mm

 Toki-dev465/Tokeychain
An interactive keychain with an accelerometer and an OLED display powered by the Xiao ESP-32 S3 microcontroller.
Tokeychain is an open-source printed circuit board by Toki-dev465, from the Toki-dev465/Tokeychain repository on GitHub, published under the MIT licence. It is a 2-layer board of 37 × 37 mm with 3 parts on 15 nets, routed with 25 tracks and 0 vias.
Its parts include 2 ICs and 1 connector. It belongs with the lEDs and displays boards and the ESP32 boards of this library.
I built this project as a fun way to learn more about PCB, CAD and firmware design. I spent quite a lot of time on it and learned a lot especially about CAD modelling. I hope to show it off by hooking it up to my keys and other accessories.
The Xiao ESP32-S3 reads tilt from the ADXL345 accelerometer. This is used to create interactive animations displayed on the OLED. As of right now, there is only one "game", the ball game. As you tilt the device the ball starts speeding up in that direction and slows down over time from "friction." The ball also bounces off the edge, which is displayed as a white box. The device will support more of these interactive animations and the animations will be cycled by tap detection on the accelerometer module. This version of the Xiao supports a rechargeable battery with an on-board charging module, which this device will utilize.
All went quite smoothly except for the CAD modelling part. I used Fusion only once and that was by following a tutorial. Therefore, this project gave me a massive headache! I had lots of trouble just doing the most basic and minute things such as creating a sketch, projecting onto a sketch, etc. However, due to the immense amount of time I spent, I learned a lot regarding the basics of Fusion and spending so much time on it just made completing the final design more rewarding. I am very proud of how it turned out.
The schematic and PCB were made using the open-source software KiCad. I made sure to use global net variables for the schematic because otherwise, I would be left with incomprehensible messy wiring. The PCB uses a two-layer system. The top layer (F.Cu) is used for routing traces, whereas the bottom layer (B.Cu) is used for grounding using copper fill zones. I made sure to make the power traces 0.5mm in thickness as recommended by professionals in the industry.
| Schematic | PCB |
|---|---|
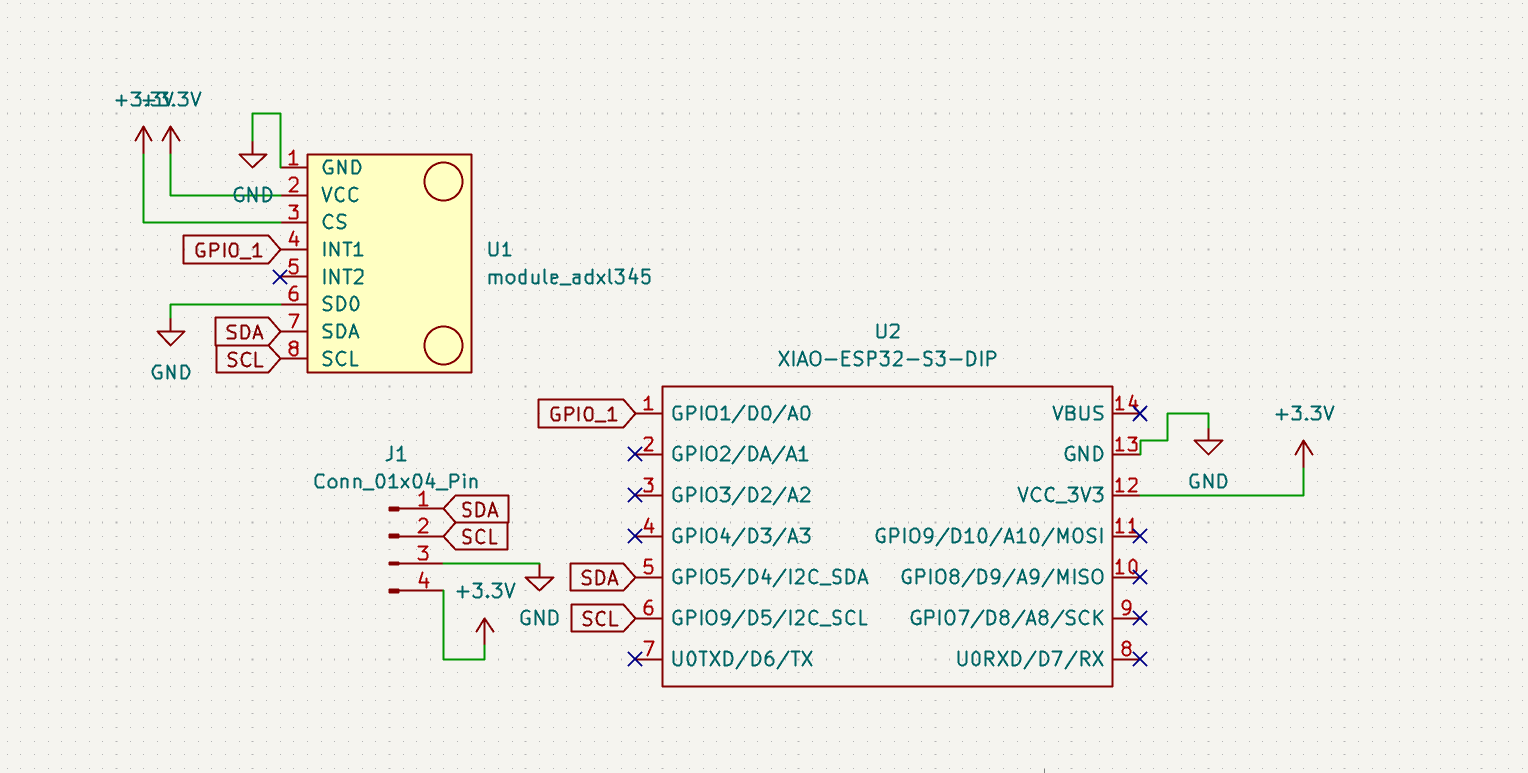 | 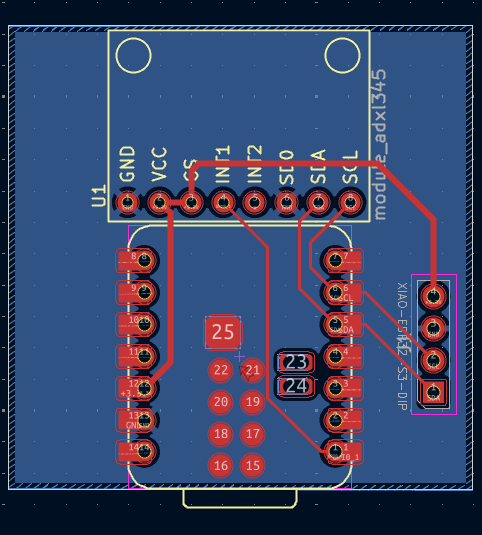 |
The CAD components were built using AutoDesk Fusion software. The components are all inside a 38x50x20 mm 3D-printed case with a key loop at the top and a USB-C cutout at the bottom. The back is covered using a snap-fit cover.
| Fusion Snapshot |
|---|
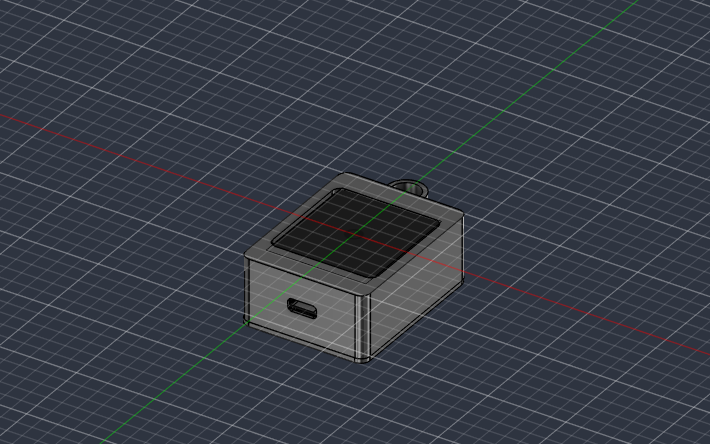 |
| Qty | Value | Footprint | References |
|---|---|---|---|
| 1 | Conn_01x04_Pin | xiao:OLED_SSD1306_I2C_0.96 | J1 |
| 1 | XIAO-ESP32-S3-DIP | xiao:XIAO-ESP32-S3-DIP | U2 |
| 1 | module_adxl345 | xiao:module_adxl345 | U1 |
It measures 37 × 37 mm and has 2 copper layers, 1.6 mm thick.
3 parts. The full list of its parts is on this page, with links to each part's symbol and footprint where PCBKit's library has them.
From the Toki-dev465/Tokeychain repository on GitHub, at the commit this page was made from: the board is PCB/Tokeychain.kicad_pcb and its schematic PCB/Tokeychain.kicad_sch. PCBKit opens the board in the browser, with nothing to install.
Its repository publishes it under the MIT licence: you may reuse it on that licence's terms (keep the author's notice, and for a copyleft licence share your changes alike).

hzeller/rpi-rgb-led-matrix
Controlling up to three chains of 64x64, 32x32, 16x32 or similar RGB LED displays using Raspberry Pi GPIO


atopile/atopile
Design circuit boards with code! ✨ Get software-like design reuse 🚀, validation, version control and collaboration in hardware; starting with electronics ⚡️


hackclub/sprig
🍃 Learn to code by making games in a JavaScript web-based game editor.