
2 layers90.8 × 60 mm

 ThroatyMumbo/GameConsoleV216
RP2350-based retro style game console
Console is an open-source printed circuit board by ThroatyMumbo, from the ThroatyMumbo/GameConsoleV2 repository on GitHub, published under the MIT licence. It is a 4-layer board of 200 × 150 mm with 45 parts on 81 nets, routed with 549 tracks and 125 vias.
It is built around the AP63203WU. Its parts include 17 resistors, 6 capacitors, 6 connectors, 2 ICs and 2 diodes. It belongs with the retro computing and games boards of this library.
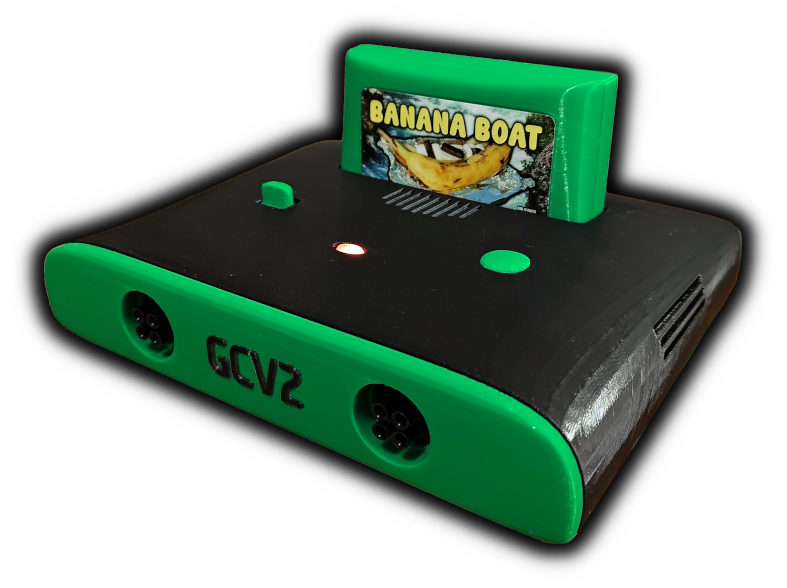
This is the 2nd iteration of an ongoing project where I'm attempting to create my own homemade "retro" game console.
The rules are pretty straightforward:
An RP2350B (via the Pimoroni PGA2350) generates NTSC color composite video straight out of its GPIO through a resistor ladder, plays chiptune audio through an I2S DAC, reads two controller ports, and boots games off real cartridges over a parallel memory-mapped bus. The board, the cartridge PCBs and the 3D-printed shell are all in this repo alongside the firmware, the games, and a host emulator for developing them without touching hardware.
The console is flashed over SWD using a debug probe (i.e. a separate Pico 2). PLCC-32 based cartridges are programmed using a T48.
tools/gen_sample_bank.py), and the
option to install their own 48 kHz DSP fill callback and do everything themselves.| Subsystem | Wiring |
|---|---|
| Video | 6-bit R-2R ladder (150 Ω / 300 Ω) on GPIO2–7 → RCA center, 300 Ω terminator to GND |
| Audio | PCM5102A: DIN=GPIO8, BCK=GPIO9, LRCK=GPIO10, SCK tied to GND (SCK-less mode) |
| Controllers | 1-wire data on GPIO40/41, external pull-ups to 3.3 V, one PIO state machine each |
| Cart bus | A0–A15 = GPIO16–31, D0–D7 = GPIO32–39, /RD = GPIO44, /CS = GPIO45, /WR = GPIO46 |
| Cart presence | /BUSY on GPIO11: held LOW while a cart is seated, and doubles as the coprocessor's ready/busy line |
| Logging / flashing | UART0 on GPIO0/1 and SWD, both to a second Pico running debugprobe |
The four PIO/peripheral users are deliberately disjoint: video owns pio0 sm0, audio pio0 sm1 (plus DMA_IRQ_1), the cart bus master pio1, and the controller ports pio2.
hardware/ holds the KiCad projects - the console board, a PLCC-32 parallel ROM cart, and an
RP2350B smart cart - plus fab/assembly outputs and the STLs for the 3D-printed shell, feet, buttons
and cartridge cases.
Every cart presents a 64-byte GCV2 header at offset 0 over the parallel bus. A flag in that header
picks the class; presence itself is a single GPIO read, so hot-swap needs no bus probing.
74HCT273 bank latch, and nothing else.
Address lines reach 16 KiB at a time; a byte written over /WR selects the bank. Burned on a bench
programmer.cart/emu/, and each game supplies its own compute function.Games are freestanding ARM binaries linked at a fixed 192 KiB game-RAM window, packed into a ROM
image by tools/pack_cart.py. They call the console only through one append-only ABI table
(console_api.h): video, the 2D engine, a software 3D rasterizer, audio, input, assets, coprocessor,
and a few system calls. Asset data is cached into PSRAM at load; anything bigger streams off the cart
on demand.
See games directory README.
Games are portable C that only talk to console_api_t, so the emulator recompiles each one natively
into a .so and supplies the API table - there is no CPU emulation. It renders real frames, mixes
real audio, and can dump PNGs, write a WAV, or replay scripted controller input against a golden
per-frame CRC.
cmake -S emu -B emu/build && cmake --build emu/build
scripts/run-emu.sh doogus --frames 900 --png /tmp/frames
scripts/run-emu.sh bananaboat --frames 900 \
--input tests/input/bananaboat_play.in --hash-check tests/golden/bananaboat.hashbash tests/run.sh # audio DSP, cart header format, sample-bank validator, game logic/solversThe console has no USB - it is flashed over SWD from a second Pico running debugprobe
(GP2→SWCLK, GP3→SWDIO, GND↔GND), with its UART bridged on the same probe for logs.
PICO_SDK_PATH=/path/to/pico-sdk scripts/flash-console.sh     # build + flash
scripts/console-log.py                                       # stream the console's UART
scripts/flash-console.sh --rescue # unwedge a hung board, then flashscripts/build-rom-cart.sh testrom --program --verify # build, pack, burn a dumb ROM cart (minipro)
scripts/build-flash-cart-rp2350.sh nbody # smart cart: firmware + ROM image in one shot
scripts/build-flash-cart-teensy.sh nbody # Teensy 4.1 variantsrc/ console firmware (the cartridge BIOS) + library code: video/ audio/ input/ cart/ engine/
cart/sdk/ the game SDK: ABI headers, linker script, toolchain file
cart/emu/ smart-cart firmware library (RP2350 and Teensy 4.1 bus responders + coprocessor worker)
games/ the games; games/<g>/cart/ is that game's companion smart-cart firmware
emu/ host emulator
demos/ opt-in bring-up and measurement apps (overscan test card, bus validator, 3D scene, engine demo)
tools/ cart packer, sample-bank generator
scripts/ build/flash/log helpers
tests/ host unit tests + golden replay hashes
hardware/ KiCad projects (console + both carts), fab outputs, 3D-printed shellGreat question! This is just a fun challenge and sort of childhood wish fulfillment. I don't plan on ever releasing this or its future iterations as something you could buy in stores (there's already tons of "retro" game console knockoffs out there). Might be cool to give it out as a limited run merch item though.
Yes they do. The three main games (Banana Boat, Doogfighter, and It's Time to Party!!) are entirely AI-generated and more or less intentionally crappy for enterainment purposes. I don't have any plans on making a legit game for this unfortunately. I have a troubled history with starting ambitious game projects and losing interest after 2-3 months. Maybe in future iterations once this project is more refined, others will be compelled to make their own games for this console. That'd be pretty insane and also a huge honor.
You can't! This is a hobby project. If you want to make your own you can find the gerbers, BOMs, and
3D print materials in the hardware/ directory. Just be warned that it's going to be expensive and
you'll be doing a lot of 3D printing and soldering. The semi-assembled console and ROM cart PCBs
alone cost me over $400. Probably not worth it unless you're as stupid with money as I am.
It sure isn't. I plan to address this in V3 of this project by replacing it with an actual 8-bit or 16-bit CPU, depending on what I can find. The RP2350 acts as a convenient stepping stone to get me to that final goal of making a retro console that's as authentic as possible to that late 80s/early 90s time period.
The console supports N64 controllers as a convenience for testing purposes. They only require a single data wire and run on 3.3V, which makes them very easy to use with an MCU. The physical port is not an N64 controller port, but a generic circular 4-pin Bulgin SA2367/SA2368. The 4th wire is hooked up to some of the ADC GPIOs on the RP2350, but currently not used in the console firmware or any of the games; reserved for future applications. I still have yet to design my own controller, which is a separate project in itself. I'll likely tackle this in V3.
GCV1 (aka the "Catbox") is literally just a Pico 2 wired up to a VGA connector, aux jack, N64 controller, and a 6-pin "cartridge" slot for a W25Q* memory card/ROM chip. All contained in a gray 3D printed box with a pic of my parents' cat embossed on the front. Honestly not too fundamentally different from GCV2, but a lot less polished. I haven't bothered pushing it to GitHub because it's a messy thrown together prototype that I made to get familiar with the minimal core design of a game console.
| Qty | Value | Footprint | References |
|---|---|---|---|
| 7 | 300R | Resistor_SMD:R_0603_1608Metric | R3, R4, R5, R6, R7, R8, R14 |
| 5 | 150R | Resistor_SMD:R_0603_1608Metric | R9, R10, R11, R12, R13 |
| 4 | MH_Pad | MountingHole:MountingHole_4.5mm_Pad | H1, H2, H3, H4 |
| 3 | 1k | Resistor_SMD:R_0603_1608Metric | R2, R16, R17 |
| 3 | TestPoint | TestPoint:TestPoint_Pad_D1.5mm | TP1, TP2, TP3 |
| 2 | 100nF | Capacitor_SMD:C_0603_1608Metric | C3, C6 |
| 2 | 22uF | Capacitor_SMD:C_0805_2012Metric | C4, C5 |
| 1 | 100k | Resistor_SMD:R_0603_1608Metric | R1 |
| 1 | 100uF | Capacitor_SMD:C_1210_3225Metric | C1 |
| 1 | 10k | Resistor_SMD:R_0603_1608Metric | R15 |
| 1 | 22uF | Capacitor_Tantalum_SMD:CP_EIA-3216-18_Kemet-A | C2 |
| 1 | 4.7uH | Inductor_SMD:L_Sunlord_MWSA0603S | L1 |
| 1 | AP63203WU | Package_TO_SOT_SMD:TSOT-23-6 | U1 |
| 1 | Barrel_Jack_Switch | Connector_BarrelJack:BarrelJack_Horizontal | J2 |
| 1 | Cart_Edge_44 | GameConsoleV2:EDAC_357-044-520-202 | J10 |
| 1 | Controller 1 | Connector_PinHeader_2.54mm:PinHeader_2x02_P2.54mm_Vertical | P1 |
| 1 | Controller 2 | Connector_PinHeader_2.54mm:PinHeader_2x02_P2.54mm_Vertical | P2 |
| 1 | D6C90-F2-LFS | GameConsoleV2:SW_CK_D6C_4pin | SW1 |
| 1 | D_Schottky | Diode_SMD:D_SMA | D1 |
| 1 | LED | LED_SMD:LED_0805_2012Metric | D2 |
| 1 | PCM5102A_Board | GameConsoleV2:PCM5102A_Board | U2 |
| 1 | Pimoroni_PGA2350 | GameConsoleV2:Pimoroni_PGA2350 | A1 |
| 1 | Polyfuse | Fuse:Fuse_1812_4532Metric | F1 |
| 1 | RCA_3Port | GameConsoleV2:uxcell_RCA_3port_PCB_mount | J11 |
| 1 | SWD/UART Debug | Connector_PinHeader_2.54mm:PinHeader_1x05_P2.54mm_Vertical | J7 |
| 1 | SW_SPDT | GameConsoleV2:SW_Slide_SPDT_SS12D10 | SW3 |
It measures 200 × 150 mm and has 4 copper layers, 1.6 mm thick.
45 parts, built around the AP63203WU. The full list of its parts is on this page, with links to each part's symbol and footprint where PCBKit's library has them.
From the ThroatyMumbo/GameConsoleV2 repository on GitHub, at the commit this page was made from: the board is hardware/console.kicad_pcb and its schematic hardware/carts/rom_cart/rom_cart.kicad_sch. PCBKit opens the board in the browser, with nothing to install.
Its repository publishes it under the MIT licence: you may reuse it on that licence's terms (keep the author's notice, and for a copyleft licence share your changes alike).

AzonInc/Doorman
ESP32-S3 based Intercom Gateway (TCS / Koch / Niko / Scantron / Analogue Systems)

KaiPereira/Cheetah-MX4-Mini
A powerful yet compact 3D printer motherboard that supports TMC stepsticks, fans, heaters, screens and thermistors

FujiNetWIFI/fujinet-hardware
Schematics and design files for FujiNet hardware


lhm0/pd_logger
This repository contains two DIY gadgets to monitor and log USB-C Power Delivery (PD). Both devices are designed to be easy to build, hackable, and useful for makers who want to explore USB-C PD.

Arkos-Engineering/HT-15_hardware
We can split this out into separate repos later, right now its very convenient to have everything here.

Bouni/BSH-Board
A board that interfaces the DBUS of several home appliances and brings them into Home-Assitant via ESPHome
