2 layers57 × 55.2 mm
LogicAnalyzer
gusmanb/logicanalyzer
24 channel, 100Msps logic analyzer hardware and software
10 parts5.1kGPL-3.0
 SubZero-Robotics/2023-CommandRobot3
2023 robot code for FRC 5690
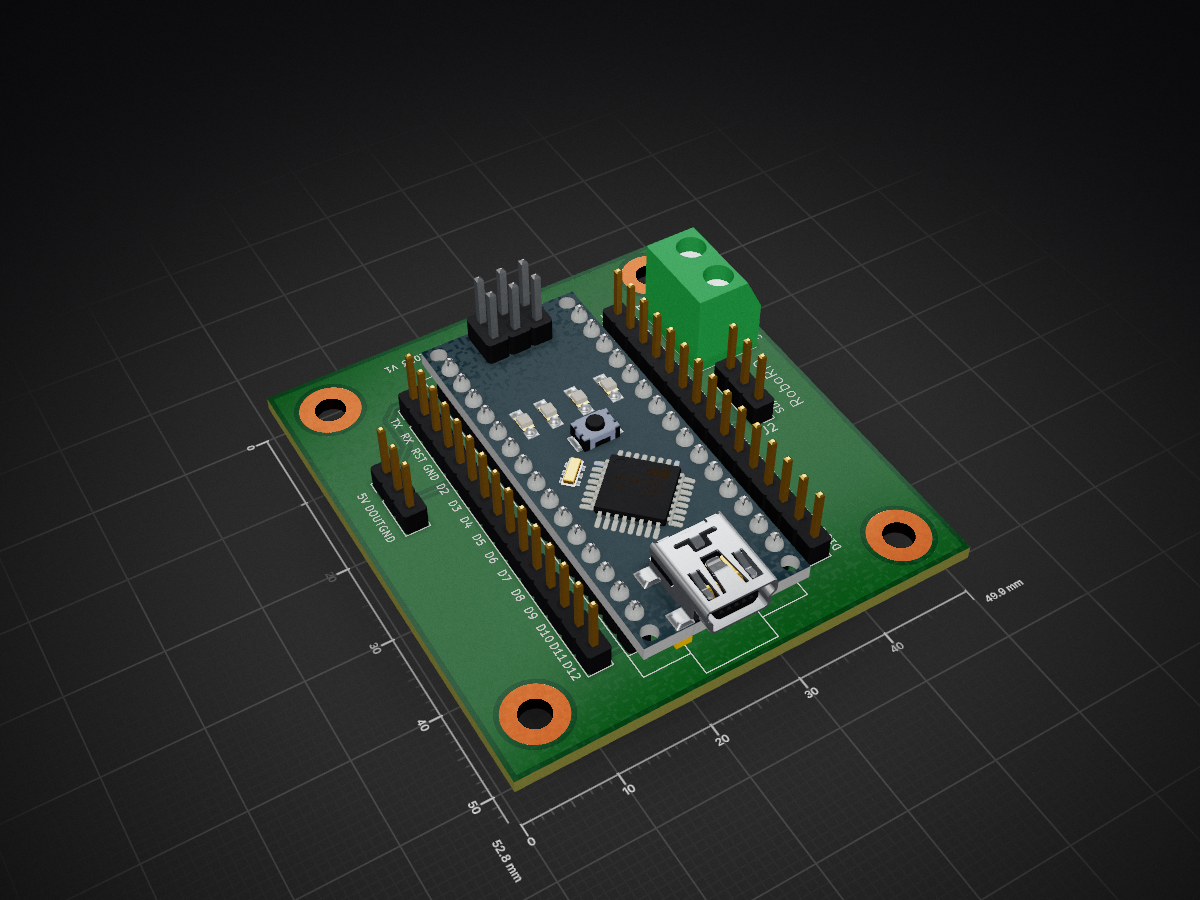
Led controller is an open-source printed circuit board by SubZero-Robotics, from the SubZero-Robotics/2023-CommandRobot repository on GitHub. It is a 2-layer board of 49.9 × 52.8 mm with 10 parts on 28 nets, routed with 76 tracks and 0 vias.
It belongs with the robots and motor control boards and the AVR (ATmega, ATtiny) boards of this library.
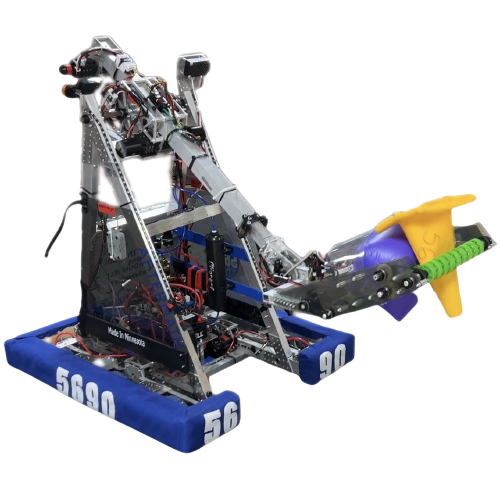
Code for our 2023 robot. Built with the WPILib command-based framework.
Current Issues
·
The Blue Alliance
:warning: TODO: Add about section
Main should always contain known, tested, and working code that has been throroughly verified by running it on the robot. Use other development branches to create new features and test them before pulling into main via a Pull Request (PR). main cannot have code pushed to it directly, meaning a PR is mandatory.
Use the main branch for non-competition usage and practice.
Before a competition, create a new branch based on main and lock it via a GitHub protection rule to prevent pushes. Only use this branch during a competition to avoid unnecessary or breaking deployments to the RIO.
:warning: Changes should only be made to this branch if there is a blocking error that must be fixed immediately! :warning:
Following the WPILib command based structure we have broken our robot up into a number of subsystems. They are listed below:
| Subsystem | Purpose |
|---|---|
| Brake | Set or unset brakes (supports brake mode and pneumatics) |
| Drive | Drives robot |
| Extension | Extends the arm |
| Intake | Activates the intake |
| LEDController | Activates the LEDs (Does yellow and purple) |
| RotateArm | Rotates the arm |
| Wrist | Rotates the wrist |
| Purpose/Name | CAN ID | Motor/Driver Type |
|---|---|---|
| Left drive lead* | 6 | TalonFX |
| Left drive follow* | 5 | TalonFX |
| Right drive lead | 8 | TalonFX |
| Right drive follow | 7 | TalonFX |
| Lead arm rotation | 1 | SparkMax |
| Follow arm rotation | 3 | SparkMax |
| Wrist rotation | 15 | SparkMax |
| Intake spinner | 17 | SparkMax |
| Extension motor* | 50 | SparkMax |
| Pneumatic controller | 9 | RevPH |
* = Inverted
| Device | Address |
|---|---|
| Gateway | 10.56.90.1 |
| Gateway | 10.56.90.129 (subject to change) |
| RIO | 10.56.90.2 |
| Coral | 10.56.90.4 |
| LimeLight | 10.56.90.11 |
| Laptop | Dynamic |
The vision service is a systemd service that autostarts the python script on the Coral Dev Board on boot.
The vision.service file contains the command to run the vision python script. The file is located at /etc/systemd/system/vision.service
If you made a change to the vision.service file make sure to reload the daemon and the vision script with these commands:
sudo systemctl daemon-reloadsudo systemctl restart visionTo check the status of the vision service, use this command:
sudo systemctl status vision
Install the following:
Clone Repository and search for SubZero-Robotics/2023-CommandRobotGitHub issues are how we track which tasks need work along with who should be working on them. Pay attention to the issue number since this is how each one is uniquely identified. To create a new issue, visit the issues tab in the repository and click New issue. Give it a descriptive title and enough information in the comment area so that anyone working on the issue knows exactly what needs to be changed/fixed. Additionally, assignees (who is working on it) and labels (what type of issue is this) can be assigned on the right.
Branches are simply named pointers that point to a commit. Our main branch is called main, but we don't make changes to it directly. Instead, a new branch should be created before any code is modified. Click on the current branch in the bottom-left corner in VS Code and then click + Create new branch.... The following naming conventions should be followed:
For a feature branch (major change):
feature-<issue number>-<a few words describing the change>
For a smaller, individual/small group branch:
<first name>-<issue number>-<a few words describing the change>
After finishing a small change, such as modifying a method or adding a new file, a new commit should be made immediately. Go to the Source Control tab on the left side of VS Code and add the changed/added/deleted files from the Changes dropdown to Staging by clicking the +. Once the changes are staged, Type a descriptive commit message and then click the Commit button.
Commiting only applies the new commit locally. So to make it available to others in the repo, it needs to be pushed to the remote (GitHub's servers in this case). Either click publish in the Source Control tab if the branch hasn't been pushed before or push it otherwise to send the new commit to the remote's branch (this will be called origin/<your branch's name>).
If someone else has made their branch available on the remote, you might be wondering how other people can get those same commits into their local repo. This process is called pulling, and it involves downloading the remote's commits and merging them with the local branch's commits.
Sometimes, you might see a merge conflict appear which can happen if more than one person has worked on the same line in a file, thus making git unable to automatically merge them. To fix this, click on the conflicted file (denoted by a !) that opens the merge conflict editor. Once at the line(s) in question, either accept the incoming (one that exists on GitHub), the HEAD (the one that you have locally), or attempt to manually merge the two together by directly editing the line(s). Repeat this process for each line/file until all conflicts are resolved. Once done, stage the now-fixed files, create a new commit, and push.
Now that all of your changes have been made (and tested!), it's time to get them merged into the main branch. Either click the Create Pull Request button in the Source Control tab (inline with the SOURCE CONTROL text, fourth one from the left) or go to the Pull requests tab on GitHub, click New pull request, and set the compare branch to your branch. Fill in the template with a good title, a detailed description, a list of changes made, and the issue number before creating it. Assign a reviewer(s) on the right and label the PR accordingly.
The reviewer is responsible for looking over the PR, testing the changes themselves, and adding comments to the code changes if necessary. There are three possible actions a reviewer can take:
Resolve under each comment once fixed, then re-request a review)1 Prototype 4 v2 2 Prototype 4
| Device | Address |
|---|---|
| Gateway | 10.56.90.1 |
| RIO | 10.56.90.2 |
| Coral | 10.56.90.4 |
| LimeLight | 10.56.90.11 |
If you would like to contact the subzero robotics programmers, you can do so at 5690programmers@gmail.com
To contact the team directly, you can find us on facebook or email us at subzerorobotics@esko.k12.mn.us
Project Link: https://github.com/subzero-robotics/2023-commandRobot
| Qty | Value | Footprint | References |
|---|---|---|---|
| 4 | MountingHole_3.2mm_M3_Pad | MountingHole:MountingHole_3.2mm_M3_Pad | H1, H2, H3, H4 |
| 2 | Conn_01x03 | Connector_PinHeader_2.54mm:PinHeader_1x03_P2.54mm_Vertical | J1, J2 |
| 2 | Conn_01x15_Male | Connector_PinHeader_2.54mm:PinHeader_1x15_P2.54mm_Vertical | J4, J5 |
| 1 | Arduino_Nano_v3.x | Module:Arduino_Nano | A1 |
| 1 | Conn_01x02 | TerminalBlock:TerminalBlock_bornier-2_P5.08mm | J3 |
It measures 49.9 × 52.8 mm and has 2 copper layers, 1.6 mm thick.
10 parts. The full list of its parts is on this page, with links to each part's symbol and footprint where PCBKit's library has them.
From the SubZero-Robotics/2023-CommandRobot repository on GitHub, at the commit this page was made from: the board is hardware/led controller/led controller/led controller.kicad_pcb and its schematic hardware/led controller/led controller/led controller.kicad_sch. PCBKit opens the board in the browser, with nothing to install.
Its repository states no licence, so its author keeps all rights: ask SubZero-Robotics before reusing the design.
gusmanb/logicanalyzer
24 channel, 100Msps logic analyzer hardware and software

byrantech/laptop
anyon_e, a highly integrated, high end, open source laptop. Attempt the impossible.

joeycastillo/Sensor-Watch
A board replacement for the classic Casio F-91W wristwatch


OLIMEX/OLINUXINO
OLINUXINO is Open Source / Open Hardware, low cost from EUR 24 Linux Industrial grade Single Board Computer capable to operate -25+85C

rusefi/rusefi
rusefi - GPL internal combustion engine control unit

VoronDesign/Voron-Hardware
Cool Hardware designed by the Voron Design group

hoglet67/RGBtoHDMI
Bare-metal Raspberry Pi project that provides pixel-perfect sampling of Retro Computer RGB/YUV video and conversion to HDMI