
2 layers189.5 × 204.9 mm
SmartSpin2k Panelized
doudar/SmartSpin2k
Transform your spin bike into a Smart Trainer!
749 parts292GPL-2.0
 scrapcomputing/ThrottleBlaster57
A Turbo circuit with a MHz display that can slow down the CPU speed
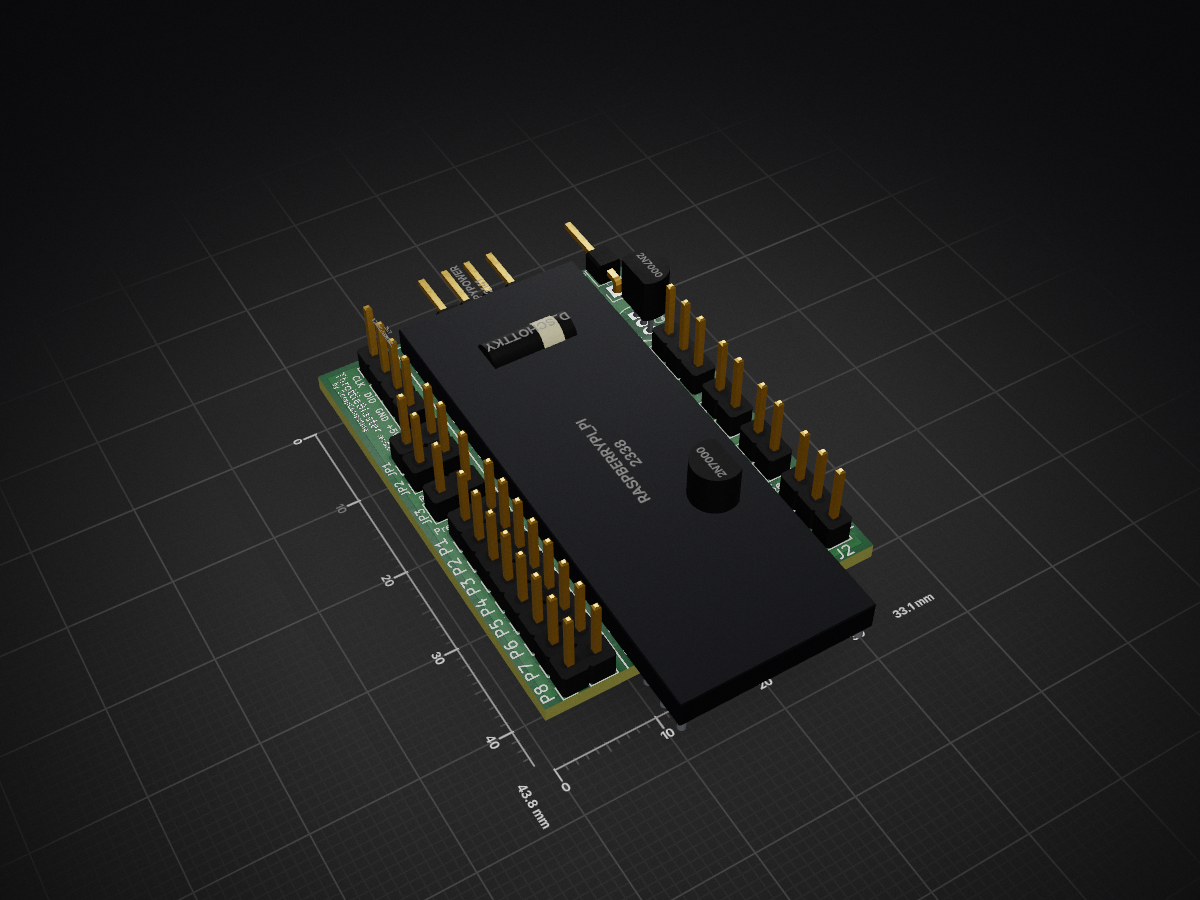
ThrottleBlaster is an open-source printed circuit board by scrapcomputing, from the scrapcomputing/ThrottleBlaster repository on GitHub, published under the GPL-2.0 licence. It is a 2-layer board of 33.1 × 43.8 mm with 34 parts on 38 nets, routed with 373 tracks and 20 vias.
It is built around the MAX3232ID. Its parts include 12 connectors, 6 capacitors, 4 ICs, 2 resistors and 2 transistors. It belongs with the lEDs and displays boards and the RP2040 boards of this library.
A Pi Pico-based Turbo circuit with a MHz display that reduces the effective frequency of fast CPUs by pulling down the STPCLK# pin at a specified frequency and duty-cycle.
This allows you to play speed-sensitive games, like Digger on a 1200MHz Athlon!
Since rev.0.8e we also support the Pico 2!
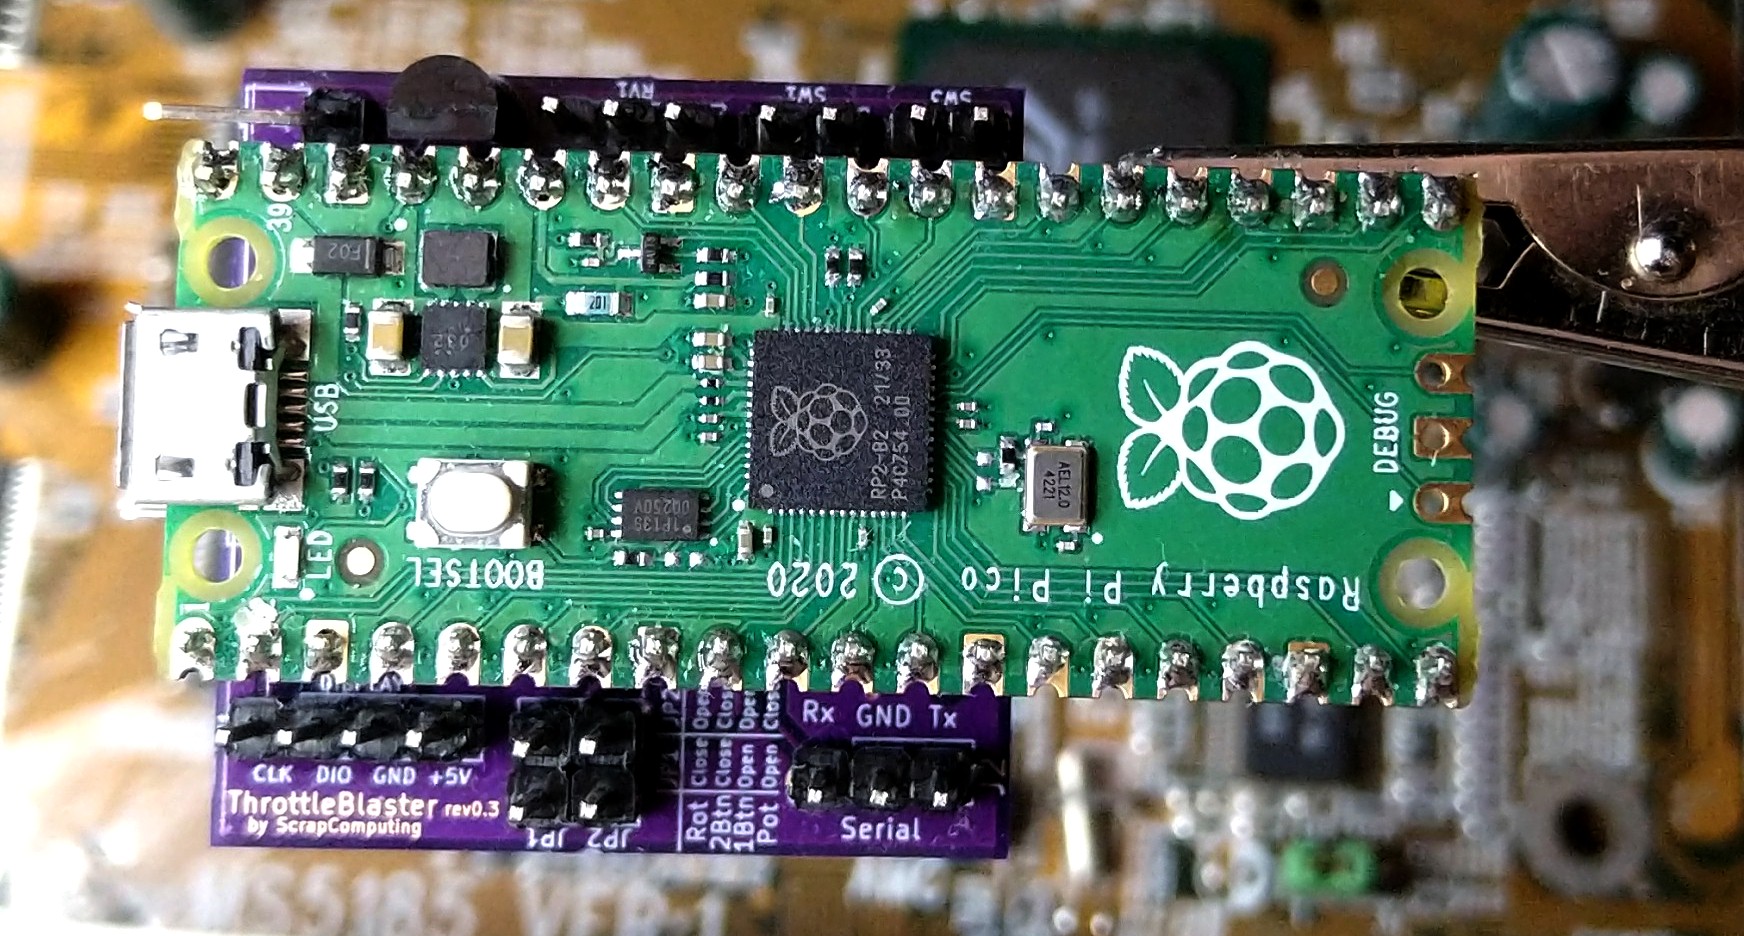
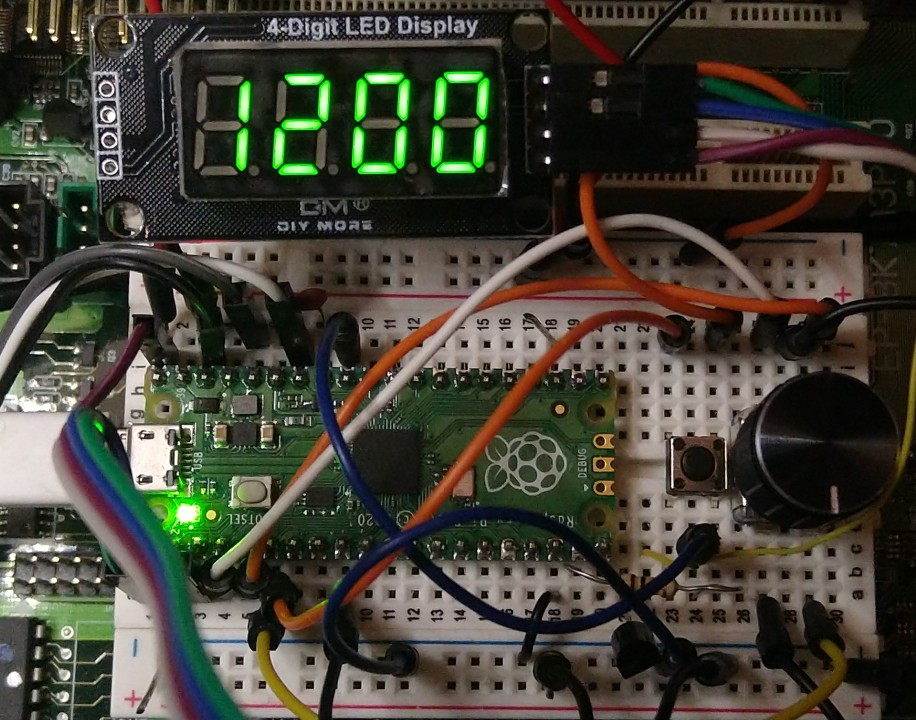
Videos:
Part 3 (rev 0.3): https://www.youtube.com/watch?v=g4OluJwGDEQ
Mounted on a 5.25 panel: https://www.youtube.com/shorts/n1aFvRNtOcw (by Michael Swimm)
Controllable by serial: https://www.youtube.com/watch?v=71rln-R2mis (by Michael Swimm)
Download firmware ThrottleBlaster_pico1.uf2 (or ThrottleBlaster_pico2.uf2 for the Pico 2): https://github.com/scrapcomputing/ThrottleBlaster/releases
Download gerbers (ThrottleBlaster_gerbers_rev.X.X.zip): https://github.com/scrapcomputing/ThrottleBlaster/releases
A front panel design by Michael Swimm: https://www.thingiverse.com/thing:6619261
The Throttle Blaster is a fancy PWM controller that pulls the CPU's STPCLK# to ground.
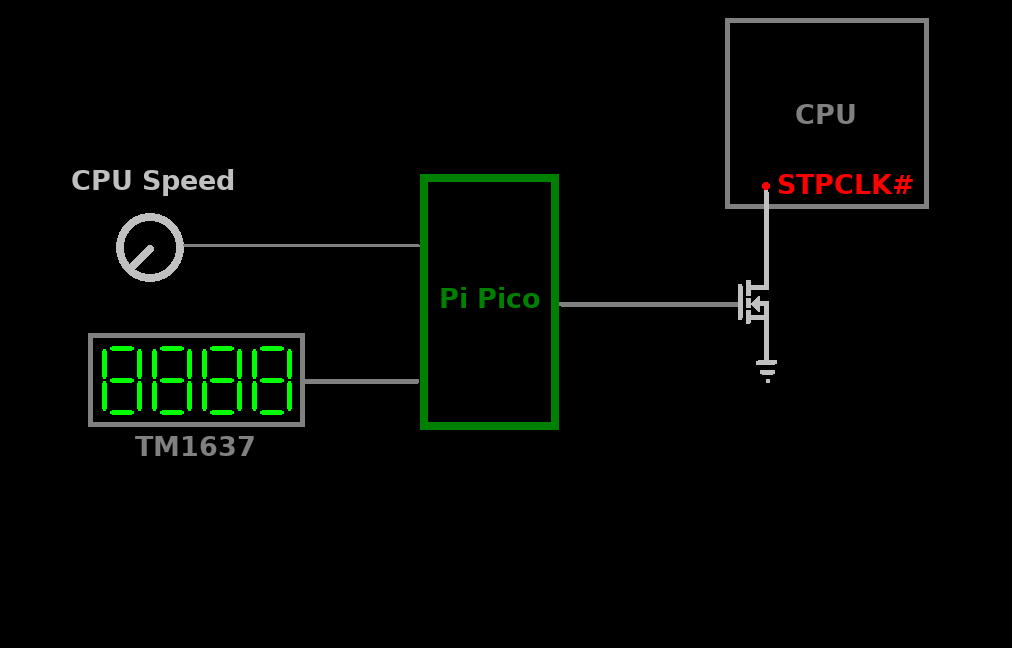
It is tailored to the needs of vintage PC enthusiasts, so it drives a 4-digit 7-segment display and is pre-loaded with presets that span several hardware generations.
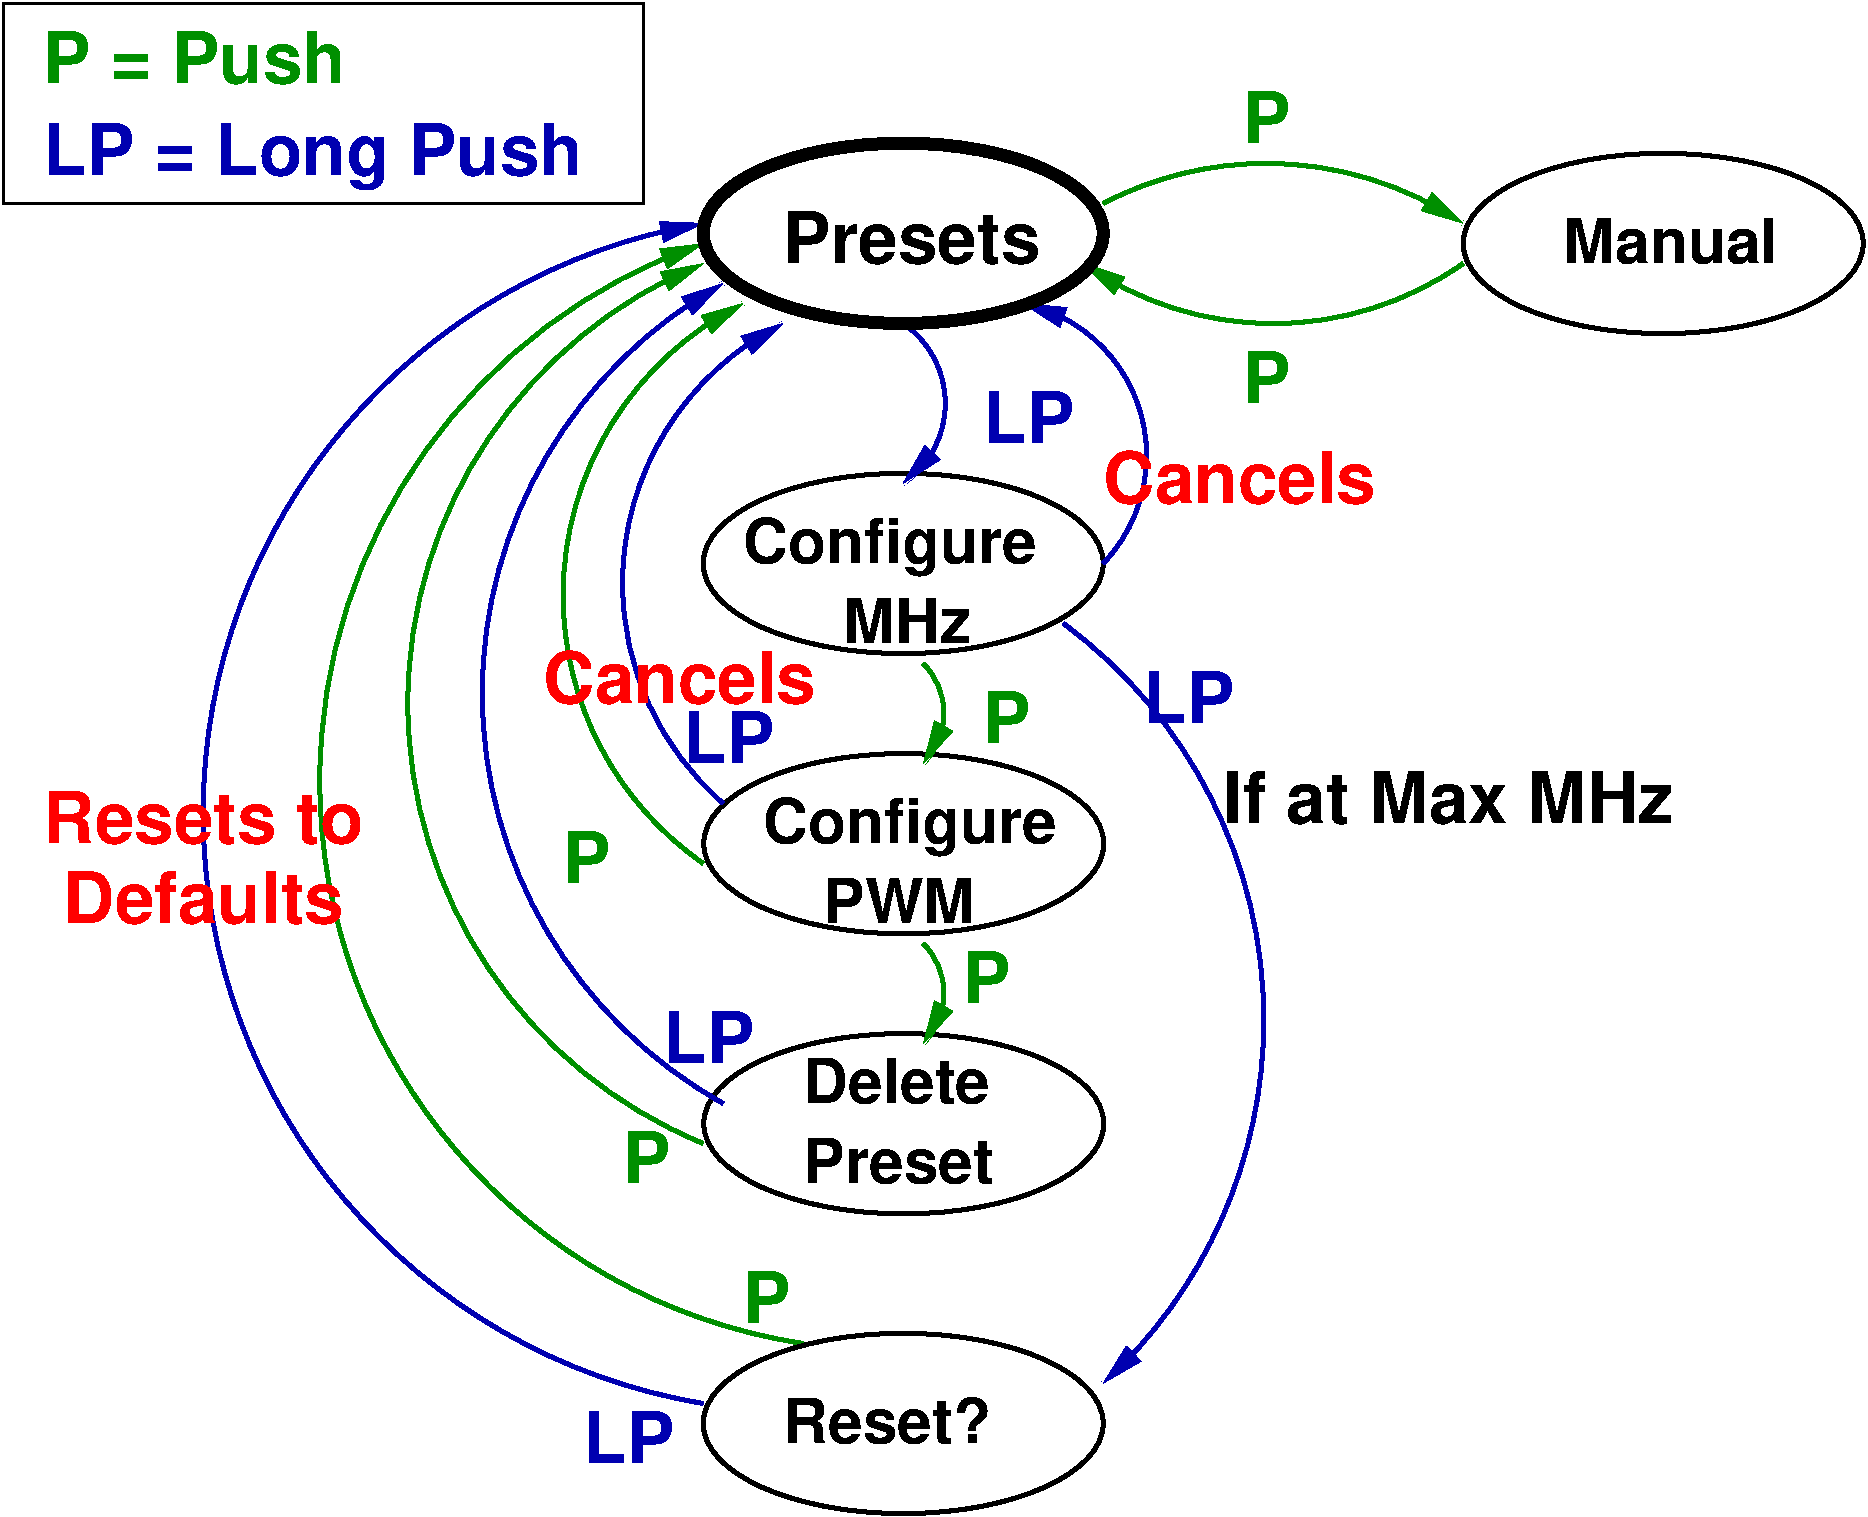
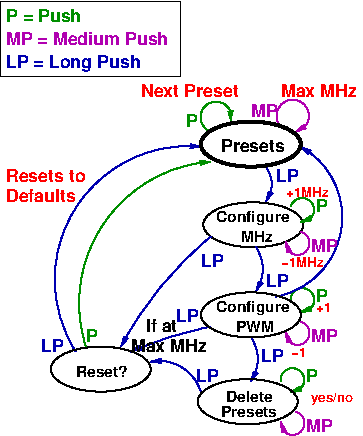
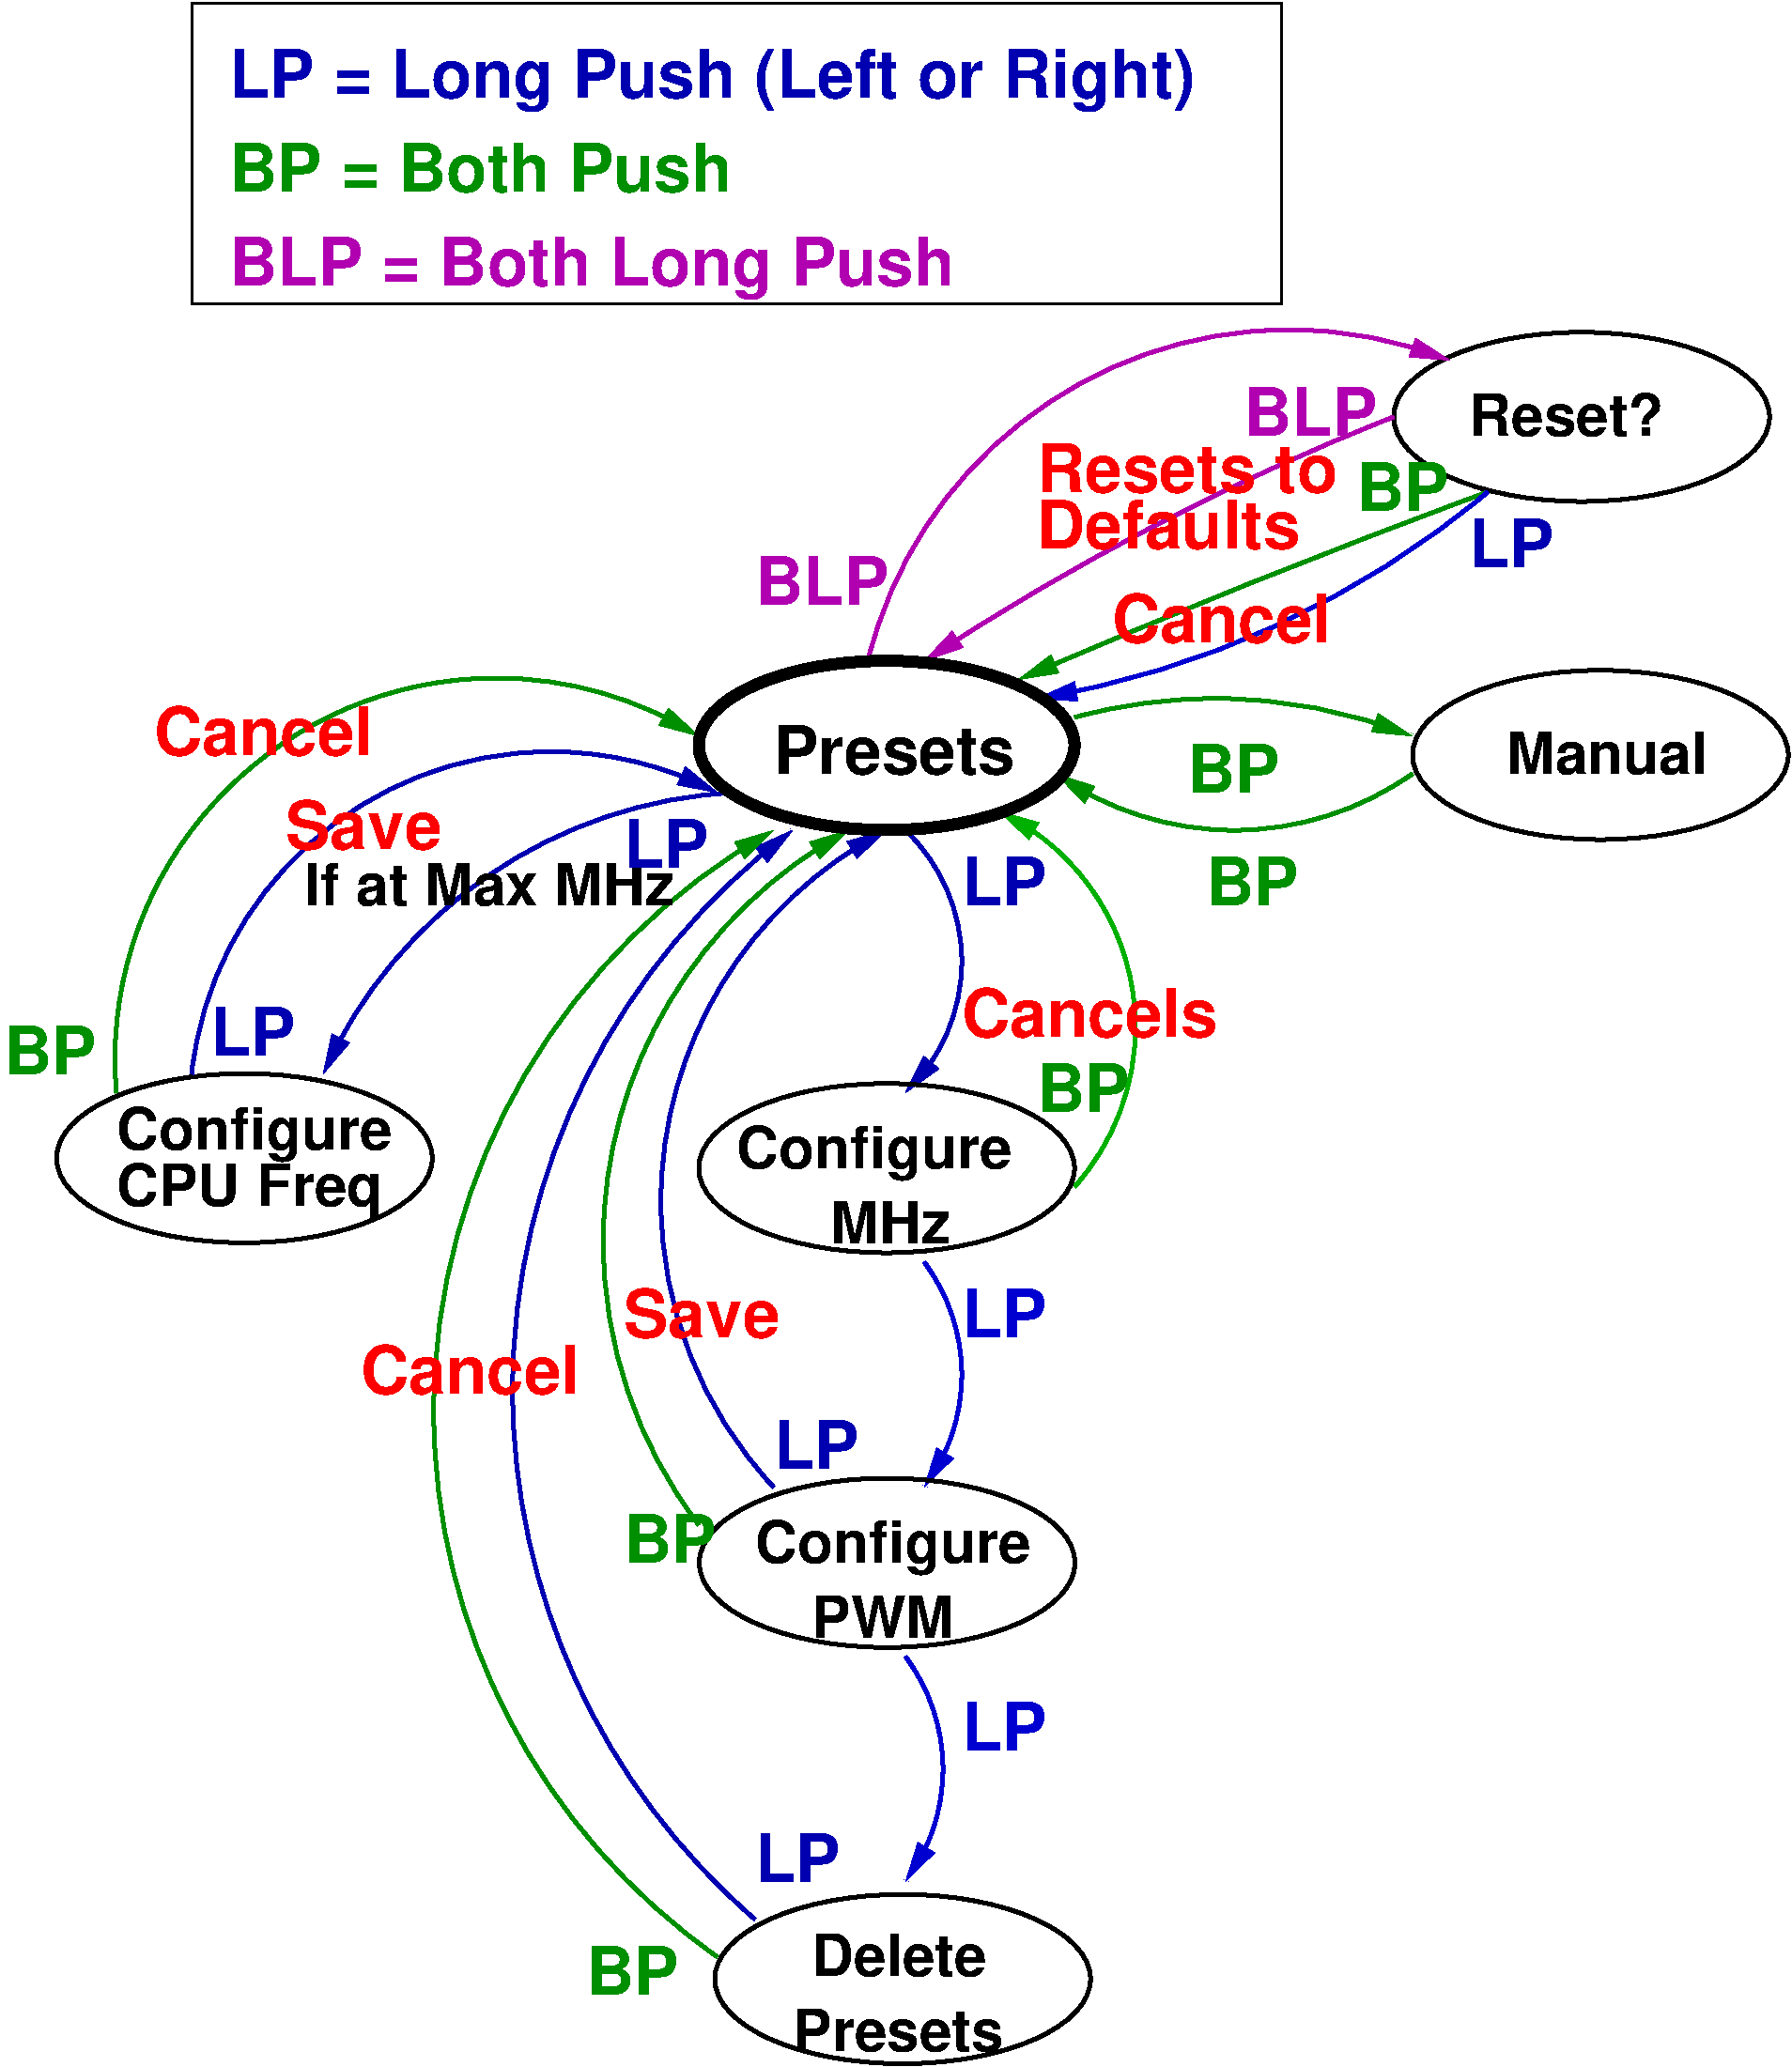
You can connect to the Throttle Blaster via the serial port and set the Frequency and PWM Period.
This is convenient for launching a game with a .bat file that first configures the Throttle Blaster and then launches the game.
Press the button (rotary encoder, or any individual button in other modes) and plug in the ThrottleBlaster to power. The led on the Pico will start flashing fast for around 2 seconds and the MHz display will show "RES".
This helps revert the deleted presets or any potential flash-related issue.
F<MHz>P<Period>\r, where:
<MHz> is the desired effective frequency in MHz (float),<Period> is the PWM Period level (1-256),\r (also seen as ^M) is the Carriage-Return character (ASCII 13 0x0d).F4.77P8 sets the frequency to 4.77MHz and the PWM period to 8 which is a around 50us.kermit set port COM1, set speed 9600, output F4.77P8\13. This will set the frequency to 4.77 MHz, the period to 8 and will send a Carriage-Return character (\13).Note Changing the frequency is not instantaneous. So if you are setting the frequency in a batch file, please consider adding a delay before launching the game.
Note Please note that the serial-port functionality is totally optional. You don't need to populate the MAX3232 IC and its capacitors if you are not planning to use it.
Since revision 0.7 you can also directly select a preset by pushing one of the 8 available buttons. This functionality is compatible with all other modes of operation.
Please note that you don't need a Rev 0.7 PCB to use this feature. You can simply connect buttons to the Pico's GPIOs, with one button pin to the GPIO and the other to ground, see table below:
| GPIO | 10 | 11 | 12 | 13 | 18 | 19 | 20 | 21 |
|---|---|---|---|---|---|---|---|---|
| Freq (MHz) | 4 | 8 | 10 | 25 | 33 | 66 | 133 | Max |
Connect the computer case reset button to RES1 and another cable from RES2 to the computer motherboard.
Now when you press the reset button, the Throttle Blaster will detect it and will temporarily set the frequency to maximum for a faster boot.
During this time the MHz display will show "boot" and show a count down until the frequency is restored.
Note Polarity matters: If you connect the reset cables to the RES headers the wrong way your PC won't boot!
Since revision 0.4 the default rotation direction of the knob has been changed and a new jumper JP3 has been added. Closing the jumper will reverse the direction for both the rotary encoder and the potentiometer.
| Display | Performance equivalence |
|---|---|
| 4 | 4.77 MHz IBM PC |
| 8 | 8 MHz |
| 10 | 10 MHz |
| 25 | 25 MHz |
| 33 | 33 MHz 486 |
| 66 | 66 MHz 486 |
| 133 | 133 MHz Pentium |
| 450 | 450 MHz Pentium-II |
| 733 | 733 MHz Pentium-III |
cd firmware/ && mkdir build && cd buildcmake -DCMAKE_BUILD_TYPE=Release -DPICO_SDK_PATH=/path/to/pico-sdk/ -DPICO_BOARD=<pico|pico2> -DPICO_TM1637_PATH=/path/to/TM1637-pico/ ../src/ && makeThrottleBlaster_pico1.uf2 (or ThrottleBlaster_pico2.uf2) in the build directory.ThrottleBlaster_pico1.uf2 (or ThrottleBlaster_pico2.uf2 for the Pico 2) firmware to the drive associated with the PicoThe Pico should boot and you should see the Pico's LED light up.
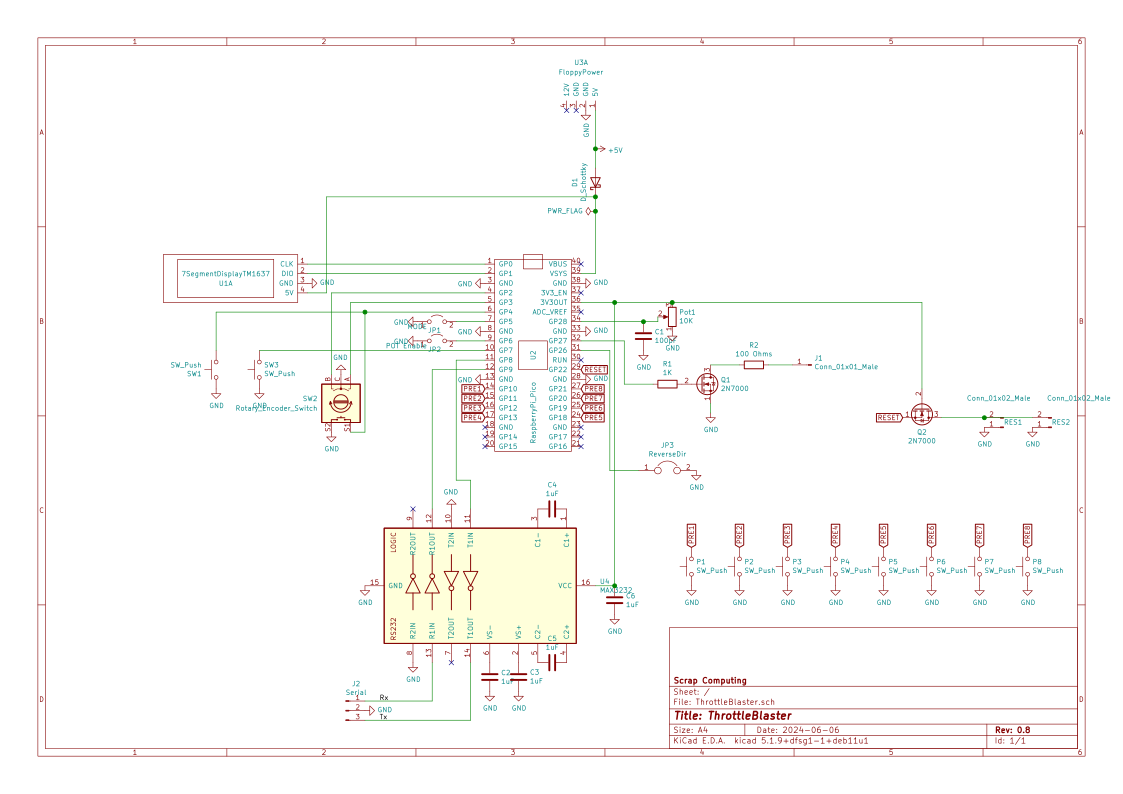
The Throttle Blaster circuit is fairly simple:
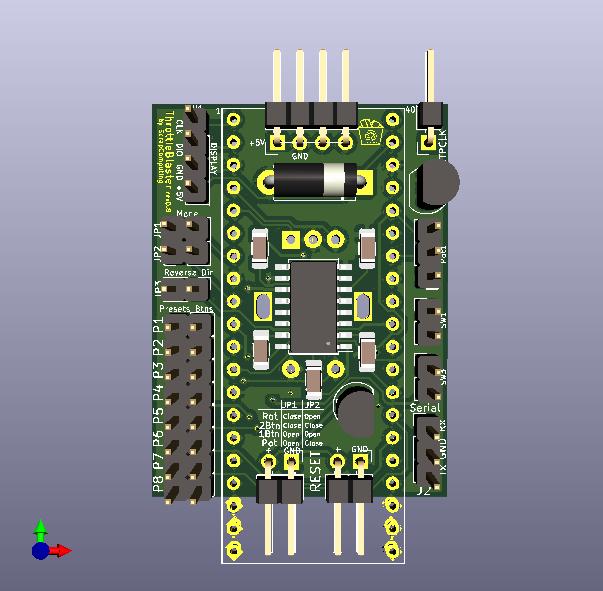
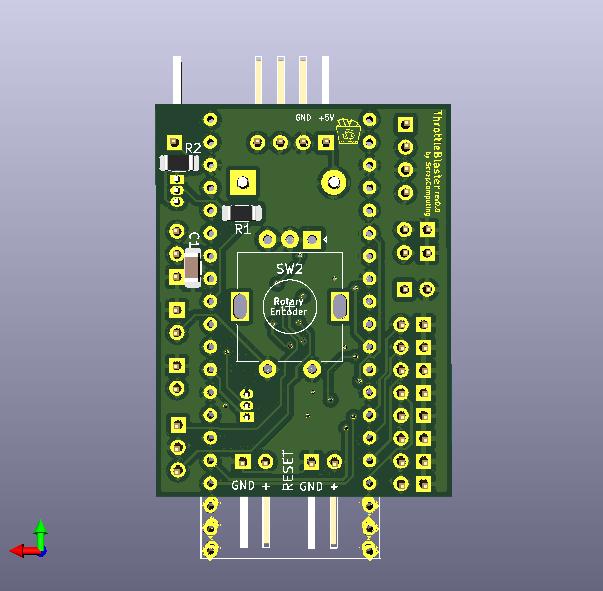
Download gerbers: https://github.com/scrapcomputing/ThrottleBlaster/releases
| Reference | Quantity | Value | Description |
|---|---|---|---|
| N/A | 1 (recommended) | TM1637 based 4-digit 7-segment display | The display of the Throttle Blaster |
| D1 | 1 | Through-hole diode (preferrably Schottky 1N5817) | Reverse polarity protection |
| N/A (for Pico) | 2 | 1x17 female through-hole pin-header 2.54mm pitch (Harwin M20-7821746) | For attaching the Pico to the board. |
| J1 | 1 (optional) | 1x01 male through-hole angled pin-header 2.54mm pitch | For the STPCLK# cable |
| RES1,2 | 2 (optional) | 1x02 male through-hole angled pin-header 2.54mm pitch | For Reset detection |
| J2 | 1 (optional UART) | 1x03 male through-hole pin-header 2.54mm pitch | For controlling the Throttle Blaster via serial. (Requires MAX3232) |
| JP1/JP2 | 1 | 2x02 (or 2x 1x02) male through-hole pin-header 2.54mm | Selects mode of operation. |
| JP3 | 1 | 1x02 male through-hole pin-header 2.54mm pitch | For the JP3 jumper that flips the rotation direction |
| SW1/SW2 | 2 (optional) | 1x02 male through-hole pin-header 2.54mm pitch | For the SW1 and SW2 switches |
| U1 | 1 (optional) | 1x04 male through-hole angled pin-header 2.54mm pitch | For connecting the TM1637 7-segment display. |
| Jumpers | 2 | 2.54mm pitch Jumpers | For JP1/JP2 |
| Q1 (optional Q2) | 1 (2 for optional RESET detection) | 2N7000 N-channel MOSFET | Pulls down the CPU's STPCLK# pin |
| R1 | 1 | 1K Resistor SMD 1206 | For the throttle transistor gate. |
| R2 | 1 | 100 Ohm Resistor SMD 1206 WARNING: P-iii CPUs and VIA MVP3-based boards may need lower values like 47 Ohms | Between the throttle pin and the throttling transistor for additional safety. It's value could be lower. |
| Pot1 | 1 (mode POT) | 10K linear potentiometer | Selects Frequency in Potentiometer mode. |
| SW1 | 1 (mode 1Btn) | Push button | Selects Frequency in 1Btn mode. |
| SW3 | 1 (mode 2Btn) | Push button | The right button in 2Btn mode. |
| Preset Btns P1-P8 | 8 (optional) | 1x02 (or one 8x02) male through-hole pin-header 2.54mm | Headers for the 8 preset push-buttons. |
| SW2 | 1 (mode ROT) | Rotary Encoder with push-button, (ALPS EC11E-Switch) Vertical | Selects Frequency in Rotary mode. Note: These are widely available online using keywords like: "rotary encoder switch Arduino" and they can also be found in kits with fitting knobs. |
| U2 | 1 | Raspberry Pi Pico | |
| U3 | 1 | 1x04 horizontal pin header 2.54mm pitch | For connecting to the floppy power connector, for powering the unit. |
| C1 | 1 (mode POT) | 100pF Ceramic capacitor SMD 1205 | Used to reduce potentiometer noise. |
| C2,C3,C4,C5,C6 | 5 (optional UART) | 1uF Ceramic Capacitor SMD 1206 | For MAX3232 (serial port) |
| U4 | 1 (optional UART) | MAX3232 SOIC-16 5.3x10.2mm (Commonly listed as 16-SOIC 3.90mm width) | For controlling the Throttle Blaster via the serial port. WARNING: There are many fakes/clones of the MAX3232 available online but these are known not to work well or at all. They may need smaller capacitor values as mentioned in fake max3232 issue. So please avoid them and get a MAX3232 from a known brand and supplier. |
STPCLK# pinJust look for it in your CPU's datasheet. This table lists the STPCLK# pin number for your reference:
| CPU | STPCLK# Pin |
|---|---|
| Pentium MMX | V34 |
| Pentium Pro | A3 |
| Pentium-iii socket | AG35 |
| Pentium-iii slot1 | B6 |
| Athlon XP | AC1 |
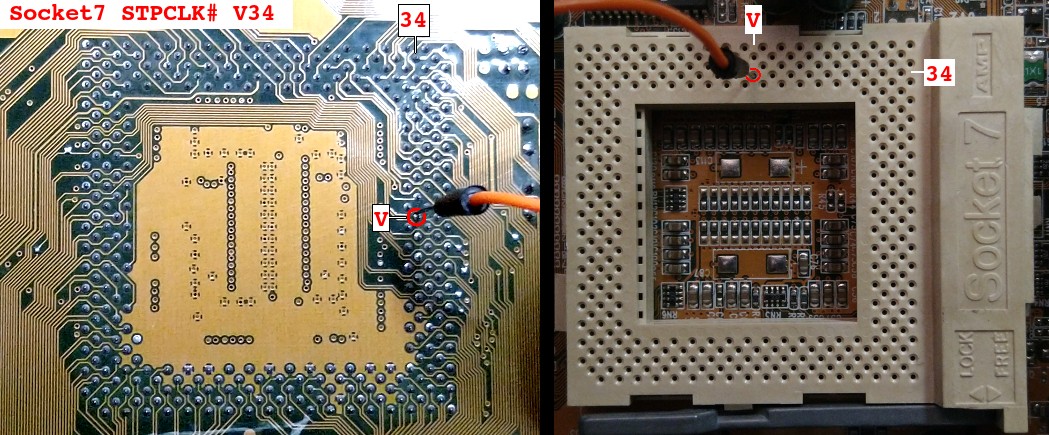
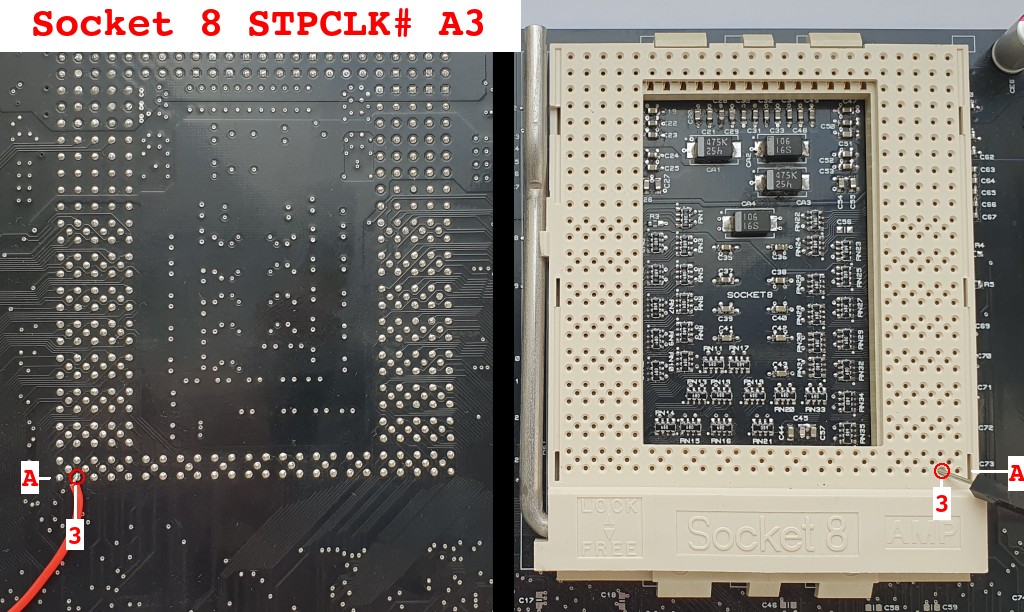
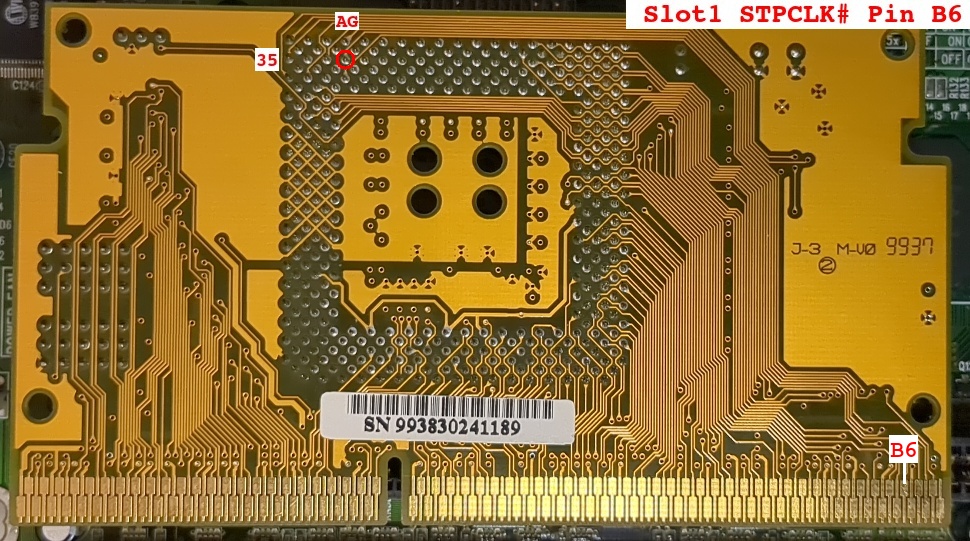
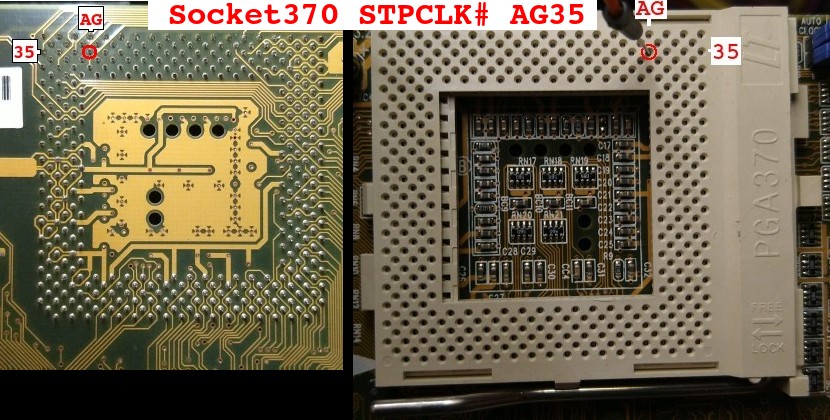
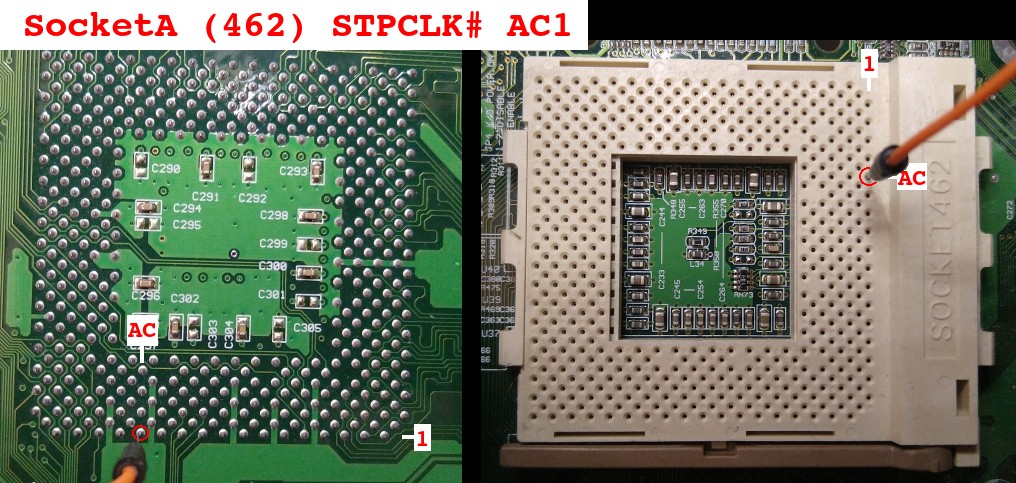
486 or older CPUs don't usually have a STPCLK# pin. Instead they have the HOLD pin which has somewhat similar functionality and is active high. Some boards use PWM on this HOLD pin when the Turbo button is pressed.
The HOLD pin is not pulled down internally by the CPU. So it is up to the motherboard to pull it down. The problem is that this is usually actively pulled down by the CPU chipset, meaning that if we try to pull it up with the Throttle Blaster we may damage the chipset. So I don't think there is a way to get the Throttle Blaster to work universally with older systems.
The project is GPLv2 except for Pwm.pio which comes from the Pi Pico SDK examples and is under SPDX-License-Identifier: BSD-3-Clause.
| Qty | Value | Footprint | References |
|---|---|---|---|
| 10 | SW_Push | Connector_PinHeader_2.54mm:PinHeader_1x02_P2.54mm_Vertical | P1, P2, P3, P4, P5, P6, P7, P8, SW1, SW3 |
| 5 | 1uF | Capacitor_SMD:C_1206_3216Metric_Pad1.33x1.80mm_HandSolder | C2, C3, C4, C5, C6 |
| 2 | 2N7000 | Package_TO_SOT_THT:TO-92_Inline | Q1, Q2 |
| 2 | Conn_01x02_Male | Connector_PinHeader_2.54mm:PinHeader_1x02_P2.54mm_Horizontal | RES1, RES2 |
| 1 | 100 Ohms | Resistor_SMD:R_1206_3216Metric_Pad1.30x1.75mm_HandSolder | R2 |
| 1 | 100pF | Capacitor_SMD:C_1206_3216Metric_Pad1.33x1.80mm_HandSolder | C1 |
| 1 | 10K | Connector_PinHeader_2.54mm:PinHeader_1x03_P2.54mm_Vertical | Pot1 |
| 1 | 1K | Resistor_SMD:R_1206_3216Metric_Pad1.30x1.75mm_HandSolder | R1 |
| 1 | 7SegmentDisplayTM1637 | Connector_PinHeader_2.54mm:PinHeader_1x04_P2.54mm_Vertical | U1 |
| 1 | Conn_01x01_Male | Connector_PinHeader_2.54mm:PinHeader_1x01_P2.54mm_Horizontal | J1 |
| 1 | D_Schottky | Diode_THT:D_5W_P10.16mm_Horizontal | D1 |
| 1 | FloppyPower | Connector_PinHeader_2.54mm:PinHeader_1x04_P2.54mm_Horizontal | U3 |
| 1 | MAX3232 | Package_SO:SOIC-16W_5.3x10.2mm_P1.27mm | U4 |
| 1 | MODE | Connector_PinHeader_2.54mm:PinHeader_1x02_P2.54mm_Vertical | JP1 |
| 1 | POT Enable | Connector_PinHeader_2.54mm:PinHeader_1x02_P2.54mm_Vertical | JP2 |
| 1 | RaspberryPi_Pico | ThrottleBlaster:raspberry_pi_pico | U2 |
| 1 | ReverseDir | Connector_PinHeader_2.54mm:PinHeader_1x02_P2.54mm_Vertical | JP3 |
| 1 | Rotary_Encoder_Switch | Rotary_Encoder:RotaryEncoder_Alps_EC11E-Switch_Vertical_H20mm | SW2 |
| 1 | Serial | Connector_PinHeader_2.54mm:PinHeader_1x03_P2.54mm_Vertical | J2 |
It measures 33.1 × 43.8 mm and has 2 copper layers, 1.6 mm thick.
34 parts, built around the MAX3232ID. The full list of its parts is on this page, with links to each part's symbol and footprint where PCBKit's library has them.
From the scrapcomputing/ThrottleBlaster repository on GitHub, at the commit this page was made from: the board is kicad/ThrottleBlaster.kicad_pcb. PCBKit opens the board in the browser, with nothing to install.
Its repository publishes it under the GPL-2.0 licence: you may reuse it on that licence's terms (keep the author's notice, and for a copyleft licence share your changes alike).
doudar/SmartSpin2k
Transform your spin bike into a Smart Trainer!


zephray/ELTerm
ANSI/VT100-compatible serial terminal built with Raspberry Pi Pico and EL640.480-AM/AG screen


Tjeerdie/SPECTRE
Speeduino compatible engine control unit (ECU) based around black STM32F407VET6 board.

cole8888/SRNE-Solar-Charge-Controller-Monitor
Read data from SRNE solar charge controllers.


jimbro1000/VersaTermMinus
Based on the VersaTerm project but slightly shrunk in the wash