

2 layers148.8 × 132.2 mm
Usbflashprog
robsonsmartins/usbflashprog
A memory device programmer (Flash/EPROM/E2PROM) board and software, connected to PC by USB port.
125 parts36

 sarpharaj-09/LEDCube1
A 4×4×4 LED cube that tries to look impressive with its patterns… until you remember it’s just 64 tiny lights doing their best.
LedCubePCB is an open-source printed circuit board by sarpharaj-09, from the sarpharaj-09/LEDCube repository on GitHub. It is a 2-layer board of 64.8 × 50.4 mm with 36 parts on 72 nets, routed with 228 tracks and 6 vias.
It is built around the 74HC595 and BC547. Its parts include 22 resistors, 4 transistors, 3 capacitors, 3 connectors and 2 ICs. It belongs with the AVR (ATmega, ATtiny) boards of this library.

An intelligent 3D addressable LED cube system with real-time pattern control and dynamic animations





The LED Cube is a sophisticated 3D light display system featuring dynamically addressable LEDs arranged in a cubic lattice. This system combines embedded microcontroller programming with custom PCB design to create an immersive visual experience with real-time pattern generation and animation control.
Built around the Arduino Nano platform with a professionally designed PCB in KiCAD, this project demonstrates the practical application of LED control techniques, spatial algorithms, and embedded systems design for creative visual displays.
🚀 Development Status: This project is currently in active development. New features and optimizations are being added regularly. Contributions and feedback are welcome!




| Feature | Description |
|---|---|
| 🎯 3D LED Matrix | Fully addressable multi-dimensional LED array |
| 🎨 Real-time Animation | Dynamic pattern generation and smooth transitions |
| 🔧 Modular Architecture | Clean code separation for easy expansion and maintenance |
| ⚡ Efficient Power Management | Optimized LED control and power distribution |
| 🎮 Pattern Library | Diverse built-in animation patterns and effects |
| 💡 Customizable Brightness | PWM-based brightness control |
| 🔄 Smooth Animations | Anti-aliasing and interpolation for fluid motion |
| 📊 Debugging Support | Serial monitoring and real-time data visualization |
| Component | Quantity | Specification | Purpose |
|---|---|---|---|
| Microcontroller | 1× | Arduino Nano ATmega328P | Main processor |
| Shift Register | 1× | 74HC595 | Column selection driver |
| NPN Transistors | 4× | 2N2222 or similar | Layer multiplexing |
| LEDs | 64× | 5mm or SMD | Visual display elements |
| Current Limiting Resistors | 64× | 470Ω | LED current protection |
| Layer Transistor Base Resistors | 4× | 1kΩ | Transistor base limiting |
| Push Button | 1× | Standard momentary | Animation control input |
| Decoupling Capacitors | 1× | 100µF | Power supply filtering |
| Power Supply | 1× | 5V, 1A+ | System power |
| PCB | 1× | Custom KiCAD design | Component integration |
| Structural Frame | - | 3D printed or acrylic | Cube structure |
| Parameter | Specification |
|---|---|
| Cube Size | 4 layers × 4 rows × 4 columns (64 LEDs total) |
| LED Type | Binary on/off (single channel per LED) |
| Color Depth | 1-bit per LED (on/off only) |
| Refresh Rate | 60+ FPS (multiplexed display) |
| Control Interface | Shift register (74HC595) + Layer transistors |
| Input Control | Physical button with debouncing |
| Power Consumption | Varies by animation (typically < 500mA) |
| Microcontroller | Arduino Nano ATmega328P |
┌──────────────────┐    ┌─────────────────────┐    ┌──────────────────┐
│  PATTERN ENGINE  │    │  LED CONTROLLER     │    │  PHYSICAL LEDS   │
│                  │    │                     │    │                  │
│ • Animation Gen  │────▶• Pixel Mapping     │────▶• RGB Addressable │
│ • Color Calc     │    │ • SPI/Data Driver  │    │   Output         │
│ • Timing Logic   │    │ • Brightness PWM   │    │                  │
└──────────────────┘ └─────────────────────┘ └──────────────────┘// Manages frame buffer and multiplexed LED display output
class LEDCube {
// Frame buffer operations
setLED(layer, col, on); // Set individual LED
setLayer(layer, mask); // Set entire layer
clearFrame(); // Clear all LEDs
fillAll(); // Turn on all LEDs
// Display operations
refresh(); // Perform one refresh cycle
Button::Event refreshFor(ms); // Refresh with button polling
// Button access
Button& button(); // Get button object
}// Contains 12 distinct animation methods
class Animator {
// Each returns Button::Event to signal button press
Button::Event allOn(); // Fill entire cube
Button::Event layerSweep(); // Sweep through layers
Button::Event rain(); // Falling particles
Button::Event bounceBall(); // Bouncing sphere
Button::Event spiral(); // Spiral pattern
Button::Event checkerboard(); // Alternating pattern
Button::Event sparkle(); // Random twinkling
Button::Event wipe(); // Progressive wipe
Button::Event propeller(); // Rotating blades
Button::Event snake(); // Snake movement
Button::Event firework(); // Explosion effect
Button::Event allOff(); // Turn off all
}// Manages animation dispatch and button-triggered switching
class AnimationManager {
void run(); // Main loop - runs animations
void flashIndex(); // Visual feedback for mode
// Internally:
// • Tracks current animation index
// • Dispatches to Animator methods
// • SHORT PRESS → next animation
// • LONG PRESS → previous animation
}// Handles debounced button input detection
class Button {
enum Event { NONE, SHORT_PRESS, LONG_PRESS };
Button::Event check(); // Poll button state
}| Requirement | Description |
|---|---|
| PlatformIO IDE | VS Code with PlatformIO extension recommended |
| Arduino Nano | Microcontroller board |
| KiCAD | For PCB design modifications (optional) |
| Electronic Components | LEDs, resistors, capacitors as per BOM |
| Fabrication Tools | Soldering equipment, wire strippers, etc. |
# Clone repository
git clone https://github.com/yourusername/LED-Cube.git
cd LED-Cube

# Open in VS Code with PlatformIO
code .# Install via PlatformIO
pio pkg install
# Required libraries will be automatically installedEdit code/include/Config.h to customize hardware settings:
namespace Config {
    // 74HC595 Shift Register pins
    constexpr uint8_t DS    = 2;      // Data input
    constexpr uint8_t RCLK  = 3;      // Latch clock
    constexpr uint8_t SRCLK = 4;      // Shift clock

    // Layer selection pins (NPN transistors)
    constexpr uint8_t LAYER_PINS[4] = {5, 6, 7, 8};

    // Button input pin
    constexpr uint8_t BUTTON_PIN = 10;

    // Cube dimensions
    constexpr uint8_t NUM_LAYERS  = 4;
    constexpr uint8_t NUM_COLUMNS = 16;

    // Timing parameters
    constexpr uint16_t LAYER_ON_US = 500;     // Microseconds per layer
    constexpr uint16_t DEBOUNCE_MS = 50;      // Button debounce
    constexpr uint16_t LONG_PRESS_MS = 600;   // Long press threshold
}# Build project
pio run
# Upload to Arduino Nano
pio run -t upload
# Monitor serial output
pio device monitorFollow the PCB layout in ledCubePCB/ for proper component placement and solder connections. Use the circuit diagram for electrical connections.
The cube automatically starts at animation 0 (All ON). Use the physical button to navigate:
// main.cpp — Main program loop
LEDCube          cube;           // Display driver & button handler
Animator         anim(cube);     // Animation engine
AnimationManager mgr(cube, anim); // Animation dispatcher

void setup() {
    randomSeed(analogRead(A0));
    cube.begin();
}

void loop() {
    mgr.run();   // Runs current animation, switches on button press
}| Index | Animation | Description |
|---|---|---|
| 0 | All ON | Entire cube illuminated |
| 1 | Layer Sweep | Progressive sweep through all layers |
| 2 | Rain | Particles falling through the cube |
| 3 | Bounce Ball | Bouncing sphere within the cube |
| 4 | Spiral | Spiraling pattern through 3D space |
| 5 | Checkerboard | Alternating on/off pattern |
| 6 | Sparkle | Random twinkling LEDs |
| 7 | Wipe | Progressive reveal/clear pattern |
| 8 | Propeller | Rotating blade-like effects |
| 9 | Snake | Snake-like movement pattern |
| 10 | Firework | Explosion-like burst effect |
| 11 | All OFF | All LEDs turned off |
Control animations via physical button (Pin 10):
SHORT PRESS (< 600ms)  → Advance to next animation
LONG PRESS (≥ 600ms) → Return to previous animationDebounce: 50ms to prevent false triggers Visual Feedback: Brief flash shows current animation index on entry
test/pattern.cpp for pattern validationEach animation in the Animator class:
_tick(ms) refreshes display and polls buttonExample Pattern: layerSweep()
Button::Event Animator::layerSweep() {
    // Animate through each layer
    for (uint8_t layer = 0; layer < NUM_LAYERS; layer++) {
        // Set frame for this layer
        _cube.setLayer(layer, 0xFFFF);  // All columns ON

        // Refresh and check for button press
        Button::Event evt = _tick(100);  // Refresh for 100ms
        if (evt != Button::NONE) {
            return evt;  // Button pressed - exit and switch
        }
    }
    return Button::NONE;  // Loop again
}
Adding New Animations:
// 1. Add method declaration in Animator.h
Button::Event myNewAnimation();

// 2. Implement in Animator.cpp
Button::Event Animator::myNewAnimation() {
    // Your animation code
    return _tick(delayMs);  // Refresh and return button event
}

// 3. Register in AnimationManager.cpp dispatch table
// Update _total count and add to dispatcher
PCB Front View
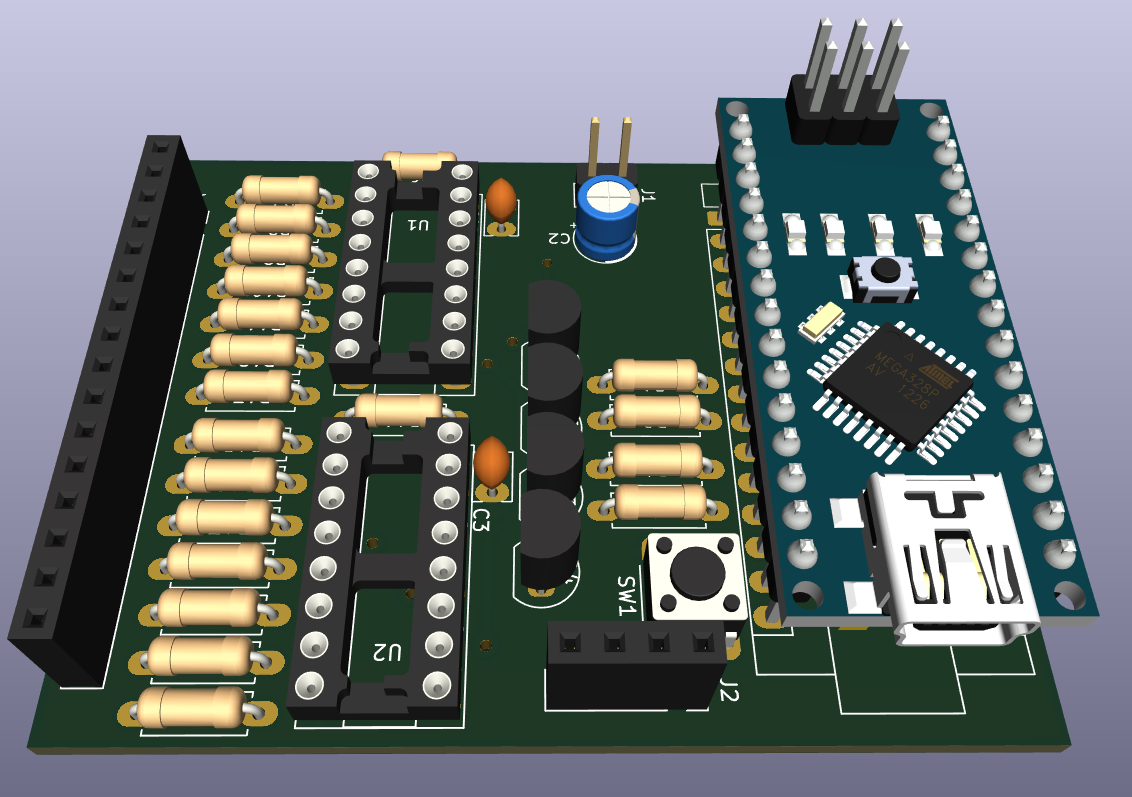
Front side of the custom-designed PCB with Arduino Nano, shift register, and transistor drivers
PCB Back View
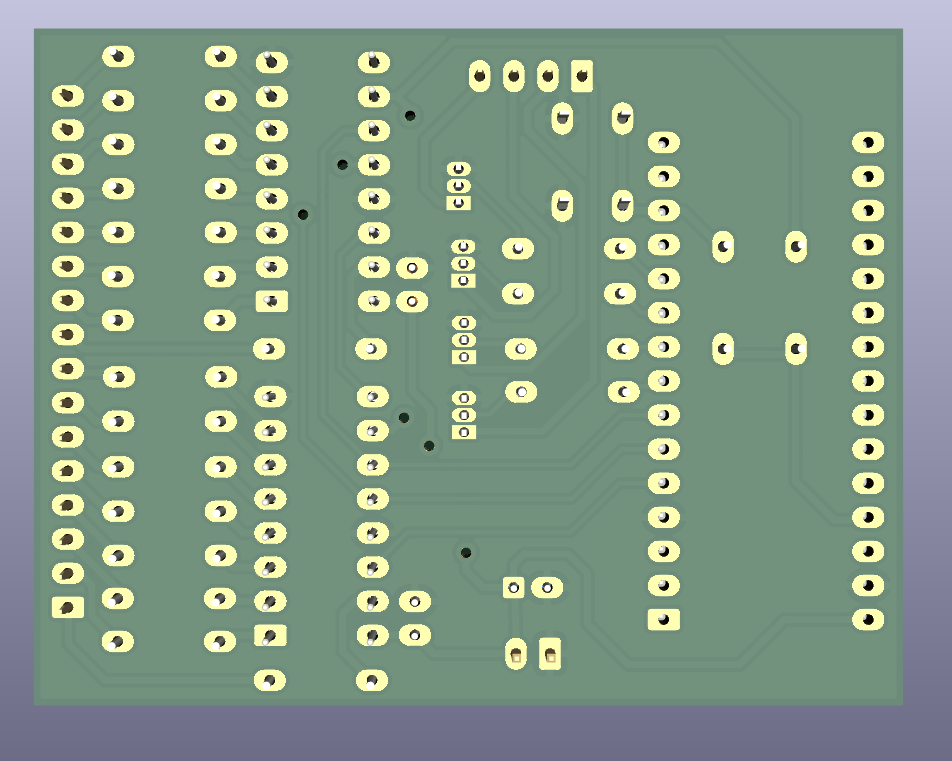
Back side of the PCB showing copper traces and signal routing
3D Enclosure Design
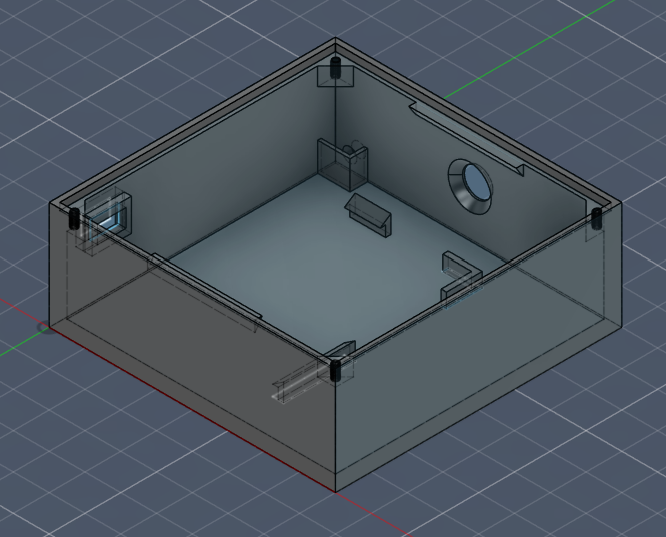
3D-printed or acrylic case structure for holding the 4×4×4 LED array
Animation Showcase

Real-time demonstration of all 12 animation patterns in action
Video Highlights:
LED-Cube/
│
├── code/                          # Firmware Source Code
│   ├── src/
│   │   ├── main.cpp               # Entry point & main loop
│   │   ├── LEDCube.cpp            # Frame buffer & display driver
│   │   ├── AnimationManager.cpp   # Animation dispatcher & controller
│   │   ├── Animator.cpp           # 12 animation implementations
│   │   ├── Button.cpp             # Button input handling
│   │   ├── LayerController.cpp    # Layer multiplexing control
│   │   └── ShiftRegister.cpp      # 74HC595 shift register driver
│   │
│   ├── include/
│   │   ├── Config.h               # Hardware pinout & settings
│   │   ├── LEDCube.h              # Frame buffer interface
│   │   ├── AnimationManager.h     # Animation manager interface
│   │   ├── Animator.h             # Animation methods interface
│   │   ├── Button.h               # Button control interface
│   │   ├── LayerController.h      # Layer control interface
│   │   └── ShiftRegister.h        # Shift register interface
│   │
│   ├── test/
│   │   └── nano_test.cpp          # Unit tests for Arduino Nano
│ │| Document | Location | Purpose |
|---|---|---|
| Schematic | ledCubePCB/ledCubePCB.kicad_sch | Electrical design |
| PCB Layout | ledCubePCB/ledCubePCB.kicad_pcb | Board layout |
ledCubePCB/ for PCB detailsThis project is licensed under the MIT License - see the LICENSE file for details.
MIT License

Copyright (c) 2024 LED Cube Project

Permission is hereby granted, free of charge, to any person obtaining a copy
of this software and associated documentation files (the "Software"), to deal
in the Software without restriction, including without limitation the rights
to use, copy, modify, merge, publish, distribute, sublicense, and/or sell
copies of the Software, and to permit persons to whom the Software is
furnished to do so, subject to the following conditions:

The above copyright notice and this permission notice shall be included in all
copies or substantial portions of the Software.

THE SOFTWARE IS PROVIDED "AS IS", WITHOUT WARRANTY OF ANY KIND, EXPRESS OR
IMPLIED, INCLUDING BUT NOT LIMITED TO THE WARRANTIES OF MERCHANTABILITY,
FITNESS FOR A PARTICULAR PURPOSE AND NONINFRINGEMENT.
Sarpharaj Dewan
💼 Embedded Systems & Robotics Enthusiast



If you found this project useful or inspiring, please consider giving it a star!

"Creativity illuminated in three dimensions."
Made with ❤️ by Sarpharaj Dewan
| Qty | Value | Footprint | References |
|---|---|---|---|
| 20 | 100R | Resistor_THT:R_Axial_DIN0207_L6.3mm_D2.5mm_P7.62mm_Horizontal | R1, R2, R4, R5, R10, R11, R12, R13, R14, R15, R16, R17, R18, R19, R20, R21 +4 |
| 4 | BC547 | Package_TO_SOT_THT:TO-92_Inline | Q1, Q2, Q3, Q4 |
| 2 | 0.1uf | Capacitor_THT:C_Disc_D3.8mm_W2.6mm_P2.50mm | C1, C3 |
| 2 | 74HC595 | Package_DIP:DIP-16_W7.62mm_Socket_LongPads | U1, U2 |
| 1 | 100uf | Capacitor_THT:CP_Radial_D5.0mm_P2.50mm | C2 |
| 1 | 10k | Resistor_THT:R_Axial_DIN0207_L6.3mm_D2.5mm_P7.62mm_Horizontal | R22 |
| 1 | Arduino_Nano_Every | Module:Arduino_Nano | A1 |
| 1 | Conn_01x02_Pin | Connector_PinHeader_2.54mm:PinHeader_1x02_P2.54mm_Vertical | J1 |
| 1 | Conn_01x04_Socket | Connector_PinSocket_2.54mm:PinSocket_1x04_P2.54mm_Vertical | J2 |
| 1 | Conn_01x16_Socket | Connector_PinSocket_2.54mm:PinSocket_1x16_P2.54mm_Vertical | J3 |
| 1 | R | Resistor_THT:R_Axial_DIN0207_L6.3mm_D2.5mm_P7.62mm_Horizontal | R3 |
| 1 | SW_Push | Button_Switch_THT:SW_PUSH_6mm | SW1 |
robsonsmartins/usbflashprog
A memory device programmer (Flash/EPROM/E2PROM) board and software, connected to PC by USB port.

Ixox/midibox-SID
PCBs, Panels and firmware for puting a 4 stereo voices midiboxSid in a 1U 19" rack


lambdaBoost/MC6205-graphical-display
graphical display on old neon plasma screen

toohka42/Divergence-Meter
Itron Divergence meter based on Steins;Gate anime series

YousefAliAicha/sentinel-arduino-firmware
Adaptive traffic-light FSM on the Arduino UNO R3 — pedestrian preemption, LDR-gated night mode with HC-SR04 vehicle detection, and a multiplexed 7-segment countdown. Fully non-blocking.

24bec124-sketch/IROC-U-Charging-PMOS
Developed for Team Arrow as part of IRoC-U (ISRO Robotics Challenge - URSC), a national student competition hosted by the Indian Space Research Organization (ISRO).
It measures 64.8 × 50.4 mm and has 2 copper layers, 1.6 mm thick.
36 parts, built around the 74HC595 and BC547. The full list of its parts is on this page, with links to each part's symbol and footprint where PCBKit's library has them.
From the sarpharaj-09/LEDCube repository on GitHub, at the commit this page was made from: the board is ledCubePCB/ledCubePCB.kicad_pcb and its schematic ledCubePCB/ledCubePCB.kicad_sch. PCBKit opens the board in the browser, with nothing to install.
Its repository states no licence, so its author keeps all rights: ask sarpharaj-09 before reusing the design.