2 layers40.2 × 67.8 mm
Point controller switches
penguintutor/modelrailway-point-controller
Model railway point controller
30 parts1GPL-3.0
 penguintutor/modelrailway-point-controller1
Model railway point controller
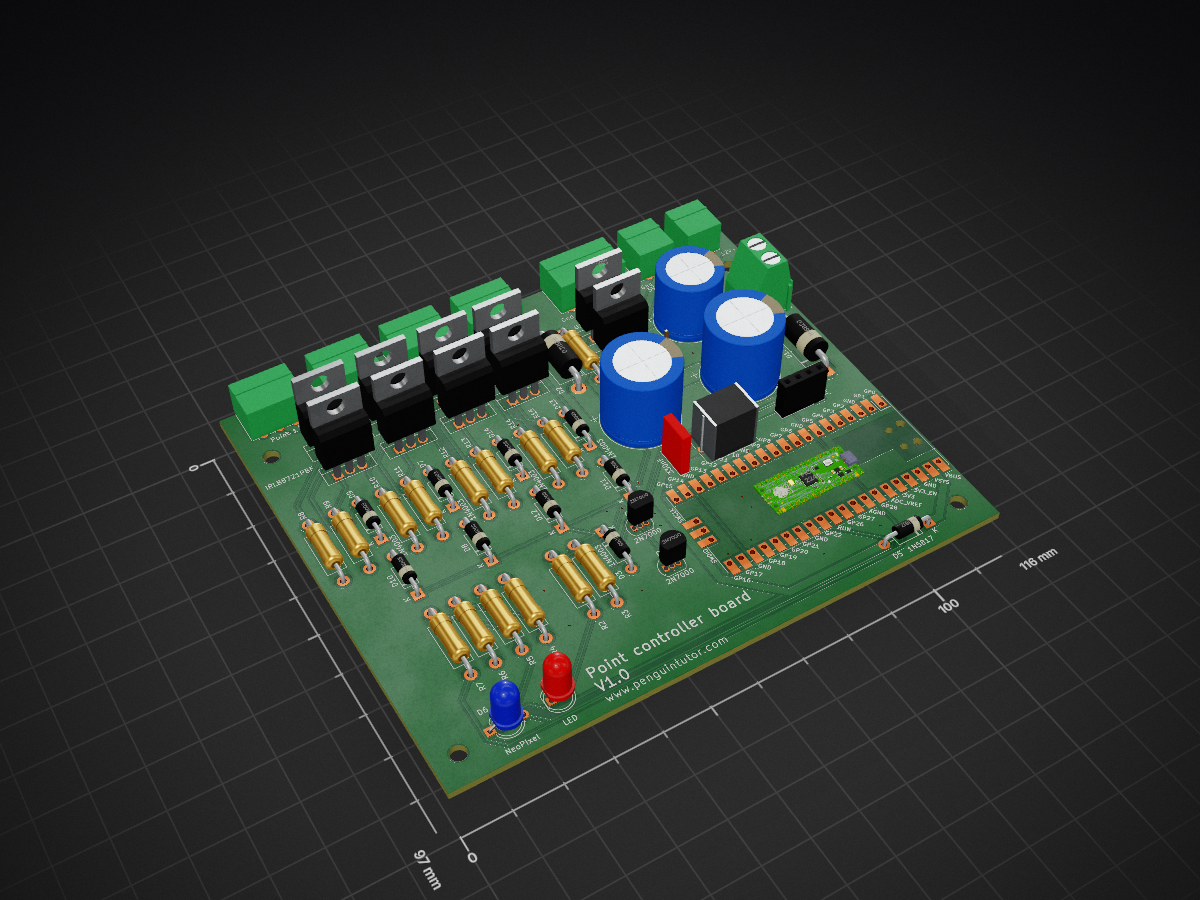
Point controller is an open-source printed circuit board by penguintutor, from the penguintutor/modelrailway-point-controller repository on GitHub, published under the GPL-3.0 licence. It is a 2-layer board of 116 × 97 mm with 61 parts on 64 nets, routed with 341 tracks and 23 vias.
It is built around the L7805 and IRLB8721PBF. Its parts include 15 resistors, 14 diodes, 11 transistors, 9 connectors and 5 capacitors. It belongs with the RP2040 boards of this library.


The model railway point controller provides a way to control up to 4 points using a Raspberry Pi Pico W. It includes a MOSFET based capacitor discharge unit on the PCB and MOSFET controllers for each of the point motors.
It includes a second control board connected by I2C which can be connected to physical LEDs and switches to provide a way to control the points. The points can also be controlled using a web interface which can also be used in conjunction with GUI software to provide a touch screen interface.
This version needs to be installed on a Raspberry Pi Pico W with the appropriate network enabled MicroPython. MicroPython can be installed through the Thonny editor.
To install the program, copy all the files in the pico-src directory to the top-level of the Raspberry Pi Pico. For the network connection you also need to create a file called secrets.py with details of your SSID and PASSWORD. The example below shows the formatting for the secrets.py file.
SSID="NetworkSSID"
PASSWORD="WiFiPassword"The program can be run in two modes.
Note that in client mode it is currently blocking and will not operate until it has successfully connected to the network.
The mode is set by editing the entry "mode" in the pico-lights.py file.
mode="ap" # Use as an access point mode="client" # Use as a Wi-Fi client
For the code to run automatically on start-up save the pico-point-controller.py file on your Pico as main.py.
The board can be used in WiFi only mode, which does not use the I2C based switch and LED board. For that use the file pico-point-controller.wifionly.py instead of pico-point-controller.py (or save as main.py for auto-run)
For more details see www.penguintutor.com/points
| Qty | Value | Footprint | References |
|---|---|---|---|
| 9 | 1N4003 | Diode_THT:D_DO-41_SOD81_P10.16mm_Horizontal | D3, D7, D8, D9, D10, D11, D12, D13, D14 |
| 9 | IRLB8721PBF | Package_TO_SOT_THT:TO-220-3_Vertical | Q1, Q4, Q5, Q6, Q7, Q8, Q9, Q10, Q11 |
| 8 | 470R | Resistor_THT:R_Axial_DIN0411_L9.9mm_D3.6mm_P15.24mm_Horizontal | R8, R9, R10, R11, R12, R13, R14, R15 |
| 4 | MountingHole | MountingHole:MountingHole_3.2mm_M3 | H1, H2, H3, H4 |
| 2 | 10K | Resistor_THT:R_Axial_DIN0411_L9.9mm_D3.6mm_P15.24mm_Horizontal | R5, R7 |
| 2 | 1N5820 | Diode_THT:D_DO-201AD_P15.24mm_Horizontal | D1, D2 |
| 2 | 2200μF+ | Custom_footprints:CP_Radial_D16.0mm_P7.50mm_P5.00mm | C2, C3 |
| 2 | 2N7000 | Package_TO_SOT_THT:TO-92_Inline | Q2, Q3 |
| 2 | 4K7 | Resistor_THT:R_Axial_DIN0411_L9.9mm_D3.6mm_P15.24mm_Horizontal | R4, R6 |
| 1 | 100nF | Capacitor_THT:C_Rect_L11.5mm_W7.5mm_P10.00mm_MKT | C5 |
| 1 | 1K0 | Resistor_THT:R_Axial_DIN0411_L9.9mm_D3.6mm_P15.24mm_Horizontal | R2 |
| 1 | 1N5817 | Diode_THT:D_DO-41_SOD81_P10.16mm_Horizontal | D5 |
| 1 | 2200μF | Capacitor_THT:CP_Radial_D14.0mm_P5.00mm | C1 |
| 1 | 22R | Resistor_THT:R_Axial_DIN0411_L9.9mm_D3.6mm_P15.24mm_Horizontal | R1 |
| 1 | 2K2 | Resistor_THT:R_Axial_DIN0411_L9.9mm_D3.6mm_P15.24mm_Horizontal | R3 |
| 1 | 330nF | Capacitor_THT:C_Rect_L7.0mm_W2.0mm_P5.00mm | C4 |
| 1 | 5V output | Connector_Phoenix_MC:PhoenixContact_MC_1,5_2-G-3.5_1x02_P3.50mm_Horizontal | J5 |
| 1 | Enable 5V | Connector_PinHeader_2.54mm:PinHeader_1x02_P2.54mm_Vertical | JP1 |
| 1 | I2C Exp | Connector_PinSocket_2.54mm:PinSocket_1x04_P2.54mm_Vertical | J4 |
| 1 | I2C out | Connector_Phoenix_MC:PhoenixContact_MC_1,5_4-G-3.5_1x04_P3.50mm_Horizontal | J3 |
| 1 | L7805 | Package_TO_SOT_THT:TO-220-3_Vertical | U1 |
| 1 | LED | LED_THT:LED_D5.0mm | D4 |
| 1 | NeoPixel | LED_THT:LED_D5.0mm-4_RGB_Wide_Pins | D6 |
| 1 | Pico | Pico:RPi_Pico_SMD_TH | U2 |
| 1 | Point 1 | Connector_Phoenix_MC:PhoenixContact_MC_1,5_3-G-3.5_1x03_P3.50mm_Horizontal | J7 |
| 1 | Point 2 | Connector_Phoenix_MC:PhoenixContact_MC_1,5_3-G-3.5_1x03_P3.50mm_Horizontal | J6 |
| 1 | Point 3 | Connector_Phoenix_MC:PhoenixContact_MC_1,5_3-G-3.5_1x03_P3.50mm_Horizontal | J9 |
| 1 | Point 4 | Connector_Phoenix_MC:PhoenixContact_MC_1,5_3-G-3.5_1x03_P3.50mm_Horizontal | J8 |
| 1 | Power in | TerminalBlock_Phoenix:TerminalBlock_Phoenix_MKDS-1,5-2_1x02_P5.00mm_Horizontal | J1 |
| 1 | Power out | Connector_Phoenix_MC:PhoenixContact_MC_1,5_2-G-3.5_1x02_P3.50mm_Horizontal | J2 |
It measures 116 × 97 mm and has 2 copper layers, 1.6 mm thick.
61 parts, built around the L7805 and IRLB8721PBF. The full list of its parts is on this page, with links to each part's symbol and footprint where PCBKit's library has them.
From the penguintutor/modelrailway-point-controller repository on GitHub, at the commit this page was made from: the board is electronics/point-controller/point-controller.kicad_pcb and its schematic electronics/point-controller-switches/point-controller-switches.kicad_sch. PCBKit opens the board in the browser, with nothing to install.
Its repository publishes it under the GPL-3.0 licence: you may reuse it on that licence's terms (keep the author's notice, and for a copyleft licence share your changes alike).
penguintutor/modelrailway-point-controller
Model railway point controller

dzervas/wemos-mini-external-power
WeMos Mini shield for external power supply (up to 35V)

ironerae/cant-ilever-Board-V2
The V2 iteration of the previous custom 3D printer mainboard powered by the Raspberry Pi Pico (RP2040)


KoffeinFlummi/rustbucket
Access your car's diagnostics with a BeagleBone Blue and Rust.


stelioskat/esp8266-led-dimmer
Wifi enabled LED strip dimmer that is controlled using MQTT messages.
