Skip to the content
PCBKitNew board
2 layers29.5 × 16.5 mmVibration motor circuit, the printed circuit board in 3D

Vibration motor circuit

NickEngmann/MagicGPT8Ball

🎱

Size
29.5 × 16.5 mm
Copper layers
2
Thickness
1.6 mm
Parts
5
Nets
5
Pads
11
Tracks, vias
13, 0
Pours
2
Routed
Yes
KiCad
KiCad 8.0 (file 20240108)
Created
20 Nov 2024
Updated
28 Mar 2026

Overview

Vibration motor circuit is an open-source printed circuit board by NickEngmann, from the NickEngmann/MagicGPT8Ball repository on GitHub, published under the MIT licence. It is a 2-layer board of 29.5 × 16.5 mm with 5 parts on 5 nets, routed with 13 tracks and 0 vias.

It is built around the PN2222A. Its parts include 2 connectors, 1 resistor, 1 diode and 1 transistor. It belongs with the robots and motor control boards of this library.

Main components

1

README

README.md

Magic (GPT)8 Ball 🎱

Overview

The Magic (GPT)8 Ball is a modern reinvention of the classic fortune-telling toy, powered by AI and IoT technology. It features voice recognition, motion sensing, and real-time AI responses through ChatGPT. When shaken, it records your question through a built-in microphone, processes it using OpenAI's APIs, and displays a mystical response on its integrated circular display.

Features

  • Voice-activated recording with automatic silence detection
  • Motion-based activation using QMI8658 6-axis IMU
  • Real-time transcription using OpenAI's Whisper API
  • AI-powered responses from ChatGPT
  • Smooth animations and UI transitions
  • RGB LED status indicator
  • Haptic feedback through dual vibration motors
  • WiFi manager for easy network setup
  • Offline mode with classic Magic 8 Ball responses
  • Built-in battery management and charging

Hardware Requirements

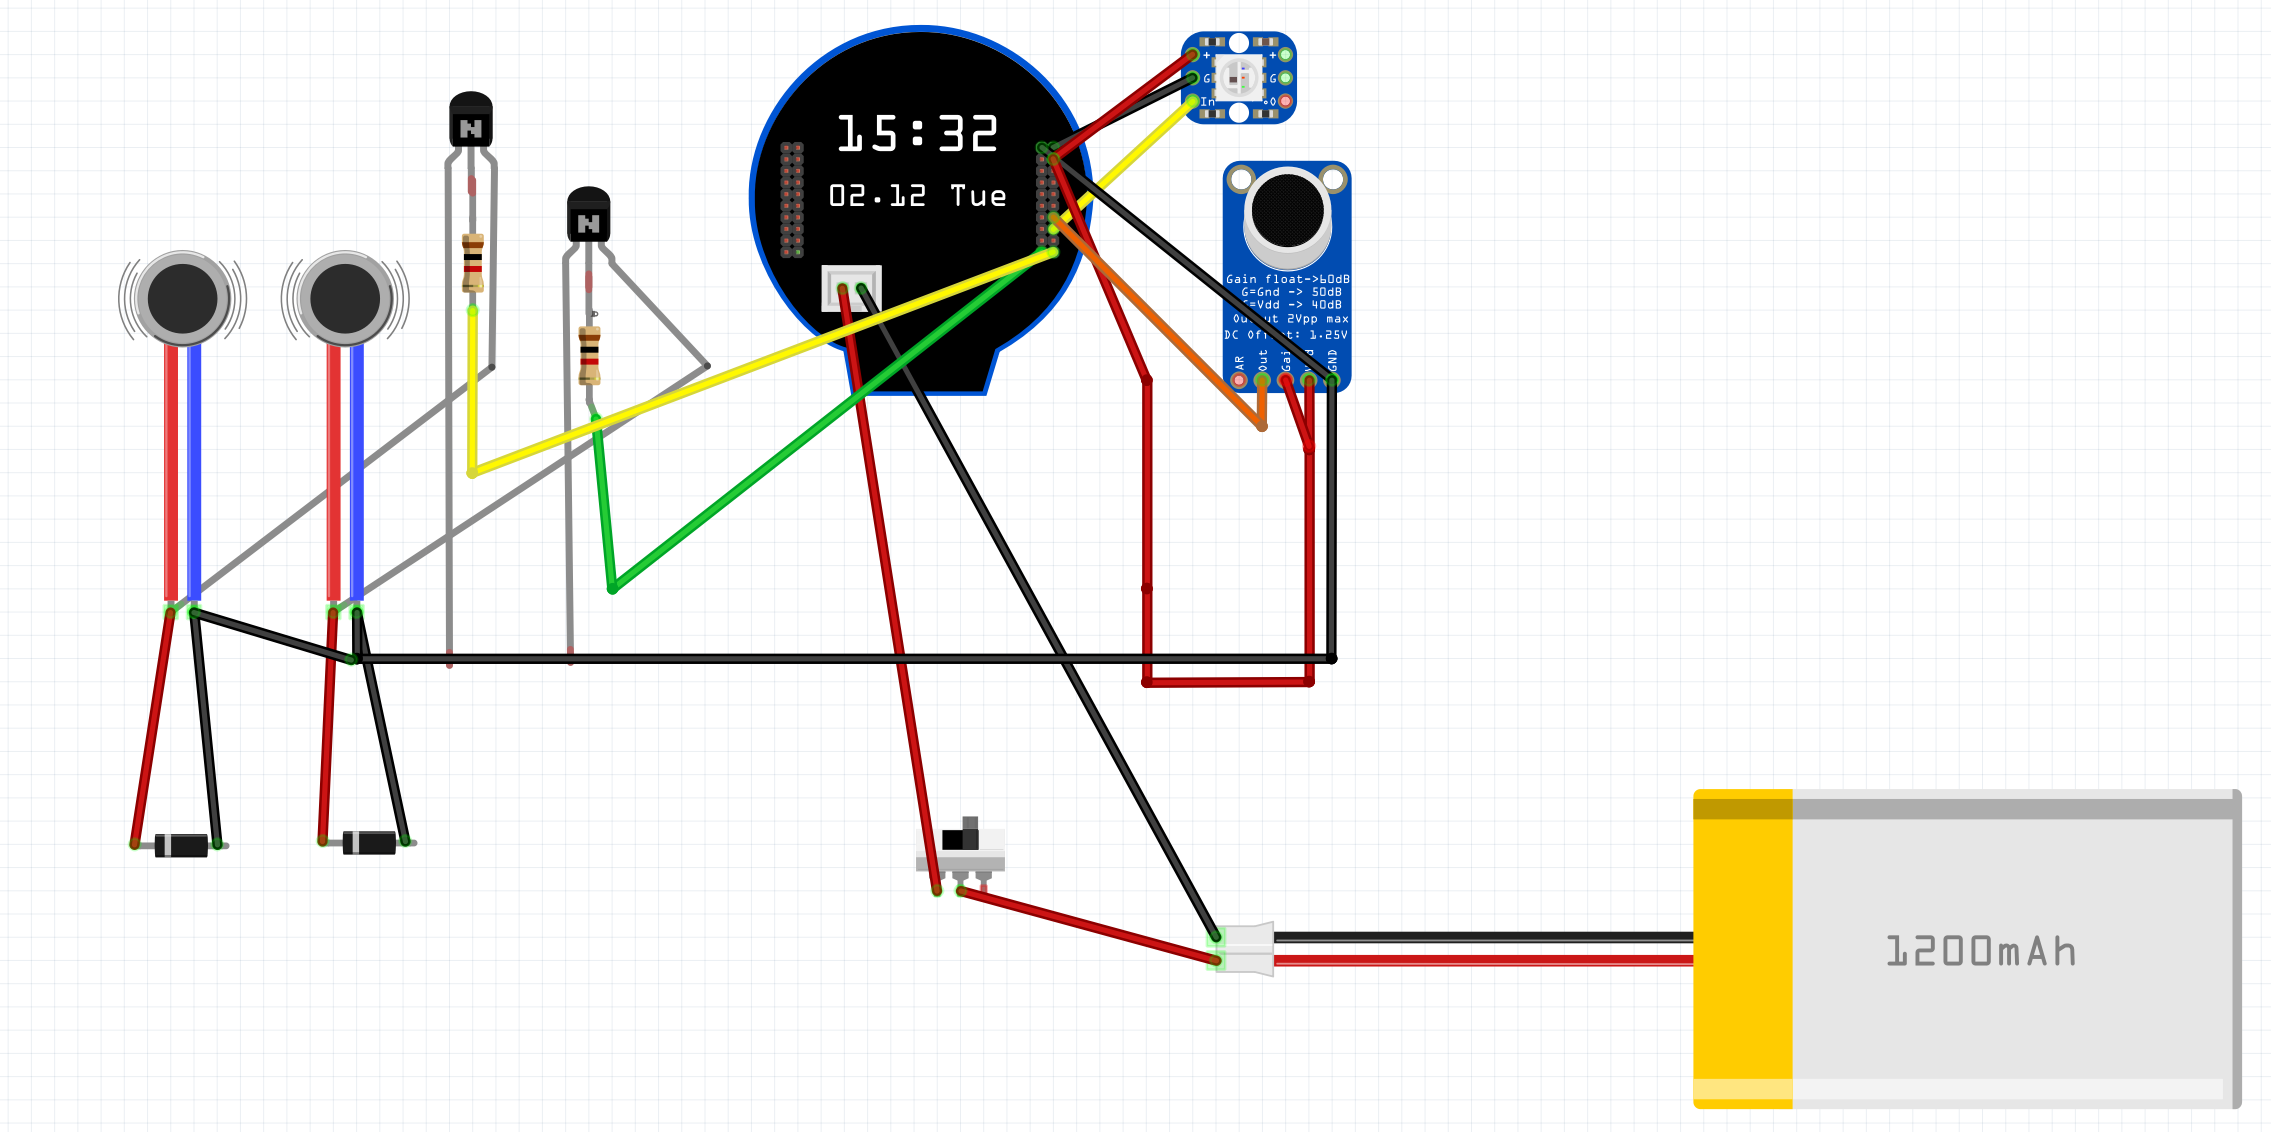
Project Wiring Diagram

Core Components

  • Waveshare ESP32-S3 1.28" LCD Development Board
    • ESP32-S3 microcontroller
    • 1.28" Round LCD Display (240×240 resolution)
    • Built-in QMI8658 6-axis IMU
    • USB-C for programming and charging
  • MAX9814 Microphone Amplifier Module
  • 2x Vibration Motors
  • WS2812B RGB LED
  • 1200mAh LiPo Battery
  • 3D printed enclosure (files TBD)

Pin Connections

Built-in Components (ESP32-S3 Board)
  • LCD Display
    • DC: GPIO8
    • CS: GPIO9
    • CLK: GPIO10
    • MOSI: GPIO11
    • RST: GPIO12
    • BL: GPIO40
  • QMI8658 IMU
    • SDA: GPIO6
    • SCL: GPIO7
External Components
  • MAX9814 Microphone
    • VDD → 3.3V
    • GND → GND
    • OUT → GPIO2 (ADC1_CH1)
  • Vibration Motors
    • Motor 1: GPIO5
    • Motor 2: GPIO13
  • RGB LED: GPIO3

Software Setup

Development Environment

  1. Install Visual Studio Code

  2. Install PlatformIO IDE extension

  3. Clone the repository:

    bash
    git clone https://github.com/NickEngmann/MagicGPT8Ball.git
    cd MagicGPT8Ball

Dependencies

  • WiFiManager for network configuration
  • ArduinoJson (7.x) for API communication
  • LVGL for UI and animations
  • TFT_eSPI for display driver
  • Adafruit_NeoPixel for RGB LED control

APIs and Services

  1. Set up a val.town account:
    • Deploy the included val.town.js function
    • Update the endpoint URL in main.cpp
  2. Configure OpenAI API key in val.town environment

Building and Flashing

  1. Open project in VS Code with PlatformIO

  2. Install dependencies:

    bash
    pio lib install
  3. Build and upload:

    bash
    pio run --target upload

Environment Configuration

  1. In the project root directory, create a .env file with your val.town endpoint and device token:

    ini
    VALTOWN_URL="https://your-valtown-endpoint.val.run"
    DEVICE_TOKEN="your-device-token"
  2. For reference, an .env.example file is provided:

    ini
    VALTOWN_URL="https://example-valtown-endpoint.val.run"
    DEVICE_TOKEN="example-device-token"

    Note: Never commit your actual .env file to version control. The .env.example file serves as a template.

  3. File locations should follow this structure:

    text
    MagicGPT8Ball/
    ├── .env                  # Your actual configuration (do not commit)
    ├── .env.example         # Template for others (safe to commit)
    ├── generate_env.py      # Handles environment setup
    ├── data/                # Generated during build
    └── ...
  4. During build:

    • The system automatically copies your .env file to the device's filesystem
    • If .env is missing, it will use .env.example as a fallback
    • Environment variables are securely stored on the device
  5. To update configuration:

    • Modify .env file

    • Rebuild and upload filesystem:

      bash
      pio run -t uploadfs
    • Upload program:

      bash
      pio run -t upload

Usage Instructions

First-Time Setup

  1. Power on the device
  2. Connect to "MagicGPT8Ball" WiFi network
  3. Configure your WiFi through the captive portal
  4. Device will restart and connect to your network

Daily Use

  1. Wake device by moving it or pressing the power button
  2. Wait for "Shake me" prompt
  3. Shake device to activate recording
  4. Speak your question clearly
  5. Wait for response (blue animation indicates processing)
  6. Device will display the AI-generated response
  7. Shake again for a new question

LED Status Indicators

  • Blue pulse: Starting up
  • Solid green: Ready
  • Red blink: Recording
  • Cyan pulse: Processing
  • Yellow blink: Offline mode
  • Purple blink: Error state

Advanced Features

Debug Mode

Enable detailed logging by uncommenting #define ENABLE_DEBUG in the following files:

  • Recorder.h - Audio debugging
  • main.cpp - System debugging

Voice Detection Parameters

Adjust sensitivity in Recorder.h:

  • AUDIO_THRESHOLD: Voice detection threshold
  • SILENCE_TIMEOUT: Silence duration before stopping
  • MAX_RECORD_SECONDS: Maximum recording duration

Animation Settings

Customize animations in Animations.h:

  • MOTION_SMOOTHING: Movement smoothness
  • GYRO_SENSITIVITY: Motion sensitivity
  • IDLE_AMPLITUDE: Idle animation range

Project Structure

text
├── src/
│   ├── main.cpp              # Main application logic
│   ├── Animations.*          # Display animations
│   ├── Recorder.*           # Audio recording
│   ├── TextStateManager.*   # Display text handling
│   ├── VibrationManager.*   # Haptic feedback
│   └── LEDLogger.*         # RGB LED control
├── lib/
│   └── QMI8658/            # IMU driver
└── val.town.js             # Serverless API handler

Troubleshooting

Common Issues

  1. WiFi Connection Problems

    • Reset configuration by holding boot button
    • Check serial output for connection status
    • Verify network credentials in portal
  2. Recording Issues

    • Check microphone connections
    • Verify ADC readings in debug mode
    • Adjust voice detection threshold
  3. Display Problems

    • Verify SPI connections
    • Check power supply voltage
    • Update TFT_eSPI configuration

Error Messages

  • "Wifi: X" - No network connection
  • "Error: processing request" - API communication failed
  • "Error: recording failed" - Audio capture issue

Contributing

  1. Fork the repository
  2. Create a feature branch
  3. Follow existing code style
  4. Add unit tests if applicable
  5. Submit a pull request

License

This project is licensed under the MIT License.

Acknowledgments

  • OpenAI for ChatGPT and Whisper APIs
  • Waveshare for ESP32-S3 hardware
  • LVGL team for graphics library
  • val.town for serverless hosting
  • Open source community for libraries and tools

Parts

5
QtyValueFootprintReferences
11KResistor_THT:R_Axial_DIN0207_L6.3mm_D2.5mm_P7.62mm_HorizontalR1
11N4007Diode_THT:D_DO-41_SOD81_P10.16mm_HorizontalD1
1Conn_01x02_PinConnector_PinHeader_2.00mm:PinHeader_1x02_P2.00mm_VerticalJ1
1Conn_01x03_PinConnector_PinHeader_2.00mm:PinHeader_1x03_P2.00mm_VerticalJ2
1PN2222APackage_TO_SOT_THT:TO-92_InlineQ1

Questions

How big is the Vibration motor circuit PCB?

It measures 29.5 × 16.5 mm and has 2 copper layers, 1.6 mm thick.

What parts does the Vibration motor circuit use?

5 parts, built around the PN2222A. The full list of its parts is on this page, with links to each part's symbol and footprint where PCBKit's library has them.

Where can I download the Vibration motor circuit KiCad files?

From the NickEngmann/MagicGPT8Ball repository on GitHub, at the commit this page was made from: the board is hardware/vibration_motor_circuit/vibration_motor_circuit.kicad_pcb and its schematic hardware/vibration_motor_circuit/vibration_motor_circuit.kicad_sch. PCBKit opens the board in the browser, with nothing to install.

Can I use the Vibration motor circuit design in my own project?

Its repository publishes it under the MIT licence: you may reuse it on that licence's terms (keep the author's notice, and for a copyleft licence share your changes alike).

Similar boards

  • 2 layers152.4 × 101.6 mm8088-FE2010A SBC, the printed circuit board in 3D

    8088-FE2010A SBC

    skiselev/micro_8088

    Micro 8088 - IBM XT Compatible Processor Board based on Faraday FE2010 chipset

    72 parts412GPL-3.0
  • 2 layers33.7 × 66 mmSmartbell, the printed circuit board in 3D

    Smartbell

    Staacks/there.oughta.be

    Projects featured on my blog at https://there.oughta.be

    27 parts108GPL-3.0
  • 4 layers100 × 100 mm2063-Z80, the printed circuit board in 3D

    2063-Z80

    Z80-Retro/2063-Z80

    Retro Z80 CPU Board

    86 parts96
  • 2 layers30.7 × 76.1 mmRepeater v2, the printed circuit board in 3D

    Repeater v2

    plusvic/simplebus2-intercom

    General description of the Simplebus2 protocol used by some Comelit's intercoms. Hardware for retransmitting Simplebus2 messages over UART.

    17 parts95CC0-1.0
  • 2 layers28.8 × 43.8 mmAdv pcb, the printed circuit board in 3D

    Adv pcb

    Vail-CW/vail-adapter

    Adapter for cw morse keys to USB

    13 parts81MIT
  • 2 layers23.2 × 52.1 mmOpenC64Saver, the printed circuit board in 3D

    OpenC64Saver

    SukkoPera/OpenC64Saver

    Protect your Commodore 64 from killer power supplies!

    17 parts79
  • 4 layers184.2 × 169.5 mmSB mini II, the printed circuit board in 3D

    SB mini II

    simonboak/SB-mini-II

    A homebrewed Apple II clone

    97 parts76MIT
  • 2 layers49.5 × 30 mmAirpcb smd old, the printed circuit board in 3D

    Airpcb smd old

    issalig/toshiba_air_cond

    AB protocol decoder for toshiba air conditioners

    30 parts65