2 layers37 × 37 mm
 modular-things/modular-things81
plug and play w/ virtualized hardware
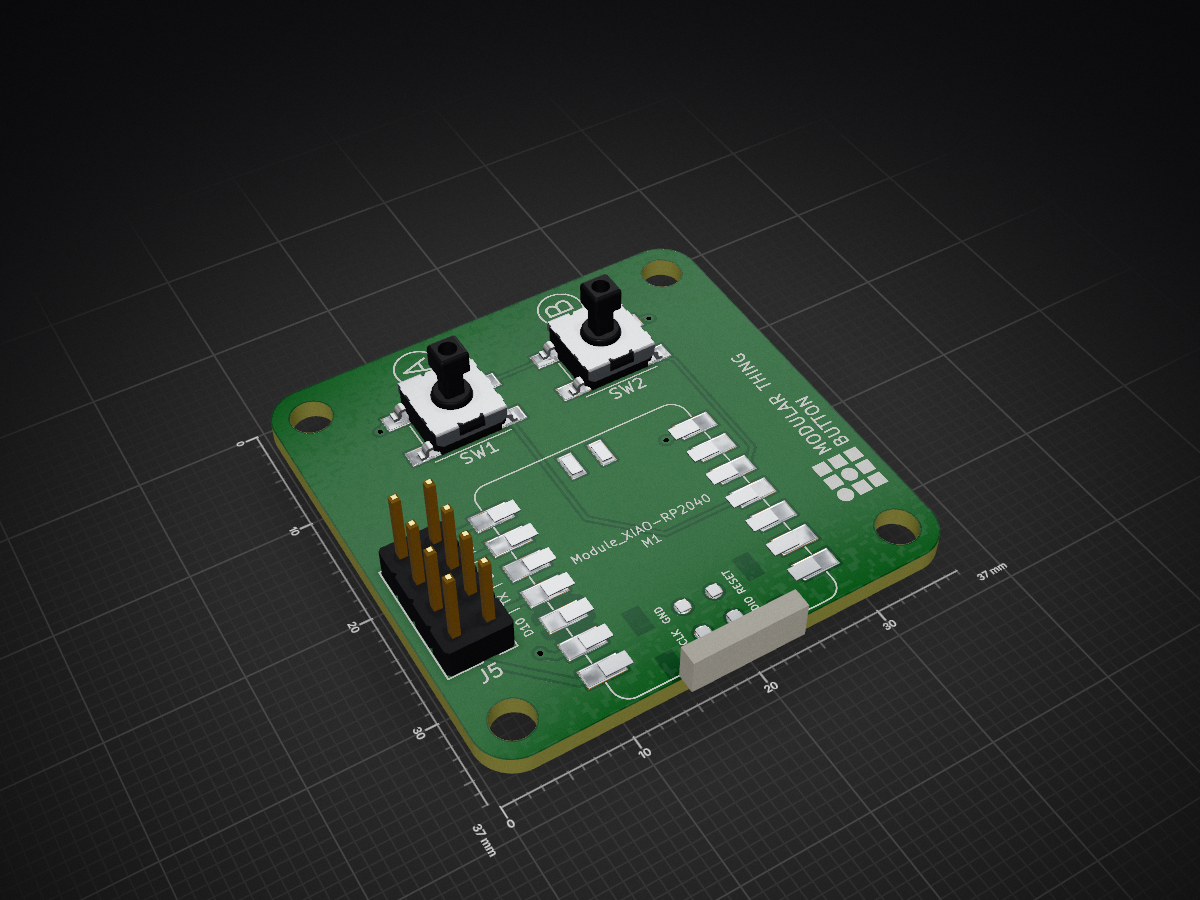
Rp2040 button is an open-source printed circuit board by modular-things, from the modular-things/modular-things repository on GitHub, published under the MIT licence. It is a 2-layer board of 37 × 37 mm with 7 parts on 21 nets, routed with 32 tracks and 4 vias.
Its parts include 2 switches and 1 connector. It belongs with the RP2040 boards of this library.
use virtualization to easily write programs that run across multiple hardware devices
The Modular-Things project is an approach to building modular hardware systems which can be composed in software. The underlying technology is a small networking library for packetizing and routing messages across devices (OSAP) and a web-based editor for composing that hardware into functional systems in software.
Stated simply our tools let you take hardware devices and add a library to them which allows you to plug that device into a browser-based editor where you can write programs that control it and other devices. Because it's JavaScript in the browser you can also write interfaces in HTML/CSS/JS and import various high-level libraries which interact with and control your physical computing system.
For a succinct introduction (3 min) check out our video for CHI2023 by clicking below.

An example Modular Things construction kit can be seen below with circuits available here.

Modular-Things is written by Quentin Bolsee, Leo McElroy and Jake Read based on ongoing work at the MIT Center for Bits and Atoms and Hack Club.
It is based on the surprising performance of modern USB, an insight that we picked up from the urumbu project (paper). Under the hood, it uses osap to route packets and serialize data. Also inspired by the virtual-machine architecture pioneered by Nadya Peek and Ilan Moyer, way back in the way back.
You can use the latest modular-things by navigating to https://modular-things.com/, or follow these instructions to run it locally:
npm install within this reponpm run dev to startup a local server !...modular-things/?file=yourFile.js&panel=devices&panelWidth=70
where file is at repo/examples/
For embedded (arduino) codes, install the OSAP library, which you can download as a zip here: https://github.com/jakeread/osap-arduino, and should also be available via arduino's library manager.
Also, install the FlashStorage_SAMD library, via the library manager.
We use the ArduinoCore-fab-sam for these circuits, which you can install into Arduino via the notes in that repo. For the RP2040 XIAO boards, we use Earle F. Philhower, the Third's PICO build, and for D21 XIAOs, you can follow the XIAO docs.
As of osap 0.5.0, we can use an improved design pattern to build devices. At this time, this will only work on RP2040 based devices (which use a more modern compiler), but it is possible to back port this to c++11 based devices (most Arduinos).
The basic pattern is pretty simple, we have a function:
// types include float, String, int, and boolean
float someFunction(String oneArgument, int anotherArgument){
  // ... your function body
}
And we include it as a method in the devices' software object with this one-liner, handing it the function poniter, and the names of the function and its arguments:
OSAP_Port_RPC<decltype(&someFunction)> rpcMuleTwo(&someFunction, "someFunction", "oneArgument, anotherArgument");Once we do that, and compile and load the code, the module should appear automatically when it's plugged into modular-things.com/
Below is a full example of a device that uses these Automatic RPCs.
#include <osap.h>
#include <Adafruit_GFX.h>
#include <Adafruit_SSD1306.h>


// display setup, which is wired to the XIAO's labelled SCL/SDA pins
#define SCREEN_WIDTH 128 // OLED display width, in pixels
#define SCREEN_HEIGHT 64 // OLED display height, in pixels
#define SCREEN_ADDRESS 0x3C
Adafruit_SSD1306 display(SCREEN_WIDTH, SCREEN_HEIGHT);


// a potentiometer and a button
// the pot is on XIAO D2/A2, which is GPIO num 28
// the button is on XIAO D3, which is GPIO num 29 (and will need a pullup)
#define PIN_POTENTIOMETER 28
#define PIN_BUTTON 29
#define PIN_LED_BLINK PIN_LED_R
#define PIN_LED_WD PIN_LED_G


// we instantiate an OSAP runtime, give it a serialport and a name:
OSAP_Runtime osap;
OSAP_Gateway_USBSerial serLink(&Serial);To explain how module authorship works, we've just tidied up the rgbb example, which you can find here (arduino) and here (javascript).
Basically: we have an Arduino code that we give a "typeName" - that is then discovered by OSAP via the Modular-Things client. Modular-Things then looks for a matching JS or TS constructor, and if it finds one, instantiates it and passes in the devices' unique name (a string identifier).
The constructed object can then use that string ID, as well as individual port string IDs, to route messages to its paired object.
The result is that the "virtual thing" (javascript) acts as a proxy for the arduino-thing, making for cleaner programming model when multiple things exist in the same system.
Arduino "RGBB Thing" |
JavaScript "RGBB Thing" |
|
|
At the time of writing, we mostly write modular-things using SAMD21 and RP2040 platforms. It is likely that OSAP will run on other microcontrollers, but there are funky-things that happen with Arduino's internal abstractions of i.e.
Serialobjects (which OSAP uses to button up link layers) and Flash-Storage libraries (to store names). Drop us a line if you have a favourite platform that you would like to see supported.
| Qty | Value | Footprint | References |
|---|---|---|---|
| 2 | Switch_Tactile_Omron | fab:Button_Omron_B3SN_6.0x6.0mm | SW1, SW2 |
| 1 | Conn_02x04_Odd_Even | fab:PinHeader_2x04_P2.54mm_Vertical_pinch | J5 |
| 1 | Module_XIAO-RP2040 | fab:SeeedStudio_XIAO_RP2040_SMD | M1 |
| 1 | Val** | fab:cba_logo | Ref** |
| 1 | Val** | fab:qr_programmer | Ref** |
The 6 most common of 7 parts.
It measures 37 × 37 mm and has 2 copper layers, 1.6 mm thick.
7 parts. The full list of its parts is on this page, with links to each part's symbol and footprint where PCBKit's library has them.
From the modular-things/modular-things repository on GitHub, at the commit this page was made from: the board is things/button-xiao/circuit/design/rp2040_button.kicad_pcb and its schematic things/accel-LSM6DSO-xiao/circuit/design/rp2040_LSM6DSO.kicad_sch. PCBKit opens the board in the browser, with nothing to install.
Its repository publishes it under the MIT licence: you may reuse it on that licence's terms (keep the author's notice, and for a copyleft licence share your changes alike).


byrantech/laptop
anyon_e, a highly integrated, high end, open source laptop. Attempt the impossible.


AxxAxx/AxxSolder
STM32 Based soldering station for JBC cartridges, 9-24 VDC and USB-PD power


jamro/tiny-engineer
A small desktop robot that brings an AI coding assistant to life, physically acting out when it reads files, thinks, writes code, and finishes work.

hoglet67/RGBtoHDMI
Bare-metal Raspberry Pi project that provides pixel-perfect sampling of Retro Computer RGB/YUV video and conversion to HDMI
