2 layers31 × 39 mm

 micktwomey/alt-controller-jam1
Custom controller hardware for ALT.CTRL.GameCraft 2023
Controller is an open-source printed circuit board by micktwomey, from the micktwomey/alt-controller-jam repository on GitHub, published under the MIT licence. It is a 2-layer board with 30 parts on 37 nets, routed with 12 tracks and 0 vias.
Its parts include 9 connectors, 8 switches and 1 IC. It belongs with the RP2040 boards of this library.
Repo holding the hardware and code behind the controller components used in https://www.gamecraft.it/events/altctrljam-2023/
A Raspberry Pi Pico running CircuitPython acts as a HID keyboard device.
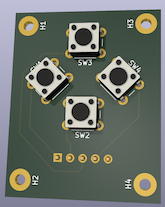
Two (or more) button pads are connected to the Pico using jumper cables. Each button pad has 4 buttons.
You can position these anywhere you want on an alternative controller. Embed them in cardboard, stick onto things, etc.
KiCad is used to design the boards. You can even see me following the tutorial in kicad-tutorial!
JLCPCB was used to print the boards. Elbow grease and lots of solder was used to assemble the boards.
The schematics can be found in dpad.
The Pico runs CircuitPython and uses Adafruit's HID library to emulate a keyboard. It's also possible to emulate a mouse and a gamepad (there are some experiments for gamepad emulation in experiments).
Code execution order:
When running the library code lives in lib on the pico but lives in src here in GitHub.
just is used to run the build and deployment steps.
poetry is used to manage local tool dependencies. It's also used to install libraries into your development environment, but these won't allow you to run the code on your desktop. They're primarily intended to allow for error checking.
Note that the default paths in the justfile are Apple Mac defaults, you'll need to adjust them for your machine.
poetry installjust buildbootsel button on the Pico while plugging in the USB cable into your machineRPI-RP2 disk is mountedjust install-firmwarejust deployYou can make this process a little more efficient using:
just watch to see which disk is mountedjust install-firmware && just deploy && just eject in another terminal to flash the firmware and install the code in one step.If you're using mise it should activate automatically.
| Qty | Value | Footprint | References |
|---|---|---|---|
| 12 | MountingHole_Pad | MountingHole:MountingHole_3.2mm_M3_Pad | H1, H2, H3, H4, H5, H6, H7, H8, H9, H10, H11, H12 |
| 8 | SW_Push_Dual | Button_Switch_THT:SW_TH_Tactile_Omron_B3F-10xx | SW1, SW2, SW3, SW4, SW5, SW6, SW7, SW8 |
| 5 | Conn_01x02_Socket | Connector_JST:JST_XH_B2B-XH-AM_1x02_P2.50mm_Vertical | J1, J2, J3, J4, J5 |
| 4 | Conn_01x05_Socket | Connector_PinHeader_1.00mm:PinHeader_1x05_P1.00mm_Vertical | J6, J7, J8, J9 |
| 1 | Pico | MCU_RaspberryPi_and_Boards:RPi_Pico_SMD_TH | U1 |
30 parts. The full list of its parts is on this page, with links to each part's symbol and footprint where PCBKit's library has them.
From the micktwomey/alt-controller-jam repository on GitHub, at the commit this page was made from: the board is controller/controller.kicad_pcb and its schematic controller/controller.kicad_sch. PCBKit opens the board in the browser, with nothing to install.
Its repository publishes it under the MIT licence: you may reuse it on that licence's terms (keep the author's notice, and for a copyleft licence share your changes alike).

google/mozc-devices
Circuit diagrams and firmware source code for Gboard DIY keyboards


VoronDesign/Voron-Hardware
Cool Hardware designed by the Voron Design group

hoglet67/RGBtoHDMI
Bare-metal Raspberry Pi project that provides pixel-perfect sampling of Retro Computer RGB/YUV video and conversion to HDMI

tenderlove/initial-v
It's a BMW shifter converted to a Bluetooth Keyboard that you use with Vim

hackclub/OnBoard
💡 Join 1,000 teenagers and make your first PCB with a $100 grant!

