
4 layers307 × 46.1 mm
Stm32pe midi
udu3324/stm32pe-midi
a midi controller using the mpe protocol to create more expressive music
136 parts35GPL-3.0

 Lytrix/max4live_controller_w_oled9
max4live OSC controller with 3 12 bit magnetic encoders, 2 push buttons and oled screen
5hp controller oled is an open-source printed circuit board by Lytrix, from the Lytrix/max4live_controller_w_oled repository on GitHub. It is a 2-layer board of 25 × 105 mm with 14 parts on 58 nets, routed with 254 tracks and 17 vias.
It is built around the TCA9548APW. Its parts include 10 connectors, 2 resistors and 2 ICs. It belongs with the lEDs and displays and audio and music boards and the NXP (LPC, Kinetis, i.MX RT) boards of this library.
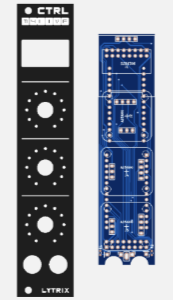
This repository contain the files to be able to create a Max4live 4 controller with Oled as a 5HP Eurorack module to control your VST plugins.
This setup can easily be extended to a 4 units by using jumper cables on the same pcb together with the headers on the boards to maximize a 5 panel order from jlcpcb.
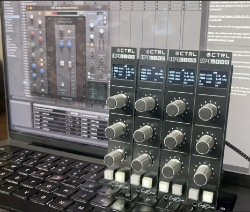
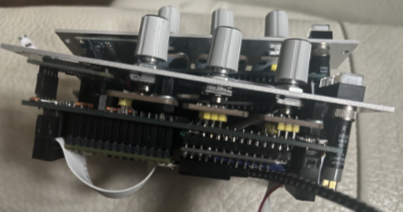
Max4Live Controller & Hub folder to /Music/Ableton/User Library/Presets/Audio EffectsMax4live Serial Hub OSC.amxd to the master channel and select your Teensy device.Max4live Controller OSC.amxd on to the track you want to controlAfter using excelent Eurorack Droid system and having created my own Launchpad type solution on it, I wanted to have more hands on controllers also for my VST plugins within Ableton.
I really like the SSL suite of EQ's so I first looked at the UC1, As it was too big to fit in my small studio, I decided to build my own eurorack version to fit into my controller case with visual feedback to limit having to look at the DAW screen when adjusting EQ.
I discovered early on the 127 midi steps were not fine grained enough. Even using the pitchbend range or using MSB/LSB (sending on CC1 + CC 32) were often with issues still:
So after some experimentation I decided to go with using an 3 euro AS5600 magnetic encoder and a cheap 0.75 Euro EC11 encoder to get a noise free 12bit 4096 step resolution which was precise enough to dail precise frequencies using this video as an example: https://www.youtube.com/watch?v=1UmqNF65rck
This worked surpisingly well and is a great hack!
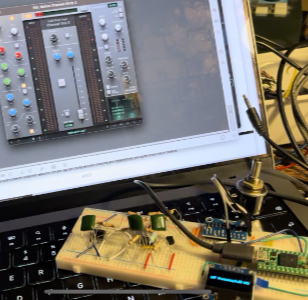
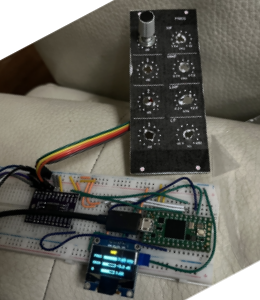
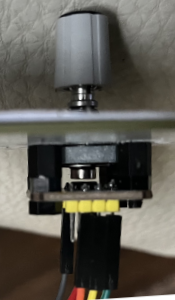
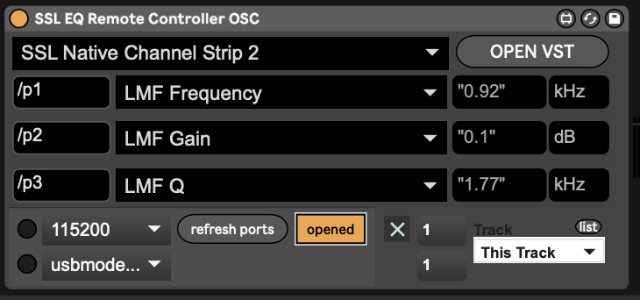
The next challenge was to ensure the encoder did not switch back to 0 halfway if the parameter changed via mouse input or when the parameter type changed. The solution was to set the offset of the magnetic encoder chip when the value changed externally. That way the encoder is always in sync before it adjusts it's value.
I coded a piece of logic to ensure whenever the value of the encoder is outside of +-2 numbers, MaxMSP sends an offset value update to the Teensy. The encoder is only allowed to change the values when the values of the VST parameter and the AS5600 offset are the same.
Th next challenge was to ensure the value was updated before the encoder could output any values. Here I got a lot of race condition issues, and it took me a week before I could tackle this.
For all functions I use lists to iterate over all changed values which are updated and also to set each of the AS5600 controllers and OSC adresses within different functions. This makes the code more DRY and makes it easier to add more parameters.
I created one function to gather all values to be displayed which loops in the main loop of the Arduino code. I also created one function to set all updates from the encoders And created one function to parse to each specific OSC address recieving part.
The software side consists on 2 pieces of code. One for the Teensy and one for Max4live.
I tested first a simple setup with using the standard serial ASCII communication, but found it quite fiddly to ensure to retrieve each different piece of information being send. The Open Sound Control (OSC) addressing structure felt like a much more robust way to send information back and forth, but unfortunately the OSC library from CNMAT did not work properly any more in the current MaxMSP and via serial (instead of network port). After a lot of research I finally found a good working library to make this work on the Teensy with MaxMSP (jey!): https://github.com/thomasfredericks/MicroOsc
Max4Live using more than 1 instance fix: add r --- to create random unique numbers https://cycling74.com/forums/multiple-max4live-instances
Serial input Teensy to MaxMSP https://www.youtube.com/watch?v=6bT3G4Mep7E
Serial output MaxMSP to Teensy https://www.youtube.com/watch?v=68L-WHh3Ows
Button switch using internal pull up: https://www.pjrc.com/teensy/td_digital.html
MaxMSP scaling log https://cycling74.com/forums/vst-plugin-parameter-scaling-problem
Dynamically load bpatchers: https://cycling74.com/forums/dynamically-created-sub-patchersbpatches
Dummy virtual Serial https://arduino.stackexchange.com/questions/9857/can-i-make-the-arduino-ignore-serial-print
Best example with many displays https://www.youtube.com/watch?v=XFh9ZhL0jhE
Control Surface library struggle https://github.com/tttapa/Control-Surface/issues/286
Good example to start with, also using 4 displays and using MCU: https://projecthub.arduino.cc/criusdigitalstudio/diy-usb-midi-daw-controller-ecdcf6
good example of display fader https://github.com/yilmazyurdakul/ArduinoOledMidiController https://github.com/yilmazyurdakul/ArduinoOledMidiController/blob/main/ArduinoFile.ino
4 rotary encoders with midi control http://little-scale.blogspot.com/2017/04/teensy-36-basicsusing-rotary-encoders.html
2 displays https://www.brainy-bits.com/post/two-is-better-than-one-how-to-connect-two-spi-oled-displays
4 displays with Arduino https://www.youtube.com/watch?v=MO6hbQcX8fE
4 displays and 4 encoders with visuals https://projecthub.arduino.cc/yilmazyurdakul/arduino-midi-controller-with-encoder-oled-display-eeprom-311960
display https://www.pjrc.com/teensy/td_libs_SSD1306.html encoder https://www.pjrc.com/teensy/td_libs_Encoder.html endless potentiometer: https://github.com/juanlittledevil/EndlessPotentiometer noise reducer analog signal: https://github.com/dxinteractive/ResponsiveAnalogRead
scroll text example: https://stackoverflow.com/questions/40564050/scroll-long-text-on-oled-display
midi https://github.com/tttapa/Control-Surface
http://midibox.org/forums/topic/29225-modul-box-ng-v2/?do=findComment&comment=199453
Oled display <25mm height https://www.winstar.com.tw/products/oled-module/graphic-oled-display/sh1106-oled.html
multiplexer met tutorial (zie ook youtube filmpje) https://www.tinytronics.nl/shop/nl/communicatie-en-signalen/io-converters/i2c-multiplexer-tca9548a
128 pulse encoder (too expensive) https://nl.mouser.com/datasheet/2/54/ace-777357.pdf
1024 to 256 midi values with 10 bit nano: https://forum.arduino.cc/t/potentiometer-send-midi-cc/142766/7
analog potentiometer Kore2: https://hackaday.io/project/171841-driveralgorithm-for-360-deg-endless-potentiometer with: https://nl.mouser.com/ProductDetail/Alpha-Taiwan/RV112FF-40B3N22F0B10K?qs=Znm5pLBrcAJwOGngbhkPgg%3D%3D
more examples: https://diyelectromusic.wordpress.com/2021/09/28/arduino-midi-rotary-encoder-controller/
magnetic encoder: https://curiousscientist.tech/blog/as5600-magnetic-position-encoder
working magnetic encoder example https://www.youtube.com/watch?v=1UmqNF65rck
Bourns dail 20 turn https://www.zendamateur-marktplaats.nl/componenten/componenten-anders/bourns-dial-model-h-46-36496.html
potential bigger potentiometer: https://www.gear4music.com/Guitar-and-Bass/Emerson-Custom-CTS-250K-Short-Split-Shaft-Pro-Potentiometer/1GAA
Encoder example fast/slow relative unsigned bit: https://remotify.io/community/question/absolute-14-bit
OSC https://github.com/CNMAT/OSC/blob/master/examples/SerialOscuinowithMessages/SerialOscuinowithMessages.ino https://www.ableton.com/en/packs/connection-kit/ https://github.com/thomasfredericks/MicroOsc
https://forum.arduino.cc/t/slipserial-and-osc-but-generally-reading-serial-across-loop-s/563369
| Qty | Value | Footprint | References |
|---|---|---|---|
| 3 | AS5600_2_PWR | SSD1306:AS5600 | J2, J4, J5 |
| 2 | 220 | Resistor_SMD:R_0603_1608Metric_Pad0.98x0.95mm_HandSolder | R1, R2 |
| 2 | Conn_01x01_Socket | Connector_PinHeader_2.54mm:PinHeader_1x01_P2.54mm_Vertical | J6, J9 |
| 2 | Conn_01x02_Socket | Connector_PinHeader_2.54mm:PinHeader_1x02_P2.54mm_Vertical | J3, J7 |
| 1 | SSD1306 | SSD1306:128x64OLED_25mm | J1 |
| 1 | TCA9548 | SSD1306:DIP-24_W9.xx mm_Socket | IC1 |
| 1 | Teensy4.0 | Teensy:Teensy40_SMT | U1 |
| 1 | ToMAINModule | Connector_PinSocket_2.54mm:PinSocket_2x08_P2.54mm_Vertical | J16 |
| 1 | ToSateliteModule | Connector_PinSocket_2.54mm:PinSocket_2x08_P2.54mm_Vertical | J10 |
It measures 25 × 105 mm and has 2 copper layers, 1.6 mm thick.
14 parts, built around the TCA9548APW. The full list of its parts is on this page, with links to each part's symbol and footprint where PCBKit's library has them.
From the Lytrix/max4live_controller_w_oled repository on GitHub, at the commit this page was made from: the board is Kicad/5hp_controller_oled.kicad_pcb and its schematic Kicad/5hp_controller_oled.kicad_sch. PCBKit opens the board in the browser, with nothing to install.
Its repository states no licence, so its author keeps all rights: ask Lytrix before reusing the design.
udu3324/stm32pe-midi
a midi controller using the mpe protocol to create more expressive music

MacMannes/XVA1-User-Interface
A hardware user interface for the XVA1 virtual analog synthesizer, inspired by the Hydrasynth's layout. The XVA1 (and its FM sibling the XFM2) is built on an Artix-7 FPGA but has no built-in UI — this project adds one.

Scottapotamas/triaxial-loadcell-breakout
Breakout board to sample 3-axis load cells with I2C interface


lucimobility/luci-sdk-encoders
Design files and documentation for power wheelchair encoders compatible with the LUCI sensor system


ArnaudSchlumberger/MainBotPCB
This project is part of Robot Télécom Strasbourg's work as part of our participation to the French Robot Cup.

aswinserigreen/morishield_hardware
all components bom , pcb layouts and schematics of morishield is maintained here