2 layers67.7 × 138.4 mm
 luishutterli/starbridge
To make it easy for you to get started with GitLab, here's a list of recommended next steps.
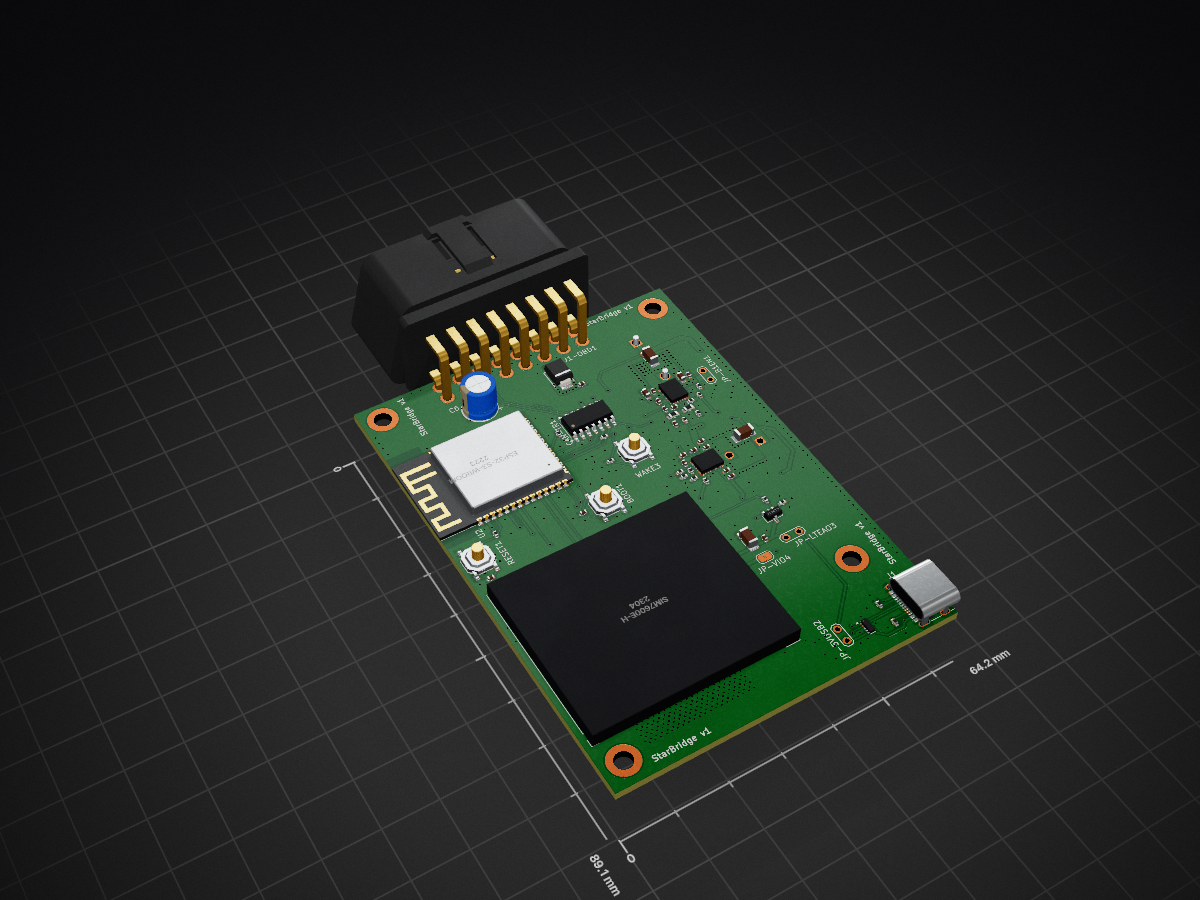
StarBridge Adapter is an open-source printed circuit board by luishutterli, from the luishutterli/starbridge repository on GitHub. It is a 4-layer board of 64.2 × 89.1 mm with 68 parts on 100 nets, routed with 396 tracks and 630 vias.
It is built around the ESP32-S3-WROOM-1-N8, SIM7600E-H and TJA1043T, with the LM61495RPHR, ESD7104MUTAG and AO3401A among its other parts. Its parts include 3 capacitors, 3 ICs, 2 resistors, 2 connectors and 1 diode. It belongs with the interfaces and adapters boards and the ESP32 boards of this library.


To make it easy for you to get started with GitLab, here's a list of recommended next steps.
Already a pro? Just edit this README.md and make it your own. Want to make it easy? Use the template at the bottom!
cd existing_repo
git remote add origin https://gitlab.com/luishutterli/star-bridge-luis-hutterli.git
git branch -M main
git push -uf origin mainUse the built-in continuous integration in GitLab.
When you're ready to make this README your own, just edit this file and use the handy template below (or feel free to structure it however you want - this is just a starting point!). Thanks to makeareadme.com for this template.
Every project is different, so consider which of these sections apply to yours. The sections used in the template are suggestions for most open source projects. Also keep in mind that while a README can be too long and detailed, too long is better than too short. If you think your README is too long, consider utilizing another form of documentation rather than cutting out information.
Choose a self-explaining name for your project.
Let people know what your project can do specifically. Provide context and add a link to any reference visitors might be unfamiliar with. A list of Features or a Background subsection can also be added here. If there are alternatives to your project, this is a good place to list differentiating factors.
On some READMEs, you may see small images that convey metadata, such as whether or not all the tests are passing for the project. You can use Shields to add some to your README. Many services also have instructions for adding a badge.
Depending on what you are making, it can be a good idea to include screenshots or even a video (you'll frequently see GIFs rather than actual videos). Tools like ttygif can help, but check out Asciinema for a more sophisticated method.
Within a particular ecosystem, there may be a common way of installing things, such as using Yarn, NuGet, or Homebrew. However, consider the possibility that whoever is reading your README is a novice and would like more guidance. Listing specific steps helps remove ambiguity and gets people to using your project as quickly as possible. If it only runs in a specific context like a particular programming language version or operating system or has dependencies that have to be installed manually, also add a Requirements subsection.
Use examples liberally, and show the expected output if you can. It's helpful to have inline the smallest example of usage that you can demonstrate, while providing links to more sophisticated examples if they are too long to reasonably include in the README.
Tell people where they can go to for help. It can be any combination of an issue tracker, a chat room, an email address, etc.
If you have ideas for releases in the future, it is a good idea to list them in the README.
State if you are open to contributions and what your requirements are for accepting them.
For people who want to make changes to your project, it's helpful to have some documentation on how to get started. Perhaps there is a script that they should run or some environment variables that they need to set. Make these steps explicit. These instructions could also be useful to your future self.
You can also document commands to lint the code or run tests. These steps help to ensure high code quality and reduce the likelihood that the changes inadvertently break something. Having instructions for running tests is especially helpful if it requires external setup, such as starting a Selenium server for testing in a browser.
Show your appreciation to those who have contributed to the project.
For open source projects, say how it is licensed.
If you have run out of energy or time for your project, put a note at the top of the README saying that development has slowed down or stopped completely. Someone may choose to fork your project or volunteer to step in as a maintainer or owner, allowing your project to keep going. You can also make an explicit request for maintainers.
| Qty | Value | Footprint | References |
|---|---|---|---|
| 8 | 10k | Resistor_SMD:R_0402_1005Metric | B2-Rffb2, R-G_LIM3, R-G_P3, R-I_P1, R-I_P2, R-I_P3, R-I_P4, R3 |
| 6 | 1uF | Capacitor_SMD:C_0402_1005Metric | B1-Cinx2, B1-Cinx3, B1-Cvcc1, B2-Cinx1, B2-Cinx2, B2-Cvcc1 |
| 4 | 100k | Resistor_SMD:R_0402_1005Metric | B1-Rfbt1, B1-Rreset1, B2-Rfbt1, B2-Rreset1 |
| 4 | 100nF | Capacitor_SMD:C_0402_1005Metric | B1-Cboot1, B2-Cboot1, C3, C4 |
| 3 | 100uF | Capacitor_SMD:C_1206_3216Metric_Pad1.33x1.80mm_HandSolder | B1-Cout1, B2-Cout1, C1 |
| 3 | Jumper_2_Open | TestPoint:TestPoint_2Pads_Pitch2.54mm_Drill0.8mm | JP-5VUSB2, JP-B1EN1, JP-LTEAO3 |
| 3 | ~ | EasyEDA:SW-SMD_4P-L5.1-W5.1-P3.70-LS6.5-TL_H1.5 | BOOT1, RESET1, WAKE3 |
| 2 | 100nF, 1mOhm | Capacitor_SMD:C_0402_1005Metric | B1-Cbias1, B2-Cbias1 |
| 2 | 10uF | Capacitor_SMD:C_0603_1608Metric | B1-Cin2, B1-Cin3 |
| 2 | 10uF, 1mOhm | Capacitor_SMD:C_0402_1005Metric | B2-Cin1, B2-Cin2 |
| 2 | 5.1k | Resistor_SMD:R_0402_1005Metric | R1, R2 |
| 2 | 51k | Resistor_SMD:R_0402_1005Metric | B1-Rt1, B2-Rt1 |
| 2 | LM61495RPHR | Snapeda:RPH0016A | B1-5v1, B2-3.3v1 |
| 1 | 10pF | Capacitor_SMD:C_0402_1005Metric | B1-Cdd1 |
| 1 | 10uF | Capacitor_SMD:C_0402_1005Metric | C2 |
| 1 | 15pF, 50v | Capacitor_SMD:C_0402_1005Metric | C5 |
| 1 | 15uH, 12mOhm | Snapeda:IND_WE-FAMI_1215_WRE | B1-L1 |
| 1 | 1k | Resistor_SMD:R_0402_1005Metric | B1-Rfbb2 |
| 1 | 24k | Resistor_SMD:R_0603_1608Metric | B1-Rfbb1 |
| 1 | 33k | Resistor_SMD:R_0402_1005Metric | B2-Rffb1 |
| 1 | 4.99k | Resistor_SMD:R_0603_1608Metric | B1-Rff1 |
| 1 | 6.2uH, 16.5mOhm | Snapeda:IND_WE-FAMI_8010_WRE | B2-L1 |
| 1 | AO3401A | Package_TO_SOT_SMD:SOT-23 | Q1 |
| 1 | C-OBD-II-16M | C-OBD-II-16M:COMTECH_C-OBD-II-16M | J1-OBD1 |
| 1 | CAN-I ERR | TestPoint:TestPoint_Pad_D4.0mm | TP1 |
| 1 | C_Polarized_Small | Capacitor_THT:CP_Radial_D6.3mm_P2.50mm | C6 |
| 1 | ESD7104MUTAG | Package_DFN_QFN:Diodes_UDFN-10_1.0x2.5mm_P0.5mm | U3 |
| 1 | ESP32-S3-WROOM-1 | PCM_Espressif:ESP32-S3-WROOM-1 | U2 |
| 1 | LOGO | LOGO | G*** |
| 1 | SIM7600E-H | StarBridgeLibrary:WaveShare_SIM7600E-H_Hat | U1 |
| 1 | SMBJ36A_C19077588 | EasyEDA:SMB_L4.6-W3.6-LS5.4-RD | D1 |
| 1 | SolderJumper_2_Bridged | Jumper:SolderJumper-2_P1.3mm_Bridged2Bar_RoundedPad1.0x1.5mm | JP-VIO4 |
| 1 | TJA1043T | Package_SO:SOIC-14_3.9x8.7mm_P1.27mm | CAN-TR1 |
| 1 | USB_C_Receptacle_USB2.0_16P | Connector_USB:USB_C_Receptacle_G-Switch_GT-USB-7010ASV | J1 |
The 64 most common of 68 parts.
It measures 64.2 × 89.1 mm and has 4 copper layers, 1.6 mm thick.
68 parts, built around the ESP32-S3-WROOM-1-N8, SIM7600E-H, TJA1043T and LM61495RPHR. The full list of its parts is on this page, with links to each part's symbol and footprint where PCBKit's library has them.
From the luishutterli/starbridge repository on GitHub, at the commit this page was made from: the board is hardware/adapter/StarBridge-Adapter.kicad_pcb and its schematic hardware/adapter/StarBridge-Adapter.kicad_sch. PCBKit opens the board in the browser, with nothing to install.
Its repository states no licence, so its author keeps all rights: ask luishutterli before reusing the design.

TrickfireRobotics/circuit-schematics
A repo for storing some of TrickFire's circuit schamtics, diagrams, and other related circuit files


cs99x/GasMonitorLoRaCloud
This project is a mobile and embedded application for a university course called "Mobile and Embedded Development".


Stevemwa/FMS_ESP32
This is a fleet management system that sends vehicle location data over to Firebase Cloud

AVIUS001/ic2e-esc-design-journey-public
Public-safe Aerial8/IC2E ESC design-journey overview (no manufacturable IP)
