2 layers101.6 × 76.2 mm

 HMC-E80/E803
Files for E80
MTB V2 is an open-source printed circuit board by HMC-E80, from the HMC-E80/E80 repository on GitHub. It is a 4-layer board of 101.6 × 76.2 mm with 128 parts on 140 nets, routed with 1,717 tracks and 226 vias.
It is built around the CD74HC4050M, MC33HB2002ES and MCP6004-E/P, with the L7805, LD1086DT and LM3880-1AC among its other parts. Its parts include 38 capacitors, 29 resistors, 11 ICs, 10 diodes and 6 fuses. It belongs with the NXP (LPC, Kinetis, i.MX RT) boards of this library.


This repository includes Arduino sketches (.ino) for the Teensy on the E80 motherboard.
The files for each lab are included in a separate folder.
The .ino files in each lab folder share the same name as the folder (e.g., E80_Lab_01.ino is in a folder named E80_Lab_01.ino).
This is a requirement for the Arduino IDE.
This respository also includes a folder of all the libraries you need for the various hardware peripherals on your motherboard (e.g., the GPS, and intertial measurement unit (IMU)).
The MATLAB folder contains the various MATLAB .m files which are used throughout the labs.
You will need to configure Git on your machine. Git is a distributed version control system. This means you can download a local clone of a collection of source code files and easily track the changes that you make to your code. While we won't be using all the features of git in E80, we will introduce you to the main features that will enable you to interact with the code base for your robot.
First, you need to install Git on your computer. We recommend that for this class you use Git Desktop which provides a convenient GUI interface for interacting with the code.
Code > Open with GitHub Desktop. You will get a prompt to clone/download the repo, and GitHub Desktop will ask you where to save the files. Choose a location on your hard drive where you want to save the files (i.e., NOT in a folder that is synchronized in the cloud like a Google Drive File Stream folder). You should choose a location on your hard drive to minimize the chances of having any data corrupted.
Open with GitHub Desktop is not working properly, simply copy the URL for the repository (e.g., https://github.com/HMC-E80/E80) and then manually clone the repository in GitHub Desktop using File > Clone Repository. Enter the copied URL into the "Respository URL" field.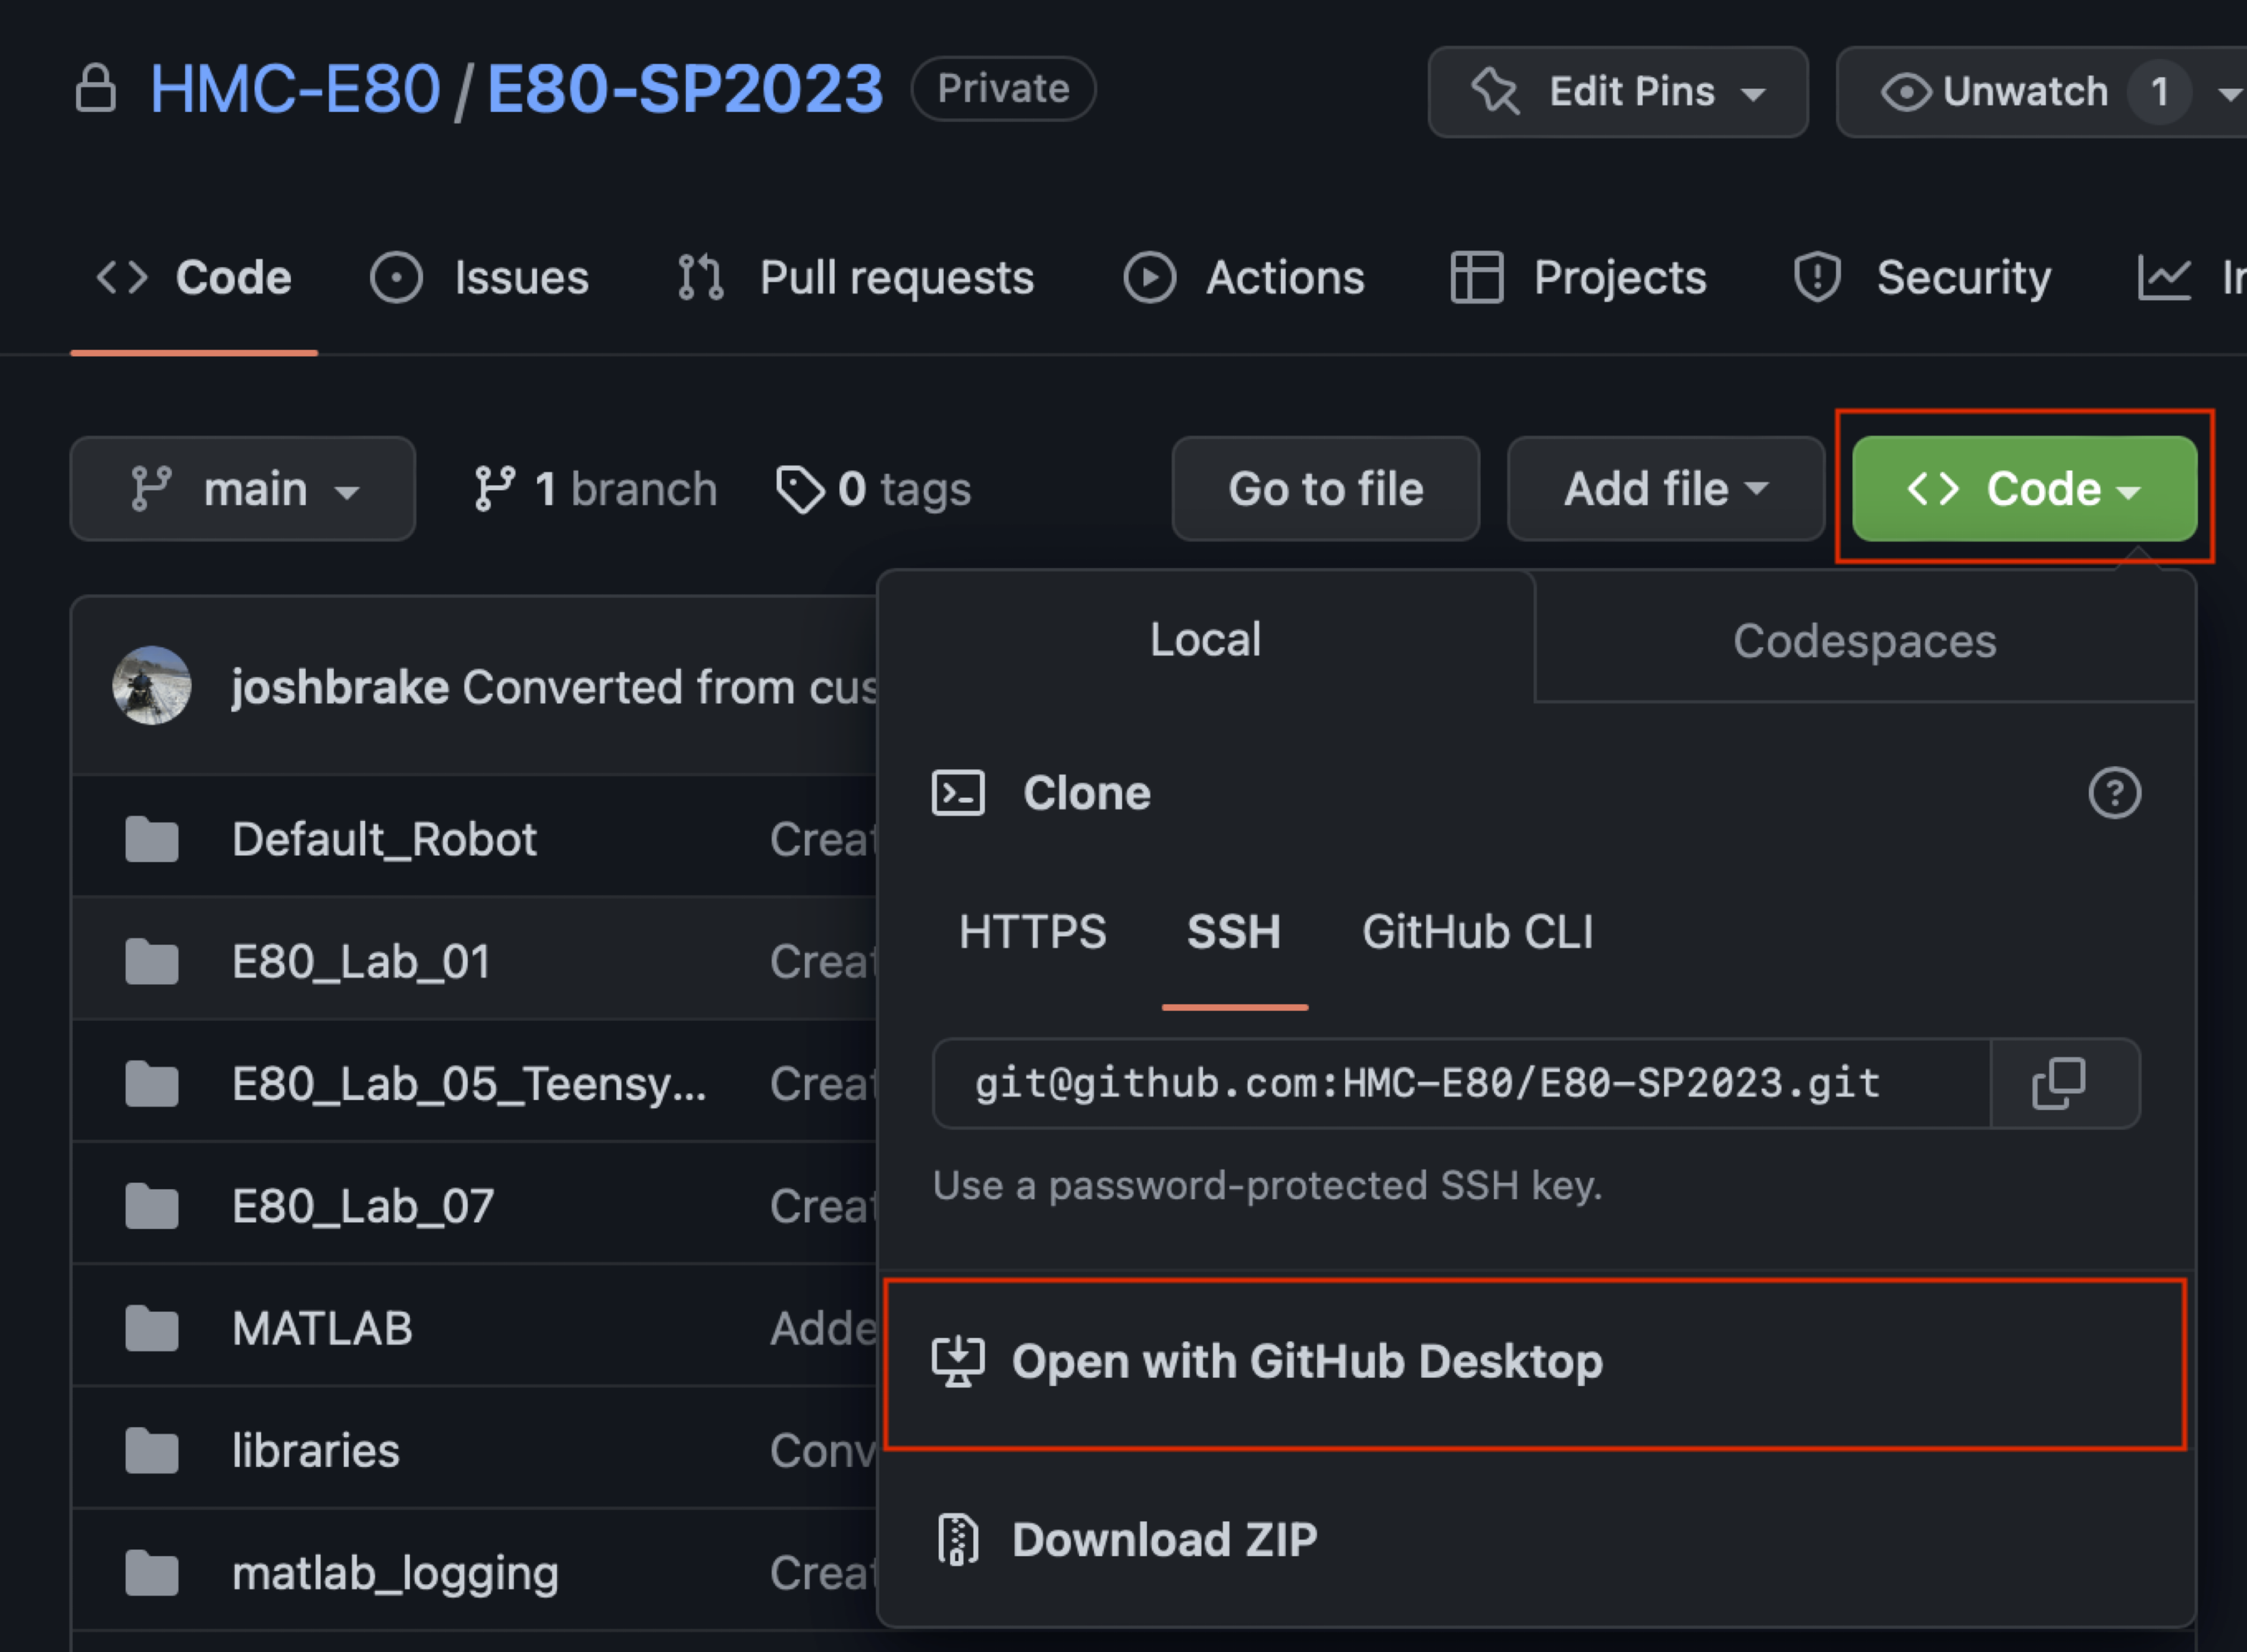
Follow the instructions below to download and use this code within the Arduino IDE.
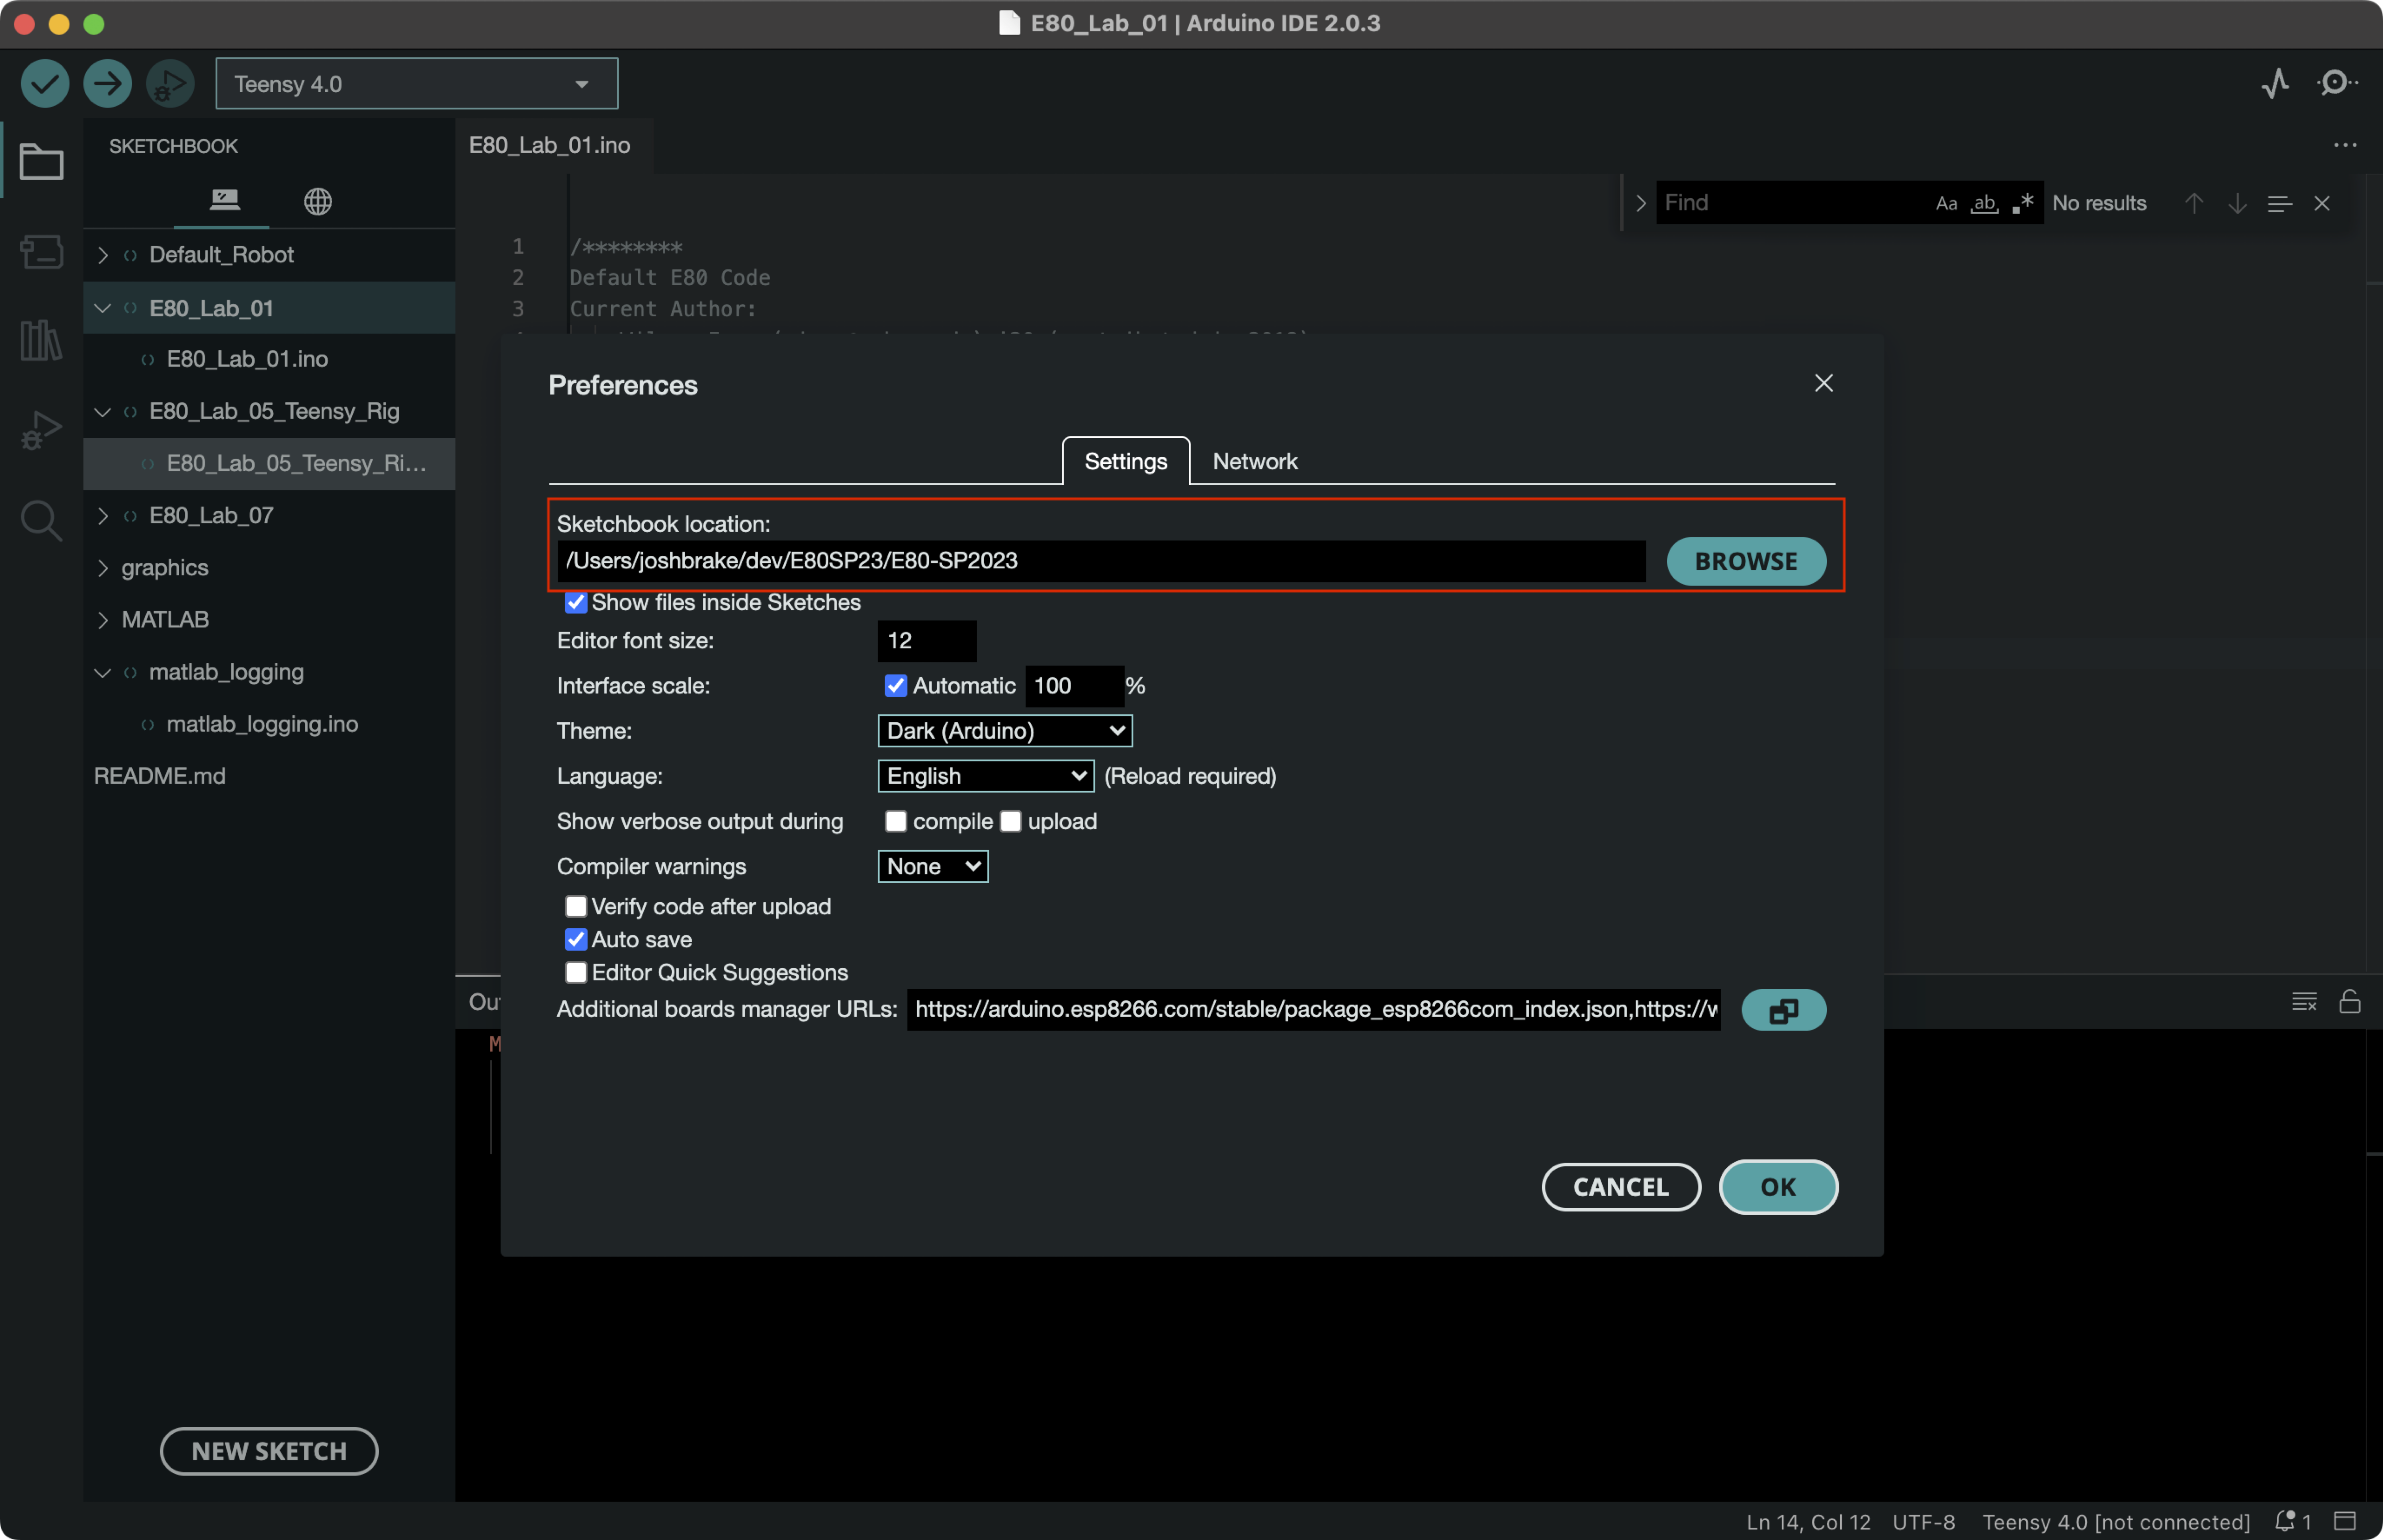
E80_Lab_01.ino sketch and Verify it to check that it compiles and all the libraries are properly downloaded.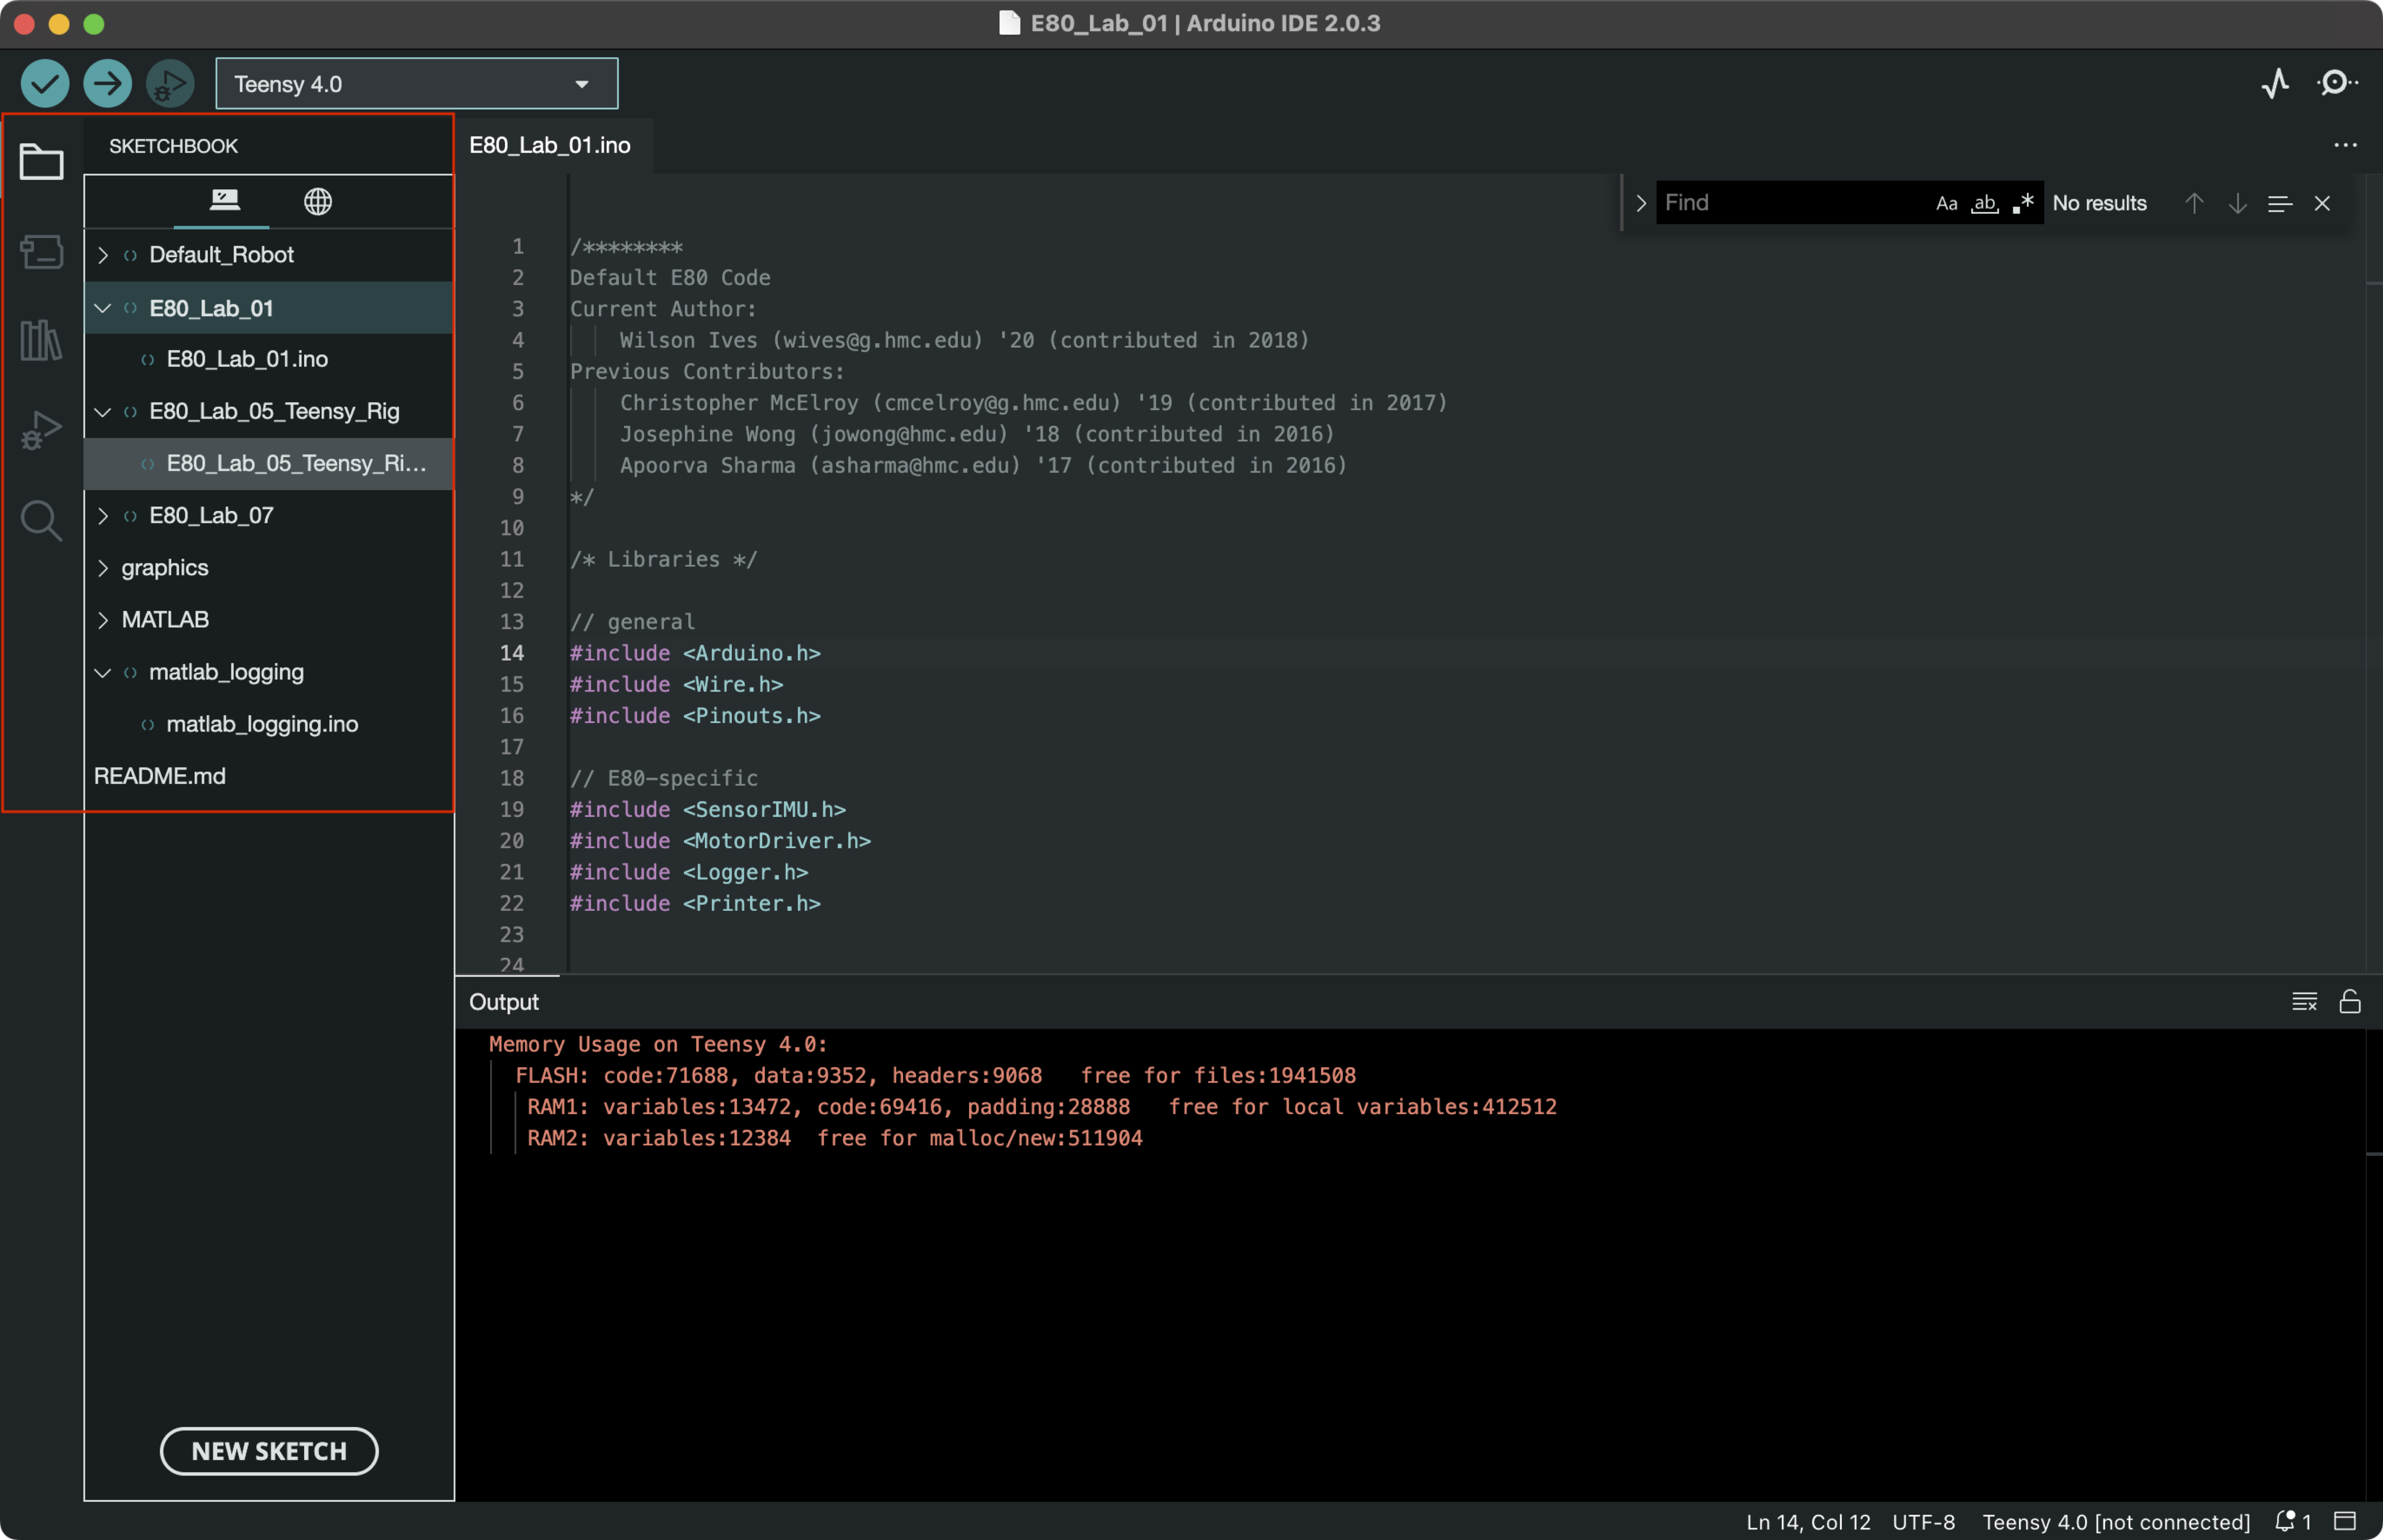
Congratulations, you are now set up and have the default E80 source code downloaded! If you have any issues with these instructions, please reach out to one of the instructors.
| Qty | Value | Footprint | References |
|---|---|---|---|
| 15 | 0.1uF | MTB_V2_Footprints:0603 | C18, C19, C20, C21, C22, C23, C24, C25, C26, C27, C28, C29, C30, C31, C32 |
| 15 | 0.1uF | MTB_V2_Footprints:0805 | C2, C6, C7, C8, C10, C11, C13, C15, C17, C33, C34, C35, C36, C37, C38 |
| 12 | 10k | MTB_V2_Footprints:0805 | R2, R12, R14, R16, R19, R20, R21, R23, R24, R25, R28, R29 |
| 9 | LED | MTB_V2_Footprints:0805_Diode | D1, D2, D3, D4, D5, D6, D7, D8, D9 |
| 8 | 470 | MTB_V2_Footprints:0805 | R4, R5, R6, R10, R11, R13, R15, R17 |
| 8 | TEST_POINT | MTB_V2_Footprints:Test_Point | TP1, TP2, TP3, TP4, TP5, TP6, TP7, TP8 |
| 5 | Jumper | MTB_V2_Footprints:Jumper | JP1, JP2, JP3, JP4, JP5 |
| 4 | 100uF | MTB_V2_Footprints:CP_Elec_6.3x7.7 | C9, C12, C14, C16 |
| 4 | MOUNTING_HOLE | MTB_V2_Footprints:Mounting_Hole | H1, H2, H3, H4 |
| 3 | 0.5A | MTB_V2_Footprints:1206 | F1, F2, F3 |
| 3 | 1.5A | MTB_V2_Footprints:1812 | F4, F5, F6 |
| 3 | 10uF | MTB_V2_Footprints:0805 | C3, C4, C5 |
| 3 | 200 | MTB_V2_Footprints:0805 | R22, R26, R27 |
| 3 | MC33HB2002ES | MTB_V2_Footprints:QFN-28_EP_6x6_Pitch0.65mm | U5, U7, U8 |
| 3 | PTS815 | MTB_V2_Footprints:PTS815_SJK_250_SMTR_LFS | B2, B3, B4 |
| 3 | R_Array_8 | MTB_V2_Footprints:SOIC-16W_5.3x10.2mm_Pitch1.27mm | RN1, RN2, RN3 |
| 1 | 0.01 | MTB_V2_Footprints:0612 | R1 |
| 1 | 0.33uF | MTB_V2_Footprints:0805 | C1 |
| 1 | 1.2k | MTB_V2_Footprints:0805 | R7 |
| 1 | 24k | MTB_V2_Footprints:0805 | R9 |
| 1 | 30k | MTB_V2_Footprints:0805 | R8 |
| 1 | 330k | MTB_V2_Footprints:0805 | R3 |
| 1 | 68 | MTB_V2_Footprints:0805 | R18 |
| 1 | Battery | MTB_V2_Footprints:Battery_Connector | BT1 |
| 1 | Button | MTB_V2_Footprints:Push_Button | B1 |
| 1 | CD74HC4050 | MTB_V2_Footprints:DIP-16_W7.62mm_Socket | U4 |
| 1 | D_Schottky | MTB_V2_Footprints:D_PowerDI-123 | D10 |
| 1 | GPS | MTB_V2_Footprints:GPS | GPS1 |
| 1 | L7805 | MTB_V2_Footprints:TO-252-3_TabPin2 | U2 |
| 1 | LD1086 | MTB_V2_Footprints:TO-252-3_TabPin2 | U3 |
| 1 | LM3880 | MTB_V2_Footprints:SOT-23-6 | U11 |
| 1 | MCP6004 | MTB_V2_Footprints:SOIC-14_3.9x8.7mm_Pitch1.27mm | U9 |
| 1 | MCP6541 | MTB_V2_Footprints:SC70 | U10 |
| 1 | MCP6V31 | MTB_V2_Footprints:SOT-23-5 | U1 |
| 1 | Motor A | MTB_V2_Footprints:1x2_Screw_Terminal | J2 |
| 1 | Motor B | MTB_V2_Footprints:1x2_Screw_Terminal | J3 |
| 1 | Motor C | MTB_V2_Footprints:1x2_Screw_Terminal | J4 |
| 1 | PTB_CONN | MTB_V2_Footprints:PTB_CONN | J1 |
| 1 | SON_03AGRTR_STM | MTB_V2_Footprints:LSM303AGRTR | U6 |
| 1 | Scew_Terminal_1x2 | MTB_V2_Footprints:1x2_Screw_Terminal | J5 |
| 1 | Switch_SPDT | MTB_V2_Footprints:Battery_Switch | S1 |
| 1 | Teensy3.2 | MTB_V2_Footprints:Teensy | TSY1 |
| 1 | micro_SD | MTB_V2_Footprints:microSD | SD1 |
It measures 101.6 × 76.2 mm and has 4 copper layers, 1.6 mm thick.
128 parts, built around the CD74HC4050M, MC33HB2002ES, MCP6004-E/P and L7805. The full list of its parts is on this page, with links to each part's symbol and footprint where PCBKit's library has them.
From the HMC-E80/E80 repository on GitHub, at the commit this page was made from: the board is design_files/motherboard/MTB_V3.0.2021/MTB_V2.kicad_pcb and its schematic design_files/adapter_board/tnsy4.0to3.2pinout_adapter.kicad_sch. PCBKit opens the board in the browser, with nothing to install.
Its repository states no licence, so its author keeps all rights: ask HMC-E80 before reusing the design.


mcmaier/hodor-hardware
HODOR hardware design files (KiCad 9) — Schiebetuersteuerung

FabLabValsamoggia/FabRecorder
Library requirements: TMRpcm. See code for other informations.


HuntieDK/BMW-i3-two-phase-charging
Extends the BMW i3 60Ah BEV/REX charging to use two phases


Eryk-Mozdzen/hogger2
Hemispherical Omnidirectional Gimbaled (HOG) wheel - this robot have two of them