
2 layers144 × 80 mm
DVDLaserScanner
GaudiLabs/OpenLaserScanningMicroscope
Open Source Laser Scanning Microscope
83 parts345GPL-3.0

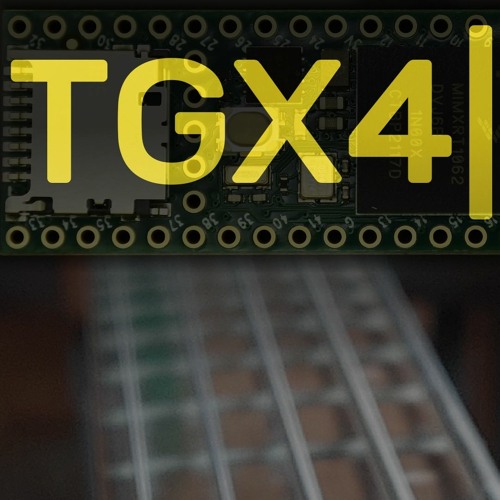
Teensy 4 based guitar amp emulator
TGX4 is an open-source printed circuit board by hexeguitar, from the hexeguitar/TGX4 repository on GitHub. It is a 4-layer board of 137 × 79.5 mm with 297 parts on 194 nets, routed with 2,218 tracks and 527 vias.
It is built around the TLC2274ID, AK4452VN and AK5552VN, with the 74LVC2G14GW, 1N4148W and MMBFJ112 among its other parts. Its parts include 100 resistors, 95 capacitors, 25 connectors, 11 diodes and 7 transistors. It belongs with the audio and music boards of this library.


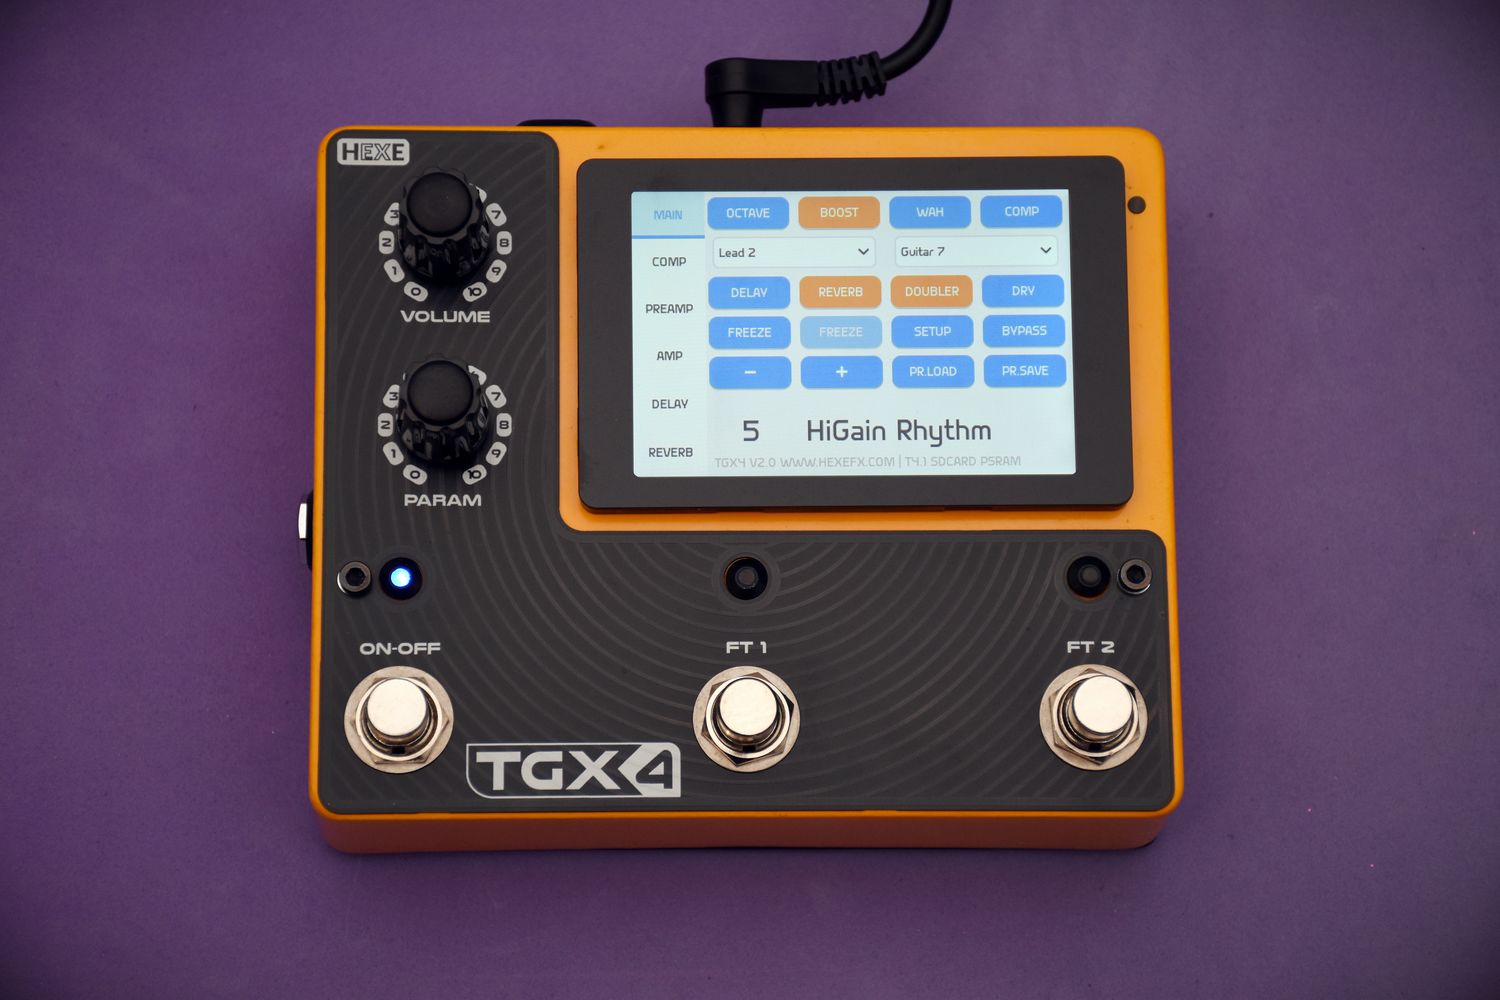
This project aims at creating a nice usable set of guitar and bass tones while using relatively inexpensive hardware and being simple to build.
It combines a Neural Network amp modeler with stereo IR cabinet emulation, versatile stereo Ping-Pong delay and 3 different reverbs. There is also a Compressor, Wah and Booster with octave up mode for further input tone shaping.
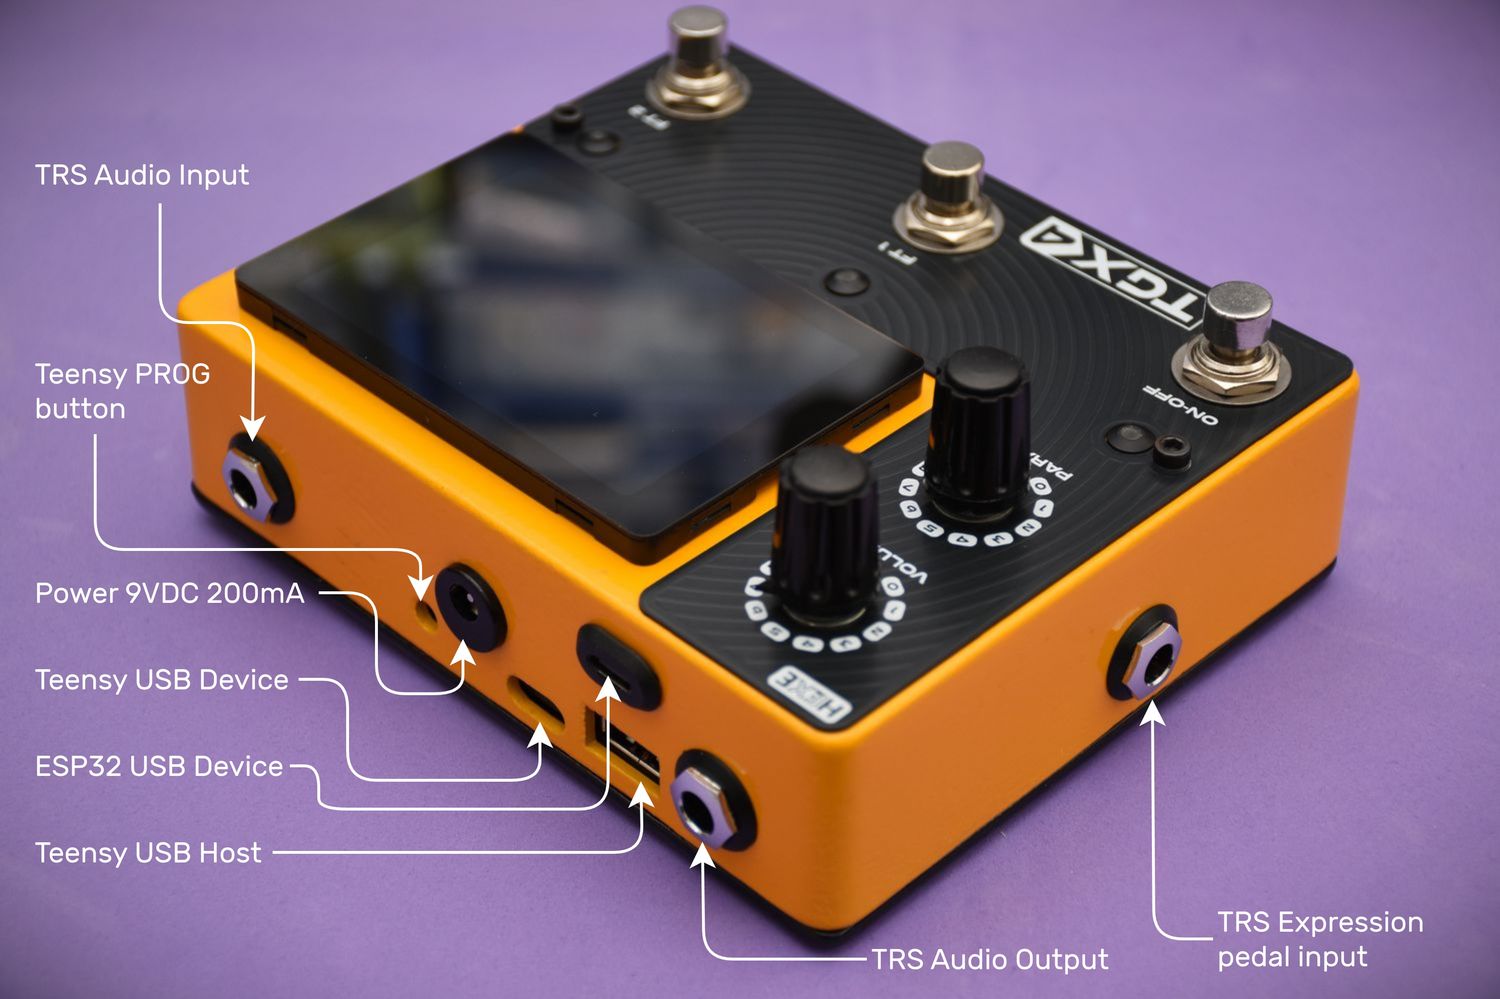
V2.1 - 12-2024 - Added Front Panel, bug fixes
V2.0 - 07-2024 - Dedicated hardware platform
V1.4 - 04.2024 - Multiple hardware platforms added
V1.3 - 03.2024 - Initial release.
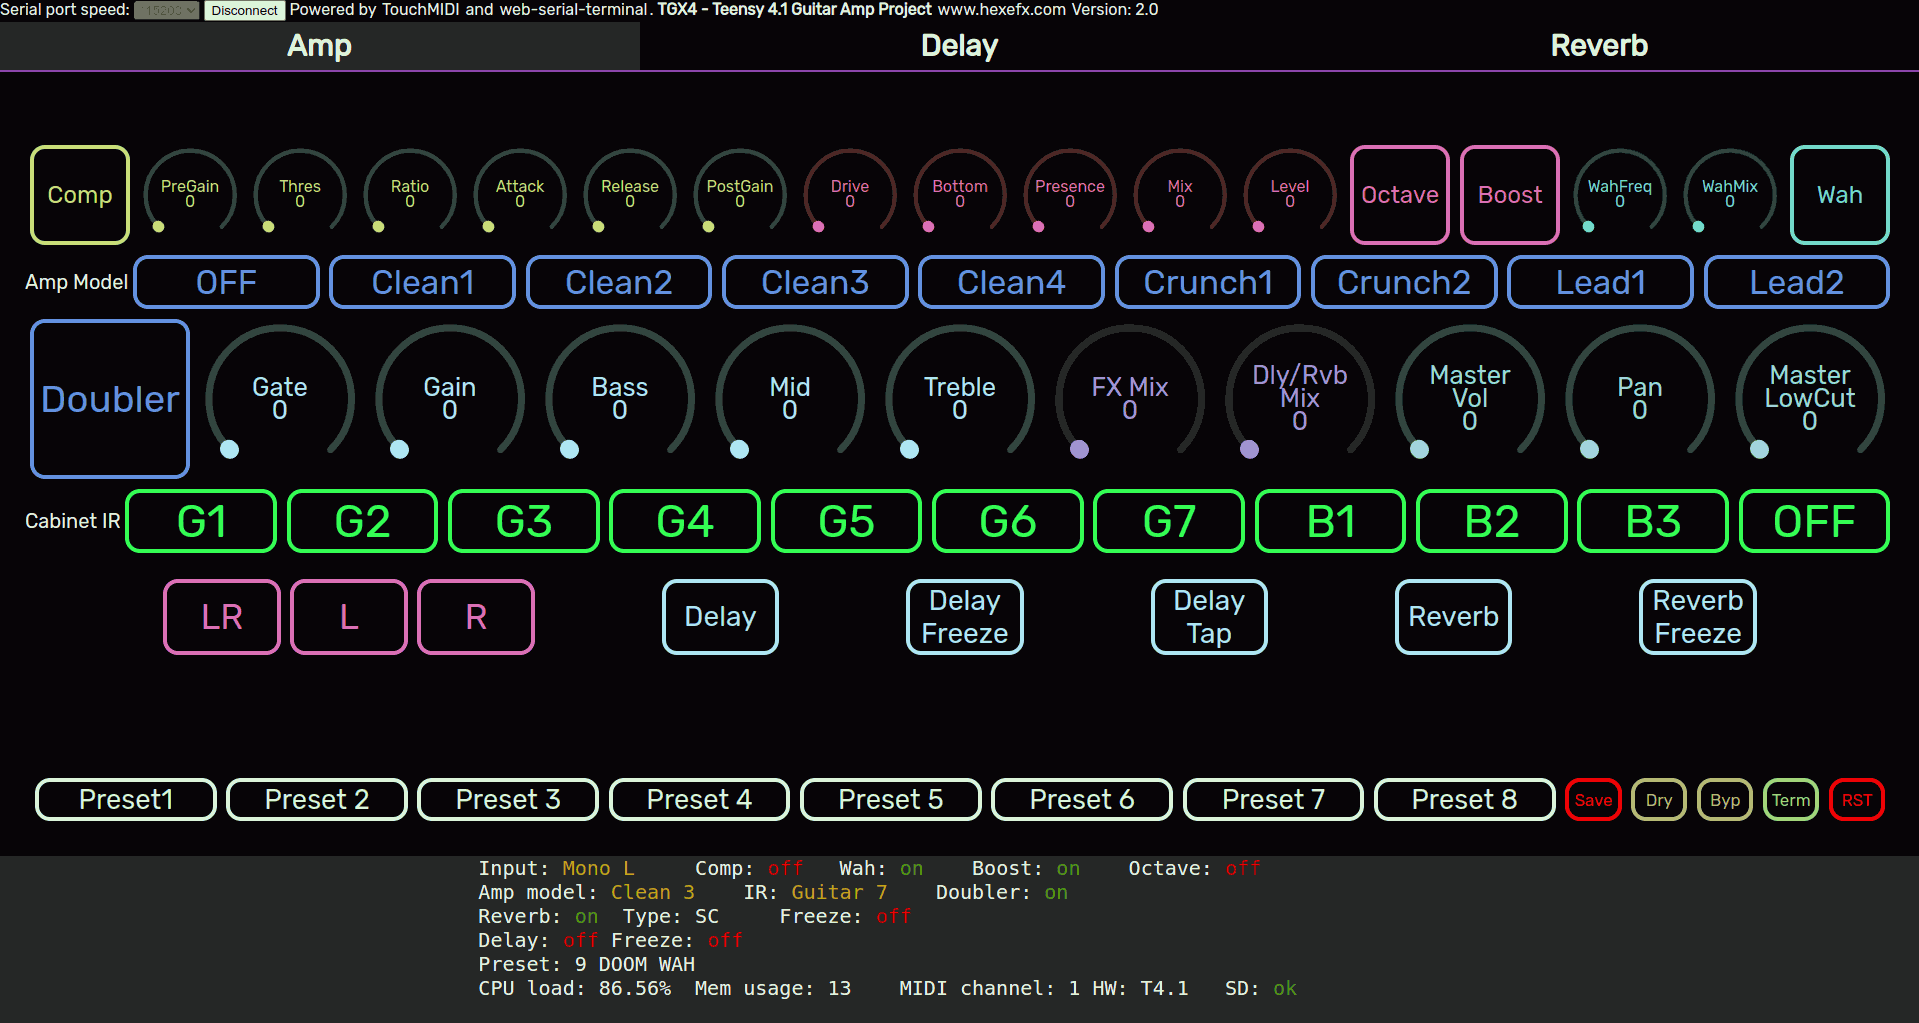
In general all the parameters are controlled via MIDI. There is a lot of controls and to make the hardware less expensive and easier to build the starting point is a simple html page using WebMIDI + WebSerial, which, opened in one of the supported browsers (Chrome, Opera, Edge) offers a full GUI interface.
Teensy is using the USB Serial port to show the status and other info about the current state.
Usage:
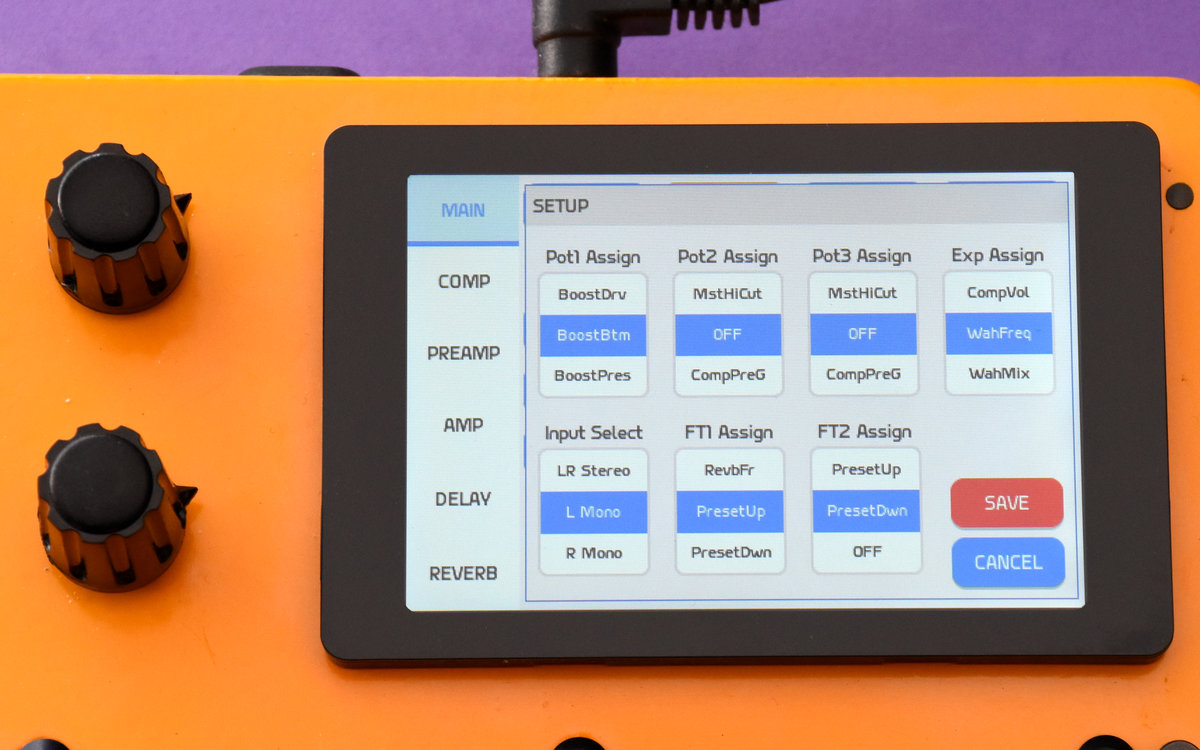
A separate project is provided for the WT32SC01Plus board (ESP32-S3 + 3.5" 480x320 IPS display, capacitive touchscreen) which is the main and dedicated user interface allowing access to all controls and functions of the pedal.
The GUI is created using LVGL9 library:
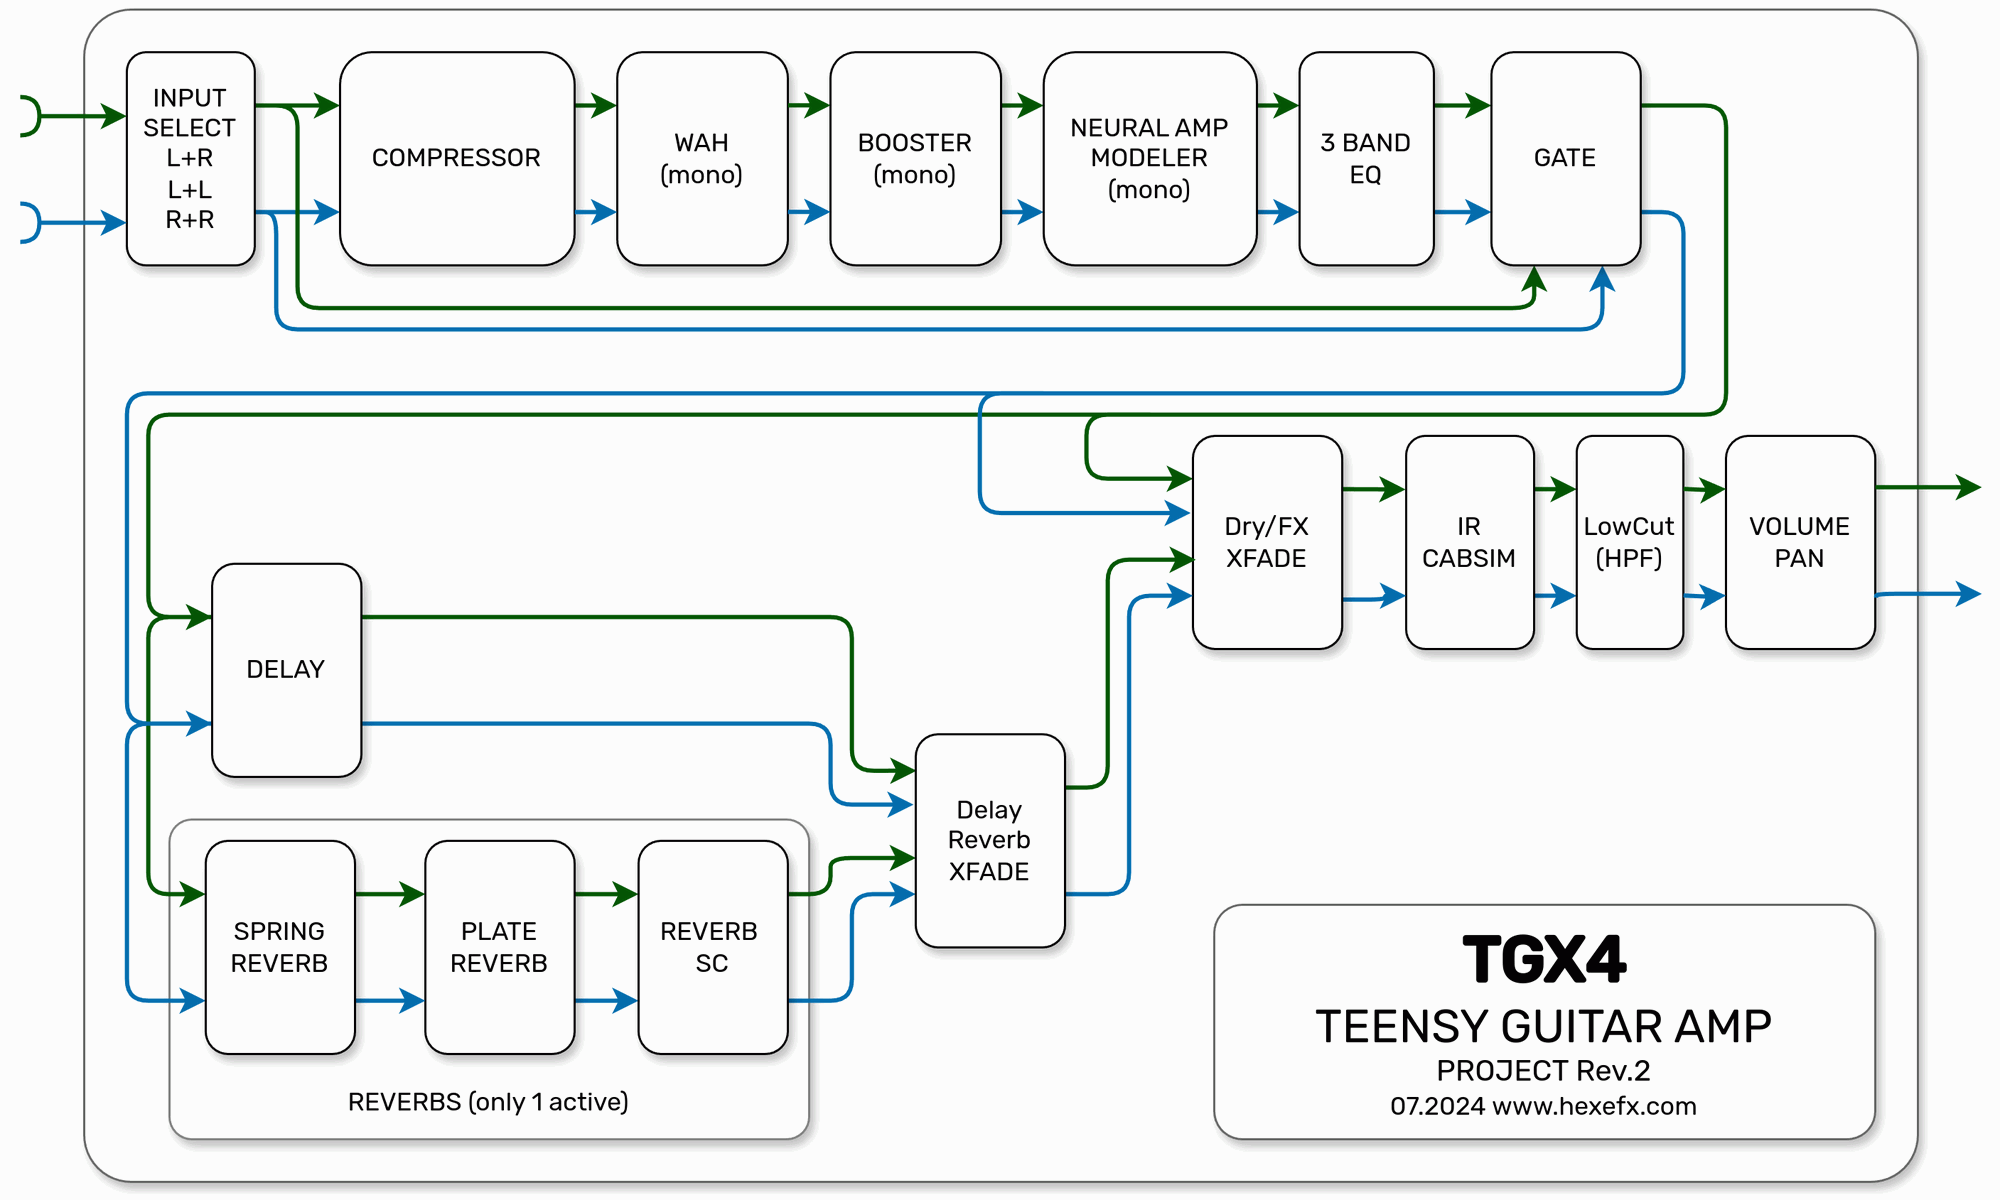
The signal flow, except three components is stereo. The three mono components are: Wah, Booster and Neural Amp Modeler. Mono means, these two sum the input signal into one and send one output to both L and R channels when enabled. In bypass mode both mono blocks pass the stereo signal unaffected. This way the TGX4 can be used either with mono source or as stereo effects processor (with Wah, Booster and Amp Modeler disabled).
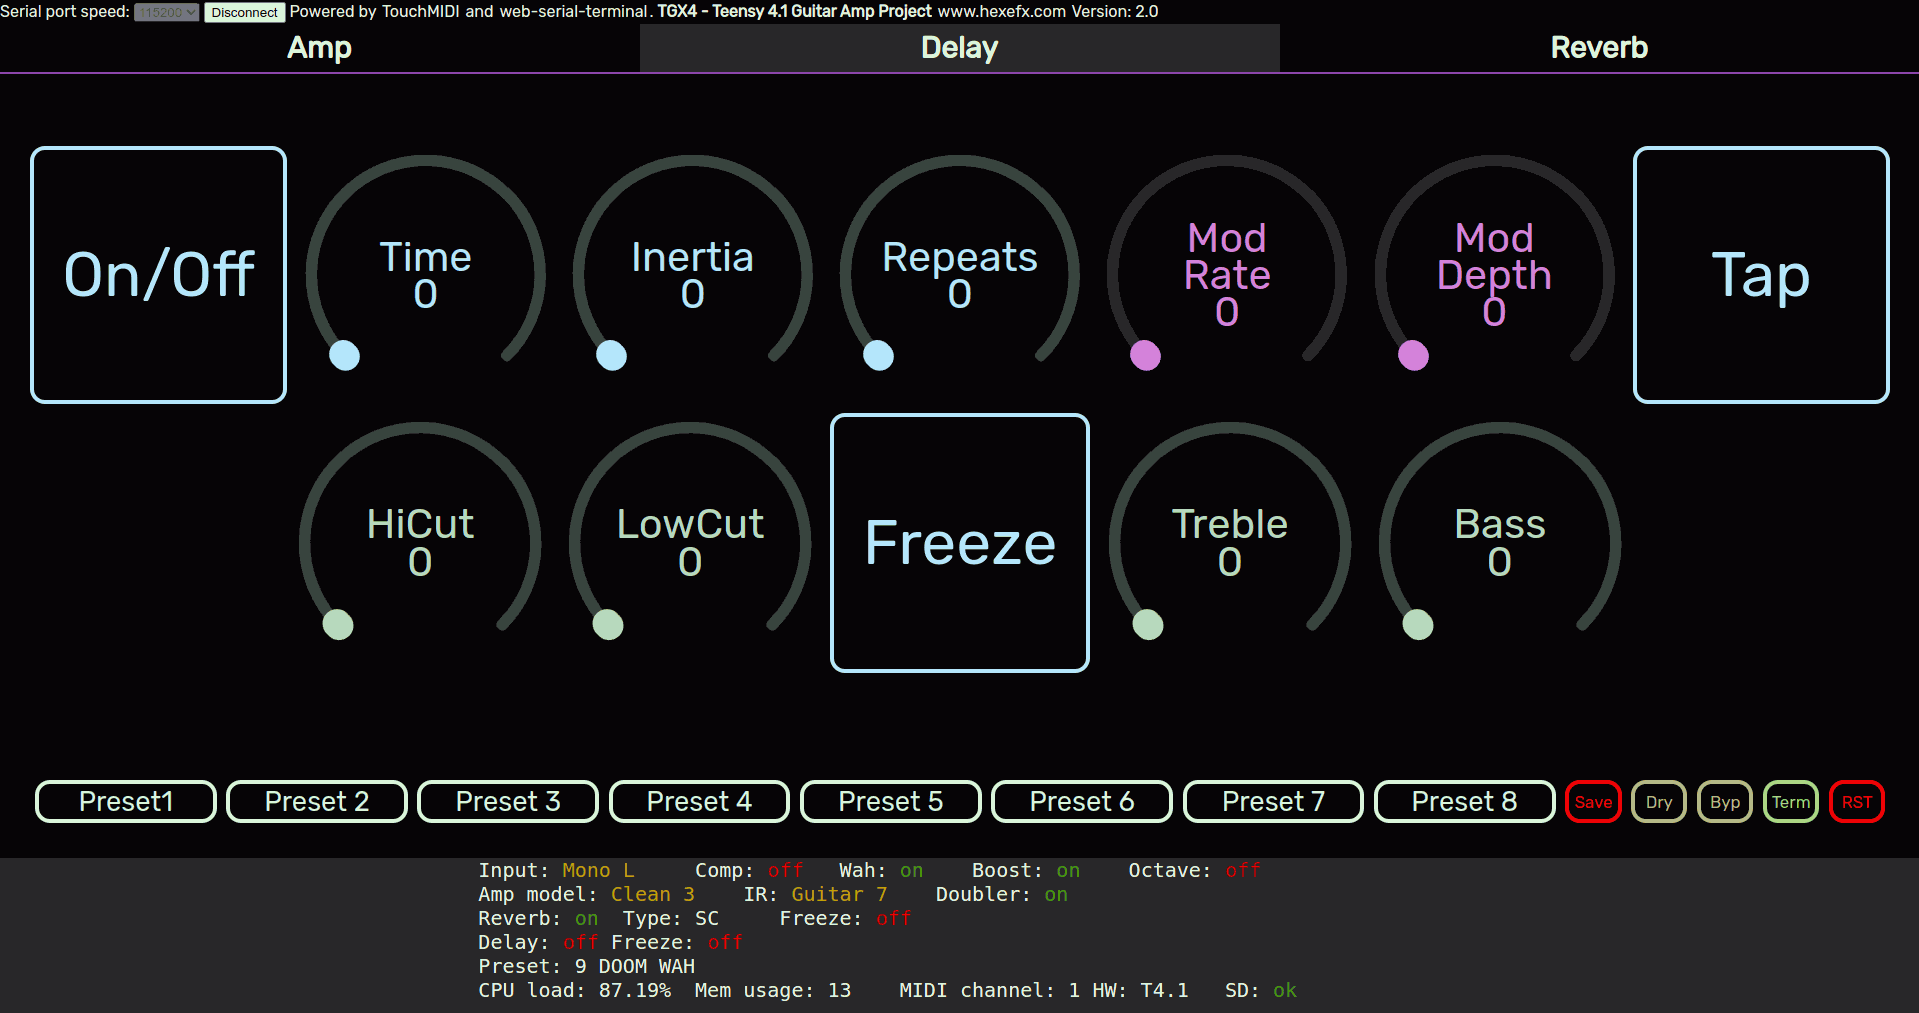
One of the time based effects, versatile 1 second delay with modulation and Freeze feature (looper mode). Controls:
There are 3 types of reverb built in, only one can be active at a time:
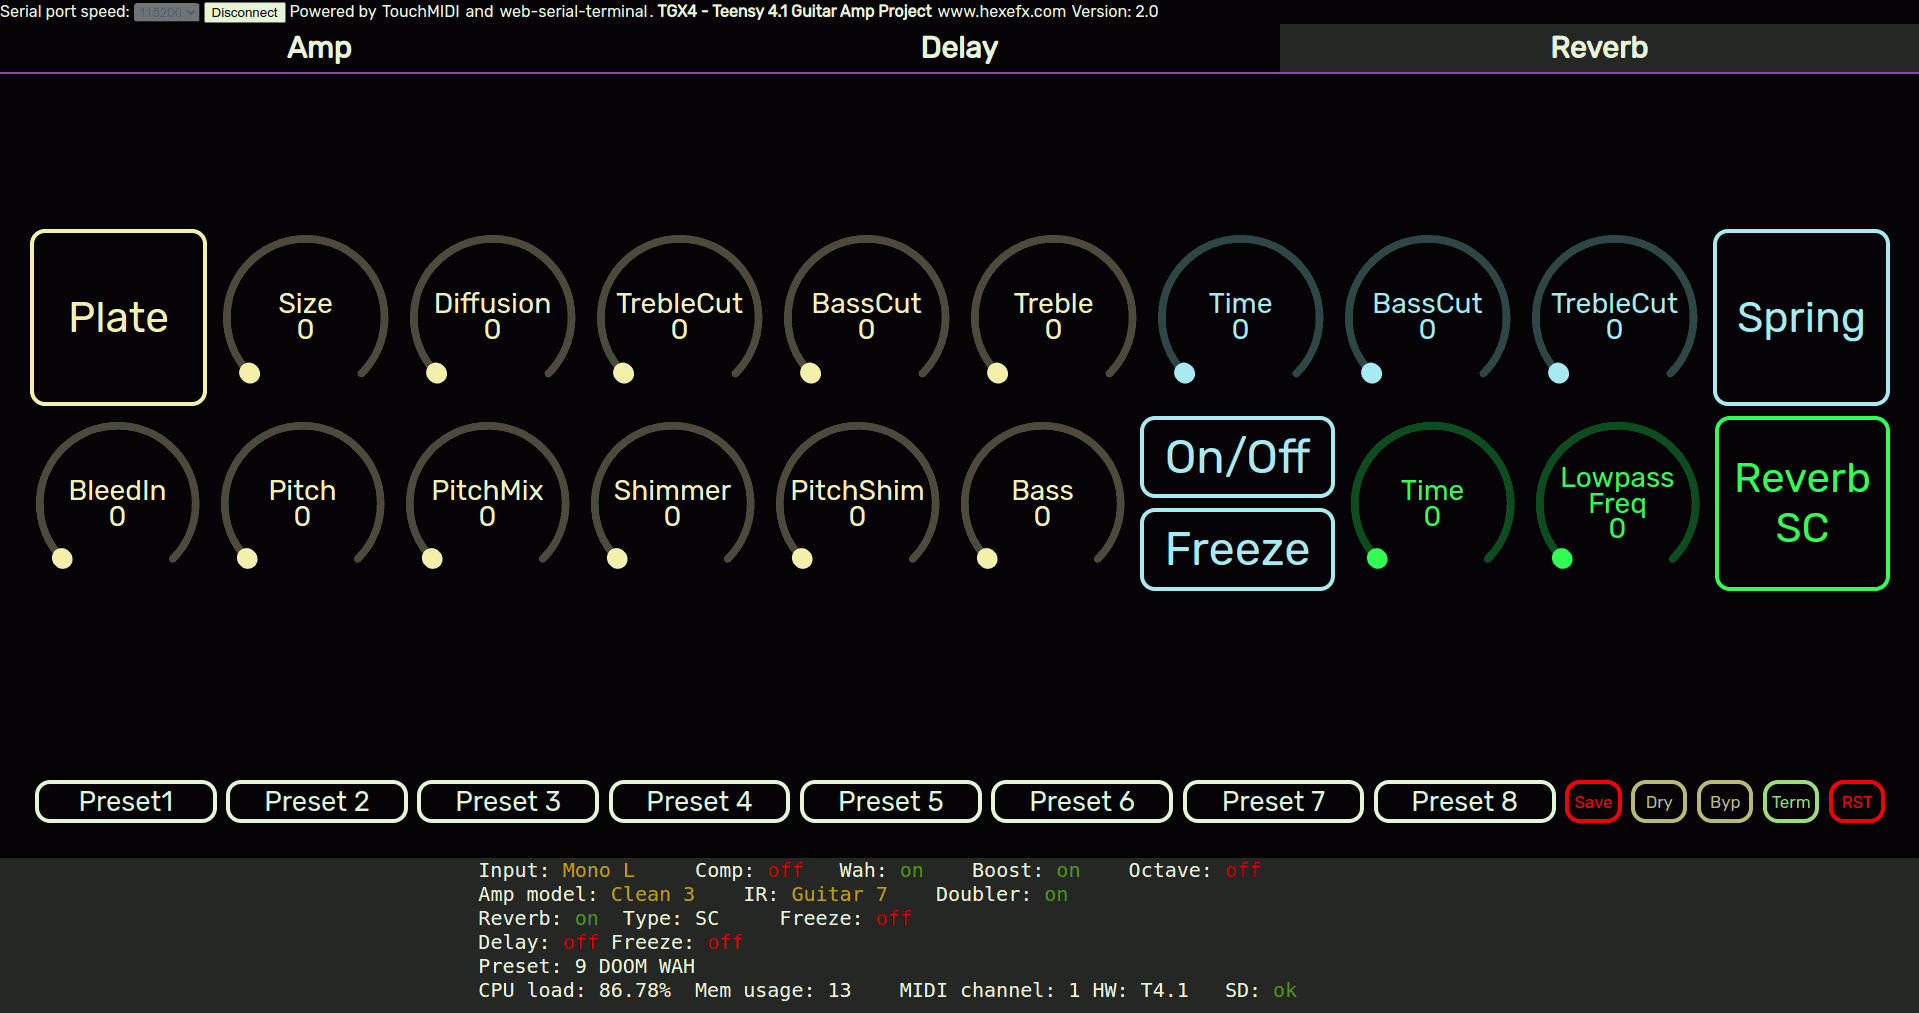
Press Plate, Spring or ReverbSC button to activate the reverb.
In the simplest form, this project can run on a Teensy 4.0 or T.4 and the audio adapter board.
Adding PSRAM to the Teensy4.1 opens up the full set of features. Lack of PSRAM results in:
Recommended upgrade would be a high impedance input buffer using an opamp or even a simple transistor one.
See here for a simple DIY project.
Alternatively, another pedal with buffered bypass can be used instead.
The hardware build option is set either in the platformio.ini file
default_envs = t40_audio_board
or by invoking the build command from the terminal:
pio run -e t40_audio_board
List of pre configured hardware platforms as of July 2024:
hexefx_tgx4 - Dedicated hardware platform for this project using 32bit AKM converters.t40_audio_board - Teensy4.0 + Audio Adaptor Boardt41_audio_board - Teensy4.1 + Audio Adaptor Boardt40_blackaddr_tgapro - Blackaddr TGA Pro + Teensy4.0t41_blackaddr_tgapro - Blackaddr TGA Pro + Teensy4.1The project is designed to be easily adaptable to many Teensy based hardware platforms, take a look here for more details.
A high gain sound, like the Preset 5 might and do create a feedback and oscillation on some of the hardware platforms, namely the SGTL5000 and ES8388. The noise gate can cut it off, although some oscillation will be audible when the gate closes. WM8731 seems to be more immune to oscillations.
A very high gain devices require a careful layout and design to make them as silent as possible. It is also a reason for designing a dedicated HW platform for the TGX4 project which incorporates design techniques to minimize these issues.
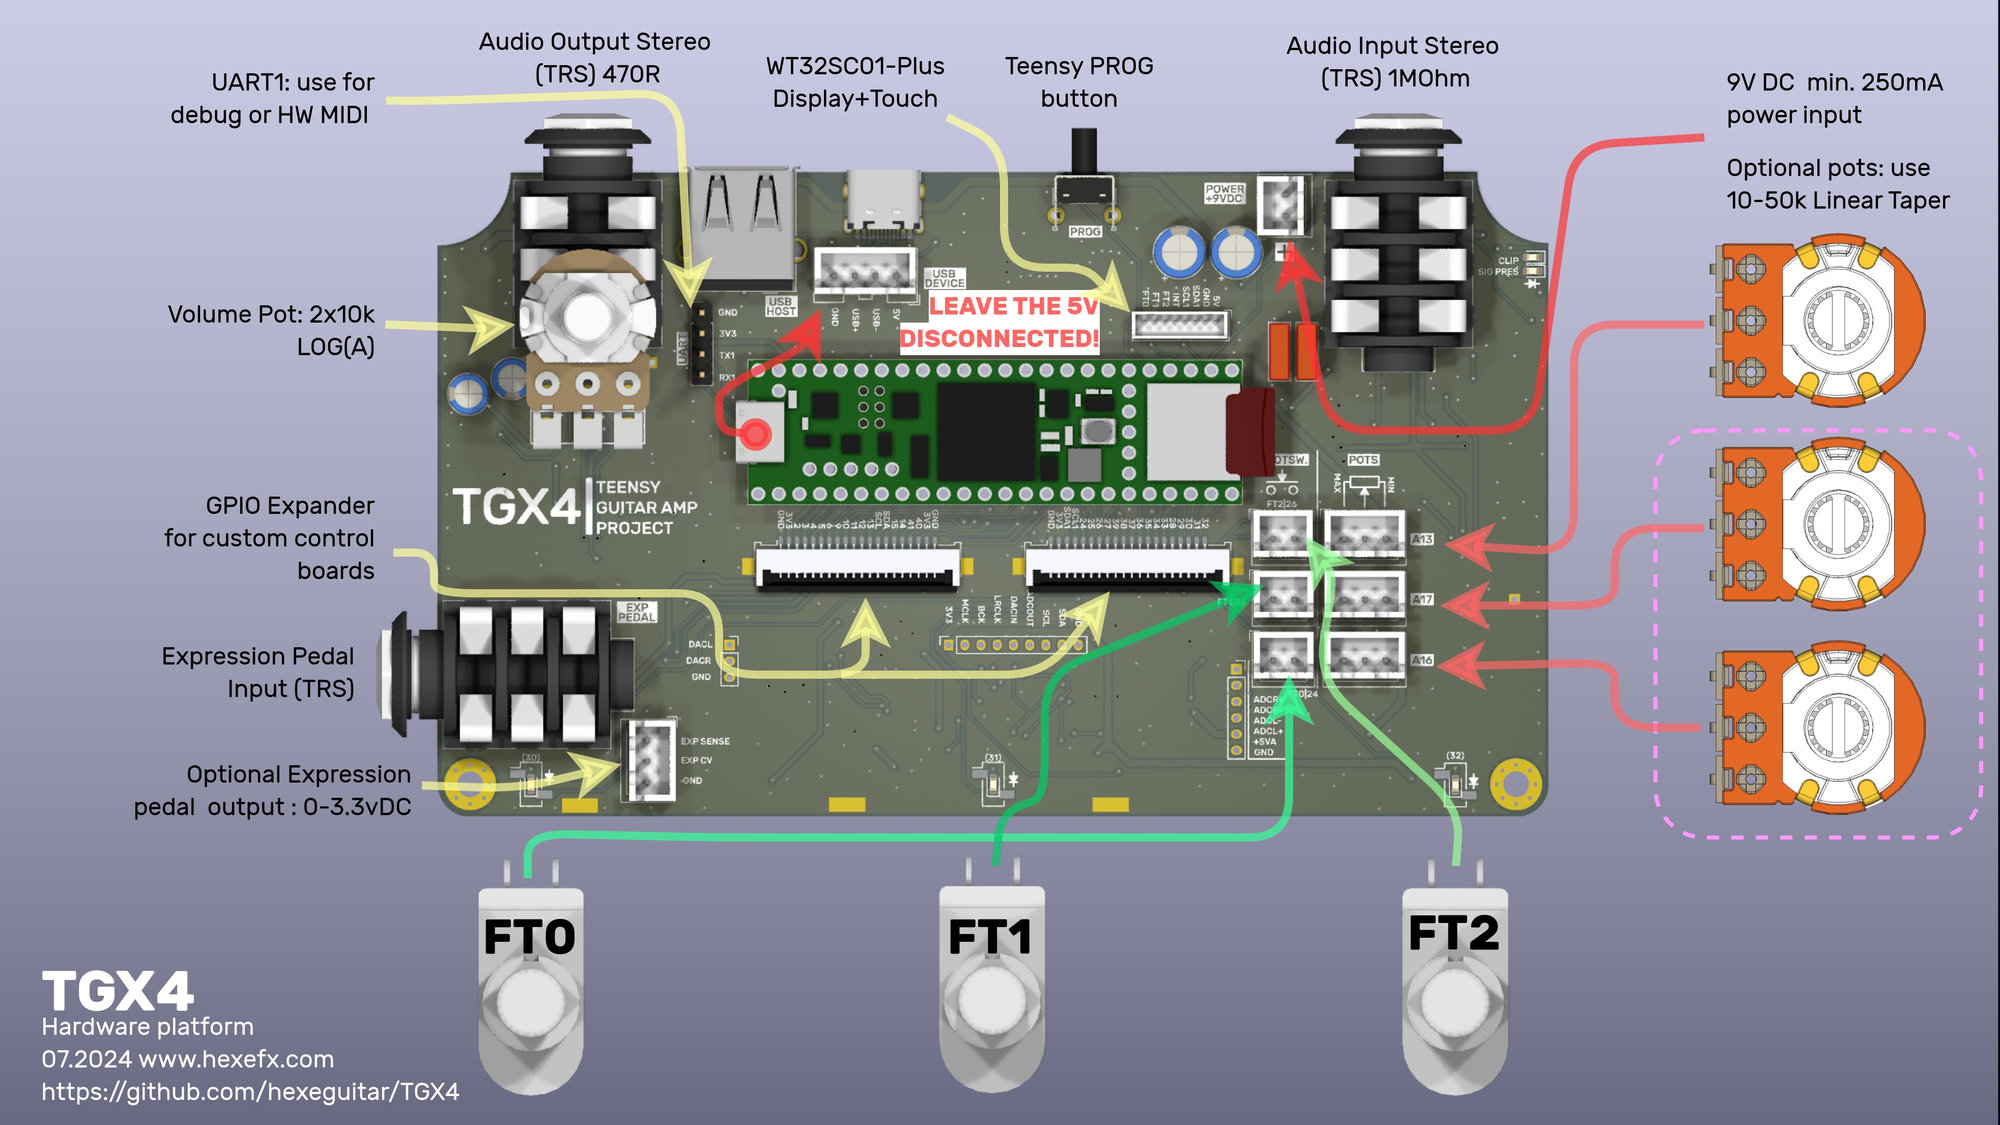
Dedicated TGX hardware platform project is available in the hardware/ folder.
platformio.ini file and set the required hardware configuration.TGX4.html file placed in the html folder in Chrome, Chromium or Edge browser (others do not implement WebMIDI and WebSerial).Connect button on the top of the page and choose Teensy Serial port.A snapshot of all controls (except Delay+Reverb Freeze modes) can be saved in 128 available preset slots. Preset System is using the SD card to store the files. If no SD card is detected, the number of presets is limited to 8, stored in EEPROM.
preset-load n, where n is the preset number in range 1-128.preset-name xxxx CLI command.Switching the presets can be done in two ways:
https://www.youtube.com/watch?v=2hztEZ9_kYk

https://www.youtube.com/watch?v=AlLRwmOwigU

All guitar/bass sounds on this track were recorded using the TGX4:
Use the Term button places on the main Amp page to switch between the status report and the CLI. Type help to list all the commands. CLI uses history and autocomplete.
Available commands:
preset-rst - repopulates the 128 (or 8 without the SD card) available presets with default "factory" ones.preset-name - sets the new name for the current preset. Argument: name, max 15 chars. Eg. preset-name Solo-Delaypreset-load - loads the preset, argument: preset number 1-128.preset-backup - creates a copy of the 128 presets data in a separate backup directory on the SD card.meminfo- print RAM memory detailsload- list CPU loads for all componentsmidi-ch- assign a new MIDI channel for the Teensy. Use it when controlling the device with other MIDI controllers. The WebMIDI interface sends the data on channel 1.i2c - I2C scanner, takes one parameter: 0, 1 or 2 (Wire, Wire1, Wire2) and reports all found devices.list - lists all the files found on the SD card.The Neural Network Modeler is based on implementation by Keith Bloemer/GuitarML
OpenAudio_ArduinoLibrary by Chip Audette
embedded_cli by Sviatoslav Kokurin.
(c) 2024 by Piotr Zapart
www.hexefx.com
| Qty | Value | Footprint | References |
|---|---|---|---|
| 21 | 10k | H_smd_passives:Hx_R_0805_2012Metric | R29, R30, R33, R34, R45, R46, R47, R48, R51, R52, R55, R56, R71, R72, R73, R74 +5 |
| 19 | 10u | H_smd_passives:Hx_C_0805_2012Metric | C6, C7, C9, C10, C13, C17, C21, C31, C74, C75, C76, C77, C78, C79, C83, C85 +3 |
| 13 | 1k | H_smd_passives:Hx_R_0805_2012Metric | R3, R4, R5, R32, R35, R39, R40, R92, R94, R95, R96, R97, R99 |
| 12 | 100k | H_smd_passives:Hx_R_0805_2012Metric | R10, R12, R13, R14, R15, R57, R59, R77, R78, R79, R90, R98 |
| 12 | 1u | H_smd_passives:Hx_C_0805_2012Metric | C8, C15, C28, C29, C30, C33, C57, C58, C65, C70, C88, C89 |
| 11 | 100n | H_smd_passives:Hx_C_0805_2012Metric | C5, C14, C16, C20, C53, C54, C80, C84, C87, C92, C94 |
| 10 | 100p | H_smd_passives:Hx_C_0805_2012Metric | C37, C38, C45, C46, C47, C48, C55, C56, C59, C60 |
| 10 | 10u | Capacitor_Tantalum_SMD:CP_EIA-3216-18_Kemet-A | C32, C34, C39, C40, C49, C50, C51, C52, C61, C62 |
| 7 | 33R | H_smd_passives:Hx_R_0805_2012Metric | R1, R2, R6, R7, R8, R9, R85 |
| 6 | 100u | Capacitor_Tantalum_SMD:CP_EIA-6032-28_Kemet-C | C4, C11, C12, C18, C19, C73 |
| 6 | 470k | H_smd_passives:Hx_R_0805_2012Metric | R58, R60, R65, R66, R67, R68 |
| 6 | 47k | H_smd_passives:Hx_R_0805_2012Metric | R61, R62, R63, R64, R69, R70 |
| 5 | 10R | H_smd_passives:Hx_R_0805_2012Metric | R36, R49, R50, R53, R54 |
| 5 | 10uH | H_smd_passives:Hx_L_0805_2012Metric | L2, L3, L4, L5, L6 |
| 5 | 1N4148W | Diode_SMD:D_SOD-123 | D3, D7, D8, D9, D10 |
| 5 | 1n | H_smd_passives:Hx_C_0805_2012Metric | C24, C25, C26, C27, C95 |
| 5 | 470p | H_smd_passives:Hx_C_0805_2012Metric | C41, C42, C43, C44, C81 |
| 4 | 150R | H_smd_passives:Hx_R_0805_2012Metric | R23, R24, R25, R26 |
| 4 | 22u | H_smd_passives:Hx_C_0805_2012Metric | C63, C64, C71, C72 |
| 4 | 2M2 | H_smd_passives:Hx_R_0805_2012Metric | R37, R38, R41, R42 |
| 4 | 3k3 | H_smd_passives:Hx_R_0805_2012Metric | R21, R22, R27, R28 |
| 4 | 4k7 | H_smd_passives:Hx_R_0805_2012Metric | R17, R18, R19, R20 |
| 4 | Conn_01x02 | Connector_JST:JST_XA_B02B-XASK-1_1x02_P2.50mm_Vertical | J6, J7, J8, J15 |
| 4 | Conn_01x03 | Connector_JST:JST_XA_B03B-XASK-1_1x03_P2.50mm_Vertical | J2, J16, J17, J18 |
| 4 | MMBFJ112 | H_SOT:SOT-23 | Q3, Q4, Q5, Q6 |
| 3 | 4n7 | H_smd_passives:Hx_C_0805_2012Metric | C1, C22, C23 |
| 3 | BAT54S | H_SOT:SOT-23 | D1, D5, D6 |
| 3 | BC817 | H_SOT:SOT-23 | Q1, Q2, Q8 |
| 3 | Conn_01x01 | Connector_PinHeader_2.00mm:PinHeader_1x01_P2.00mm_Vertical | J22, J23, J24 |
| 3 | Conn_01x02 | Connector_PinSocket_2.54mm:PinSocket_1x02_P2.54mm_Vertical_SMD_Pin1Left | J19, J20, J21 |
| 3 | Footsw_symbol | H_symbols:FootswitchTopView | SW1, SW2, SW3 |
| 3 | LED PINK | LED_SMD:LED_0603_1608Metric | D11, D12, D13 |
| 3 | TLC2274 | Package_SO:SO-14_3.9x8.65mm_P1.27mm | U6, U7, U9 |
| 3 | TRS_JACK | H_conn:NMJ6HCD2_TRSjack_smallPads | CON1, CON2, CON3 |
| 2 | 100n | Capacitor_THT:C_Rect_L7.0mm_W2.5mm_P5.00mm | C35, C36 |
| 2 | 15n | H_smd_passives:Hx_C_0805_2012Metric | C2, C3 |
| 2 | 1M | H_smd_passives:Hx_R_0805_2012Metric | R31, R88 |
| 2 | 20R | H_smd_passives:Hx_R_0805_2012Metric | R11, R16 |
| 2 | 220u | Capacitor_THT:CP_Radial_D6.3mm_P2.50mm | C67, C68 |
| 2 | 22k | H_smd_passives:Hx_R_0805_2012Metric | R43, R44 |
| 2 | 470R | H_smd_passives:Hx_R_0805_2012Metric | R75, R76 |
| 2 | 5K1 | H_smd_passives:Hx_R_0805_2012Metric | R86, R87 |
| 2 | ADDR0 | H_switches:PCB_jumper_2_closed | JP3, JP4 |
| 2 | MountingHole_Pad | MountingHole:MountingHole_3.2mm_M3_Pad_Via | H1, H2 |
| 2 | XW10202-20R-00 | H_conn:HCTL_XW10202-20R-00 _1x20-1MP_P1.00mm_Horizontal | J10, J12 |
| 1 | 100u | Capacitor_THT:CP_Radial_D5.0mm_P2.00mm | C82 |
| 1 | 10k | H_smd_passives:R_Array_Convex_4x0603 | RP1 |
| 1 | 10k | H_pots:Trimpot_SMD_mini | RV2 |
| 1 | 10kLOG | H_pots:ALPHA_DUALPOT_16mm | RV1 |
| 1 | 10uH | Inductor_SMD:L_Changjiang_FNR5020S | L1 |
| 1 | 110k | H_smd_passives:Hx_R_0805_2012Metric | R80 |
| 1 | 15k | H_smd_passives:Hx_R_0805_2012Metric | R81 |
| 1 | 2.2M | H_smd_passives:Hx_R_0805_2012Metric | R100 |
| 1 | 22n | H_smd_passives:Hx_C_0805_2012Metric | C66 |
| 1 | 22p | H_smd_passives:Hx_C_0805_2012Metric | C69 |
| 1 | 2k2 | H_smd_passives:Hx_R_0805_2012Metric | R82 |
| 1 | 2k2 | H_smd_passives:R_Array_Convex_4x0603 | RP2 |
| 1 | 47u | Capacitor_THT:CP_Radial_D5.0mm_P2.00mm | C86 |
| 1 | 500mA | H_Fuses:Fuse_1812_4532Metric | F1 |
| 1 | 50mA - 0ZCJ0005FF2E | H_Fuses:Fuse_1206_3216Metric | F2 |
| 1 | 74LVC2G14 | Package_TO_SOT_SMD:SOT-363_SC-70-6 | U8 |
| 1 | ADDR1 | H_switches:PCB_jumper_2 | JP5 |
| 1 | ADDR1 | H_switches:PCB_jumper_2_closed | JP2 |
| 1 | AK4452 | Package_DFN_QFN:QFN-32-1EP_5x5mm_P0.5mm_EP3.1x3.1mm | U4 |
| 1 | AK5552 | Package_DFN_QFN:QFN-48-1EP_7x7mm_P0.5mm_EP5.15x5.15mm | U3 |
| 1 | CLIP_OFF | H_switches:PCB_jumper_2 | JP9 |
| 1 | CLIP_SEL | H_switches:PCB_jumper_2 | JP10 |
| 1 | Conn_01x03 | Connector_PinSocket_2.00mm:PinSocket_1x03_P2.00mm_Vertical | J9 |
| 1 | Conn_01x04 | Connector_PinHeader_2.54mm:PinHeader_1x04_P2.54mm_Vertical | J3 |
| 1 | Conn_01x04 | Connector_JST:JST_XA_B04B-XASK-1_1x04_P2.50mm_Vertical | J4 |
| 1 | Conn_01x06 | Connector_PinSocket_2.00mm:PinSocket_1x06_P2.00mm_Vertical | J14 |
| 1 | Conn_01x07 | Connector_PinSocket_2.00mm:PinSocket_1x09_P2.00mm_Vertical | J5 |
| 1 | Conn_01x08 | Connector_Molex:Molex_PicoBlade_53047-0810_1x08_P1.25mm_Vertical | J11 |
| 1 | Detail2 | H_logos:HexeFx_077x022 | S2 |
| 1 | EXPSNS_A0 | H_switches:PCB_jumper_2_closed | JP7 |
| 1 | EXP_AN1 | H_switches:PCB_jumper_2_closed | JP6 |
| 1 | FuseBypass | H_switches:PCB_jumper_2 | JP8 |
| 1 | G*** | kibuzzard-661FAC7F | kibuzzard-661FAC7F |
| 1 | G*** | kibuzzard-661FB961 | kibuzzard-661FB961 |
| 1 | G*** | kibuzzard-661BAEA8 | kibuzzard-661BAEA8 |
The 274 most common of 297 parts.
It measures 137 × 79.5 mm and has 4 copper layers, 1.6 mm thick.
297 parts, built around the TLC2274ID, AK4452VN, AK5552VN and 74LVC2G14GW. The full list of its parts is on this page, with links to each part's symbol and footprint where PCBKit's library has them.
From the hexeguitar/TGX4 repository on GitHub, at the commit this page was made from: the board is hardware/KiCad_proj/MainBoard/TGX4.kicad_pcb and its schematic hardware/KiCad_proj/FrontPanel/TGX4_Panel.kicad_sch. PCBKit opens the board in the browser, with nothing to install.
Its repository states no licence, so its author keeps all rights: ask hexeguitar before reusing the design.
GaudiLabs/OpenLaserScanningMicroscope
Open Source Laser Scanning Microscope


nict41/crossover
An EasyEDA-importable schematic for the 3-way state variable electronic crossover from Elliott Sound Products Project 148 ( ), redrawn from Figure 2.


starlingcode/analog-via
Designs for an all-analog variant of the VIA meta crossfader