2 layers173 × 122.5 mm
 FailureToLoad/gameglove
A macropad for gaming
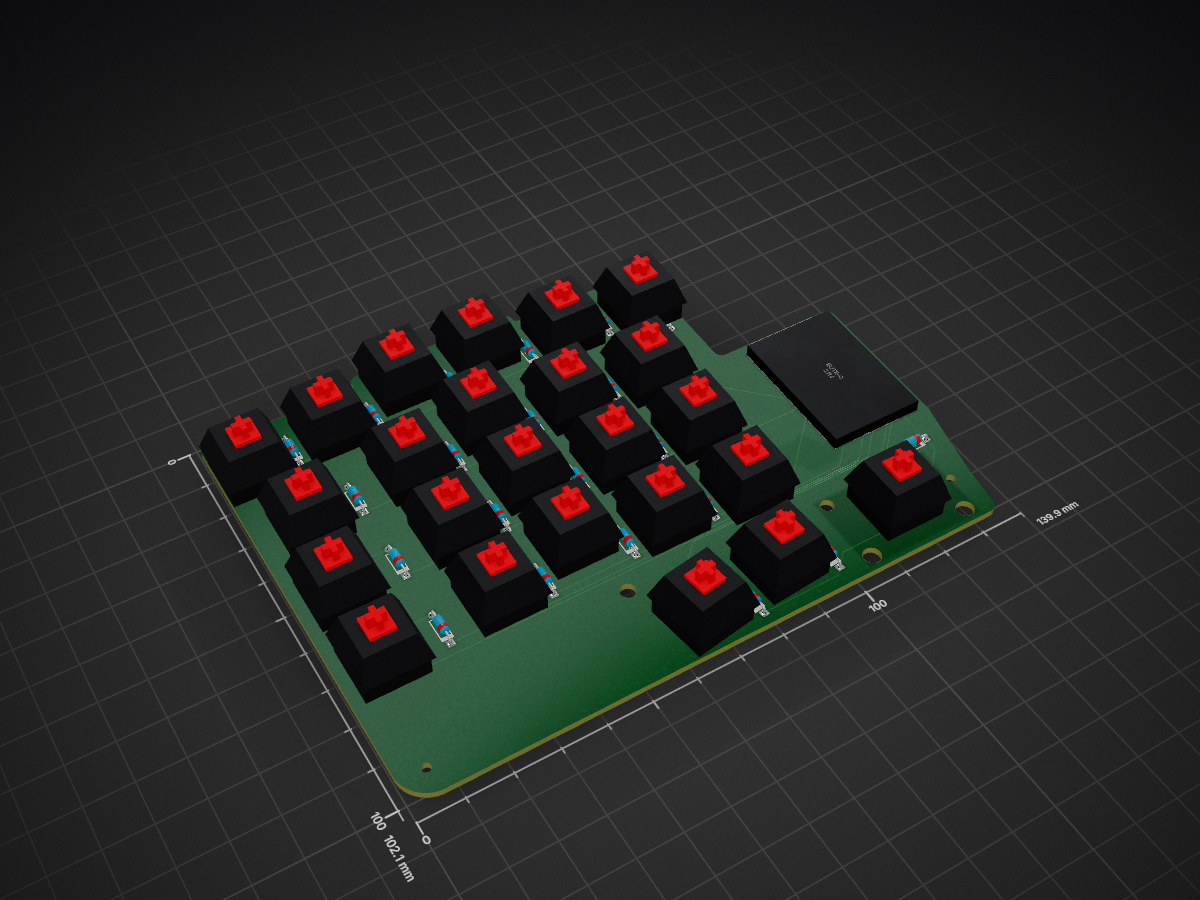
Gameglove is an open-source printed circuit board by FailureToLoad, from the FailureToLoad/gameglove repository on GitHub. It is a 2-layer board of 139.9 × 102.1 mm with 49 parts on 51 nets, routed with 185 tracks and 1 via.
Its parts include 24 diodes and 1 IC. It belongs with the keyboards and input boards and the AVR (ATmega, ATtiny) boards of this library.
Having grown tired of trying different keyboard layouts that all always felt slightly off, I set out to design a gaming peripheral that felt right.
This is a perpipheral that will sit along side my normal keyboard so it should be half the size of a 60% at most.
I can't shake this very specific muscle memory, so may as well design around it.
I've never been able to hit keys like Z, X, and C reliably. My brain refuses to memorize the meat signals to reach down, then laterally. That led me to at least remove the lateral movement by going for something ortholinear-ish.
Pure ortholinear was uncomfortable for me, but column staggered ortho made a lot of sense. The problem is that most column staggered layouts base the spacing off of home-row hand positioning. This is for gaming, so the spacing should be oriented around WASD positioning.
From trying pure ortholinear, my hands felt fairly cramped with 1u modifier keys.
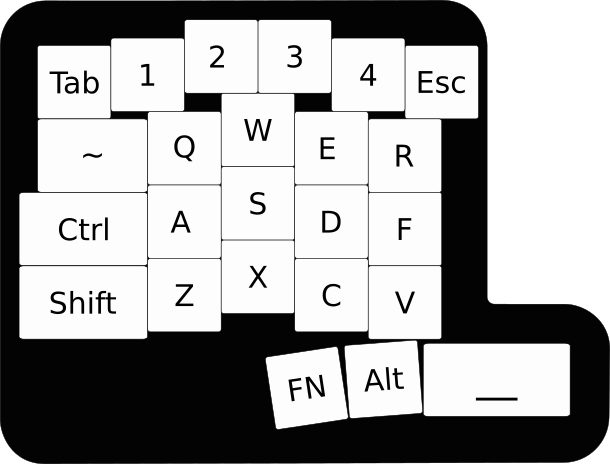
After a fair amount of iteration and prototyping, I've landed on the following.
I liked the look of 6 keys on row 1 and row 5 felt just right at 3 keys.
Row staggering the first row got me my 2/3 key situation I wanted. The last row was positioned based off of where my thumb comfortably sits.
I cannot stress how much time I spent measuring the thumb positioning. It is maddening how many ways there are to do it wrong.
I shifted the spacing so that W defines the "peak" of the column staggering.
I changed the shift to be 1.75u to avoid non-standard sizing issues with keycap sets and then right-justified the modifiers to conform to the row-aligned, column-staggered requirement.
| Qty | Value | Footprint | References |
|---|---|---|---|
| 1 | 1 | footprints:MXOnly-1U-NoLED | MX2 |
| 1 | 1 | footprints:D_axial | D2 |
| 1 | 2 | footprints:MXOnly-1U-NoLED | MX3 |
| 1 | 2 | footprints:D_axial | D3 |
| 1 | 3 | footprints:D_axial | D4 |
| 1 | 3 | footprints:MXOnly-1U-NoLED | MX4 |
| 1 | 4 | footprints:MXOnly-1U-NoLED | MX5 |
| 1 | 4 | footprints:D_axial | D5 |
| 1 | A | footprints:MXOnly-1U-NoLED | MX13 |
| 1 | A | footprints:D_axial | D13 |
| 1 | C | footprints:MXOnly-1U-NoLED | MX20 |
| 1 | C | footprints:D_axial | D20 |
| 1 | D | footprints:D_axial | D15 |
| 1 | D | footprints:MXOnly-1U-NoLED | MX15 |
| 1 | E | footprints:MXOnly-1U-NoLED | MX10 |
| 1 | E | footprints:D_axial | D10 |
| 1 | Elite-C | footprints:Elite-C-castellated-29pin-holes | U1 |
| 1 | F | footprints:MXOnly-1U-NoLED | MX16 |
| 1 | F | footprints:D_axial | D16 |
| 1 | Q | footprints:MXOnly-1U-NoLED | MX8 |
| 1 | Q | footprints:D_axial | D8 |
| 1 | R | footprints:MXOnly-1U-NoLED | MX11 |
| 1 | R | footprints:D_axial | D11 |
| 1 | S | footprints:MXOnly-1U-NoLED | MX14 |
| 1 | S | footprints:D_axial | D14 |
| 1 | V | footprints:D_axial | D21 |
| 1 | V | footprints:MXOnly-1U-NoLED | MX21 |
| 1 | W | footprints:MXOnly-1U-NoLED | MX9 |
| 1 | W | footprints:D_axial | D9 |
| 1 | X | footprints:MXOnly-1U-NoLED | MX19 |
| 1 | X | footprints:D_axial | D19 |
| 1 | Z | footprints:MXOnly-1U-NoLED | MX18 |
| 1 | Z | footprints:D_axial | D18 |
| 1 | ctrl | footprints:D_axial | D12 |
| 1 | ctrl | footprints:MXOnly-1.75U-NoLED | MX12 |
| 1 | esc | footprints:MXOnly-1U-NoLED | MX6 |
| 1 | esc | footprints:D_axial | D6 |
| 1 | grave | footprints:MXOnly-1U-NoLED | MX1 |
| 1 | grave | footprints:D_axial | D1 |
| 1 | pgdn | footprints:MXOnly-1U-NoLED | MX22 |
| 1 | pgdn | footprints:D_axial | D22 |
| 1 | pgup | footprints:MXOnly-1U-NoLED | MX23 |
| 1 | pgup | footprints:D_axial | D23 |
| 1 | shift | footprints:D_axial | D17 |
| 1 | shift | footprints:MXOnly-1.75U-NoLED | MX17 |
| 1 | space | footprints:D_axial | D24 |
| 1 | space | footprints:MXOnly-2U-NoLED | MX24 |
| 1 | tab | footprints:D_axial | D7 |
| 1 | tab | footprints:MXOnly-1.5U-NoLED | MX7 |


benkrasnow/DSKY_EL_replica
Schematic, PCB layout, mechanical CAD, and firmware to create a replica of the DSKY with electroluminescent display


It measures 139.9 × 102.1 mm and has 2 copper layers, 1.6 mm thick.
49 parts. The full list of its parts is on this page, with links to each part's symbol and footprint where PCBKit's library has them.
From the FailureToLoad/gameglove repository on GitHub, at the commit this page was made from: the board is pcb/gameglove.kicad_pcb and its schematic pcb/gameglove.kicad_sch. PCBKit opens the board in the browser, with nothing to install.
Its repository states no licence, so its author keeps all rights: ask FailureToLoad before reusing the design.