
2 layers40 × 30 mm

How to make the Maludo Uno, a single key Digispark USB Keyboard
Uno is an open-source printed circuit board by darioschmid, from the darioschmid/MaludoUno repository on GitHub. It is a 2-layer board of 18.8 × 19.2 mm with 3 parts on 9 nets, routed with 14 tracks and 0 vias.
Its parts include 1 IC and 1 switch. It belongs with the keyboards and input boards of this library.
How to make the Maludo Uno, a single key Digispark Morse Code Keyboard mainly intended as a keychain suitable gadget.
It runs my Digispark Morse Keyboard Arduino script.

I was inspired by Snipeye's Uno:

It's based on the AtMega32u4 Microcontroller. In contrast, my "Maludo Uno" is based on the weaker, but cheaper AtTiny85/Digispark.
I used my Digispark Morse Keyboard Arduino Script to be able to use Morse Code for Input. Previously I hardly knew any Morse Codes, but I reckoned this would be quite a fun project for getting involved into Morse Code.
Visit DigisparkMorseCode/MorseCodes.txt, or open a Text Editor and hold the key down for 4sec. It prints out all available Morse Codes. Hold down the key to switch between DE and US keyboard layout.
Example:
"M  A   L    U   D   O      U  N   O"
"-- •- •-•• ••- -•• ---    ••- -• ---"
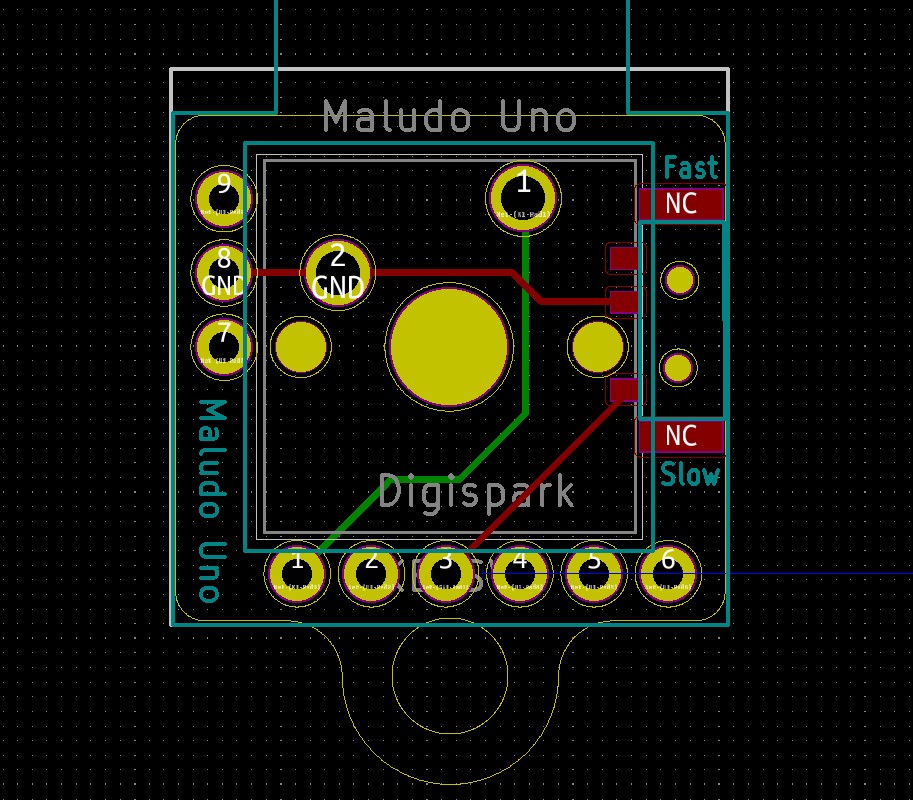
Setting the Speed Switch to "Fast" activates automatic space insertion between words and allows your "dah's" (long presses) to be shorter.
If you set the switch to "Slow", you must manually add spaces between words with the morse codes "----" or "•-•••".
Feel free to improve my PCB design (e.g. add compability for other key switches). You can find the KiCad PCB Design files at ./KiCadFiles.
The PCB inside KiCad looks like this:
| Qty | Value | Footprint | References |
|---|---|---|---|
| 1 | Digispark | ehre6:Digispark | U1 |
| 1 | KEYSW | Button_Switch_Keyboard:SW_Cherry_MX_1.00u_PCB | Maludo Uno |
| 1 | SW_Push | Switches:MSK12C02 | SW1 |
It measures 18.8 × 19.2 mm and has 2 copper layers, 1.6 mm thick.
3 parts. The full list of its parts is on this page, with links to each part's symbol and footprint where PCBKit's library has them.
From the darioschmid/MaludoUno repository on GitHub, at the commit this page was made from: the board is KiCadFiles/Uno.kicad_pcb. PCBKit opens the board in the browser, with nothing to install.
Its repository states no licence, so its author keeps all rights: ask darioschmid before reusing the design.

hzeller/rpi-rgb-led-matrix
Controlling up to three chains of 64x64, 32x32, 16x32 or similar RGB LED displays using Raspberry Pi GPIO


atopile/atopile
Design circuit boards with code! ✨ Get software-like design reuse 🚀, validation, version control and collaboration in hardware; starting with electronics ⚡️


hackclub/sprig
🍃 Learn to code by making games in a JavaScript web-based game editor.