2 layers
Encoder RGB
clectric-diy/Charge
A collection of breakout boards and breadboard accessories to charge the Synth DIY projects on your workbench.
9 partsCERN-OHL-W-2.0

 Bemeier/bmcv7
Macro CV controller for eurorack inspired by the Emblematic Systems Catalyst
Bmcv is an open-source printed circuit board by Bemeier, from the Bemeier/bmcv repository on GitHub, published under the CC-BY-SA-4.0 licence. It is a 4-layer board of 80 × 108 mm with 373 parts on 391 nets, routed with 2,794 tracks and 787 vias.
It is built around the OPA4171AID, 74AHCT1G125SE and WS2811F, with the PEL12T-4225S-S1024, AD5754RBRE and MB85RS64PNF-G-JNERE1 among its other parts. Its parts include 169 resistors, 110 capacitors, 42 ICs, 16 switches and 15 connectors. It belongs with the STM32 boards of this library.


Eight scene-crossfaded LFOs in 16HP, with a PLL that locks them to an incoming clock. This repository is the firmware, and three other things that run the same firmware: a headless simulator, a browser frontend, and a VCV Rack module.
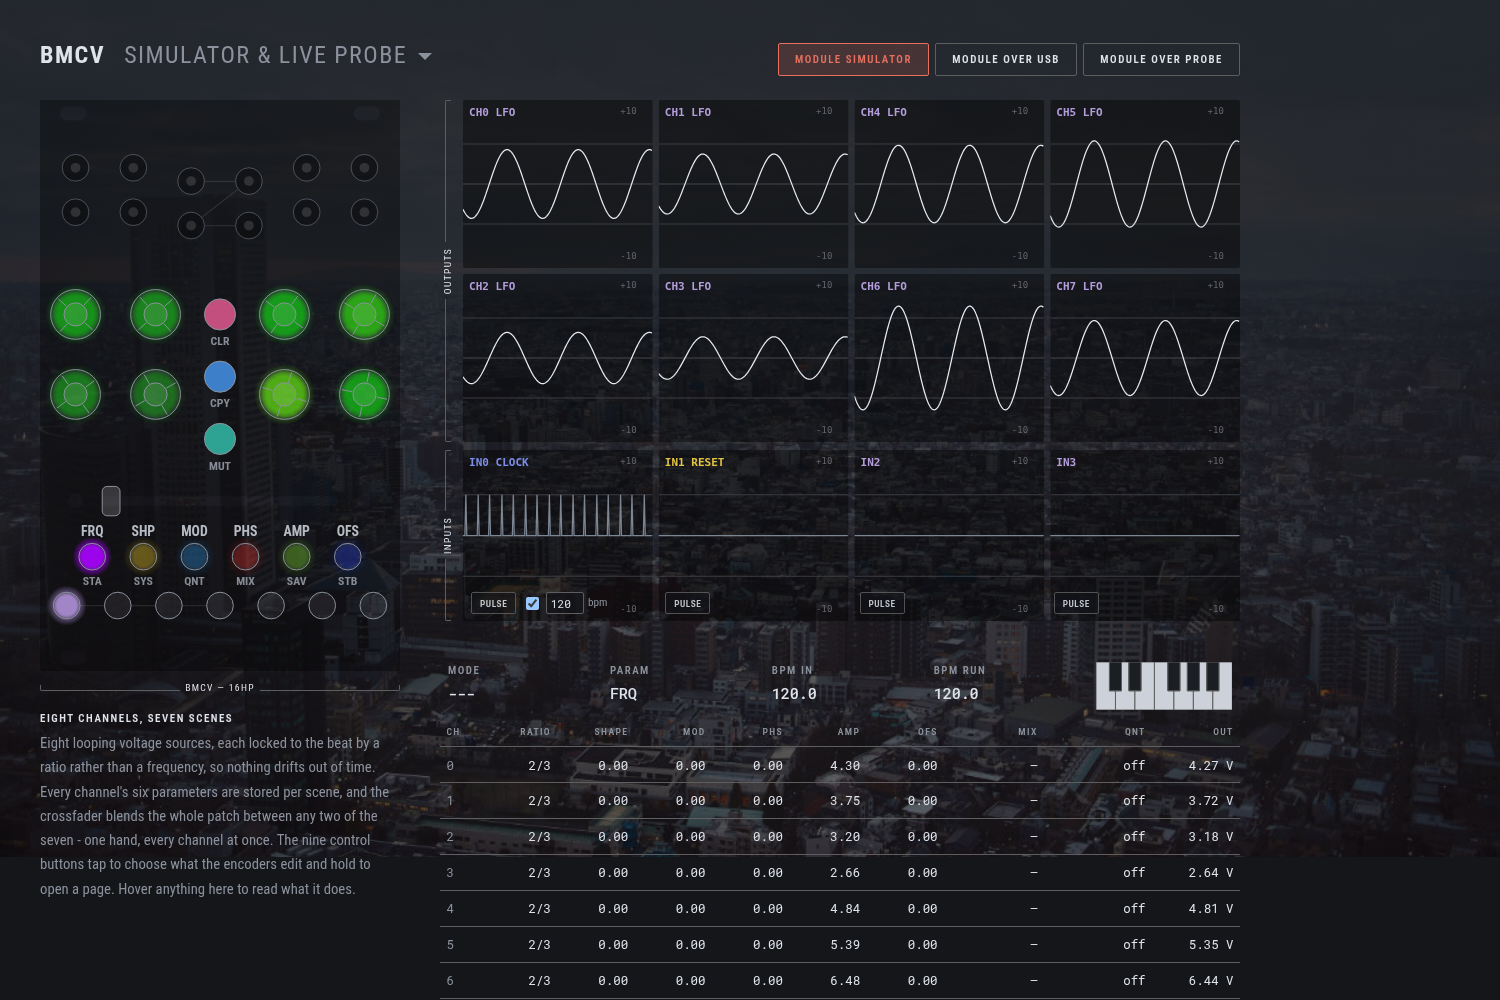
bemeier.github.io/bmcv is that frontend,
built and deployed from main. It runs the module with no install, shows a
physical one over USB if you have the hardware, and carries the
manual, a
firmware updater and a
diagnostics page.
How to play the module is the manual's job, not this file's. What follows is how the project is put together.
Everything that behaves like a BMCV runs Core/Src/Lib unmodified - the same
engine_tick, the same UX layer, the same LED renderer. Nothing below
reimplements any of it, and none of them may: a host supplies time, input and
somewhere to put the output, and that is the whole contract.
| what it is | lives in | |
|---|---|---|
| Firmware | The module. STM32G474, one bmcv_main() off a 250µs tick. | Core/Src/ |
| Simulator | The same core behind a flat C API, plus a scripting CLI for golden-file runs. | sim/ |
| Web frontend | That API compiled to wasm, with an SVG panel and scopes over it. | web/ |
| VCV Rack | A Rack module wrapping the same core. | vcv/ |
The consequence worth knowing: the browser page is not a model of the module, it is the module's own code with a different set of peripherals bolted on. That is what lets the same page decode a real module's memory - see docs/live-module.md - with no parser and no second copy of any unit conversion.
docs/architecture.md is the long version.
Core/Src/Lib/     the core: engine, UX layer, LED renderer. No hardware.
Core/Src/         the firmware's own half: ADCs, DAC, FRAM, USB, main loop.
USB_Device/       the USB stack's app layer - descriptors, WebUSB, DFU entry.
Middlewares/      ST's USB device library, with the MIDI class extended.

sim/              the flat C API, its runtime shims and the scripting CLI.
web/              the browser frontend: simulator, manual, updater, diagnostics.
vcv/              the VCV Rack plugin.

tests/            host-compiled tests over Core/Src/Lib and the USB descriptors.
tools/            code generators - the panel spec, the layout asserts.
panel/            the generated panel spec, shared by every host.
pcb/              the KiCad project; production/ holds its fab outputs.
docs/             architecture, the PLL, the wavetable, the live link, setup.
Core/Src/Lib never includes a HAL header. That is what makes the same files
compile for ARM, for the host tests, for wasm and for Rack - and it holds
because three of those four toolchains have no STM32 headers at all.
BMCV is a real Eurorack module - a Macro CV Controller inspired by the
Emblematic Systems Catalyst. The PCB is
made with KiCad 8.0; the project lives in
pcb/ and its fabrication outputs (BOM, gerbers, pick-and-place) in
production/.
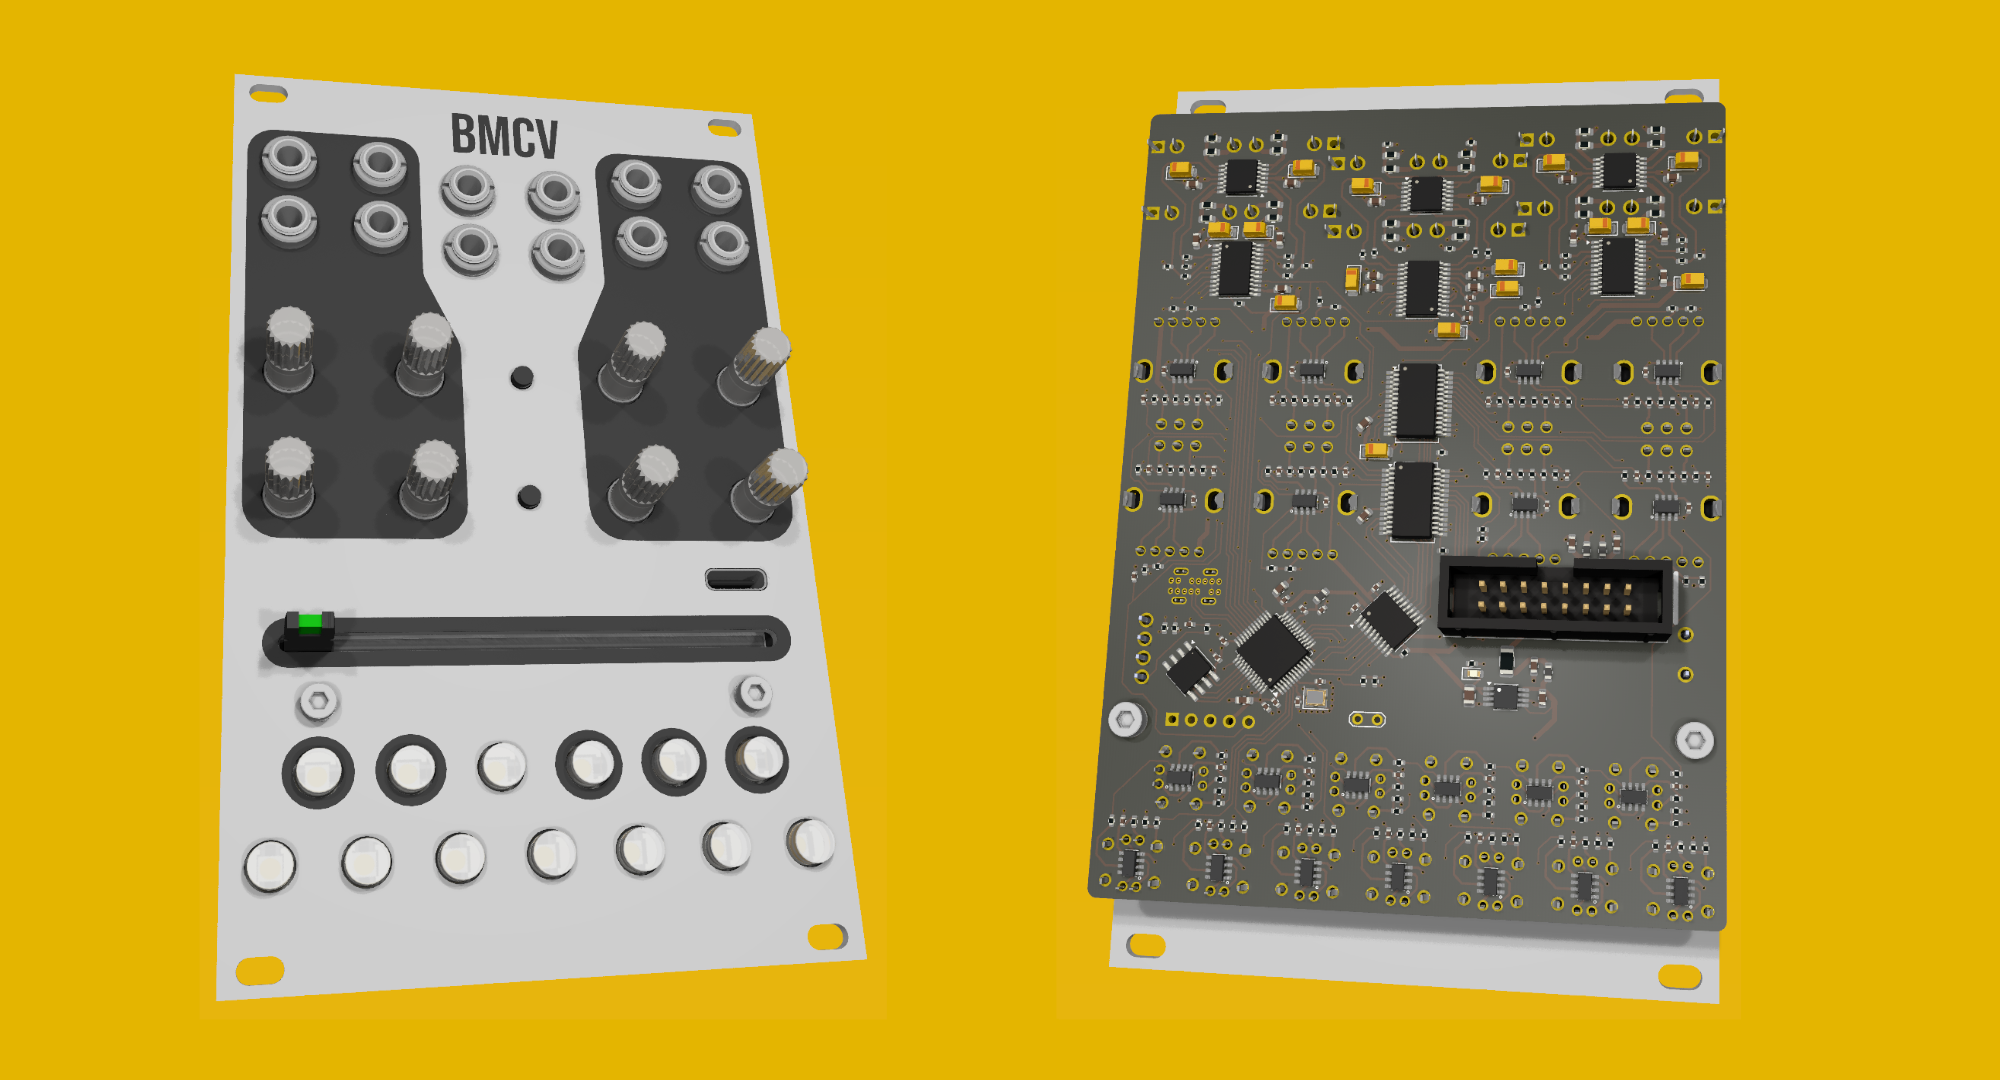
Eight output jacks and four input jacks, eight endless encoders that are also buttons, nine control buttons, seven scene buttons, a crossfader, and 21 WS2812s. One USB-C port, which is a MIDI port and a vendor interface at once - docs/midi.md, docs/live-module.md.
The panel geometry is not typed in anywhere. tools/gen_panel_spec.py reads the
KiCad placement data and the firmware's own index tables and writes panel/,
which every host then draws from - so the picture on the web page cannot drift
from the board.
Three, and most of the codebase follows from them.
A channel is an oscillator locked to a ratio, not a rate. Frequencies are
divisions of the incoming beat, so a patch stays in phase with everything around
it. That is why there is a PLL rather than a tempo readout, and why
clock_sync.c is the most carefully tested file here -
docs/pll.md.
A scene is every parameter of every channel at once, and the crossfader blends
two of them. Forty-eight values move on one fader. That is why parameters live
in a scene-indexed array rather than on the channel, and why EngineConfig is
the thing that gets saved, copied and cleared.
The whole module is one struct. BmcvInstance holds the config, the signal
path, the interaction state and the input layer; the firmware keeps exactly one.
Nothing that matters lives in a file-static. That is what lets a host run
several, a test build one per case, and a debug probe or a USB link ship the
entire module to a browser as bytes.
The colours are not decoration. One fact per LED, and the same colour for the same idea on every page - the point being that the panel teaches itself, so the manual never has to explain a colour.
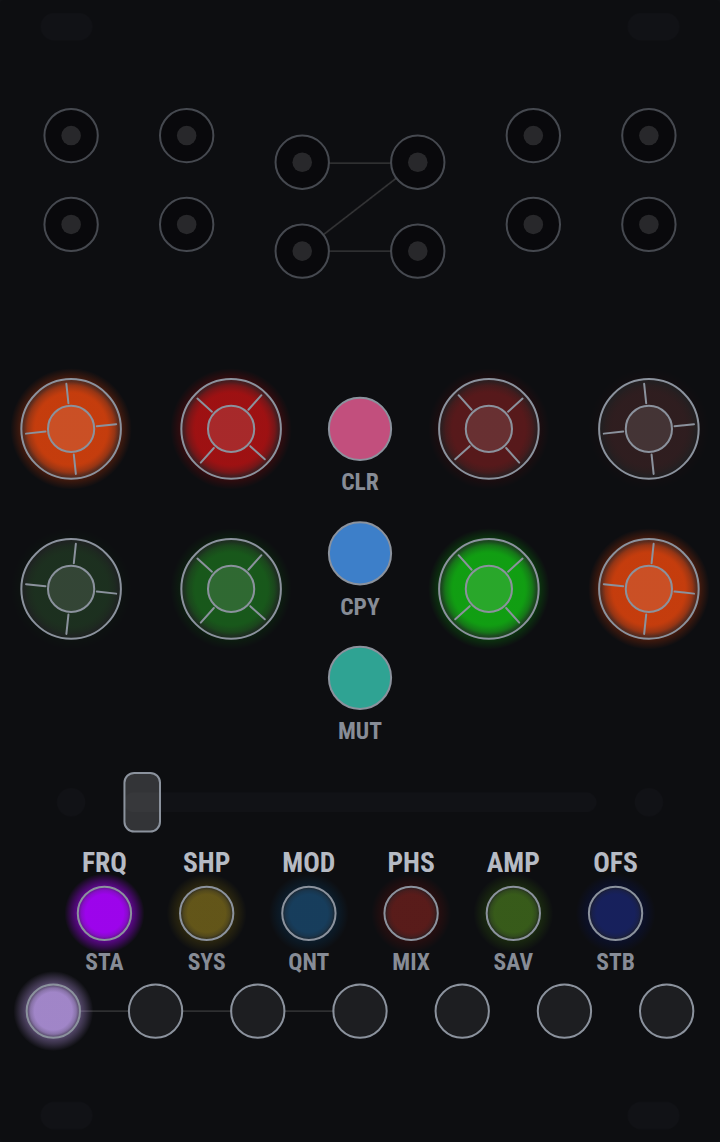
HUE_STATE_* in color_presets.h. The output clamp is the one
place brightness also carries meaning, because it is two facts on one LED.Prerequisites, what each fetch recipe actually gets and why, and
troubleshooting: docs/setup.md. On a fresh checkout, the one
thing to run first is just arm-sdk.
just arm-sdk          # fetch the ARM toolchain + STM32Cube HAL, once
just build            # ARM firmware        just flash / just flash-usb
just check            # everything host-side: format, tests, flows, wasm, web
just check-all        # the above plus the firmware and Rack plugin builds
just test-san         # the same tests under ASan/UBSan
just fmt              # clang-format the hand-written C (fmt-check to verify)
just web              # the browser frontend, at http://localhost:8000
just docs-page        # the same pages with no wasm build, for the updater
just vcv-install      # build the Rack plugin into ~/.local/share/Rack2
just vcv-dist win-x64 # a distributable .vcvplugin for any platform

# Rack running on Windows while you build in WSL. Needs the cross-compiler
# once: sudo apt install gcc-mingw-w64-x86-64 g++-mingw-w64-x86-64
just vcv-win-install  # cross-build plugin.dll into %LOCALAPPDATA%\Rack2

just panel            # regenerate the panel spec from the hardware repo
just layout-check     # regenerate the struct layout asserts from the ELF
just docs-shots       # regenerate the screenshots in this file
just dfu-check        # check the DfuSe client against a fake device
just fmt is pinned to clang-format 18, which is what CI installs; the recipe
refuses any other major, because the output moves between them.
Anything machine-specific - where your Rack SDK lives, which browser to drive -
goes in local.just, which is not checked in. CMakeLists.txt has the same
arrangement with local.cmake.
CI runs just check, the sanitizer pass and an ARM build on every push - one
job per target, in .github/workflows/ci.yml. The
firmware size is printed into the job summary rather than gated.
A push to main that clears every job bumps VERSION and CHANGELOG.md from
the commits since the last tag and cuts a GitHub Release - see
Versioning. The same push deploys web/ to GitHub Pages.
Three routes, and they want different files.
Over the programming header, from a build. just flash sends
build/BMCVFirmware.elf over an ST-Link; just flash-rel does the same with
the release build. It needs the module out of the rack with a ribbon on its
debug header, and it is the only route that can also halt the core - so it is
what just where and any breakpoint work sit on.
Over USB-C, from a build. just flash-usb sends build/BMCVFirmware.bin
through the STM32's ROM DFU bootloader, with no probe and the module still in
the rack. That is the development loop when nothing needs stepping through:
the WebUSB link and the diagnostics page still work, so printf-level debugging
survives; halting does not. The module has to be put into update mode first -
hold CPY while it powers up, or press the update-mode button on the updater
page - and the recipe says which, then waits for the bootloader to appear. See
docs/setup.md.
Over USB-C, from the browser.
bemeier.github.io/bmcv/update flashes
a released version or a local .bin, with no build and no probe. just docs-page serves the same page locally against your own build. That page
documents the rest - what to hold, what Windows needs once, what the panel does
It has to be the .bin there. The .elf beside it is what the ST-Link path
wants and is not a raw image: headers and symbols, so its first bytes are not
the vector table, and a debug build is four times the size of the flash. The
updater checks for this and refuses, naming the mistake, before erasing
anything.
Both files are on every release. The
.elf is the same build with its symbols still attached, which is what a
debugger or a live variable viewer needs to attach to a module running that
release - a .bin carries no symbol table, so no tool can find a variable in
one. Take the .elf from the release the module is actually running, since
every address in it belongs to that build.
Every release carries a
BMCV-<version>-<platform>.vcvplugin for lin-x64, win-x64, mac-x64 and
mac-arm64. Drop the one for your platform into Rack's plugin folder and
restart Rack, which unpacks it on the way up. The folder ends in your
platform's name - since Rack 2.4 there is one per platform, and a plain
plugins directory is not read:
| Windows | %LOCALAPPDATA%\Rack2\plugins-win-x64 |
| macOS (Apple silicon) | ~/Library/Application Support/Rack2/plugins-mac-arm64 |
| macOS (Intel) | ~/Library/Application Support/Rack2/plugins-mac-x64 |
| Linux | ~/.local/share/Rack2/plugins-lin-x64 |
It is not in the VCV Library, so nothing has signed it but this repository's CI. On macOS that means Gatekeeper quarantines it on download and Rack then refuses to load it - clear the flag on the file itself, before starting Rack:
xattr -dr com.apple.quarantine ~/Library/Application\ Support/Rack2/plugins-mac-arm64/BMCV-*.vcvpluginWindows may want a "more info" click past SmartScreen the first time.
Commit messages are Conventional Commits
feat: ..., fix: ..., feat!: ... for a breaking change, and so on -
enforced on pull requests by the commits CI job. VERSION and
CHANGELOG.md are generated from them by commitizen,
never edited by hand; Core/Inc/Lib/version.h is in turn generated from
VERSION at configure time, which is why it isn't checked in.
just commit interactive wizard for a correctly formatted message
just bump-dry-run preview the next version and changelog, unattended
just bump bump, commit and tag locally - or just push to main
and let the release CI job do it
Needs pipx install commitizen (or pip install --user commitizen) once.
The Rack plugin is the one thing that does not follow this version, because it
cannot: Rack refuses to load a plugin whose version does not begin with Rack's
own major, so driving vcv/plugin.json from VERSION would pin this project's
major to Rack's and cost the firmware its semver. It is fixed at 2.0.0 and
stays there - it means "for Rack 2", not "the second version of anything". The
firmware version travels on the released file's name instead,
BMCV-v0.6.1-lin-x64.vcvplugin, which is why the plugin shows as 2.0.0 in
Rack's browser however new the firmware inside it is.
This work is licensed under a Creative Commons Attribution-ShareAlike 4.0 International License.

| Qty | Value | Footprint | References |
|---|---|---|---|
| 64 | 10k | Resistor_SMD:R_0402_1005Metric | R100, R101, R102, R103, R104, R105, R106, R107, R108, R109, R110, R111, R112, R113, R114, R115 +48 |
| 36 | 100 | Resistor_SMD:R_0402_1005Metric | R132, R133, R134, R135, R136, R137, R138, R139, R140, R141, R142, R143, R144, R145, R146, R147 +20 |
| 33 | 100n | Capacitor_SMD:C_0402_1005Metric | C3, C12, C13, C18, C26, C27, C28, C29, C30, C31, C32, C33, C34, C35, C36, C112 +17 |
| 21 | 10 | Resistor_SMD:R_0402_1005Metric | R43, R44, R45, R46, R47, R48, R49, R50, R51, R52, R53, R54, R55, R56, R57, R58 +5 |
| 21 | 10n | Capacitor_SMD:C_0402_1005Metric | C44, C45, C47, C49, C50, C52, C53, C55, C56, C58, C59, C61, C100, C101, C102, C103 +5 |
| 21 | 33 | Resistor_SMD:R_0402_1005Metric | R42, R64, R65, R66, R67, R68, R69, R70, R71, R72, R73, R74, R75, R76, R77, R78 +5 |
| 21 | WS2811F | BMCV:FSOP-8 | U10, U11, U12, U13, U14, U15, U16, U17, U18, U19, U20, U21, U22, U23, U24, U25 +5 |
| 19 | 100n | Capacitor_SMD:C_0603_1608Metric | C14, C17, C19, C20, C21, C22, C23, C24, C25, C48, C51, C54, C57, C73, C74, C87 +3 |
| 18 | 10u | Capacitor_SMD:C_0805_2012Metric | C60, C63, C66, C68, C69, C70, C71, C72, C75, C76, C77, C79, C80, C81, C84, C88 +2 |
| 13 | TC002-N11AS2XT-RGB | BMCV:TC002-N11AXXX-RGB | SW1, SW2, SW3, SW4, SW5, SW6, SW7, SW8, SW9, SW10, SW11, SW12, SW13 |
| 12 | 100 | Resistor_SMD:R_0603_1608Metric | R17, R18, R19, R20, R25, R26, R27, R28, R29, R30, R31, R32 |
| 12 | 1M | Resistor_SMD:R_0603_1608Metric | R5, R10, R11, R12, R13, R14, R15, R16, R21, R22, R23, R24 |
| 12 | AudioJack2_SwitchT | BMCV:Jack_3.5mm_QingPu_WQP-PJ398SM_Vertical_CircularHoles | J1, J2, J3, J4, J5, J6, J7, J8, J9, J10, J11, J12 |
| 12 | SD12C-01FTG | Diode_SMD:D_SOD-323 | RV1, RV2, RV3, RV4, RV5, RV6, RV7, RV8, RV9, RV10, RV11, RV12 |
| 8 | 220n | Capacitor_SMD:C_0402_1005Metric | C104, C105, C106, C107, C108, C109, C110, C111 |
| 8 | PEL12T-4225S-S1024 | BMCV:PEL12T-4xxxS-S1024 | U1, U2, U3, U4, U5, U6, U7, U8 |
| 4 | 1u | Capacitor_SMD:C_0603_1608Metric | C7, C9, C10, C16 |
| 4 | 470R | Inductor_SMD:L_0603_1608Metric | FB1, FB2, FB3, FB4 |
| 3 | 22u | Capacitor_SMD:C_0805_2012Metric | C15, C97, C98 |
| 3 | OPA4171 | Package_SO:TSSOP-14_4.4x5mm_P0.65mm | U38, U39, U40 |
| 2 | 10p | Capacitor_SMD:C_0402_1005Metric | C1, C2 |
| 2 | 5k1 | Resistor_SMD:R_0402_1005Metric | R1, R2 |
| 2 | 680n | Capacitor_SMD:C_0603_1608Metric | C85, C86 |
| 2 | AD5754R | BMCV:TSSOP-24-1EP_4.4x7.8mm_P0.65mm_EP3.2x5mm | U34, U35 |
| 2 | MCP23S17_SS | Package_SO:SSOP-28_5.3x10.2mm_P0.65mm | U30, U31 |
| 1 | 1k | Resistor_SMD:R_0402_1005Metric | R158 |
| 1 | 38.4MHz 10pF | Crystal:Crystal_SMD_2520-4Pin_2.5x2.0mm | Y1 |
| 1 | 74AHCT1G125 | Package_TO_SOT_SMD:SOT-353_SC-70-5 | U42 |
| 1 | AD7367-5 | Package_SO:TSSOP-24_4.4x7.8mm_P0.65mm | U33 |
| 1 | Conn_02x08_Eurorack | BMCV:Eurorack_Full_IDC_Vertical | J16 |
| 1 | DebugPins | Connector_PinSocket_2.54mm:PinSocket_1x05_P2.54mm_Vertical | Jw1 |
| 1 | EXTRA_PIN_1 | TestPoint:TestPoint_Pad_D1.5mm | J13 |
| 1 | FN1 | BMCV:TS-1095PS-AXXBX-C3DX | SW14 |
| 1 | FN2/Boot | BMCV:TS-1095PS-AXXBX-C3DX | SW15 |
| 1 | FN3 | BMCV:TS-1095PS-AXXBX-C3DX | SW16 |
| 1 | MB85RS64PNF-G-JNERE1 | Package_SO:SSOP-8_3.9x5.05mm_P1.27mm | U37 |
| 1 | R_Potentiometer_Dual | BMCV:ALPHA_B10KX2 | RV13 |
| 1 | SMD1206P110TF | Fuse:Fuse_1206_3216Metric | F1 |
| 1 | STM32G474CETx | Package_QFP:LQFP-48_7x7mm_P0.5mm | U36 |
| 1 | TLV76733 | BMCV:HVSSOP-8-1EP_3x3mm_P0.65mm_EP1.57x1.89mm | U41 |
| 1 | TXS0108EPW | Package_SO:TSSOP-20_4.4x6.5mm_P0.65mm | U32 |
| 1 | USB_C_Receptacle_USB2.0_14P | BMCV:GT-USB-7035E | J14 |
| 1 | ~ | BMCV:BMCVPanel | Z1 |
It measures 80 × 108 mm and has 4 copper layers, 1.61 mm thick.
373 parts, built around the OPA4171AID, 74AHCT1G125SE, WS2811F and PEL12T-4225S-S1024. The full list of its parts is on this page, with links to each part's symbol and footprint where PCBKit's library has them.
From the Bemeier/bmcv repository on GitHub, at the commit this page was made from: the board is pcb/BMCV.kicad_pcb and its schematic pcb/BMCV.kicad_sch. PCBKit opens the board in the browser, with nothing to install.
Its repository publishes it under the CC-BY-SA-4.0 licence: you may reuse it on that licence's terms (keep the author's notice, and for a copyleft licence share your changes alike).
clectric-diy/Charge
A collection of breakout boards and breadboard accessories to charge the Synth DIY projects on your workbench.

MarkWestbroek/MusicBrain
A central brain running on teensy or a lighter MCU to process any control signals (MIDI, CV, our own) into the same but adding logic, ADSRs, DCOs, CV matrices etc. to it


OmkarTikekar0037/usb3-gigabit-ethernet-adapter
This is a repository for version control of zoho project - USB 3.1 to Gigabit Ethernet Adapter

offgridevices/offgrid-hardware
Open hardware from OffGrid Devices. One folder per board. CERN-OHL-S.

punkfab/pcb-corpus
235 real KiCad boards from open-source hardware repositories, prepared as a placement and routing benchmark
